> ## Documentation Index
> Fetch the complete documentation index at: https://docs.bellabooking.com/llms.txt
> Use this file to discover all available pages before exploring further.
# Clients
> This guide walks you through all core features of the **Clients** section in Bella Booking.
***
## Introduction
The **Clients** section serves as your comprehensive database for client management.
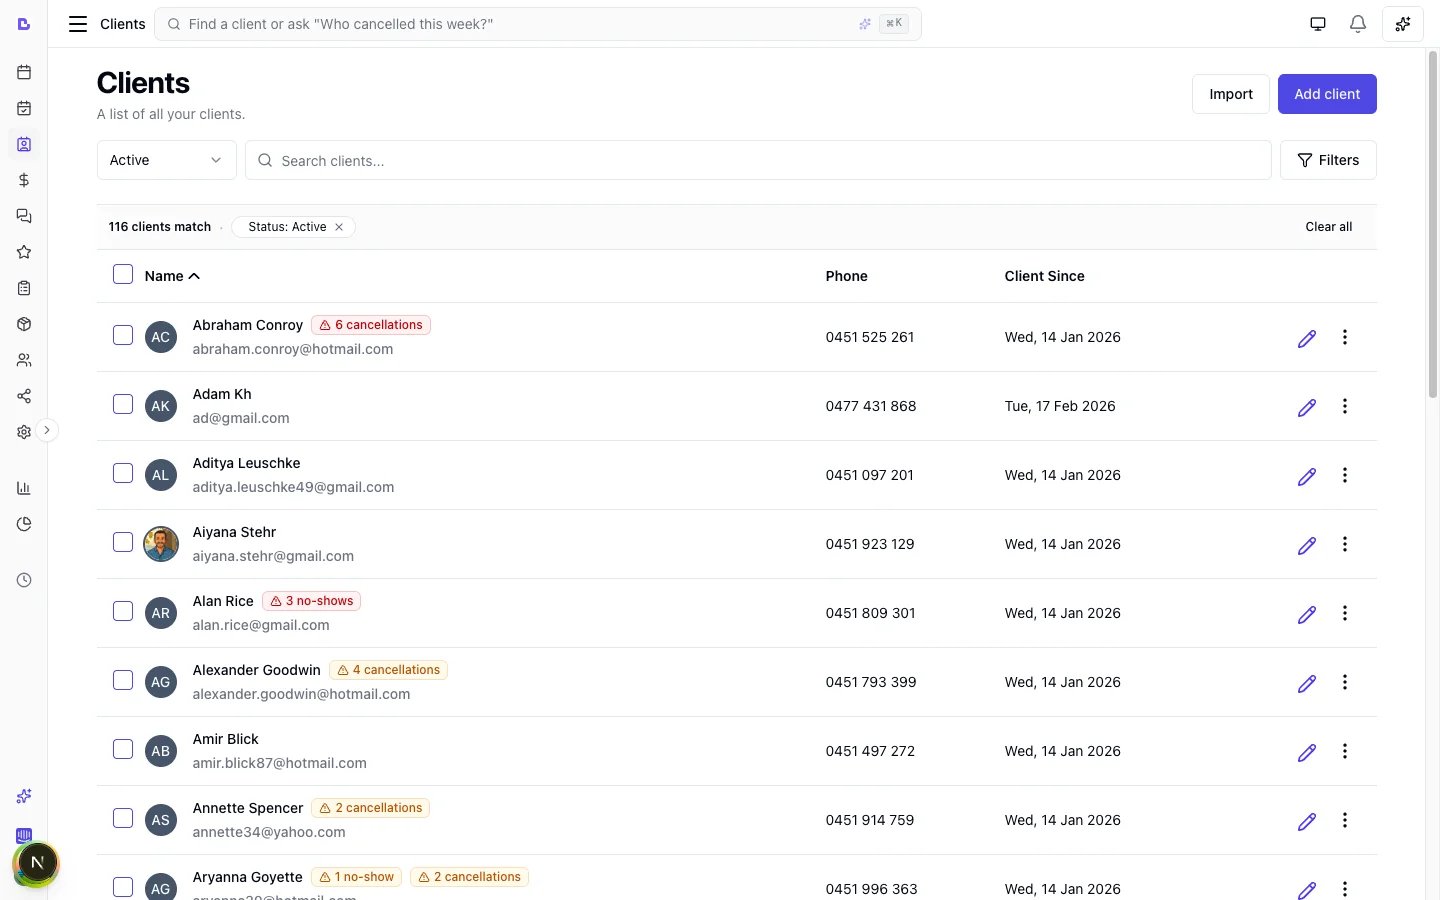 Easily add, update, search, import, and organise client profiles to keep all contact and history information at your fingertips, supporting smooth and efficient operations.
***
## The new-client star (new / first marker)
A small **star** appears next to a client to flag someone who is genuinely **new to your business** — so your team can prepare for a first visit. It shows as **"New"** on client surfaces (your Clients list, the client's record) and as **"First"** on appointment surfaces (the scheduler card, agenda, appointment details and appointment list).
**A client is flagged new only when both of these are true:**
1. **They have never attended before** — they have no appointment that has already happened and wasn't cancelled. (An upcoming booking still counts as new — that's the point of the cue; a no-show doesn't make someone "attended".) It is **not** based on whether appointments were marked *Completed*, so it works even if your team doesn't mark appointments complete.
2. **They were added as a new client in Bella** — created by your team or via online booking. Clients you **imported/migrated** from another system, and older clients from before we started recording how each client was added, are **never** flagged new — so migrating your existing client book doesn't make all your regulars light up.
It's worked out automatically and clears itself once a client has been in — there's nothing to switch on. If a long-standing client is *not* showing the star, that's expected: they've already attended (or they pre-date/were imported into your account).
If a client who has clearly visited before is showing the star, it usually means they were **imported** or created before new-client tracking existed, combined with no in-Bella appointment history yet — reach out to support if a client looks wrong and we'll take a look.
***
## Key features
* **Client List View:** See all clients in a table, including Name, Phone, and Client since.
* **Client Statistics:** View total revenue, appointment count, cancellation count, and no-show count for each client.
* **Add Client:** Create new profiles with full contact and notification preferences.
* **Search:** Find any client instantly by name or phone number.
* **Import:** Bring in multiple clients at once using a CSV spreadsheet.
* **Export:** Export your client list to CSV for backups or external use.
* **Edit & Details:** View and update client information, files, and appointments using an interactive side panel.
* **Archive & Delete:** Archive clients to hide them from the active list, restore them later, or permanently delete archived clients with no history.
* **Merge Duplicates:** Combine a duplicate client into the one you keep — all appointments, sales, loyalty, credit balance, documents, and family links transfer across, and the duplicate is archived. See [Handling Duplicate Clients](#6-handling-duplicate-clients).
* **Block from Online booking:** Stop a specific client from self-booking through your booking page while keeping their profile active so your team can still book them manually.
* **Note & Document Visibility:** Separate note fields for private (team-only), client-visible, and client-written notes. Files and photos stay in the business dashboard — they are not published to the client's booking portal.
* **Document Management:** Upload, view, and delete files attached to client profiles — including files clients attach on forms.
* **Avatar Photos:** Upload a profile photo for any client — JPG, PNG, WebP, or HEIC (straight from an iPhone). Photos appear across the scheduler, client profiles, and appointment views.
* **Photos & Comparison:** A visual gallery of every image on a client — direct uploads, timeline-note attachments, appointment photos, and form uploads — with Before/After/Progress/Reference categories, side-by-side before/after comparison, and grouping by appointment.
* **Family members:** Link dependents and family members to a client's account, manage relationships, and book appointments on their behalf.
* **Loyalty:** View a client's loyalty points balance, transaction history, and available rewards. Manually adjust points when needed.
* **Communication Consent:** Manage announcement and marketing opt-in preferences, and send direct messages from the client profile. See [Messages](/messages).
***
## Step-by-step usage instructions
### 1. Adding a new client
1. Go to the **Clients** section in the main sidebar.
2. Click the `Add client` button (top-right).
3. In the side panel, enter:
* **First name** (required)
* **Last name** (optional)
* **Email** (optional, for appointment notifications)
* **Phone number** (optional, for appointment notifications)
* **Date of birth** (optional; the year is optional too) — used for the [birthday reward](/programmes/birthday), the [birthday greeting](/settings/automated-messages) and the "birthdays this month" filter. All three work from the day and month alone, so a birthday with no year is complete
* **Notes** (optional, for internal business notes)
* **Notification preferences:** Select whether to send booking reminders via SMS and/or email for this client.
4. Once all fields are filled, click `Save` at the bottom of the panel.
5. The new client now appears at the top of your client list.
***
### 2. Viewing and editing a client’s details
1. Locate the desired client:
* Use the **Search** bar at the top to type part of their name or phone number.
* Or, navigate through the paginated list with Next/Previous.
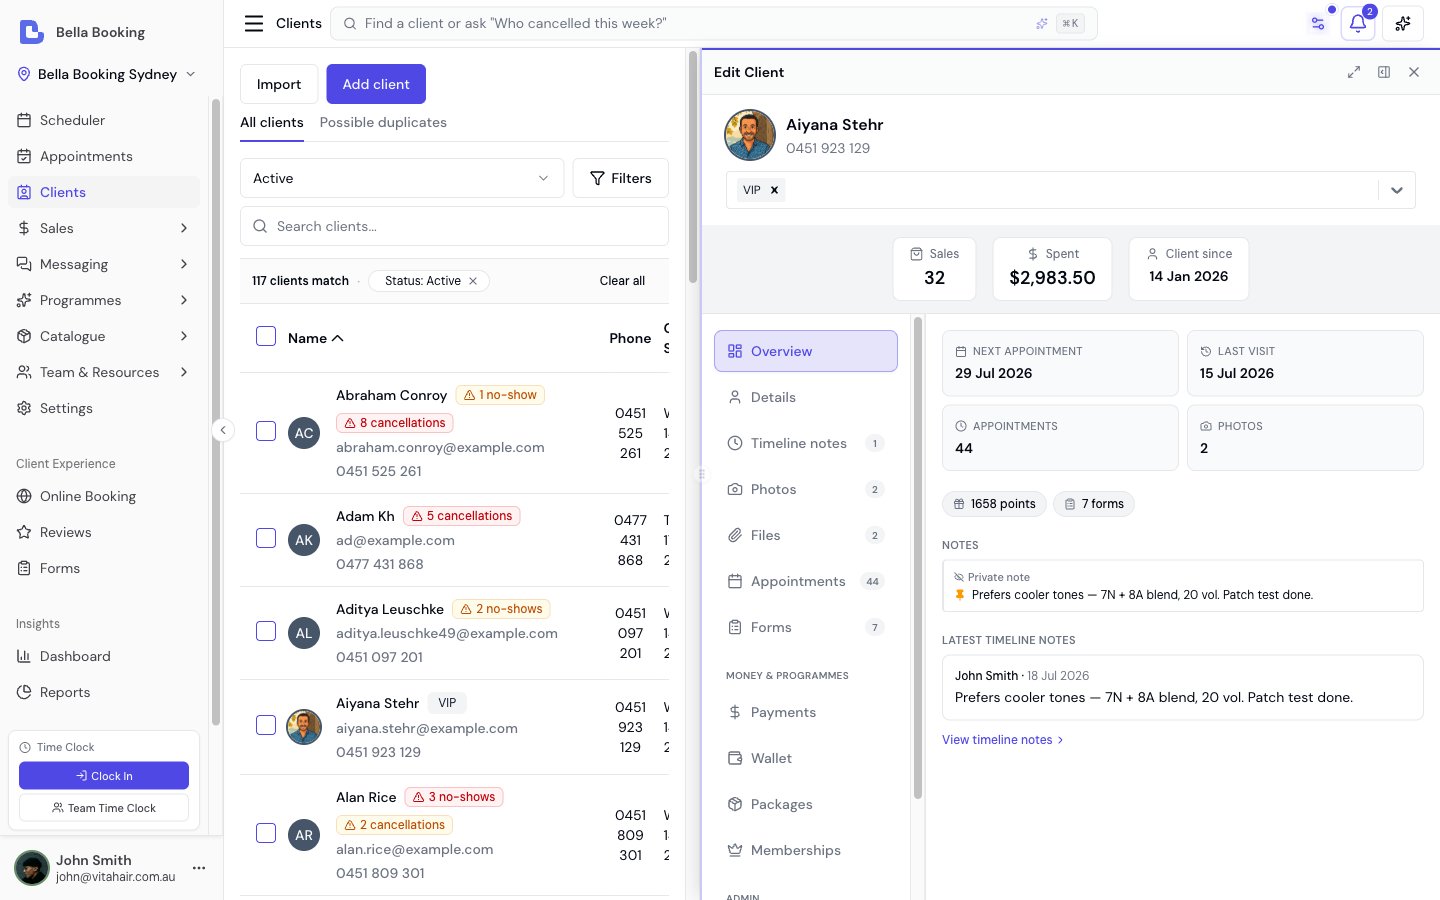
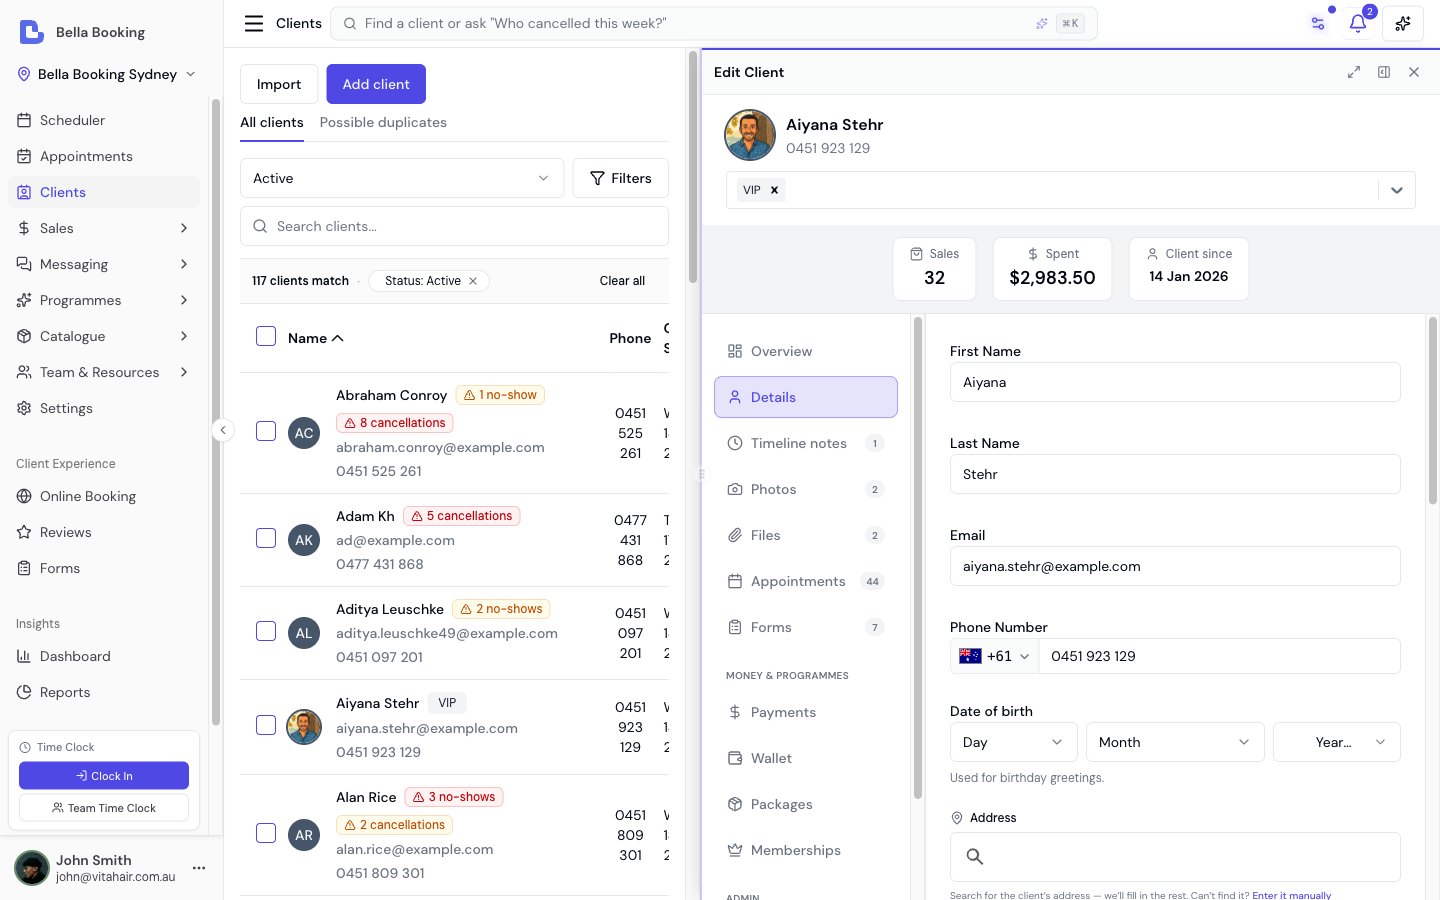
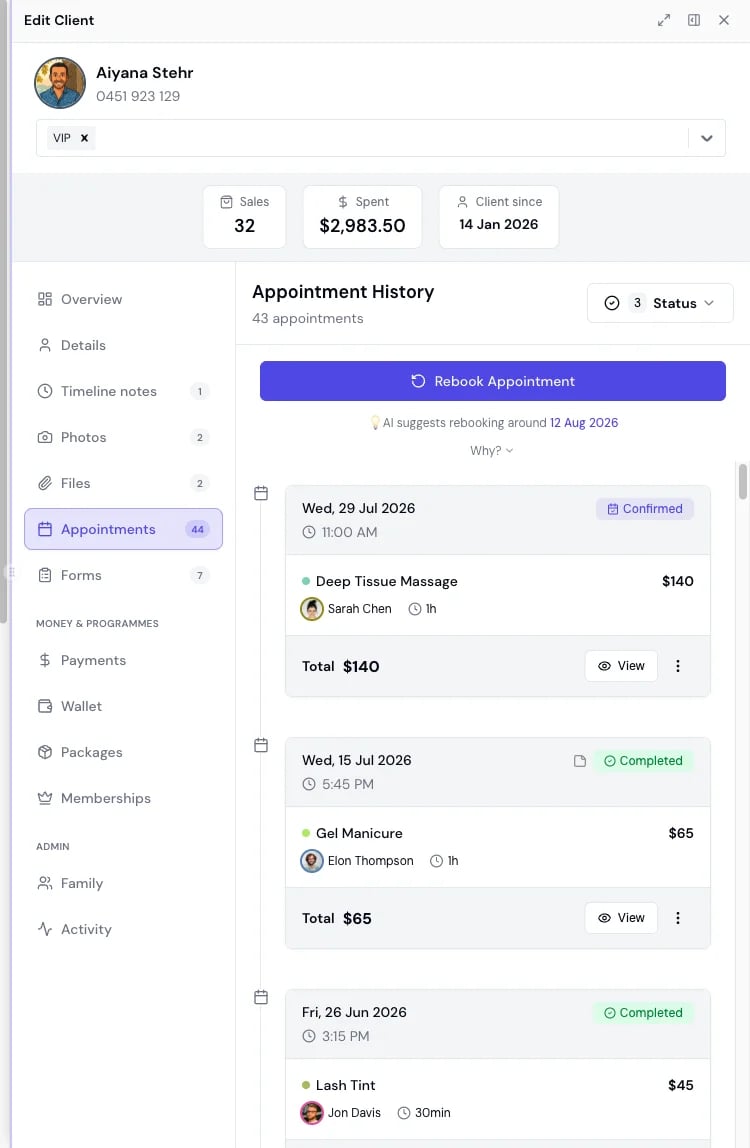
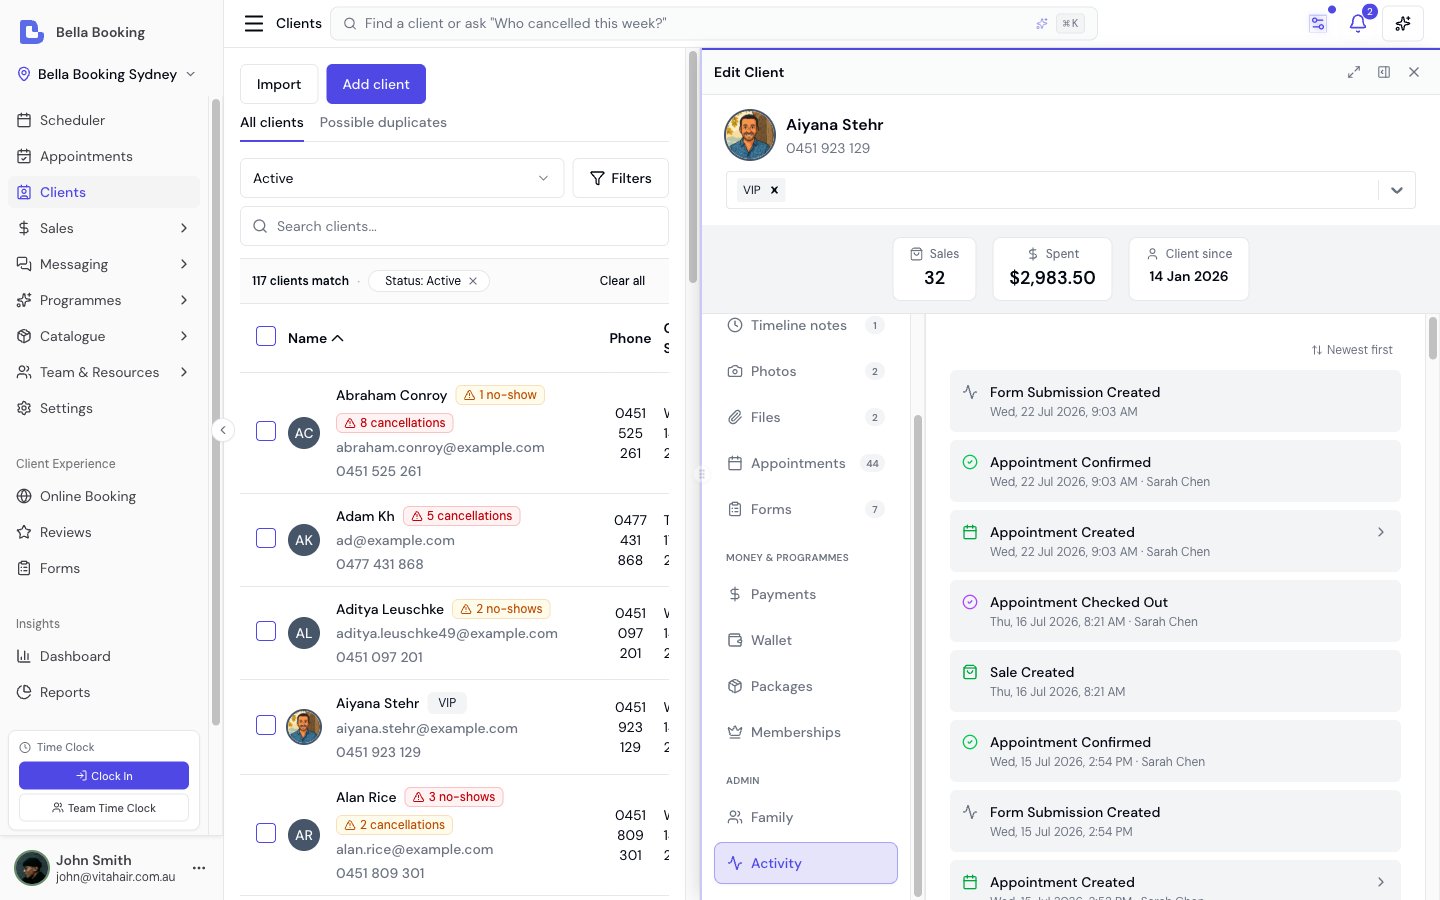
2. Click **any client row** in the list. This opens the side panel with several tabs. Tabs with content show a count badge, and the tab rail groups record tabs, then money & programmes, then admin:
* **Overview:** The landing view — next appointment, last appointment, appointment and photo counts, active programmes and balances, pinned timeline notes, quick notes, and the latest timeline entries. Every figure links straight into the tab it comes from.
* **Details:** View/edit personal info, notes, and notification settings. Make changes and click `Save` to update.
* **Timeline notes:** Keep a dated, append-only history of this client — consultation notes, colour formulas, observations — each entry with its author, category, and optional file or photo attachments. Pin important entries to surface them on the scheduler and the new-appointment form.
* **Photos:** A visual gallery of every image on the client — direct uploads, timeline-note attachments, appointment photos, and photos from form uploads — with Before/After/Progress/Reference categories, filtering, before/after comparison, and grouping by appointment.
* **Files:** Every file on the client's record in one list — direct uploads (added here with `Add`), files attached to timeline notes, files from the client's appointments, and files from form uploads — each labelled with its source (form files show as **Form — \{template name}**). When files come from more than one source, filter pills let you narrow to direct uploads, timeline notes, appointments, or Form. Files are deleted where they were added — note and appointment files are view-only here.
* **Appointments:** See a list of the client’s past and upcoming appointments.
* **Family:** Manage family members and dependents linked to this client. Add, edit, or remove family relationships.
* **Wallet:** The client's balances and rewards in one tab, switched with pills at the top: **Loyalty** (points balance, available rewards, full transaction history — Owners and Admins can manually adjust points; see [Loyalty programme](/loyalty)), **Credit** (stored-value balance split into the client's own money and promotional bonus, top-ups, and the full ledger — applies automatically at checkout; see [Client credit](/client-credit)), and **Referrals** (the client's refer-a-friend link and referral activity — see [Referrals](/programmes/referrals)). Clients find the same link themselves on your booking site under **Account → Refer a friend** (not on My profile).
* **Activity:** View a chronological history of all activities related to this client, including appointment creation, confirmations, reschedules, cancellations, and notifications sent.
Easily add, update, search, import, and organise client profiles to keep all contact and history information at your fingertips, supporting smooth and efficient operations.
***
## The new-client star (new / first marker)
A small **star** appears next to a client to flag someone who is genuinely **new to your business** — so your team can prepare for a first visit. It shows as **"New"** on client surfaces (your Clients list, the client's record) and as **"First"** on appointment surfaces (the scheduler card, agenda, appointment details and appointment list).
**A client is flagged new only when both of these are true:**
1. **They have never attended before** — they have no appointment that has already happened and wasn't cancelled. (An upcoming booking still counts as new — that's the point of the cue; a no-show doesn't make someone "attended".) It is **not** based on whether appointments were marked *Completed*, so it works even if your team doesn't mark appointments complete.
2. **They were added as a new client in Bella** — created by your team or via online booking. Clients you **imported/migrated** from another system, and older clients from before we started recording how each client was added, are **never** flagged new — so migrating your existing client book doesn't make all your regulars light up.
It's worked out automatically and clears itself once a client has been in — there's nothing to switch on. If a long-standing client is *not* showing the star, that's expected: they've already attended (or they pre-date/were imported into your account).
If a client who has clearly visited before is showing the star, it usually means they were **imported** or created before new-client tracking existed, combined with no in-Bella appointment history yet — reach out to support if a client looks wrong and we'll take a look.
***
## Key features
* **Client List View:** See all clients in a table, including Name, Phone, and Client since.
* **Client Statistics:** View total revenue, appointment count, cancellation count, and no-show count for each client.
* **Add Client:** Create new profiles with full contact and notification preferences.
* **Search:** Find any client instantly by name or phone number.
* **Import:** Bring in multiple clients at once using a CSV spreadsheet.
* **Export:** Export your client list to CSV for backups or external use.
* **Edit & Details:** View and update client information, files, and appointments using an interactive side panel.
* **Archive & Delete:** Archive clients to hide them from the active list, restore them later, or permanently delete archived clients with no history.
* **Merge Duplicates:** Combine a duplicate client into the one you keep — all appointments, sales, loyalty, credit balance, documents, and family links transfer across, and the duplicate is archived. See [Handling Duplicate Clients](#6-handling-duplicate-clients).
* **Block from Online booking:** Stop a specific client from self-booking through your booking page while keeping their profile active so your team can still book them manually.
* **Note & Document Visibility:** Separate note fields for private (team-only), client-visible, and client-written notes. Files and photos stay in the business dashboard — they are not published to the client's booking portal.
* **Document Management:** Upload, view, and delete files attached to client profiles — including files clients attach on forms.
* **Avatar Photos:** Upload a profile photo for any client — JPG, PNG, WebP, or HEIC (straight from an iPhone). Photos appear across the scheduler, client profiles, and appointment views.
* **Photos & Comparison:** A visual gallery of every image on a client — direct uploads, timeline-note attachments, appointment photos, and form uploads — with Before/After/Progress/Reference categories, side-by-side before/after comparison, and grouping by appointment.
* **Family members:** Link dependents and family members to a client's account, manage relationships, and book appointments on their behalf.
* **Loyalty:** View a client's loyalty points balance, transaction history, and available rewards. Manually adjust points when needed.
* **Communication Consent:** Manage announcement and marketing opt-in preferences, and send direct messages from the client profile. See [Messages](/messages).
***
## Step-by-step usage instructions
### 1. Adding a new client
1. Go to the **Clients** section in the main sidebar.
2. Click the `Add client` button (top-right).
3. In the side panel, enter:
* **First name** (required)
* **Last name** (optional)
* **Email** (optional, for appointment notifications)
* **Phone number** (optional, for appointment notifications)
* **Date of birth** (optional; the year is optional too) — used for the [birthday reward](/programmes/birthday), the [birthday greeting](/settings/automated-messages) and the "birthdays this month" filter. All three work from the day and month alone, so a birthday with no year is complete
* **Notes** (optional, for internal business notes)
* **Notification preferences:** Select whether to send booking reminders via SMS and/or email for this client.
4. Once all fields are filled, click `Save` at the bottom of the panel.
5. The new client now appears at the top of your client list.
***
### 2. Viewing and editing a client’s details
1. Locate the desired client:
* Use the **Search** bar at the top to type part of their name or phone number.
* Or, navigate through the paginated list with Next/Previous.
2. Click **any client row** in the list. This opens the side panel with several tabs. Tabs with content show a count badge, and the tab rail groups record tabs, then money & programmes, then admin:
* **Overview:** The landing view — next appointment, last appointment, appointment and photo counts, active programmes and balances, pinned timeline notes, quick notes, and the latest timeline entries. Every figure links straight into the tab it comes from.
* **Details:** View/edit personal info, notes, and notification settings. Make changes and click `Save` to update.
* **Timeline notes:** Keep a dated, append-only history of this client — consultation notes, colour formulas, observations — each entry with its author, category, and optional file or photo attachments. Pin important entries to surface them on the scheduler and the new-appointment form.
* **Photos:** A visual gallery of every image on the client — direct uploads, timeline-note attachments, appointment photos, and photos from form uploads — with Before/After/Progress/Reference categories, filtering, before/after comparison, and grouping by appointment.
* **Files:** Every file on the client's record in one list — direct uploads (added here with `Add`), files attached to timeline notes, files from the client's appointments, and files from form uploads — each labelled with its source (form files show as **Form — \{template name}**). When files come from more than one source, filter pills let you narrow to direct uploads, timeline notes, appointments, or Form. Files are deleted where they were added — note and appointment files are view-only here.
* **Appointments:** See a list of the client’s past and upcoming appointments.
* **Family:** Manage family members and dependents linked to this client. Add, edit, or remove family relationships.
* **Wallet:** The client's balances and rewards in one tab, switched with pills at the top: **Loyalty** (points balance, available rewards, full transaction history — Owners and Admins can manually adjust points; see [Loyalty programme](/loyalty)), **Credit** (stored-value balance split into the client's own money and promotional bonus, top-ups, and the full ledger — applies automatically at checkout; see [Client credit](/client-credit)), and **Referrals** (the client's refer-a-friend link and referral activity — see [Referrals](/programmes/referrals)). Clients find the same link themselves on your booking site under **Account → Refer a friend** (not on My profile).
* **Activity:** View a chronological history of all activities related to this client, including appointment creation, confirmations, reschedules, cancellations, and notifications sent.
 ***
### Client statistics
When viewing a client's details, you can see key statistics at a glance:
| Statistic | Description |
| ----------------- | ------------------------------------------------------- |
| **Total spent** | Total revenue from this client's completed appointments |
| **Appointments** | Total number of appointments (all statuses) |
| **Cancellations** | Number of cancelled appointments |
| **No-Shows** | Number of no-show appointments |
| **Client since** | Date when the client was first added |
These statistics help you:
* Identify your most valuable clients by total spend
* Track appointment history and patterns
* Monitor cancellation and no-show rates per client
* Make informed decisions about client management
***
### Note and document visibility
Clients and appointments each have three **quick-note** fields to control who can see what:
**Quick-note fields:**
| Field | Who can see it | Who can edit it |
| -------------------- | ------------------------------------------------------------------------------------------- | ------------------------------------- |
| **Private note** | Your team only | Owners and Admins |
| **Note for client** | Your team and the client (on **My profile** and on every appointment in the booking portal) | Owners and Admins |
| **Note from client** | Your team (and the client on the appointment as "Your notes") | The client (e.g. when booking online) |
* **Private note** is for internal information like colour formulas, medical details, or personal preferences.
* **Note for client** on the **client profile** is a standing note. The client sees it as **From the business** on **My profile** and on **every appointment** in the booking portal (shown to your team with a "Shared with client" badge). Use it for allergies, accessibility needs, or standing instructions that apply across visits. This is separate from the appointment **Note for client**, which appears only on that appointment as **For this appointment**.
* **Note from client** is written by the client (for example when booking online) and is shown to your team on the client record and on that appointment. It appears to the client on the appointment page as **Your notes**.
* These quick notes are **not** included in SMS or appointment confirmation/reminder emails. For a one-off message on a receipt, use the [Receipt note](/settings/receipts#adding-a-note-to-a-single-receipt) at checkout instead.
**Document visibility:**
* Files and photos on the client or appointment record are for **your team in the dashboard** — they are not shown in the client’s booking portal.
* There is no public/private toggle that publishes a file into the booking site. *(Sharing a file with the client online is not available yet.)*
***
### Timeline notes
The quick-note fields above hold the client's *current* state — you overwrite them as things change. The **Timeline notes** tab is different: it's an **append-only history** of dated entries, so nothing is ever lost. Use it to log consultation notes, colour formulas, and observations over time.
Each timeline entry records:
* **Who** added it and **when** — captured automatically.
* A **category** — General, Formula, or Consultation — to keep entries organised.
* **Formatted text** — use **bold**, *italic*, and bullet or numbered lists to keep longer consultation notes readable.
* Optional **attachments** — add a file or photo (PDF, Word, Excel, image incl. HEIC and TIFF, or text, up to 20 MB) directly to the entry.
**Pinning:** pin an entry to flag it as important. Pinned notes surface on the **scheduler tooltip** and the **new-appointment form**, so the team sees key information (allergies, preferences, alerts) without opening the client record.
**Locking and amendments:** for records that need to stay tamper-proof — consultation sign-offs, consent, clinical observations — **lock** an entry. A locked note can no longer be edited or deleted, and shows who locked it and when. If you need to correct or add to a locked note later, choose **Amend**: this adds a new entry linked back to the original, so the full history stays intact. Locking is permanent.
Timeline notes live in the business dashboard only — they are never shown to clients online.
***
### Profile photos
Every client can have a small profile photo (avatar) that appears across the scheduler, client list, client profile, and appointment views. It can come from three places:
* **You upload one** — open the client's edit panel and click their avatar to upload a photo (JPG, PNG, WebP, or HEIC — straight from an iPhone).
* **The client uploads one** — clients with an online account can add or change their own photo from the **My profile** page of your booking site.
* **A default from the client's Gravatar** — the first time a client signs in to your booking site, Bella checks [Gravatar](https://gravatar.com), a public profile-picture service many people have linked to their email address (often years ago, through WordPress or a blog). If the client has a public Gravatar, it's used as their starting default photo — the same way Slack, GitHub, and ChatGPT use Gravatar for new accounts. Bella never takes photos from Google, Facebook, social media, or the client's phone; a client can manage or delete their Gravatar itself at gravatar.com.
To **change or remove** a photo, click the avatar in the client's edit panel, or use **Change photo** / **Remove photo** in the client's **⋮** menu (on the Clients list or the client record) — and the client can do the same from My profile on your booking site. A removed photo stays removed: the Gravatar default is never applied again after you or the client delete it.
***
### Client photos
The **Photos** tab gathers every image on a client's record into one visual gallery — photos you upload here directly, image attachments from timeline notes, photos taken on the client's appointments, and photos clients attach on forms — so you can see their whole history at a glance. It's ideal for skin clinics, med spas, and cosmetic tattoo artists documenting progress over time. Form photos show their provenance as **Form — \{template name}**.
Each photo can be tagged with a **category** — Before, After, Progress, or Reference — and the gallery's filter pills show one category at a time. Tag a photo when you upload it, or change it later from the photo's menu.
* **Add photos** — click `Add` (or drag and drop) to upload JPG, PNG, WebP or HEIC images, up to 20 MB each (iPhone HEIC photos are converted automatically). Optionally choose a category, and link the photo to one of the client's appointments so it groups under that appointment.
* **Group by appointment** — switch the view to *By appointment* to see photos organised under each appointment's date and services.
* **Before/after comparison** — click `Compare`, select any two photos, and view them side by side with a shared zoom. Download the pair as a single image for a consultation record or to share.
* **Full screen** — click any photo to open it full screen, with thumbnails and zoom.
* **Download** — save the original image from a photo's menu, or from the full-screen view's download button.
Photos taken on a client's appointments also appear here automatically — it's the same image shown on both the appointment and the client gallery, not a copy. The link works both ways: a photo uploaded here and linked to an appointment also shows on that appointment's Photos tab. Each photo is managed where it was added and is view-only on the other surface.
Like timeline notes, client photos live in the business dashboard only — they are never shown to clients online.
#### Annotate a photo
You can mark up any gallery image — a client photo or one taken on an appointment — to highlight treatment areas, map injection points, or note progress. Annotation works on uploaded images (JPG, PNG, or WebP); it isn't available for PDF or other file attachments.
1. Find the photo in the **Photos** gallery and open its **⋮** menu.
2. Choose **Annotate**. The **Annotate photo** dialog opens with a canvas over the image.
3. Mark it up with the tools provided — **pen**, **rectangle**, **ellipse**, **arrow**, and **text** — and set the **colour** and **stroke width**. Use **undo** to step back.
4. Click **Save annotated copy**.
Saving creates a **new copy** of the photo (named "\{original} (annotated)") with an **Annotated** badge in the gallery. The original image is never changed, so you keep both the clean reference and the marked-up version. You need the same upload permission used for adding photos.
***
### 3. Importing clients (CSV upload)
**Free data migration service** — Don't want to prepare the file yourself? We offer a **free data cleanup and import service**. Send us your client data in any format (CSV, spreadsheet, export from another system — anything you have) and our team will clean it up and import it for you. Just reach out via **Support** in the sidebar or email **[hello@bellabooking.com](mailto:hello@bellabooking.com)** to get started.
**Switching from another platform?** See our [step-by-step migration guide](/getting-started/switching-from-other-software) for export instructions covering Fresha, Vagaro, Phorest, Timely, Square Appointments, Shortcuts, Kitomba, Mindbody, Booker, Acuity Scheduling, Ovatu, and Client Diary. Export your data, email it to **[hello@bellabooking.com](mailto:hello@bellabooking.com)** along with a short team list, and we'll import everything for you within one business day.
If you prefer to do it yourself:
1. In the Clients section, click the `Import` button.
2. Download the provided **template CSV** to see required fields and formatting.
3. Fill in your client data in the CSV. Save the file.
4. Back in Bella Booking, upload the completed CSV file.
5. Map your CSV columns to Bella Booking fields (first name is required; last name, email, phone, date of birth, notes, and family relationships are optional). Dates of birth in ambiguous numeric formats are read using your business's country format.
6. Review the preview — the importer runs a **validation and duplicate check** before anything is saved:
* **Within your CSV:** Rows with the same email or phone number as another row are flagged as duplicates.
* **Against your existing clients:** Rows matching an existing client's email or phone number are flagged as duplicates.
* Flagged rows appear in a **"Needs attention"** tab with clear error messages. You can fix each row inline, drop the offending field, skip the row, or download the flagged rows as a CSV to fix and re-import.
7. Only rows that pass all validation are imported. You'll see a summary of successful and failed rows.
8. Newly imported clients appear in your client list.
**Importing family members** — to bring in family members who share a primary
client's contact (for example, a child on a parent's phone or email), add a
**Main client email** or **Main client phone** column with the primary account
holder's contact, plus a **Relationship type** column (Child, Spouse, Partner,
Sibling, Parent, Friend, Pet, or Other). Each family member is imported as
their own client record, linked to the primary — and a dependant is allowed to
share the primary's email or phone without being flagged as a duplicate.
The importer **prevents duplicate records automatically**. You don't need to
worry about creating duplicates — any row that matches an existing client by
email or phone will be rejected with a clear message, so you can decide how to
handle it.
***
### 4. Archiving, restoring, and deleting clients
Bella Booking uses an **archive-first** approach to client management. You cannot delete a client directly — you must archive them first. This protects against accidental data loss.
#### Archiving a client
Archiving hides a client from the active list while preserving all their records (appointments, history, notes, documents, family links, and loyalty points).
**From the client list:**
1. Find the client you wish to archive.
2. Click the **three-dot menu** next to their row.
3. Select **Archive**.
4. Confirm in the dialog. The client is now hidden from the active list.
**From the client detail panel:**
1. Open the client's side panel by clicking their row.
2. Click the **three-dot menu** at the bottom of the Details tab (next to the Save button).
3. Select **Archive**.
4. Confirm in the dialog.
You cannot archive a client who has non-cancelled appointments, active
waitlist entries, or a non-zero [client credit](/client-credit) balance.
Cancel or complete all appointments, remove any waitlist entries, and zero any
credit balance (pay it out or write it off via an adjustment) first.
#### Viewing archived clients
1. On the **Clients** page, use the **Status** filter dropdown at the top of the table.
2. Select **Archived** to see only archived clients, or **All** to see both active and archived clients.
3. Archived clients are displayed with an "Archived" badge next to their name.
#### Restoring an archived client
**From the client list:**
1. Filter the client list to show archived clients using the status filter.
2. Click the **three-dot menu** next to the archived client.
3. Select **Restore**.
4. The client returns to the active list with all their records intact.
**From the client detail panel:**
1. Open the archived client's side panel.
2. Click the **three-dot menu** at the bottom of the Details tab.
3. Select **Restore**.
Archiving is reversible. All appointment history, notes, documents, family
members, and loyalty points are preserved while archived.
#### What you cannot do with an archived client
While a client is archived:
* Their profile details are **read-only** — you cannot edit their information
* You cannot create new appointments for them
* You cannot upload or delete files from their profile
* You cannot adjust their loyalty points
* Activity history and loyalty history are view-only
* **They are blocked from online booking** — they will not be able to book appointments through your booking page
To make changes or allow them to book online again, **restore** the client first. If you only need to stop a client from booking online (without archiving them), use the [Block from Online booking](#5-blocking-a-client-from-online-booking) toggle instead.
#### Permanently deleting a client
Permanent deletion is only available for archived clients and has strict requirements:
**From the client list:**
1. Filter the client list to show archived clients.
2. Click the **three-dot menu** next to the archived client.
3. Select **Permanently delete** (shown in red).
4. A confirmation dialog appears. **You must type the client's full name** to confirm.
5. Click **Permanently delete** to remove the client and all their data.
**From the client detail panel:**
1. Open the archived client's side panel.
2. Click the **three-dot menu** at the bottom of the Details tab.
3. Select **Permanently delete** (shown in red).
4. Confirm in the dialog.
**Permanent deletion requirements:** A client can only be permanently deleted if they have:
* **No appointment history** (including cancelled and archived appointments)
* **No sales history** (including archived sales)
* **No waitlist entries** (including archived entries)
* **No client credit balance** — the [client credit](/client-credit) balance must be zero (pay it out or write it off first)
If the client has any of these records, permanent deletion is not available. The client will remain in an archived state. This is by design — it preserves your business records and reporting accuracy.
**Important:** Once a client is permanently deleted, the system has no record
of them. If they use online booking in the future, they will appear as a **new
client** and will not be blocked. If you want to prevent a client from booking
online, **archive them instead** — archived clients are blocked from online
booking while their records are preserved.
In practice, most clients who have ever had an appointment cannot be
permanently deleted. Archiving is the recommended way to manage inactive
clients.
***
### 5. Blocking a client from online booking
Use this when you want to stop a specific client from self-booking through your booking page — for repeated no-shows, payment disputes, or anyone you'd rather book in manually — but you still want to keep their profile, history, and the ability to book them yourself.
Blocking is a **softer alternative to archiving**. The client stays on your active list; only the self-service booking path is closed.
#### How a blocked client sees it
When a blocked client opens your booking page, they see a generic "Online booking unavailable. Please contact us." message — the same message archived clients see. They are **not** told they have been specifically blocked, which keeps the experience low-confrontation for both sides.
#### Blocking a client
1. Open the client's side panel from the Clients list.
2. On the **Details** tab, scroll down to the **Online booking access** card (below Communication preferences).
3. Turn the **Block from online booking** toggle on.
4. Click **Save**. An amber **Blocked** badge appears next to the client's name on the list and in the panel header.
#### Unblocking a client
1. Open the client's side panel.
2. On the **Details** tab, find the **Online booking access** card.
3. Turn **Block from online booking** off, then click **Save**. The Blocked badge disappears and the client can self-book again.
#### What stays the same when a client is blocked
* Their profile, notes, family links, loyalty points, and history are untouched.
* Your team can still book appointments for them from the scheduler — blocking only affects self-service through the booking page.
* Any **existing future appointments stay confirmed**. Blocking does not cancel anything that's already on the calendar. Automated reminders continue to fire as normal.
* If they ever had a Bella online-booking account, they can still sign in to view their existing appointments — they just can't create new ones.
#### When to block vs archive
| Situation | Use |
| ---------------------------------------------------------------------- | ------------------------------- |
| Client still uses you (in-person) but you don't want them self-booking | **Block** |
| Client no longer uses you at all and you want them off the active list | **Archive** |
| Banned outright — no future bookings of any kind | **Archive** (and don't restore) |
Blocking only affects the **online booking page**. Anyone with your **Clients
— Edit** permission can apply or remove a block; no extra permission is
required.
***
### 6. Handling duplicate clients
#### Prevention during import
The CSV importer has **built-in duplicate detection** — it checks every row against your existing clients by email and phone number, and also checks for duplicates within the CSV itself. Possible duplicates are flagged in the preview so you can decide how to handle each one — **merge** into the existing client, **link as a family member**, **keep both**, or **skip** — before anything is saved. See [Importing Clients](#3-importing-clients-csv-upload) for details.
#### Reviewing possible duplicates
Bella also scans your existing list for you. On the **Clients** page, open the **Possible duplicates** tab (the badge shows how many records could be merged away). It compares active clients that share a phone number or email address and have matching names — family members who share a contact are deliberately left alone.
Each pair offers the right action in place:
* **Merge** — when the duplicate record has no appointments, sales, or other history, you can merge it right from the list (after a confirmation). If it carries history, family links, or differing contact details, Bella takes you to the full merge preview instead so you can review before confirming.
* **Keep both** — if they're genuinely two different people, choose Keep both and the pair won't be listed again. (You can undo this straight away if you tap it by mistake.)
After each merge you're returned to the list, so you can work through several duplicates in one sitting. The tab needs the same clients-delete permission as merging.
#### Merging existing duplicates
If you already have duplicate client records (for example, from manual entry, or spotted after an import), you can **merge** them so no history is lost — either from the **Possible duplicates** tab above, or manually:
1. Open the client profile you want to **keep**.
2. From that client's **"⋯" menu**, choose **Merge with another client**.
3. **Search for the duplicate** you want to fold in. (Try partial searches like "Sarah J" or "0412" to catch variations.)
4. **Review the preview.** Bella shows exactly how many appointments, sales, loyalty entries, documents, and family members will move across, flags anything you should check first, and shows the profile you'll end up with — if the client you're keeping is missing a surname or an email, it's filled in from the duplicate automatically.
5. **Resolve any differences** — if the two profiles have different email addresses, phone numbers, or loyalty balances, choose which to keep (or combine the points).
6. **Confirm the merge.** Every appointment, sale, loyalty entry, document, note, and family link transfers to the client you kept, and the duplicate is archived automatically. A same-currency [client credit](/client-credit) balance is combined too; if the two profiles hold credit in different currencies, zero one balance before merging.
Merging is permanent and can't be undone — double-check you've opened the
client you want to **keep** before you confirm. Merging requires the
clients-delete permission.
A few combinations can't be merged automatically — for example, when **both** profiles have an online booking login or a saved card on file, when the two are already linked as family members, or when both hold a credit balance in different currencies. The preview explains what's blocking the merge. Resolve the conflict first (unlink the duplicate's online booking login, remove its saved card, or remove the family link), then merge — or consolidate the records manually:
1. **Copy important notes** from the duplicate into the profile you're keeping.
2. **Rebook future appointments** under the profile you're keeping.
3. **Archive the duplicate** once everything important has been moved across.
***
### 7. Managing client files and documents
Each client profile can have attached files such as consent forms, photos, or any relevant documents.
#### Viewing client files
1. Click on a client to open their side panel
2. Navigate to the **Files** tab
3. You'll see every file on the client's record — direct uploads, timeline-note attachments, files from the client's appointments, and files from form uploads — including:
* File name
* File type
* Source (where the file was added — form files show as **Form — \{template name}**)
* Upload date
When the list spans more than one source, filter pills appear so you can narrow to direct uploads, timeline notes, appointments, or Form. Note and appointment files are managed where they were added and are view-only here. Form uploads also land on the submission itself; clients re-view them on the completed form — there is no separate documents inbox in the booking portal.
#### Uploading files to a client profile
1. Open the client's side panel
2. Go to the **Files** tab
3. Click **Add** to browse for files on your computer
4. Select a file to upload
5. **File Requirements:**
* **Maximum size:** 20 MB per file
* **Allowed file types:**
* Documents: PDF, DOC, DOCX, TXT
* Images: JPG, PNG, WEBP, HEIC (iPhone photos), TIFF (scanners)
* Spreadsheets: XLS, XLSX
HEIC photos straight from an iPhone are converted to JPEG in your browser as they upload, so
they always display. TIFF scans are stored as-is and appear in the Files list as a download —
browsers can't display TIFF, so they don't show in the Photos gallery.
6. Wait for the upload to complete
7. The file appears in the client's file list
#### Downloading client files
1. In the **Files** tab of a client's side panel
2. Find the file you want to download and click on it to open the preview window
3. Click the **Download** button to download the file
4. The file will download to your device
#### Deleting client files
1. In the **Files** tab
2. Locate the file you want to remove and click on **Toggle menu** (three dots)
3. Click the **Delete**
4. Confirm the deletion
5. **Note:** Once deleted, the file cannot be recovered
**File Management Tips:**
* Use clear, descriptive file names before uploading (e.g., "consent-form-2024.pdf")
* Organise files by date or type for easy retrieval
* Regularly review and remove outdated files
* Keep file sizes under 20 MB (the system limit)
* Ensure sensitive documents comply with privacy regulations
***
### 8. Managing family members
The **Family** tab lets you link dependents and family members to a client's account. This is useful for parents booking on behalf of children, partners sharing an account, or any situation where one client manages appointments for others.
Once family members are linked, you can book several of them on **one
appointment** \u2014 a line for each member, each having their own service
\u2014 with the account holder paying once and their benefits funding every
line. See **[Bookings for more than one person \u2192 Family and multi-client
booking](/service-catalog/bookings-for-more-than-one-person#2-family-and-multi-client-booking)**.
#### Relationship types
When adding a family member, you choose a relationship type:
| Relationship | Description |
| ------------ | -------------------------- |
| **Child** | A minor or dependent child |
| **Spouse** | A married partner |
| **Partner** | An unmarried partner |
| **Sibling** | A brother or sister |
| **Parent** | A parent of the client |
| **Friend** | A friend |
| **Pet** | A pet |
| **Other** | Any other relationship |
#### Adding a family member
1. Open a client's side panel and go to the **Family** tab.
2. Click the **Add** button (or **Add family member** if no members exist yet).
3. In the dialog, fill in:
* **First name** (required)
* **Last name** (optional)
* **Email** (optional)
* **Phone number** (optional)
* **Relationship** select from the dropdown (defaults to Child)
4. Click **Add family member** to save.
5. The new family member is created as a separate client record and linked to the primary client.
#### Viewing family members
Each family member card shows:
* Name and relationship badge
* Email and phone number (if provided)
* A **View profile** link to open the family member's own client record
#### Editing a relationship
1. Click the **three-dot menu** on a family member card.
2. Select **Edit Relationship**.
3. Choose a new relationship type from the dropdown.
4. Click **Save**.
#### Letting a family member book independently
By default a dependant's appointments and notifications are managed through the **account holder** (the primary client). If a family member should be able to sign in and book for themselves — for example a teenager old enough to manage their own appointments — you can graduate them to independent:
1. Click the **three-dot menu** on the family member's card.
2. Select **Graduate to independent**.
3. Confirm.
The family member stays linked to the account holder, but can now book their own appointments online. When a family member has their own email or phone, they also receive their own copy of appointment confirmations and reminders — addressed to them by name.
#### Changing the account holder
If a family was set up the wrong way round — for example a parent was added under their child instead of the other way round — you can swap the roles:
1. Click the **three-dot menu** on the family member's card.
2. Select **Make \[name] the account holder**.
The chosen family member becomes the account holder, and the previous account holder becomes a dependant with the relationship reversed (a child becomes a parent, and so on). The demoted account holder keeps the ability to book independently.
Changing the account holder is only available for **two-person families** — an
account holder with a single linked dependant and no other members. For larger
families, remove and re-add members to restructure the relationships.
#### Removing a family member
1. Click the **three-dot menu** on a family member card.
2. Select **Remove from Family**.
3. Confirm the removal.
Removing a family member unlinks them from the primary client but does not delete their client record. They remain in your client list as a standalone client.
***
### 9. Viewing loyalty points
The **Wallet** tab's **Loyalty** section shows a client's loyalty programme activity when the [Loyalty programme](/loyalty) is enabled. If the programme is paused, the section displays a message that existing points are preserved.
#### Points balance
Two cards are displayed at the top:
* **Available**: The client's current redeemable points balance
* **Lifetime**: Total points the client has earned over time (includes points that have been redeemed or expired)
#### Available rewards
Below the balance, each active reward is listed with:
* Reward name and discount value (e.g., "\$5.00 off · 100 pts")
* A **Can redeem** badge if the client has enough points
* A **Need X more** badge showing the shortfall if they don't
#### Adjusting points manually
**Owners** and **Admins** see an **Adjust points** button below the rewards list. Clicking it opens a dialog where you can:
1. Toggle between **Add points** and **Deduct points**
2. Enter the **Number of points**
3. Enter a **Reason** (required — recorded for the audit trail)
4. Click **Add points** or **Deduct points** to confirm
You cannot deduct more points than the client has available.
***
### Client statistics
When viewing a client's details, you can see key statistics at a glance:
| Statistic | Description |
| ----------------- | ------------------------------------------------------- |
| **Total spent** | Total revenue from this client's completed appointments |
| **Appointments** | Total number of appointments (all statuses) |
| **Cancellations** | Number of cancelled appointments |
| **No-Shows** | Number of no-show appointments |
| **Client since** | Date when the client was first added |
These statistics help you:
* Identify your most valuable clients by total spend
* Track appointment history and patterns
* Monitor cancellation and no-show rates per client
* Make informed decisions about client management
***
### Note and document visibility
Clients and appointments each have three **quick-note** fields to control who can see what:
**Quick-note fields:**
| Field | Who can see it | Who can edit it |
| -------------------- | ------------------------------------------------------------------------------------------- | ------------------------------------- |
| **Private note** | Your team only | Owners and Admins |
| **Note for client** | Your team and the client (on **My profile** and on every appointment in the booking portal) | Owners and Admins |
| **Note from client** | Your team (and the client on the appointment as "Your notes") | The client (e.g. when booking online) |
* **Private note** is for internal information like colour formulas, medical details, or personal preferences.
* **Note for client** on the **client profile** is a standing note. The client sees it as **From the business** on **My profile** and on **every appointment** in the booking portal (shown to your team with a "Shared with client" badge). Use it for allergies, accessibility needs, or standing instructions that apply across visits. This is separate from the appointment **Note for client**, which appears only on that appointment as **For this appointment**.
* **Note from client** is written by the client (for example when booking online) and is shown to your team on the client record and on that appointment. It appears to the client on the appointment page as **Your notes**.
* These quick notes are **not** included in SMS or appointment confirmation/reminder emails. For a one-off message on a receipt, use the [Receipt note](/settings/receipts#adding-a-note-to-a-single-receipt) at checkout instead.
**Document visibility:**
* Files and photos on the client or appointment record are for **your team in the dashboard** — they are not shown in the client’s booking portal.
* There is no public/private toggle that publishes a file into the booking site. *(Sharing a file with the client online is not available yet.)*
***
### Timeline notes
The quick-note fields above hold the client's *current* state — you overwrite them as things change. The **Timeline notes** tab is different: it's an **append-only history** of dated entries, so nothing is ever lost. Use it to log consultation notes, colour formulas, and observations over time.
Each timeline entry records:
* **Who** added it and **when** — captured automatically.
* A **category** — General, Formula, or Consultation — to keep entries organised.
* **Formatted text** — use **bold**, *italic*, and bullet or numbered lists to keep longer consultation notes readable.
* Optional **attachments** — add a file or photo (PDF, Word, Excel, image incl. HEIC and TIFF, or text, up to 20 MB) directly to the entry.
**Pinning:** pin an entry to flag it as important. Pinned notes surface on the **scheduler tooltip** and the **new-appointment form**, so the team sees key information (allergies, preferences, alerts) without opening the client record.
**Locking and amendments:** for records that need to stay tamper-proof — consultation sign-offs, consent, clinical observations — **lock** an entry. A locked note can no longer be edited or deleted, and shows who locked it and when. If you need to correct or add to a locked note later, choose **Amend**: this adds a new entry linked back to the original, so the full history stays intact. Locking is permanent.
Timeline notes live in the business dashboard only — they are never shown to clients online.
***
### Profile photos
Every client can have a small profile photo (avatar) that appears across the scheduler, client list, client profile, and appointment views. It can come from three places:
* **You upload one** — open the client's edit panel and click their avatar to upload a photo (JPG, PNG, WebP, or HEIC — straight from an iPhone).
* **The client uploads one** — clients with an online account can add or change their own photo from the **My profile** page of your booking site.
* **A default from the client's Gravatar** — the first time a client signs in to your booking site, Bella checks [Gravatar](https://gravatar.com), a public profile-picture service many people have linked to their email address (often years ago, through WordPress or a blog). If the client has a public Gravatar, it's used as their starting default photo — the same way Slack, GitHub, and ChatGPT use Gravatar for new accounts. Bella never takes photos from Google, Facebook, social media, or the client's phone; a client can manage or delete their Gravatar itself at gravatar.com.
To **change or remove** a photo, click the avatar in the client's edit panel, or use **Change photo** / **Remove photo** in the client's **⋮** menu (on the Clients list or the client record) — and the client can do the same from My profile on your booking site. A removed photo stays removed: the Gravatar default is never applied again after you or the client delete it.
***
### Client photos
The **Photos** tab gathers every image on a client's record into one visual gallery — photos you upload here directly, image attachments from timeline notes, photos taken on the client's appointments, and photos clients attach on forms — so you can see their whole history at a glance. It's ideal for skin clinics, med spas, and cosmetic tattoo artists documenting progress over time. Form photos show their provenance as **Form — \{template name}**.
Each photo can be tagged with a **category** — Before, After, Progress, or Reference — and the gallery's filter pills show one category at a time. Tag a photo when you upload it, or change it later from the photo's menu.
* **Add photos** — click `Add` (or drag and drop) to upload JPG, PNG, WebP or HEIC images, up to 20 MB each (iPhone HEIC photos are converted automatically). Optionally choose a category, and link the photo to one of the client's appointments so it groups under that appointment.
* **Group by appointment** — switch the view to *By appointment* to see photos organised under each appointment's date and services.
* **Before/after comparison** — click `Compare`, select any two photos, and view them side by side with a shared zoom. Download the pair as a single image for a consultation record or to share.
* **Full screen** — click any photo to open it full screen, with thumbnails and zoom.
* **Download** — save the original image from a photo's menu, or from the full-screen view's download button.
Photos taken on a client's appointments also appear here automatically — it's the same image shown on both the appointment and the client gallery, not a copy. The link works both ways: a photo uploaded here and linked to an appointment also shows on that appointment's Photos tab. Each photo is managed where it was added and is view-only on the other surface.
Like timeline notes, client photos live in the business dashboard only — they are never shown to clients online.
#### Annotate a photo
You can mark up any gallery image — a client photo or one taken on an appointment — to highlight treatment areas, map injection points, or note progress. Annotation works on uploaded images (JPG, PNG, or WebP); it isn't available for PDF or other file attachments.
1. Find the photo in the **Photos** gallery and open its **⋮** menu.
2. Choose **Annotate**. The **Annotate photo** dialog opens with a canvas over the image.
3. Mark it up with the tools provided — **pen**, **rectangle**, **ellipse**, **arrow**, and **text** — and set the **colour** and **stroke width**. Use **undo** to step back.
4. Click **Save annotated copy**.
Saving creates a **new copy** of the photo (named "\{original} (annotated)") with an **Annotated** badge in the gallery. The original image is never changed, so you keep both the clean reference and the marked-up version. You need the same upload permission used for adding photos.
***
### 3. Importing clients (CSV upload)
**Free data migration service** — Don't want to prepare the file yourself? We offer a **free data cleanup and import service**. Send us your client data in any format (CSV, spreadsheet, export from another system — anything you have) and our team will clean it up and import it for you. Just reach out via **Support** in the sidebar or email **[hello@bellabooking.com](mailto:hello@bellabooking.com)** to get started.
**Switching from another platform?** See our [step-by-step migration guide](/getting-started/switching-from-other-software) for export instructions covering Fresha, Vagaro, Phorest, Timely, Square Appointments, Shortcuts, Kitomba, Mindbody, Booker, Acuity Scheduling, Ovatu, and Client Diary. Export your data, email it to **[hello@bellabooking.com](mailto:hello@bellabooking.com)** along with a short team list, and we'll import everything for you within one business day.
If you prefer to do it yourself:
1. In the Clients section, click the `Import` button.
2. Download the provided **template CSV** to see required fields and formatting.
3. Fill in your client data in the CSV. Save the file.
4. Back in Bella Booking, upload the completed CSV file.
5. Map your CSV columns to Bella Booking fields (first name is required; last name, email, phone, date of birth, notes, and family relationships are optional). Dates of birth in ambiguous numeric formats are read using your business's country format.
6. Review the preview — the importer runs a **validation and duplicate check** before anything is saved:
* **Within your CSV:** Rows with the same email or phone number as another row are flagged as duplicates.
* **Against your existing clients:** Rows matching an existing client's email or phone number are flagged as duplicates.
* Flagged rows appear in a **"Needs attention"** tab with clear error messages. You can fix each row inline, drop the offending field, skip the row, or download the flagged rows as a CSV to fix and re-import.
7. Only rows that pass all validation are imported. You'll see a summary of successful and failed rows.
8. Newly imported clients appear in your client list.
**Importing family members** — to bring in family members who share a primary
client's contact (for example, a child on a parent's phone or email), add a
**Main client email** or **Main client phone** column with the primary account
holder's contact, plus a **Relationship type** column (Child, Spouse, Partner,
Sibling, Parent, Friend, Pet, or Other). Each family member is imported as
their own client record, linked to the primary — and a dependant is allowed to
share the primary's email or phone without being flagged as a duplicate.
The importer **prevents duplicate records automatically**. You don't need to
worry about creating duplicates — any row that matches an existing client by
email or phone will be rejected with a clear message, so you can decide how to
handle it.
***
### 4. Archiving, restoring, and deleting clients
Bella Booking uses an **archive-first** approach to client management. You cannot delete a client directly — you must archive them first. This protects against accidental data loss.
#### Archiving a client
Archiving hides a client from the active list while preserving all their records (appointments, history, notes, documents, family links, and loyalty points).
**From the client list:**
1. Find the client you wish to archive.
2. Click the **three-dot menu** next to their row.
3. Select **Archive**.
4. Confirm in the dialog. The client is now hidden from the active list.
**From the client detail panel:**
1. Open the client's side panel by clicking their row.
2. Click the **three-dot menu** at the bottom of the Details tab (next to the Save button).
3. Select **Archive**.
4. Confirm in the dialog.
You cannot archive a client who has non-cancelled appointments, active
waitlist entries, or a non-zero [client credit](/client-credit) balance.
Cancel or complete all appointments, remove any waitlist entries, and zero any
credit balance (pay it out or write it off via an adjustment) first.
#### Viewing archived clients
1. On the **Clients** page, use the **Status** filter dropdown at the top of the table.
2. Select **Archived** to see only archived clients, or **All** to see both active and archived clients.
3. Archived clients are displayed with an "Archived" badge next to their name.
#### Restoring an archived client
**From the client list:**
1. Filter the client list to show archived clients using the status filter.
2. Click the **three-dot menu** next to the archived client.
3. Select **Restore**.
4. The client returns to the active list with all their records intact.
**From the client detail panel:**
1. Open the archived client's side panel.
2. Click the **three-dot menu** at the bottom of the Details tab.
3. Select **Restore**.
Archiving is reversible. All appointment history, notes, documents, family
members, and loyalty points are preserved while archived.
#### What you cannot do with an archived client
While a client is archived:
* Their profile details are **read-only** — you cannot edit their information
* You cannot create new appointments for them
* You cannot upload or delete files from their profile
* You cannot adjust their loyalty points
* Activity history and loyalty history are view-only
* **They are blocked from online booking** — they will not be able to book appointments through your booking page
To make changes or allow them to book online again, **restore** the client first. If you only need to stop a client from booking online (without archiving them), use the [Block from Online booking](#5-blocking-a-client-from-online-booking) toggle instead.
#### Permanently deleting a client
Permanent deletion is only available for archived clients and has strict requirements:
**From the client list:**
1. Filter the client list to show archived clients.
2. Click the **three-dot menu** next to the archived client.
3. Select **Permanently delete** (shown in red).
4. A confirmation dialog appears. **You must type the client's full name** to confirm.
5. Click **Permanently delete** to remove the client and all their data.
**From the client detail panel:**
1. Open the archived client's side panel.
2. Click the **three-dot menu** at the bottom of the Details tab.
3. Select **Permanently delete** (shown in red).
4. Confirm in the dialog.
**Permanent deletion requirements:** A client can only be permanently deleted if they have:
* **No appointment history** (including cancelled and archived appointments)
* **No sales history** (including archived sales)
* **No waitlist entries** (including archived entries)
* **No client credit balance** — the [client credit](/client-credit) balance must be zero (pay it out or write it off first)
If the client has any of these records, permanent deletion is not available. The client will remain in an archived state. This is by design — it preserves your business records and reporting accuracy.
**Important:** Once a client is permanently deleted, the system has no record
of them. If they use online booking in the future, they will appear as a **new
client** and will not be blocked. If you want to prevent a client from booking
online, **archive them instead** — archived clients are blocked from online
booking while their records are preserved.
In practice, most clients who have ever had an appointment cannot be
permanently deleted. Archiving is the recommended way to manage inactive
clients.
***
### 5. Blocking a client from online booking
Use this when you want to stop a specific client from self-booking through your booking page — for repeated no-shows, payment disputes, or anyone you'd rather book in manually — but you still want to keep their profile, history, and the ability to book them yourself.
Blocking is a **softer alternative to archiving**. The client stays on your active list; only the self-service booking path is closed.
#### How a blocked client sees it
When a blocked client opens your booking page, they see a generic "Online booking unavailable. Please contact us." message — the same message archived clients see. They are **not** told they have been specifically blocked, which keeps the experience low-confrontation for both sides.
#### Blocking a client
1. Open the client's side panel from the Clients list.
2. On the **Details** tab, scroll down to the **Online booking access** card (below Communication preferences).
3. Turn the **Block from online booking** toggle on.
4. Click **Save**. An amber **Blocked** badge appears next to the client's name on the list and in the panel header.
#### Unblocking a client
1. Open the client's side panel.
2. On the **Details** tab, find the **Online booking access** card.
3. Turn **Block from online booking** off, then click **Save**. The Blocked badge disappears and the client can self-book again.
#### What stays the same when a client is blocked
* Their profile, notes, family links, loyalty points, and history are untouched.
* Your team can still book appointments for them from the scheduler — blocking only affects self-service through the booking page.
* Any **existing future appointments stay confirmed**. Blocking does not cancel anything that's already on the calendar. Automated reminders continue to fire as normal.
* If they ever had a Bella online-booking account, they can still sign in to view their existing appointments — they just can't create new ones.
#### When to block vs archive
| Situation | Use |
| ---------------------------------------------------------------------- | ------------------------------- |
| Client still uses you (in-person) but you don't want them self-booking | **Block** |
| Client no longer uses you at all and you want them off the active list | **Archive** |
| Banned outright — no future bookings of any kind | **Archive** (and don't restore) |
Blocking only affects the **online booking page**. Anyone with your **Clients
— Edit** permission can apply or remove a block; no extra permission is
required.
***
### 6. Handling duplicate clients
#### Prevention during import
The CSV importer has **built-in duplicate detection** — it checks every row against your existing clients by email and phone number, and also checks for duplicates within the CSV itself. Possible duplicates are flagged in the preview so you can decide how to handle each one — **merge** into the existing client, **link as a family member**, **keep both**, or **skip** — before anything is saved. See [Importing Clients](#3-importing-clients-csv-upload) for details.
#### Reviewing possible duplicates
Bella also scans your existing list for you. On the **Clients** page, open the **Possible duplicates** tab (the badge shows how many records could be merged away). It compares active clients that share a phone number or email address and have matching names — family members who share a contact are deliberately left alone.
Each pair offers the right action in place:
* **Merge** — when the duplicate record has no appointments, sales, or other history, you can merge it right from the list (after a confirmation). If it carries history, family links, or differing contact details, Bella takes you to the full merge preview instead so you can review before confirming.
* **Keep both** — if they're genuinely two different people, choose Keep both and the pair won't be listed again. (You can undo this straight away if you tap it by mistake.)
After each merge you're returned to the list, so you can work through several duplicates in one sitting. The tab needs the same clients-delete permission as merging.
#### Merging existing duplicates
If you already have duplicate client records (for example, from manual entry, or spotted after an import), you can **merge** them so no history is lost — either from the **Possible duplicates** tab above, or manually:
1. Open the client profile you want to **keep**.
2. From that client's **"⋯" menu**, choose **Merge with another client**.
3. **Search for the duplicate** you want to fold in. (Try partial searches like "Sarah J" or "0412" to catch variations.)
4. **Review the preview.** Bella shows exactly how many appointments, sales, loyalty entries, documents, and family members will move across, flags anything you should check first, and shows the profile you'll end up with — if the client you're keeping is missing a surname or an email, it's filled in from the duplicate automatically.
5. **Resolve any differences** — if the two profiles have different email addresses, phone numbers, or loyalty balances, choose which to keep (or combine the points).
6. **Confirm the merge.** Every appointment, sale, loyalty entry, document, note, and family link transfers to the client you kept, and the duplicate is archived automatically. A same-currency [client credit](/client-credit) balance is combined too; if the two profiles hold credit in different currencies, zero one balance before merging.
Merging is permanent and can't be undone — double-check you've opened the
client you want to **keep** before you confirm. Merging requires the
clients-delete permission.
A few combinations can't be merged automatically — for example, when **both** profiles have an online booking login or a saved card on file, when the two are already linked as family members, or when both hold a credit balance in different currencies. The preview explains what's blocking the merge. Resolve the conflict first (unlink the duplicate's online booking login, remove its saved card, or remove the family link), then merge — or consolidate the records manually:
1. **Copy important notes** from the duplicate into the profile you're keeping.
2. **Rebook future appointments** under the profile you're keeping.
3. **Archive the duplicate** once everything important has been moved across.
***
### 7. Managing client files and documents
Each client profile can have attached files such as consent forms, photos, or any relevant documents.
#### Viewing client files
1. Click on a client to open their side panel
2. Navigate to the **Files** tab
3. You'll see every file on the client's record — direct uploads, timeline-note attachments, files from the client's appointments, and files from form uploads — including:
* File name
* File type
* Source (where the file was added — form files show as **Form — \{template name}**)
* Upload date
When the list spans more than one source, filter pills appear so you can narrow to direct uploads, timeline notes, appointments, or Form. Note and appointment files are managed where they were added and are view-only here. Form uploads also land on the submission itself; clients re-view them on the completed form — there is no separate documents inbox in the booking portal.
#### Uploading files to a client profile
1. Open the client's side panel
2. Go to the **Files** tab
3. Click **Add** to browse for files on your computer
4. Select a file to upload
5. **File Requirements:**
* **Maximum size:** 20 MB per file
* **Allowed file types:**
* Documents: PDF, DOC, DOCX, TXT
* Images: JPG, PNG, WEBP, HEIC (iPhone photos), TIFF (scanners)
* Spreadsheets: XLS, XLSX
HEIC photos straight from an iPhone are converted to JPEG in your browser as they upload, so
they always display. TIFF scans are stored as-is and appear in the Files list as a download —
browsers can't display TIFF, so they don't show in the Photos gallery.
6. Wait for the upload to complete
7. The file appears in the client's file list
#### Downloading client files
1. In the **Files** tab of a client's side panel
2. Find the file you want to download and click on it to open the preview window
3. Click the **Download** button to download the file
4. The file will download to your device
#### Deleting client files
1. In the **Files** tab
2. Locate the file you want to remove and click on **Toggle menu** (three dots)
3. Click the **Delete**
4. Confirm the deletion
5. **Note:** Once deleted, the file cannot be recovered
**File Management Tips:**
* Use clear, descriptive file names before uploading (e.g., "consent-form-2024.pdf")
* Organise files by date or type for easy retrieval
* Regularly review and remove outdated files
* Keep file sizes under 20 MB (the system limit)
* Ensure sensitive documents comply with privacy regulations
***
### 8. Managing family members
The **Family** tab lets you link dependents and family members to a client's account. This is useful for parents booking on behalf of children, partners sharing an account, or any situation where one client manages appointments for others.
Once family members are linked, you can book several of them on **one
appointment** \u2014 a line for each member, each having their own service
\u2014 with the account holder paying once and their benefits funding every
line. See **[Bookings for more than one person \u2192 Family and multi-client
booking](/service-catalog/bookings-for-more-than-one-person#2-family-and-multi-client-booking)**.
#### Relationship types
When adding a family member, you choose a relationship type:
| Relationship | Description |
| ------------ | -------------------------- |
| **Child** | A minor or dependent child |
| **Spouse** | A married partner |
| **Partner** | An unmarried partner |
| **Sibling** | A brother or sister |
| **Parent** | A parent of the client |
| **Friend** | A friend |
| **Pet** | A pet |
| **Other** | Any other relationship |
#### Adding a family member
1. Open a client's side panel and go to the **Family** tab.
2. Click the **Add** button (or **Add family member** if no members exist yet).
3. In the dialog, fill in:
* **First name** (required)
* **Last name** (optional)
* **Email** (optional)
* **Phone number** (optional)
* **Relationship** select from the dropdown (defaults to Child)
4. Click **Add family member** to save.
5. The new family member is created as a separate client record and linked to the primary client.
#### Viewing family members
Each family member card shows:
* Name and relationship badge
* Email and phone number (if provided)
* A **View profile** link to open the family member's own client record
#### Editing a relationship
1. Click the **three-dot menu** on a family member card.
2. Select **Edit Relationship**.
3. Choose a new relationship type from the dropdown.
4. Click **Save**.
#### Letting a family member book independently
By default a dependant's appointments and notifications are managed through the **account holder** (the primary client). If a family member should be able to sign in and book for themselves — for example a teenager old enough to manage their own appointments — you can graduate them to independent:
1. Click the **three-dot menu** on the family member's card.
2. Select **Graduate to independent**.
3. Confirm.
The family member stays linked to the account holder, but can now book their own appointments online. When a family member has their own email or phone, they also receive their own copy of appointment confirmations and reminders — addressed to them by name.
#### Changing the account holder
If a family was set up the wrong way round — for example a parent was added under their child instead of the other way round — you can swap the roles:
1. Click the **three-dot menu** on the family member's card.
2. Select **Make \[name] the account holder**.
The chosen family member becomes the account holder, and the previous account holder becomes a dependant with the relationship reversed (a child becomes a parent, and so on). The demoted account holder keeps the ability to book independently.
Changing the account holder is only available for **two-person families** — an
account holder with a single linked dependant and no other members. For larger
families, remove and re-add members to restructure the relationships.
#### Removing a family member
1. Click the **three-dot menu** on a family member card.
2. Select **Remove from Family**.
3. Confirm the removal.
Removing a family member unlinks them from the primary client but does not delete their client record. They remain in your client list as a standalone client.
***
### 9. Viewing loyalty points
The **Wallet** tab's **Loyalty** section shows a client's loyalty programme activity when the [Loyalty programme](/loyalty) is enabled. If the programme is paused, the section displays a message that existing points are preserved.
#### Points balance
Two cards are displayed at the top:
* **Available**: The client's current redeemable points balance
* **Lifetime**: Total points the client has earned over time (includes points that have been redeemed or expired)
#### Available rewards
Below the balance, each active reward is listed with:
* Reward name and discount value (e.g., "\$5.00 off · 100 pts")
* A **Can redeem** badge if the client has enough points
* A **Need X more** badge showing the shortfall if they don't
#### Adjusting points manually
**Owners** and **Admins** see an **Adjust points** button below the rewards list. Clicking it opens a dialog where you can:
1. Toggle between **Add points** and **Deduct points**
2. Enter the **Number of points**
3. Enter a **Reason** (required — recorded for the audit trail)
4. Click **Add points** or **Deduct points** to confirm
You cannot deduct more points than the client has available.
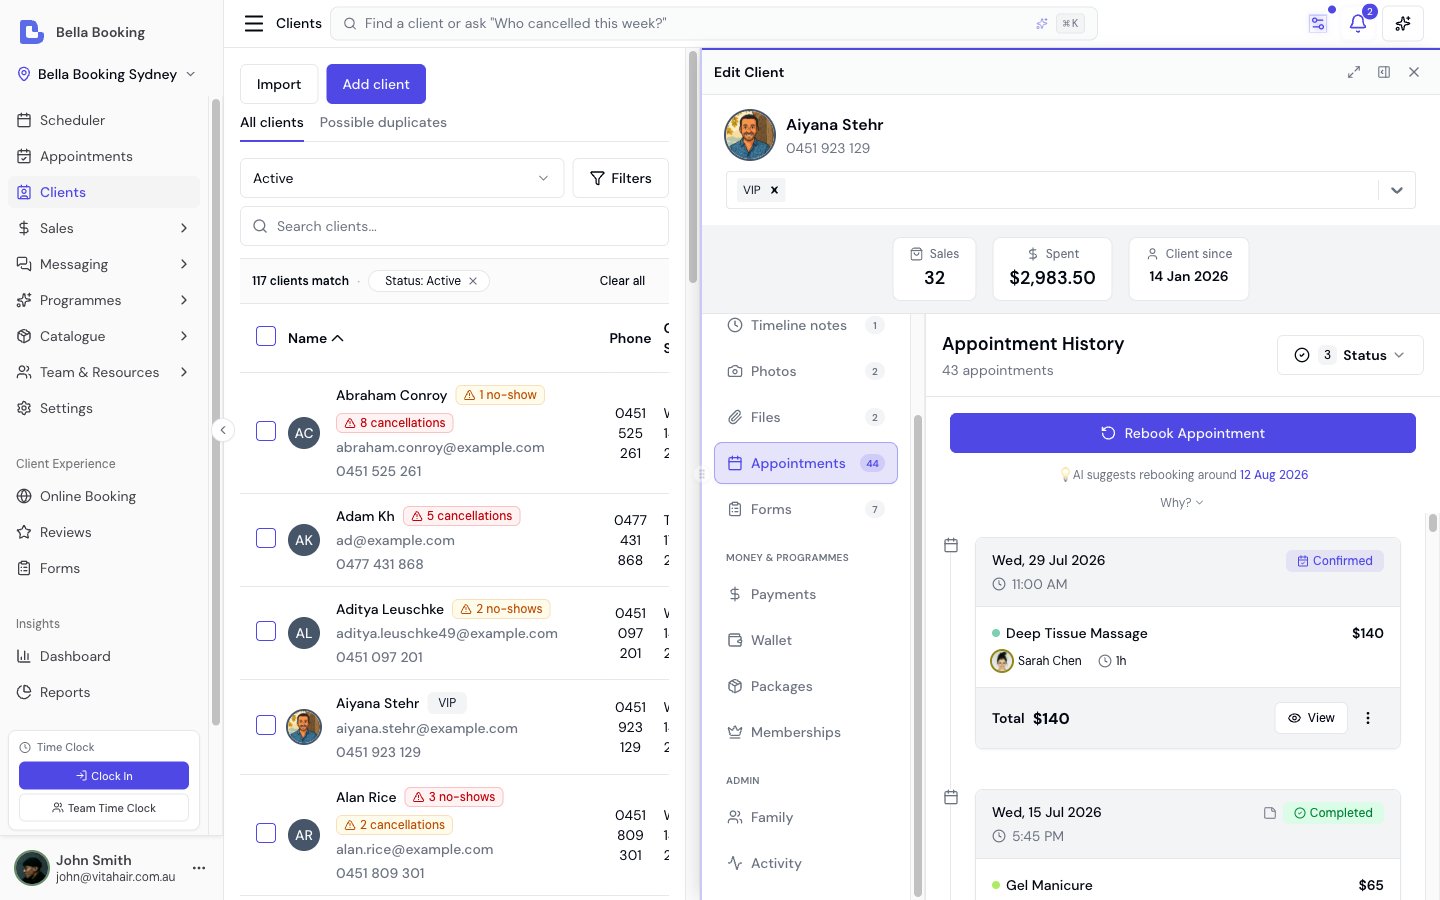
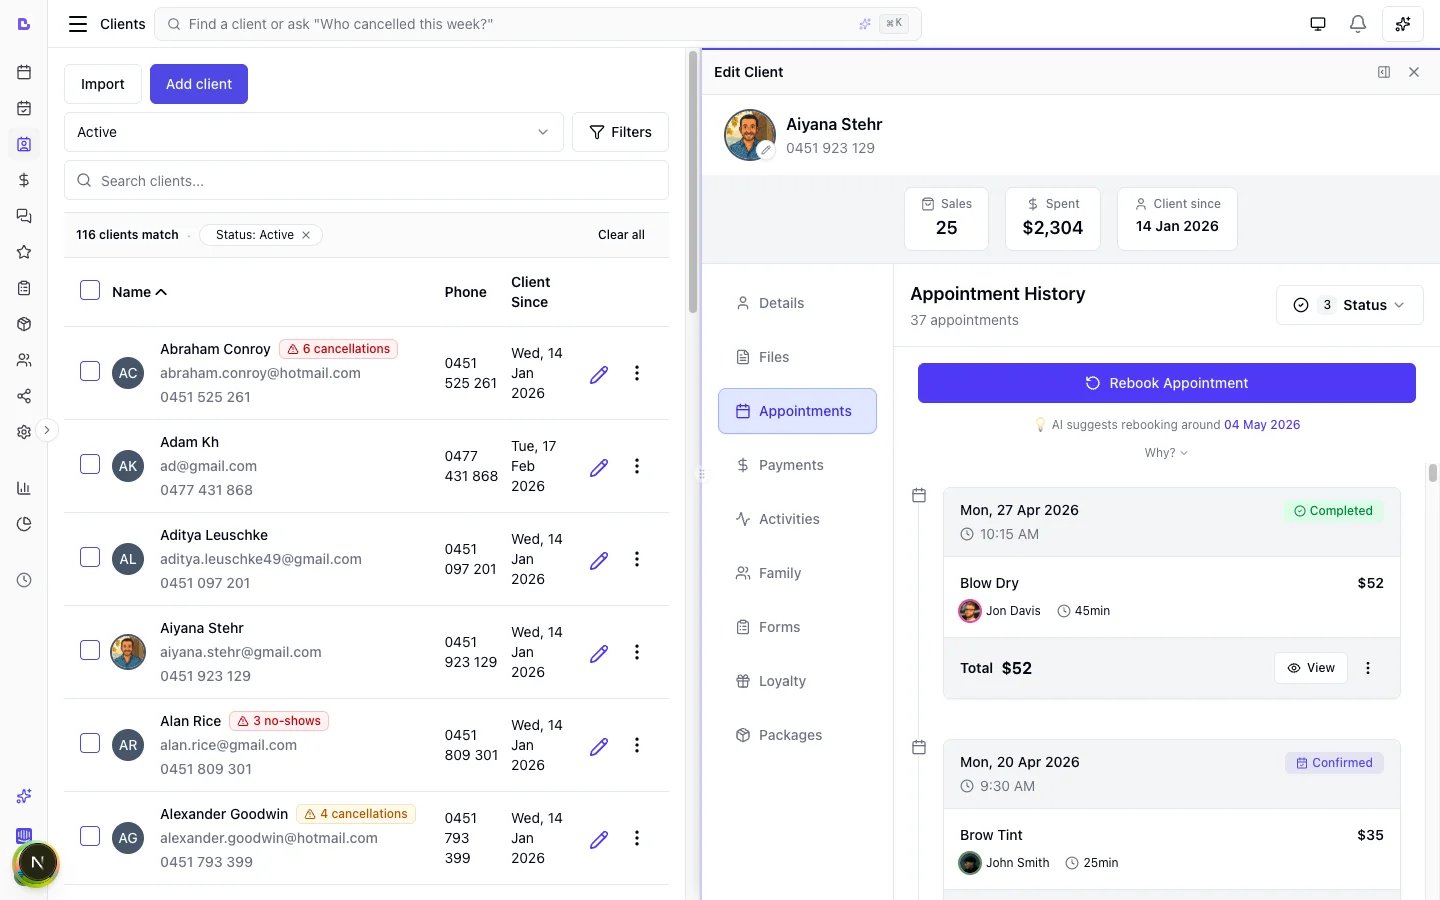 #### Transaction history
A chronological list of all point changes for this client. Each entry shows:
* **Transaction type** badge (Earned, Redeemed, Expired, Adjustment, Reversed, or Restored)
* **Description** — service names for earned points, reward name for redemptions, or reason for manual adjustments
* **Date** the transaction occurred
* **Expiry date** (for earned and adjustment transactions, if points expiration is configured)
* **Points** amount (+/- with colour coding)
Click **Load more** at the bottom to see older transactions (loaded 20 at a time).
| Transaction type | What it means |
| ---------------- | ---------------------------------------------------------------------------------- |
| **Earned** | Points awarded when an appointment was checked out |
| **Redeemed** | Points spent on a reward at checkout |
| **Expired** | Points that expired after the configured period |
| **Adjustment** | Points manually added or deducted by a team member |
| **Reversed** | Earned points taken back because a completed appointment was cancelled |
| **Restored** | Redeemed points returned because a completed appointment was cancelled or refunded |
**Note:** If the client is archived, the Loyalty section is read-only — you can view the history but cannot adjust points.
For full details on setting up and managing the loyalty programme, see [Loyalty programme](/loyalty).
***
### 10. Bulk actions — selecting multiple clients
Tick the checkbox next to any client to select them. A floating action bar appears at the bottom of the page with these options:
* **Email selected** — Starts a new **email campaign** with the selected clients pre-filled as recipients, so you can send them a branded email from Bella Booking. You're taken straight to the campaign builder to compose the message. Requires the **Manage campaigns** permission and an active [Messages Plus](/settings/messaging) subscription. See [Emailing your clients](#11-emailing-your-clients) below.
* **Copy emails** — Copies the email addresses of the selected clients to your clipboard (comma-separated, with duplicates removed so family members who share an address appear once). Clients without an email address are skipped. This is the fallback for businesses without Messages Plus — once you have it, send from Bella instead with **Email selected**, which respects each client's consent, skips addresses that have bounced, and includes an unsubscribe link.
* **Send SMS campaign** — Pre-fills a new **SMS** campaign with the selected clients as recipients. Requires the **Manage campaigns** permission and an active Messages Plus subscription.
* **Send booking portal link** — Opens a campaign with the selected clients as recipients and an invitation to their [booking portal](/getting-started/share-booking-page#client-booking-portal-link) already written, ready to adjust and send. Requires online booking, the **Manage campaigns** permission and Messages Plus.
* **Export selected** — Downloads a CSV file with just the selected clients (name, email, phone, notes, client-since date). Requires the **Export clients** permission.
* **Copy to location** — For multi-location businesses. The same action is also on a single client's **⋯** menu (on their row or in their record panel) when you only need to copy one — use this floating-bar version to copy several at once. Copies the selected clients' profiles — name, contact details, notification preferences, date of birth, tags, and profile notes — into another of your locations. **Family members are copied too**: a client's whole family travels with them and the family links are kept, so families are never split across locations. A client (or their whole family) is skipped (and told why) when they already exist at that location, or when a member shares an email or phone number with a different client in your selection. You get a summary of how many were copied and skipped. Appointment history, payments, saved cards, loyalty points, account credit, and the client's **timeline notes and files** all stay with the original location.
Selections are kept as you move between pages of the list, and cleared when you change the search text or the status filter.
**Email selected**, **Send SMS campaign** and **Send booking portal link**
appear only when you have the **Manage campaigns** permission and Messages
Plus is active (the portal invitation also needs online booking switched on).
**Copy emails** is the reverse — it appears only when those aren't available,
since sending from Bella is the better route once you have it. **Copy to
location** appears only when you have more than one location and the **Create
clients** permission. **Export selected** is always available with the
**Export clients** permission.
***
### 11. Emailing your clients
To email a group of clients — a promotion, a newsletter, a closure notice, or a seasonal hello — use an **email campaign**. Select the clients you want on the **Clients** page and click **Email selected** in the floating bar: this hands the selection straight to the campaign builder with those clients pre-filled as recipients, ready for you to compose and send.
Email campaigns send from Bella Booking, so there's no recipient cap and nothing to set up in your own email app. They include audience filters, consent handling, an automatic unsubscribe link, branded formatting with images and a **Book now** button, and delivery, open, and click tracking. Email campaigns are part of [Messages Plus](/settings/messaging).
For the full walkthrough — composing, scheduling, consent, and unsubscribes — see [Campaigns (SMS and Email)](/messages/campaigns).
You can also start an email to a single client straight from their record:
click their email address in the Clients list and choose **Send email**. This
opens a campaign pre-filled with just that client.
***
## FAQs
**Q: Do I need all fields to add a new client?**
A: Only the first name is required. Last name, email, and phone are optional.
**Q: Can I customise notification settings per client?**
A: Yes. While adding or editing, use the notification toggles for SMS and email notifications.
**Q: How do I correct a bulk import mistake?**
A: You can edit individual clients after import. To remove an imported client, archive them first, then permanently delete if they have no history.
**Q: Can I delete a client directly?**
A: No. You must **archive** a client first. Once archived, you can permanently delete them only if they have no appointment history, sales history, waitlist entries, or credit balance. See [Archiving, Restoring, and Deleting Clients](#4-archiving-restoring-and-deleting-clients) for details.
**Q: What happens when I archive a client?**
A: The client is hidden from the active list and **blocked from online booking** — they will not be able to book through your booking page. All their records are preserved and you can restore them at any time. Archiving is fully reversible.
**Q: Can an archived client still book online?**
A: No. Archived clients are blocked from online booking. If they try to book, they will be unable to proceed. To allow them to book again, restore the client from the archived list.
**Q: What happens if I permanently delete a client — can they book online again?**
A: Yes. Once permanently deleted, the system has no record of the client. If they use online booking in the future, they will appear as a new client. If your goal is to stop someone from booking online without losing their history, use [Block from Online booking](#5-blocking-a-client-from-online-booking) (or archive them) instead.
**Q: How do I stop a specific client from self-booking online without archiving them?**
A: Open the client's side panel, scroll to **Online booking access** on the Details tab, and turn **Block from online booking** on. They keep their profile, history, and existing appointments — only the online-booking page stops accepting new bookings from them. Your team can still book them manually. See [Blocking a Client from Online booking](#5-blocking-a-client-from-online-booking).
**Q: Does blocking a client cancel their existing future appointments?**
A: No. Any appointments already on the calendar stay confirmed and automated reminders continue to fire as normal. The block only prevents *new* self-service bookings from that client.
**Q: What does a blocked client see when they try to book?**
A: The same generic "Online booking unavailable. Please contact us." message that archived clients see. They are not told they have been specifically blocked.
**Q: Why can't I permanently delete a client?**
A: Permanent deletion requires the client to have no appointment history, no sales history, no waitlist entries — even archived or cancelled ones — and a zero credit balance. This is by design to preserve your business records. If the client has any history, archiving is the recommended approach.
**Q: Will importing clients create duplicates?**
A: No. The importer automatically checks every row against your existing clients by email and phone number. Any matches are flagged in the preview, where you choose to merge, link as family, keep both, or skip — so duplicates are never created silently. See [Importing Clients](#3-importing-clients-csv-upload) for details.
**Q: Can you import my data for me?**
A: Yes! We offer a **free data cleanup and import service**. Send us your client data in any format and our team will handle everything. Just reach out via **Support** in the sidebar.
**Q: How do I handle duplicate client records that already exist?**
A: Open the client you want to keep, then choose **Merge with another client** from its "⋯" menu and pick the duplicate. All of the duplicate's appointments, sales, loyalty, same-currency credit balance, documents, and family links transfer to the client you kept, and the duplicate is archived. See [Handling Duplicate Clients](#6-handling-duplicate-clients) for the full process.
**Q: Can I filter by more than name or phone?**
A: The search bar matches across name, email, and phone (with formatting and country-code variations handled automatically). You can also filter by status (Active, Archived, or All), plus the **Filters** popover for lapsed dates, spend, no-shows, contact preferences, the services a client has had, and birthdays (this month or this week).
**Q: Can I export my client list?**
A: Yes! Click the **Export CSV** button in the table footer to download your entire client list including names, emails, phone numbers, and join dates. You can also select specific clients and use **Export selected** from the floating action bar.
**Q: Can I copy a client to another location?**
A: Yes, if you run more than one location. Copy a single client from the **⋯** menu on their row or in their record panel and choose **Copy to location** — or tick several clients on the **Clients** page and click **Copy to location** in the floating action bar to copy them all at once. Bella copies each client's profile — name, contact details, notification preferences, date of birth, tags, and profile notes — into that location. **Family members come along too** — a client's whole family is copied with the family links kept intact, so families are never split across locations. A client (or their whole family) is skipped (and told why) if they already exist there, or if a member shares an email or phone number with a different client in your selection. Appointment history, payments, saved cards, loyalty points, account credit, and the client's **timeline notes and files** stay with the original location and are not copied. You need the **Create clients** permission **at the destination location** to copy into it.
**Q: How do I attach a document to a client?**
A: In the side panel, go to the **Files** tab, then click **Add** to add documents or photos directly to that client's profile.
**Q: Is there a quick way to see all of a client's appointments?**
A: Click on a client and open the **Appointments** tab in the side panel.
**Q: How can I see what actions have been taken for a client?**
A: Click on a client and open the **Activity** tab in the side panel. This shows a chronological history of all activities including appointment creation, confirmations, reschedules, cancellations, and notifications sent.
**Q: What file types can I upload to a client profile?**
A: You can upload PDF, DOC, DOCX, TXT, JPG, PNG, WEBP, HEIC, TIFF, XLS, and XLSX files. Each file must be under 20 MB. HEIC photos from an iPhone are converted to JPEG automatically; TIFF scans are kept as-is and appear in the Files list as a download.
**Q: Can I recover a deleted client file?**
A: No, once a file is deleted from a client profile, it cannot be recovered. Always double-check before deleting important documents.
**Q: How do I email a group of my clients?**
A: Tick the clients you want to include on the Clients page, then click **Email selected** in the floating bar that appears. This starts an [email campaign](/messages/campaigns) with those clients pre-filled as recipients, ready for you to compose and send from Bella Booking. See [Emailing your clients](#11-emailing-your-clients) for details. (Requires the **Manage campaigns** permission and an active Messages Plus subscription.)
**Q: Will my clients see each other's email addresses when I email a group?**
A: No. Email campaigns send each client their own individual email — recipients never see each other's addresses.
**Q: Does Bella Booking track email opens or clicks?**
A: Yes. Every email campaign shows delivery, open, and click stats on its detail page.
**Q: How can I send a mass email to all my clients?**
A: Send an **email campaign**: go to **Messaging** → **Campaigns**, click **New campaign**, choose the **Email** channel, pick your audience, and compose a branded email with formatting, an image, and a Book-now button. Campaigns send from Bella Booking with no recipient caps, respect each client's consent, include an automatic unsubscribe link, and track delivery, opens, and clicks. Email campaigns are part of [Messages Plus](/settings/messaging) — unlimited sends, fair use. See [Campaigns](/messages/campaigns) for the full guide. For text-based outreach, use the **Send SMS campaign** bulk action on the Clients page.
***
## Additional tips
* Use the **Import** function for fast migration when first setting up your account — or let us do it for you with our **free data cleanup and import service** (just reach out via **Support** in the sidebar).
* Regularly update client notes for personal touches that always impress.
* Double-check notification preferences if clients are missing reminder emails or texts.
* Use Search for rapid access, especially during busy shifts.
* **Archive** clients who haven't visited in a long time to keep your active list clean — you can always restore them later.
* Before archiving, cancel or complete any outstanding appointments and remove active waitlist entries.
* When you spot duplicate profiles, merge them (open the client you want to keep → "⋯" menu → **Merge with another client**) so appointment history and loyalty are preserved rather than lost.
***
With these tools, managing your clients in Bella Booking will be seamless and efficient. If you ever need further help, click **Support** in the sidebar to contact our team.
#### Transaction history
A chronological list of all point changes for this client. Each entry shows:
* **Transaction type** badge (Earned, Redeemed, Expired, Adjustment, Reversed, or Restored)
* **Description** — service names for earned points, reward name for redemptions, or reason for manual adjustments
* **Date** the transaction occurred
* **Expiry date** (for earned and adjustment transactions, if points expiration is configured)
* **Points** amount (+/- with colour coding)
Click **Load more** at the bottom to see older transactions (loaded 20 at a time).
| Transaction type | What it means |
| ---------------- | ---------------------------------------------------------------------------------- |
| **Earned** | Points awarded when an appointment was checked out |
| **Redeemed** | Points spent on a reward at checkout |
| **Expired** | Points that expired after the configured period |
| **Adjustment** | Points manually added or deducted by a team member |
| **Reversed** | Earned points taken back because a completed appointment was cancelled |
| **Restored** | Redeemed points returned because a completed appointment was cancelled or refunded |
**Note:** If the client is archived, the Loyalty section is read-only — you can view the history but cannot adjust points.
For full details on setting up and managing the loyalty programme, see [Loyalty programme](/loyalty).
***
### 10. Bulk actions — selecting multiple clients
Tick the checkbox next to any client to select them. A floating action bar appears at the bottom of the page with these options:
* **Email selected** — Starts a new **email campaign** with the selected clients pre-filled as recipients, so you can send them a branded email from Bella Booking. You're taken straight to the campaign builder to compose the message. Requires the **Manage campaigns** permission and an active [Messages Plus](/settings/messaging) subscription. See [Emailing your clients](#11-emailing-your-clients) below.
* **Copy emails** — Copies the email addresses of the selected clients to your clipboard (comma-separated, with duplicates removed so family members who share an address appear once). Clients without an email address are skipped. This is the fallback for businesses without Messages Plus — once you have it, send from Bella instead with **Email selected**, which respects each client's consent, skips addresses that have bounced, and includes an unsubscribe link.
* **Send SMS campaign** — Pre-fills a new **SMS** campaign with the selected clients as recipients. Requires the **Manage campaigns** permission and an active Messages Plus subscription.
* **Send booking portal link** — Opens a campaign with the selected clients as recipients and an invitation to their [booking portal](/getting-started/share-booking-page#client-booking-portal-link) already written, ready to adjust and send. Requires online booking, the **Manage campaigns** permission and Messages Plus.
* **Export selected** — Downloads a CSV file with just the selected clients (name, email, phone, notes, client-since date). Requires the **Export clients** permission.
* **Copy to location** — For multi-location businesses. The same action is also on a single client's **⋯** menu (on their row or in their record panel) when you only need to copy one — use this floating-bar version to copy several at once. Copies the selected clients' profiles — name, contact details, notification preferences, date of birth, tags, and profile notes — into another of your locations. **Family members are copied too**: a client's whole family travels with them and the family links are kept, so families are never split across locations. A client (or their whole family) is skipped (and told why) when they already exist at that location, or when a member shares an email or phone number with a different client in your selection. You get a summary of how many were copied and skipped. Appointment history, payments, saved cards, loyalty points, account credit, and the client's **timeline notes and files** all stay with the original location.
Selections are kept as you move between pages of the list, and cleared when you change the search text or the status filter.
**Email selected**, **Send SMS campaign** and **Send booking portal link**
appear only when you have the **Manage campaigns** permission and Messages
Plus is active (the portal invitation also needs online booking switched on).
**Copy emails** is the reverse — it appears only when those aren't available,
since sending from Bella is the better route once you have it. **Copy to
location** appears only when you have more than one location and the **Create
clients** permission. **Export selected** is always available with the
**Export clients** permission.
***
### 11. Emailing your clients
To email a group of clients — a promotion, a newsletter, a closure notice, or a seasonal hello — use an **email campaign**. Select the clients you want on the **Clients** page and click **Email selected** in the floating bar: this hands the selection straight to the campaign builder with those clients pre-filled as recipients, ready for you to compose and send.
Email campaigns send from Bella Booking, so there's no recipient cap and nothing to set up in your own email app. They include audience filters, consent handling, an automatic unsubscribe link, branded formatting with images and a **Book now** button, and delivery, open, and click tracking. Email campaigns are part of [Messages Plus](/settings/messaging).
For the full walkthrough — composing, scheduling, consent, and unsubscribes — see [Campaigns (SMS and Email)](/messages/campaigns).
You can also start an email to a single client straight from their record:
click their email address in the Clients list and choose **Send email**. This
opens a campaign pre-filled with just that client.
***
## FAQs
**Q: Do I need all fields to add a new client?**
A: Only the first name is required. Last name, email, and phone are optional.
**Q: Can I customise notification settings per client?**
A: Yes. While adding or editing, use the notification toggles for SMS and email notifications.
**Q: How do I correct a bulk import mistake?**
A: You can edit individual clients after import. To remove an imported client, archive them first, then permanently delete if they have no history.
**Q: Can I delete a client directly?**
A: No. You must **archive** a client first. Once archived, you can permanently delete them only if they have no appointment history, sales history, waitlist entries, or credit balance. See [Archiving, Restoring, and Deleting Clients](#4-archiving-restoring-and-deleting-clients) for details.
**Q: What happens when I archive a client?**
A: The client is hidden from the active list and **blocked from online booking** — they will not be able to book through your booking page. All their records are preserved and you can restore them at any time. Archiving is fully reversible.
**Q: Can an archived client still book online?**
A: No. Archived clients are blocked from online booking. If they try to book, they will be unable to proceed. To allow them to book again, restore the client from the archived list.
**Q: What happens if I permanently delete a client — can they book online again?**
A: Yes. Once permanently deleted, the system has no record of the client. If they use online booking in the future, they will appear as a new client. If your goal is to stop someone from booking online without losing their history, use [Block from Online booking](#5-blocking-a-client-from-online-booking) (or archive them) instead.
**Q: How do I stop a specific client from self-booking online without archiving them?**
A: Open the client's side panel, scroll to **Online booking access** on the Details tab, and turn **Block from online booking** on. They keep their profile, history, and existing appointments — only the online-booking page stops accepting new bookings from them. Your team can still book them manually. See [Blocking a Client from Online booking](#5-blocking-a-client-from-online-booking).
**Q: Does blocking a client cancel their existing future appointments?**
A: No. Any appointments already on the calendar stay confirmed and automated reminders continue to fire as normal. The block only prevents *new* self-service bookings from that client.
**Q: What does a blocked client see when they try to book?**
A: The same generic "Online booking unavailable. Please contact us." message that archived clients see. They are not told they have been specifically blocked.
**Q: Why can't I permanently delete a client?**
A: Permanent deletion requires the client to have no appointment history, no sales history, no waitlist entries — even archived or cancelled ones — and a zero credit balance. This is by design to preserve your business records. If the client has any history, archiving is the recommended approach.
**Q: Will importing clients create duplicates?**
A: No. The importer automatically checks every row against your existing clients by email and phone number. Any matches are flagged in the preview, where you choose to merge, link as family, keep both, or skip — so duplicates are never created silently. See [Importing Clients](#3-importing-clients-csv-upload) for details.
**Q: Can you import my data for me?**
A: Yes! We offer a **free data cleanup and import service**. Send us your client data in any format and our team will handle everything. Just reach out via **Support** in the sidebar.
**Q: How do I handle duplicate client records that already exist?**
A: Open the client you want to keep, then choose **Merge with another client** from its "⋯" menu and pick the duplicate. All of the duplicate's appointments, sales, loyalty, same-currency credit balance, documents, and family links transfer to the client you kept, and the duplicate is archived. See [Handling Duplicate Clients](#6-handling-duplicate-clients) for the full process.
**Q: Can I filter by more than name or phone?**
A: The search bar matches across name, email, and phone (with formatting and country-code variations handled automatically). You can also filter by status (Active, Archived, or All), plus the **Filters** popover for lapsed dates, spend, no-shows, contact preferences, the services a client has had, and birthdays (this month or this week).
**Q: Can I export my client list?**
A: Yes! Click the **Export CSV** button in the table footer to download your entire client list including names, emails, phone numbers, and join dates. You can also select specific clients and use **Export selected** from the floating action bar.
**Q: Can I copy a client to another location?**
A: Yes, if you run more than one location. Copy a single client from the **⋯** menu on their row or in their record panel and choose **Copy to location** — or tick several clients on the **Clients** page and click **Copy to location** in the floating action bar to copy them all at once. Bella copies each client's profile — name, contact details, notification preferences, date of birth, tags, and profile notes — into that location. **Family members come along too** — a client's whole family is copied with the family links kept intact, so families are never split across locations. A client (or their whole family) is skipped (and told why) if they already exist there, or if a member shares an email or phone number with a different client in your selection. Appointment history, payments, saved cards, loyalty points, account credit, and the client's **timeline notes and files** stay with the original location and are not copied. You need the **Create clients** permission **at the destination location** to copy into it.
**Q: How do I attach a document to a client?**
A: In the side panel, go to the **Files** tab, then click **Add** to add documents or photos directly to that client's profile.
**Q: Is there a quick way to see all of a client's appointments?**
A: Click on a client and open the **Appointments** tab in the side panel.
**Q: How can I see what actions have been taken for a client?**
A: Click on a client and open the **Activity** tab in the side panel. This shows a chronological history of all activities including appointment creation, confirmations, reschedules, cancellations, and notifications sent.
**Q: What file types can I upload to a client profile?**
A: You can upload PDF, DOC, DOCX, TXT, JPG, PNG, WEBP, HEIC, TIFF, XLS, and XLSX files. Each file must be under 20 MB. HEIC photos from an iPhone are converted to JPEG automatically; TIFF scans are kept as-is and appear in the Files list as a download.
**Q: Can I recover a deleted client file?**
A: No, once a file is deleted from a client profile, it cannot be recovered. Always double-check before deleting important documents.
**Q: How do I email a group of my clients?**
A: Tick the clients you want to include on the Clients page, then click **Email selected** in the floating bar that appears. This starts an [email campaign](/messages/campaigns) with those clients pre-filled as recipients, ready for you to compose and send from Bella Booking. See [Emailing your clients](#11-emailing-your-clients) for details. (Requires the **Manage campaigns** permission and an active Messages Plus subscription.)
**Q: Will my clients see each other's email addresses when I email a group?**
A: No. Email campaigns send each client their own individual email — recipients never see each other's addresses.
**Q: Does Bella Booking track email opens or clicks?**
A: Yes. Every email campaign shows delivery, open, and click stats on its detail page.
**Q: How can I send a mass email to all my clients?**
A: Send an **email campaign**: go to **Messaging** → **Campaigns**, click **New campaign**, choose the **Email** channel, pick your audience, and compose a branded email with formatting, an image, and a Book-now button. Campaigns send from Bella Booking with no recipient caps, respect each client's consent, include an automatic unsubscribe link, and track delivery, opens, and clicks. Email campaigns are part of [Messages Plus](/settings/messaging) — unlimited sends, fair use. See [Campaigns](/messages/campaigns) for the full guide. For text-based outreach, use the **Send SMS campaign** bulk action on the Clients page.
***
## Additional tips
* Use the **Import** function for fast migration when first setting up your account — or let us do it for you with our **free data cleanup and import service** (just reach out via **Support** in the sidebar).
* Regularly update client notes for personal touches that always impress.
* Double-check notification preferences if clients are missing reminder emails or texts.
* Use Search for rapid access, especially during busy shifts.
* **Archive** clients who haven't visited in a long time to keep your active list clean — you can always restore them later.
* Before archiving, cancel or complete any outstanding appointments and remove active waitlist entries.
* When you spot duplicate profiles, merge them (open the client you want to keep → "⋯" menu → **Merge with another client**) so appointment history and loyalty are preserved rather than lost.
***
With these tools, managing your clients in Bella Booking will be seamless and efficient. If you ever need further help, click **Support** in the sidebar to contact our team.