> ## Documentation Index
> Fetch the complete documentation index at: https://docs.bellabooking.com/llms.txt
> Use this file to discover all available pages before exploring further.
# Forms
> Create digital forms for client intake, consent, and waivers — automatically send them when appointments are confirmed or products are purchased, or share them manually
## Introduction
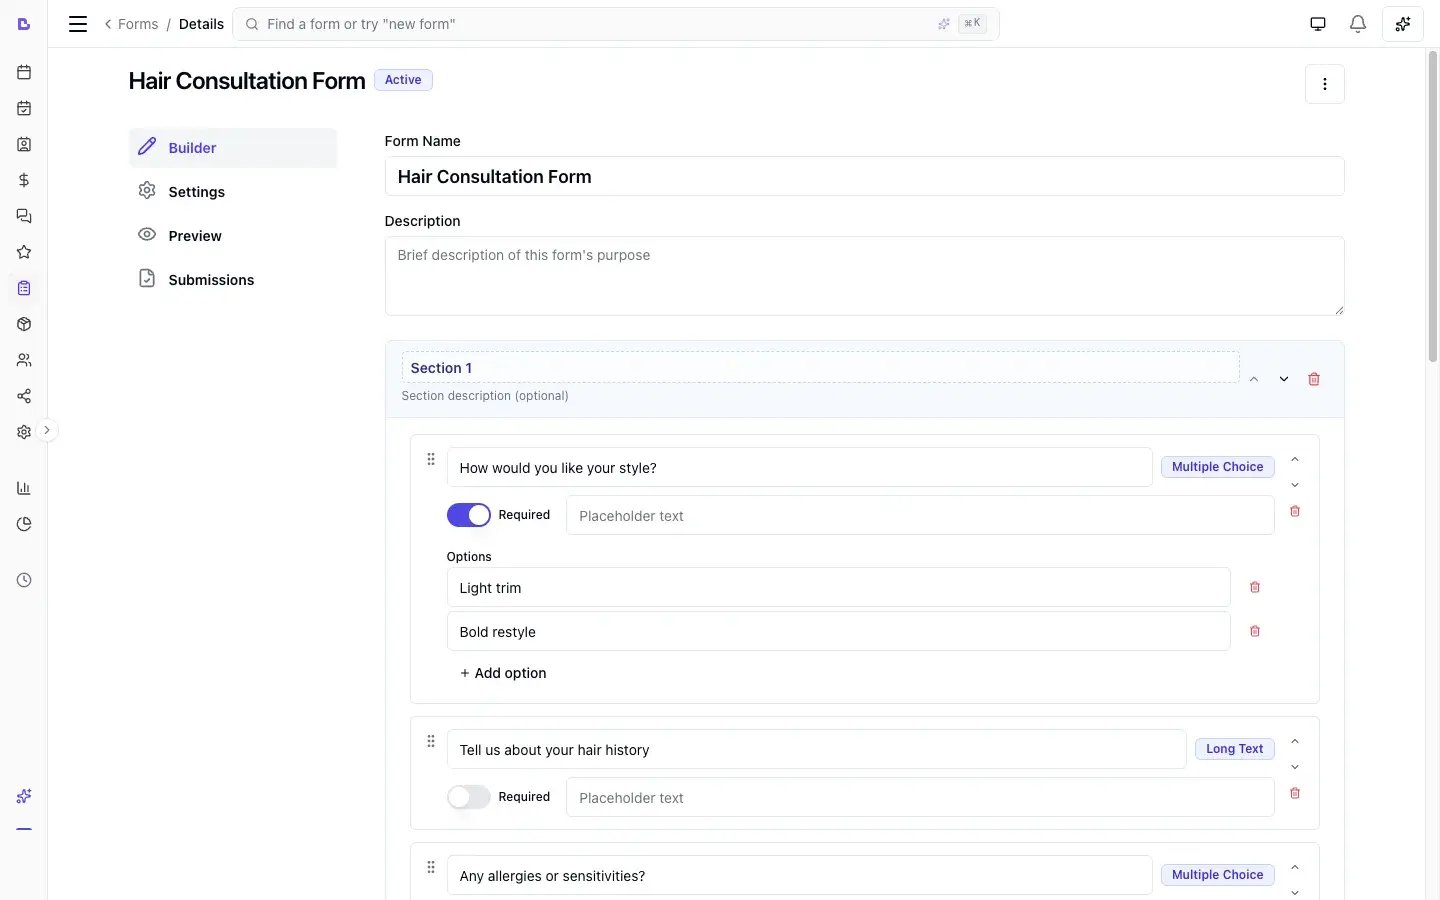
The **Forms** module lets you build digital forms — such as intake questionnaires, consent forms, and waivers — and collect responses from clients before their appointments. Forms can be linked to specific services and automatically sent when an appointment is confirmed, linked to products so a paid Product shop order sends them, or manually sent to individual clients at any time.
Completed responses are stored against the client's profile and the appointment, so your team always has the information they need.
 ***
## Key features
* **Form builder**: Create forms with sections and fields using a click-to-add interface with reorder controls
* **Nine field types**: Short text, long text, single choice (radio buttons), multiple choice (checkboxes), dropdown, yes/no, signature, **file upload** (photos and PDFs), and info blocks for display-only content
* **Sections**: Group related fields into named sections with optional descriptions
* **Service and bundle linking**: Apply a form to all services, or link it to specific services and bundles
* **Product linking**: Link a form to products so a paid Product shop order sends it automatically
* **Frequency control**: Send a form every matching appointment or purchase, or only once per client
* **Auto-send**: Automatically create and send forms when an appointment is confirmed or a linked product is purchased online
* **Manual send**: Send any form to a client on demand with email and SMS notification
* **Live preview**: See exactly what clients will see before activating a form
* **Print**: Print form previews and submitted responses directly from the browser with a print-friendly layout
* **Submissions**: View all responses in the form editor, on the client profile, or on the appointment
* **Activate/deactivate**: Control when a form is live without archiving it
* **Duplicate**: Clone an existing form to create a variation quickly
* **Archive and restore**: Soft-delete forms you no longer need, and bring them back if required
***
## Creating a form
1. Go to **Forms** in the sidebar
2. Click **Add form**
3. Enter a **Name** (e.g., "Hair Consultation") and an optional **Description**
4. Click **Save** — you are taken to the form editor
The form is created in an **inactive** state. It will not be sent to clients until you activate it.
***
## Building your form
The form editor has four tabs: **Builder**, **Settings**, **Preview**, and **Submissions**.
### Builder tab
This is where you add sections and fields.
#### Adding a section
1. Click **Add section**
2. Enter a **Title** (e.g., "Medical History") and an optional **Description**
3. Use the up/down arrows to reorder sections
#### Adding fields to a section
1. Click **Add field** within a section
2. Choose a field type from the menu:
| Field type | What it does |
| ------------------- | --------------------------------------------------------------------------------------------- |
| **Short text** | Single-line text input |
| **Long text** | Multi-line text area |
| **Single choice** | Radio buttons — client picks one option |
| **Multiple choice** | Checkboxes — client picks one or more options |
| **Dropdown** | A dropdown menu — client picks one option |
| **Yes/No** | A simple yes or no toggle |
| **Signature** | A signature pad where the client draws their signature — ideal for consent forms and waivers |
| **File upload** | Clients attach photos (JPG, PNG, WebP, HEIC) or PDFs — up to 5 files per question, 20 MB each |
| **Info block** | Display-only text (e.g., terms and conditions, instructions) — no client input |
3. Configure the field:
* **Label**: The question or prompt shown to the client
* **Required**: Toggle on to make the field mandatory
* **Placeholder**: Optional hint text shown inside the input (not available for Signature or File upload)
* **Help Text**: Optional additional guidance below the field
* **Options**: For single choice, multiple choice, and dropdown fields, add the available choices
4. Use the up/down arrows to reorder fields within a section
#### Removing sections and fields
Click the delete button on any section or field to remove it. Removing a section removes all its fields.
### Settings tab
Configure how and when the form is sent:
* **Apply to all services**: Toggle on to link this form to every service, or toggle off and select specific **services and bundles** to link it to
* **Frequency**: Choose **Every time** (sent for each matching appointment or product purchase) or **Once per client** (sent only if the client hasn't already completed it)
* **Product linking**: Add specific products so the form is sent automatically when a client buys them from your Product shop — product links are always explicit; "Apply to all services" doesn't cover products
* **Auto-send**: Toggle on to automatically create and send the form when an appointment with a linked service is confirmed, or when a linked product is purchased from your Product shop
### Preview tab
See a read-only preview of the form exactly as your clients will see it. Use this to check layout, wording, and field order before activating. Click the **Print** button to print the form preview in a print-friendly layout.
***
## Activating and deactivating a form
A form must be **activated** before it will be sent to clients.
### Activating
1. Open the form in the editor
2. Click **Activate**
3. Confirm in the dialog
Once active, the form will auto-send on appointment confirmation or linked-product purchase (if auto-send is enabled) and can be manually sent to clients.
**Link a form directly to a bundle.** As well as services, you can link a form to one or more **bundles** — select them in the same picker on the Settings tab. The form is then sent whenever that bundle is booked. (Linking to a bundle's individual services still works too, and linking to all services covers everything.)
### Deactivating
1. Open the form in the editor
2. Click **Deactivate**
3. Confirm in the dialog
Deactivating stops the form from being auto-sent for new appointments. Existing pending submissions are not affected — clients who have already received the form can still complete it.
Deactivating is different from archiving. A deactivated form is still visible and editable — it simply stops auto-sending. Use deactivate when you want to temporarily pause a form.
***
## Sending a form manually
You can send any active form to a specific client at any time from three places.
### From the form editor
1. Open the form in the editor
2. Go to the **Submissions** tab
3. Click **Send form**
4. Select a client and confirm
### From a client's profile
1. Go to **Clients** and open the client
2. Open the **Forms** tab
3. Click **Send form**
4. Choose the form and confirm
### From an appointment
1. Open the appointment
2. Open the **Forms** tab (or the ⋯ menu)
3. Click **Send form**
4. Choose the form and confirm
When you send from an appointment, the form is linked to that appointment automatically. Sending from the form editor or the client profile does not attach an appointment.
The client receives an email and SMS with a link to complete the form.
If the form uses **Once per client** frequency, you cannot send it to a client who has already completed it.
To nudge a client about a form they haven't completed, don't send it again — use **Resend link** instead. It re-sends the email and SMS for the existing form without creating a duplicate. When a form is already awaiting completion, the Send form dialog shows this and offers **Resend link** right there; the button reads **Send new form** if you really do want a second submission. Resend link is also available on any pending submission.
***
## How clients complete forms
When a form is sent — either automatically or manually — the client receives an email and SMS notification with a link.
1. The client opens the link in their browser — **no sign-in needed**: each form link is a private, single-form link
2. The form loads in the online booking portal
3. The client fills in the fields across each section
4. Required fields are validated before submission
5. The client submits the form
6. A confirmation is shown in the browser, the response is recorded, and the client receives a confirmation message
Each form link is private to that one form — anyone the client forwards it to could open it, so clients should treat it like any other personal link. Browsing forms inside the online booking portal (My forms, appointment forms) still requires signing in.
Links from forms sent **before this feature** don't carry the private token, so they still ask the client to sign in with the online booking account whose mobile number matches their client record. If such a client reports "Unable to load form", the quickest fix is to open the pending submission and **Resend link** — the fresh link opens without sign-in.
The client also receives a confirmation message acknowledging their submission — you can customise or turn this off under [Automated messages](/settings/automated-messages). Clients can view all their pending and completed forms for an appointment from the appointment forms page in the online booking portal at any time.
When a form is submitted, your business receives a notification via the [notification centre](/settings/automated-messages), and optionally via email and SMS. If the form is linked to an appointment, the assigned team members also receive individual notifications based on their preferences.
***
## Viewing submissions
There are three places to view form submissions:
### From the form editor
1. Open a form and go to the **Submissions** tab
2. See all submissions for this form — both pending and completed
3. Click a submission to open the details in a read-only viewer. Use the **Print** button to print the submission
### From a client's profile
1. Go to **Clients** and open a client's profile
2. Navigate to the **Forms** tab
3. See all form submissions for this client across all forms
### From an appointment
1. Open an appointment
2. Look for the **Forms** section
3. See when each form was sent and its status (pending or completed)
Clicking any submission opens the read-only viewer. For a **pending** submission, the viewer shows when the form was sent and offers two recovery actions:
* **Resend link** — sends the form request email and SMS again for the same form (no duplicate submission is created)
* **Copy link** — copies the form completion link so you can share it with the client directly, handy when they can't find the original email or SMS
***
## Editing a form
You can edit a form at any time, whether it is active or inactive.
1. Go to **Forms** in the sidebar
2. Click the form you want to edit
3. Make changes in the **Builder** or **Settings** tabs
4. Click **Save**
Changes take effect for new submissions. Existing completed submissions are not affected — they store the field labels and responses as they were at the time of submission.
If you rename or remove fields from an active form, new submissions will use the updated structure. Previously completed submissions retain their original field labels and responses.
***
## Duplicating a form
1. Go to **Forms** in the sidebar
2. Click the **three-dot menu** on the form you want to duplicate
3. Select **Duplicate**
A copy of the form is created with the same sections, fields, and settings. The copy is inactive by default.
***
## Archiving, restoring, and deleting forms
### Archiving a form
Archiving hides a form from the default list and stops it from being sent to clients.
1. Click the **three-dot menu** on a form
2. Select **Archive**
3. Confirm the action
Archived forms and all their submissions remain accessible — they are simply hidden from the default view.
### Viewing archived forms
Use the **status filter** on the Forms page to show archived forms.
### Restoring a form
1. Filter the list to show archived forms
2. Click the **three-dot menu** on the archived form
3. Select **Restore**
The form returns to its previous state and can be activated again.
### Deleting a form
Permanent deletion is only available for forms with no submissions.
1. Click the **three-dot menu** on the form
2. Select **Delete**
3. Confirm the action
Permanent deletion cannot be undone. If the form has any submissions (pending or completed), deletion is not available — archive it instead.
***
## Auto-send behaviour
When a form is **active** with **auto-send** enabled, the system automatically creates a pending submission each time a matching appointment is confirmed **or a linked product is purchased online**. The matching logic works as follows:
**On appointment confirmation** (whether booked online or by a team member):
1. The system checks for active forms where auto-send is enabled
2. For each matching form, it checks whether the booked services or bundles match the form's linked services and bundles (or if the form applies to all services)
3. If the form uses **Once per client** frequency, it checks whether the client has already completed this form — if so, it skips
4. A pending submission is created and the client is notified
**On a paid Product shop order:**
1. The system checks for active auto-send forms whose **linked products** include any product in the order
2. Product links are always explicit — "All services" does not cover products
3. The same **Once per client** rule applies
4. A pending submission is created and the client is notified by email/SMS; the order confirmation page also shows a **Start form** button
This is how businesses selling non-appointment offerings (written plans, programmes delivered after purchase) collect intake details automatically — link the intake form to the product, and every purchase sends it.
***
## File uploads vs client Files / Photos
Forms can collect **files and photos as answers to a question**. That is different from the client's general **Files** and **Photos** tabs on their profile.
| | **Form file-upload field** | **Client Files / Photos tabs** |
| ------------------ | ------------------------------------------------------------------------------------------------- | ------------------------------------------------------------------- |
| **Who uploads** | The client, from the form link (online booking portal) | Your team, from the dashboard (or attachments tied to appointments) |
| **Where it lives** | On the **form submission** — also surfaced on the client's **Files** / **Photos** tabs for review | On the client record (and appointment where attached) |
| **Client re-view** | On the **completed form** in the booking portal | Not as a separate “documents inbox” in the portal |
There is **no separate documents inbox** in the online booking portal where clients browse every file you have ever uploaded for them. If clients need to re-read something they submitted, they open the completed form. If your team needs a shared attachment history, use the client **Files** / **Photos** tabs and appointment attachments.
**Limits for form uploads:** up to 5 files per question, 20 MB each; JPG, PNG, WebP, HEIC, or PDF.
***
## FAQs
**Q: Can I edit a form after it has been activated?**
A: Yes. You can edit a form at any time. Changes apply to new submissions only — completed responses are preserved as they were.
**Q: What happens to submissions if I edit a form?**
A: Existing submissions are not affected. Each submission stores the field labels and response values as they were at the time of completion.
**Q: Can I send a form to a client without an appointment?**
A: Yes. Send from the client's **Forms** tab — that path does not require an appointment.
**Q: What is the difference between deactivating and archiving?**
A: Deactivating keeps the form visible and editable but stops auto-sending. Archiving hides the form from the default list entirely. Both preserve existing submissions.
**Q: Can a client complete a form more than once?**
A: It depends on the frequency setting. If set to **Every time**, the client receives the form with each matching appointment or product purchase. If set to **Once per client**, the client only receives it once.
**Q: What field types are available?**
A: Short text, long text, single choice (radio buttons), multiple choice (checkboxes), dropdown, yes/no, signature, file upload (photos and PDFs — up to 5 files per question, 20 MB each), and info block (display-only).
**Q: Can clients upload photos or files on a form?**
A: Yes. Add a **File upload** field in the form builder. See [File uploads vs client Files / Photos](#file-uploads-vs-client-files--photos) for limits and how that differs from the client's Files / Photos tabs.
**Q: Can I print a form or a client's submission?**
A: Yes. Both the form preview and individual submissions have a **Print** button that opens a print-friendly layout you can print or save as PDF.
**Q: Can I require certain fields?**
A: Yes. Toggle the **Required** option on any field. The client cannot submit the form until all required fields are filled in.
**Q: How does the client receive the form?**
A: Clients receive an email and SMS with a link to complete the form in your online booking portal.
**Q: Can I see which clients have not yet completed a form?**
A: Yes. In the **Submissions** tab of any form, pending submissions are shown alongside completed ones.
**Q: Do I need a specific subscription to use Forms?**
A: Yes. Forms is available on the **Professional** plan and above. If you don't see **Forms** in your sidebar, check your subscription or contact support.
**Q: Can I link a form to specific services or bundles only?**
A: Yes. In the **Settings** tab, toggle off **Apply to all services** and select the specific services and bundles the form should be linked to. A form linked to a bundle is sent whenever that bundle is booked.
**Q: What happens if I archive a service that is linked to a form?**
A: Nothing changes on the form side. Archived services won't generate new appointments, so the form linkage is effectively inactive. You don't need to update the form.
***
## Related documentation
* [Clients](/clients) — View form submissions on a client's profile
* [Services](/service-catalog) — Manage the services that forms are linked to
* [Automated messages](/settings/automated-messages) — Configure the notifications that include form links
* [Online booking](/settings/online-booking) — Set up your online booking portal where clients complete forms
***
## Key features
* **Form builder**: Create forms with sections and fields using a click-to-add interface with reorder controls
* **Nine field types**: Short text, long text, single choice (radio buttons), multiple choice (checkboxes), dropdown, yes/no, signature, **file upload** (photos and PDFs), and info blocks for display-only content
* **Sections**: Group related fields into named sections with optional descriptions
* **Service and bundle linking**: Apply a form to all services, or link it to specific services and bundles
* **Product linking**: Link a form to products so a paid Product shop order sends it automatically
* **Frequency control**: Send a form every matching appointment or purchase, or only once per client
* **Auto-send**: Automatically create and send forms when an appointment is confirmed or a linked product is purchased online
* **Manual send**: Send any form to a client on demand with email and SMS notification
* **Live preview**: See exactly what clients will see before activating a form
* **Print**: Print form previews and submitted responses directly from the browser with a print-friendly layout
* **Submissions**: View all responses in the form editor, on the client profile, or on the appointment
* **Activate/deactivate**: Control when a form is live without archiving it
* **Duplicate**: Clone an existing form to create a variation quickly
* **Archive and restore**: Soft-delete forms you no longer need, and bring them back if required
***
## Creating a form
1. Go to **Forms** in the sidebar
2. Click **Add form**
3. Enter a **Name** (e.g., "Hair Consultation") and an optional **Description**
4. Click **Save** — you are taken to the form editor
The form is created in an **inactive** state. It will not be sent to clients until you activate it.
***
## Building your form
The form editor has four tabs: **Builder**, **Settings**, **Preview**, and **Submissions**.
### Builder tab
This is where you add sections and fields.
#### Adding a section
1. Click **Add section**
2. Enter a **Title** (e.g., "Medical History") and an optional **Description**
3. Use the up/down arrows to reorder sections
#### Adding fields to a section
1. Click **Add field** within a section
2. Choose a field type from the menu:
| Field type | What it does |
| ------------------- | --------------------------------------------------------------------------------------------- |
| **Short text** | Single-line text input |
| **Long text** | Multi-line text area |
| **Single choice** | Radio buttons — client picks one option |
| **Multiple choice** | Checkboxes — client picks one or more options |
| **Dropdown** | A dropdown menu — client picks one option |
| **Yes/No** | A simple yes or no toggle |
| **Signature** | A signature pad where the client draws their signature — ideal for consent forms and waivers |
| **File upload** | Clients attach photos (JPG, PNG, WebP, HEIC) or PDFs — up to 5 files per question, 20 MB each |
| **Info block** | Display-only text (e.g., terms and conditions, instructions) — no client input |
3. Configure the field:
* **Label**: The question or prompt shown to the client
* **Required**: Toggle on to make the field mandatory
* **Placeholder**: Optional hint text shown inside the input (not available for Signature or File upload)
* **Help Text**: Optional additional guidance below the field
* **Options**: For single choice, multiple choice, and dropdown fields, add the available choices
4. Use the up/down arrows to reorder fields within a section
#### Removing sections and fields
Click the delete button on any section or field to remove it. Removing a section removes all its fields.
### Settings tab
Configure how and when the form is sent:
* **Apply to all services**: Toggle on to link this form to every service, or toggle off and select specific **services and bundles** to link it to
* **Frequency**: Choose **Every time** (sent for each matching appointment or product purchase) or **Once per client** (sent only if the client hasn't already completed it)
* **Product linking**: Add specific products so the form is sent automatically when a client buys them from your Product shop — product links are always explicit; "Apply to all services" doesn't cover products
* **Auto-send**: Toggle on to automatically create and send the form when an appointment with a linked service is confirmed, or when a linked product is purchased from your Product shop
### Preview tab
See a read-only preview of the form exactly as your clients will see it. Use this to check layout, wording, and field order before activating. Click the **Print** button to print the form preview in a print-friendly layout.
***
## Activating and deactivating a form
A form must be **activated** before it will be sent to clients.
### Activating
1. Open the form in the editor
2. Click **Activate**
3. Confirm in the dialog
Once active, the form will auto-send on appointment confirmation or linked-product purchase (if auto-send is enabled) and can be manually sent to clients.
**Link a form directly to a bundle.** As well as services, you can link a form to one or more **bundles** — select them in the same picker on the Settings tab. The form is then sent whenever that bundle is booked. (Linking to a bundle's individual services still works too, and linking to all services covers everything.)
### Deactivating
1. Open the form in the editor
2. Click **Deactivate**
3. Confirm in the dialog
Deactivating stops the form from being auto-sent for new appointments. Existing pending submissions are not affected — clients who have already received the form can still complete it.
Deactivating is different from archiving. A deactivated form is still visible and editable — it simply stops auto-sending. Use deactivate when you want to temporarily pause a form.
***
## Sending a form manually
You can send any active form to a specific client at any time from three places.
### From the form editor
1. Open the form in the editor
2. Go to the **Submissions** tab
3. Click **Send form**
4. Select a client and confirm
### From a client's profile
1. Go to **Clients** and open the client
2. Open the **Forms** tab
3. Click **Send form**
4. Choose the form and confirm
### From an appointment
1. Open the appointment
2. Open the **Forms** tab (or the ⋯ menu)
3. Click **Send form**
4. Choose the form and confirm
When you send from an appointment, the form is linked to that appointment automatically. Sending from the form editor or the client profile does not attach an appointment.
The client receives an email and SMS with a link to complete the form.
If the form uses **Once per client** frequency, you cannot send it to a client who has already completed it.
To nudge a client about a form they haven't completed, don't send it again — use **Resend link** instead. It re-sends the email and SMS for the existing form without creating a duplicate. When a form is already awaiting completion, the Send form dialog shows this and offers **Resend link** right there; the button reads **Send new form** if you really do want a second submission. Resend link is also available on any pending submission.
***
## How clients complete forms
When a form is sent — either automatically or manually — the client receives an email and SMS notification with a link.
1. The client opens the link in their browser — **no sign-in needed**: each form link is a private, single-form link
2. The form loads in the online booking portal
3. The client fills in the fields across each section
4. Required fields are validated before submission
5. The client submits the form
6. A confirmation is shown in the browser, the response is recorded, and the client receives a confirmation message
Each form link is private to that one form — anyone the client forwards it to could open it, so clients should treat it like any other personal link. Browsing forms inside the online booking portal (My forms, appointment forms) still requires signing in.
Links from forms sent **before this feature** don't carry the private token, so they still ask the client to sign in with the online booking account whose mobile number matches their client record. If such a client reports "Unable to load form", the quickest fix is to open the pending submission and **Resend link** — the fresh link opens without sign-in.
The client also receives a confirmation message acknowledging their submission — you can customise or turn this off under [Automated messages](/settings/automated-messages). Clients can view all their pending and completed forms for an appointment from the appointment forms page in the online booking portal at any time.
When a form is submitted, your business receives a notification via the [notification centre](/settings/automated-messages), and optionally via email and SMS. If the form is linked to an appointment, the assigned team members also receive individual notifications based on their preferences.
***
## Viewing submissions
There are three places to view form submissions:
### From the form editor
1. Open a form and go to the **Submissions** tab
2. See all submissions for this form — both pending and completed
3. Click a submission to open the details in a read-only viewer. Use the **Print** button to print the submission
### From a client's profile
1. Go to **Clients** and open a client's profile
2. Navigate to the **Forms** tab
3. See all form submissions for this client across all forms
### From an appointment
1. Open an appointment
2. Look for the **Forms** section
3. See when each form was sent and its status (pending or completed)
Clicking any submission opens the read-only viewer. For a **pending** submission, the viewer shows when the form was sent and offers two recovery actions:
* **Resend link** — sends the form request email and SMS again for the same form (no duplicate submission is created)
* **Copy link** — copies the form completion link so you can share it with the client directly, handy when they can't find the original email or SMS
***
## Editing a form
You can edit a form at any time, whether it is active or inactive.
1. Go to **Forms** in the sidebar
2. Click the form you want to edit
3. Make changes in the **Builder** or **Settings** tabs
4. Click **Save**
Changes take effect for new submissions. Existing completed submissions are not affected — they store the field labels and responses as they were at the time of submission.
If you rename or remove fields from an active form, new submissions will use the updated structure. Previously completed submissions retain their original field labels and responses.
***
## Duplicating a form
1. Go to **Forms** in the sidebar
2. Click the **three-dot menu** on the form you want to duplicate
3. Select **Duplicate**
A copy of the form is created with the same sections, fields, and settings. The copy is inactive by default.
***
## Archiving, restoring, and deleting forms
### Archiving a form
Archiving hides a form from the default list and stops it from being sent to clients.
1. Click the **three-dot menu** on a form
2. Select **Archive**
3. Confirm the action
Archived forms and all their submissions remain accessible — they are simply hidden from the default view.
### Viewing archived forms
Use the **status filter** on the Forms page to show archived forms.
### Restoring a form
1. Filter the list to show archived forms
2. Click the **three-dot menu** on the archived form
3. Select **Restore**
The form returns to its previous state and can be activated again.
### Deleting a form
Permanent deletion is only available for forms with no submissions.
1. Click the **three-dot menu** on the form
2. Select **Delete**
3. Confirm the action
Permanent deletion cannot be undone. If the form has any submissions (pending or completed), deletion is not available — archive it instead.
***
## Auto-send behaviour
When a form is **active** with **auto-send** enabled, the system automatically creates a pending submission each time a matching appointment is confirmed **or a linked product is purchased online**. The matching logic works as follows:
**On appointment confirmation** (whether booked online or by a team member):
1. The system checks for active forms where auto-send is enabled
2. For each matching form, it checks whether the booked services or bundles match the form's linked services and bundles (or if the form applies to all services)
3. If the form uses **Once per client** frequency, it checks whether the client has already completed this form — if so, it skips
4. A pending submission is created and the client is notified
**On a paid Product shop order:**
1. The system checks for active auto-send forms whose **linked products** include any product in the order
2. Product links are always explicit — "All services" does not cover products
3. The same **Once per client** rule applies
4. A pending submission is created and the client is notified by email/SMS; the order confirmation page also shows a **Start form** button
This is how businesses selling non-appointment offerings (written plans, programmes delivered after purchase) collect intake details automatically — link the intake form to the product, and every purchase sends it.
***
## File uploads vs client Files / Photos
Forms can collect **files and photos as answers to a question**. That is different from the client's general **Files** and **Photos** tabs on their profile.
| | **Form file-upload field** | **Client Files / Photos tabs** |
| ------------------ | ------------------------------------------------------------------------------------------------- | ------------------------------------------------------------------- |
| **Who uploads** | The client, from the form link (online booking portal) | Your team, from the dashboard (or attachments tied to appointments) |
| **Where it lives** | On the **form submission** — also surfaced on the client's **Files** / **Photos** tabs for review | On the client record (and appointment where attached) |
| **Client re-view** | On the **completed form** in the booking portal | Not as a separate “documents inbox” in the portal |
There is **no separate documents inbox** in the online booking portal where clients browse every file you have ever uploaded for them. If clients need to re-read something they submitted, they open the completed form. If your team needs a shared attachment history, use the client **Files** / **Photos** tabs and appointment attachments.
**Limits for form uploads:** up to 5 files per question, 20 MB each; JPG, PNG, WebP, HEIC, or PDF.
***
## FAQs
**Q: Can I edit a form after it has been activated?**
A: Yes. You can edit a form at any time. Changes apply to new submissions only — completed responses are preserved as they were.
**Q: What happens to submissions if I edit a form?**
A: Existing submissions are not affected. Each submission stores the field labels and response values as they were at the time of completion.
**Q: Can I send a form to a client without an appointment?**
A: Yes. Send from the client's **Forms** tab — that path does not require an appointment.
**Q: What is the difference between deactivating and archiving?**
A: Deactivating keeps the form visible and editable but stops auto-sending. Archiving hides the form from the default list entirely. Both preserve existing submissions.
**Q: Can a client complete a form more than once?**
A: It depends on the frequency setting. If set to **Every time**, the client receives the form with each matching appointment or product purchase. If set to **Once per client**, the client only receives it once.
**Q: What field types are available?**
A: Short text, long text, single choice (radio buttons), multiple choice (checkboxes), dropdown, yes/no, signature, file upload (photos and PDFs — up to 5 files per question, 20 MB each), and info block (display-only).
**Q: Can clients upload photos or files on a form?**
A: Yes. Add a **File upload** field in the form builder. See [File uploads vs client Files / Photos](#file-uploads-vs-client-files--photos) for limits and how that differs from the client's Files / Photos tabs.
**Q: Can I print a form or a client's submission?**
A: Yes. Both the form preview and individual submissions have a **Print** button that opens a print-friendly layout you can print or save as PDF.
**Q: Can I require certain fields?**
A: Yes. Toggle the **Required** option on any field. The client cannot submit the form until all required fields are filled in.
**Q: How does the client receive the form?**
A: Clients receive an email and SMS with a link to complete the form in your online booking portal.
**Q: Can I see which clients have not yet completed a form?**
A: Yes. In the **Submissions** tab of any form, pending submissions are shown alongside completed ones.
**Q: Do I need a specific subscription to use Forms?**
A: Yes. Forms is available on the **Professional** plan and above. If you don't see **Forms** in your sidebar, check your subscription or contact support.
**Q: Can I link a form to specific services or bundles only?**
A: Yes. In the **Settings** tab, toggle off **Apply to all services** and select the specific services and bundles the form should be linked to. A form linked to a bundle is sent whenever that bundle is booked.
**Q: What happens if I archive a service that is linked to a form?**
A: Nothing changes on the form side. Archived services won't generate new appointments, so the form linkage is effectively inactive. You don't need to update the form.
***
## Related documentation
* [Clients](/clients) — View form submissions on a client's profile
* [Services](/service-catalog) — Manage the services that forms are linked to
* [Automated messages](/settings/automated-messages) — Configure the notifications that include form links
* [Online booking](/settings/online-booking) — Set up your online booking portal where clients complete forms