> ## Documentation Index
> Fetch the complete documentation index at: https://docs.bellabooking.com/llms.txt
> Use this file to discover all available pages before exploring further.
# Products
> Manage your product inventory, track stock levels, and sell products in Bella Booking
## Introduction
The **Products** section allows you to manage your inventory — items you sell to clients alongside your services. Track stock levels, set pricing, and sell them in person through appointments or standalone sales transactions, or online through the [Product shop](/products/sell-online) on your booking page.
***
## Key features
* **Product Inventory**: Add and manage all products you sell
* **Stock Tracking**: Monitor quantity on hand
* **Pricing Management**: Set unit prices and track cost of goods
* **Sales Integration**: Products can be added to sales transactions alongside services
* **Product shop**: Sell products online through your booking page — clients can purchase and collect in person or have items set aside for their next appointment (see [Sell Online](/products/sell-online))
* **Bulk Import**: Import products in bulk from a file to add your entire catalogue at once
* **CSV Export**: Export your product list to CSV for inventory management
***
## Step-by-step usage instructions
### Viewing your products
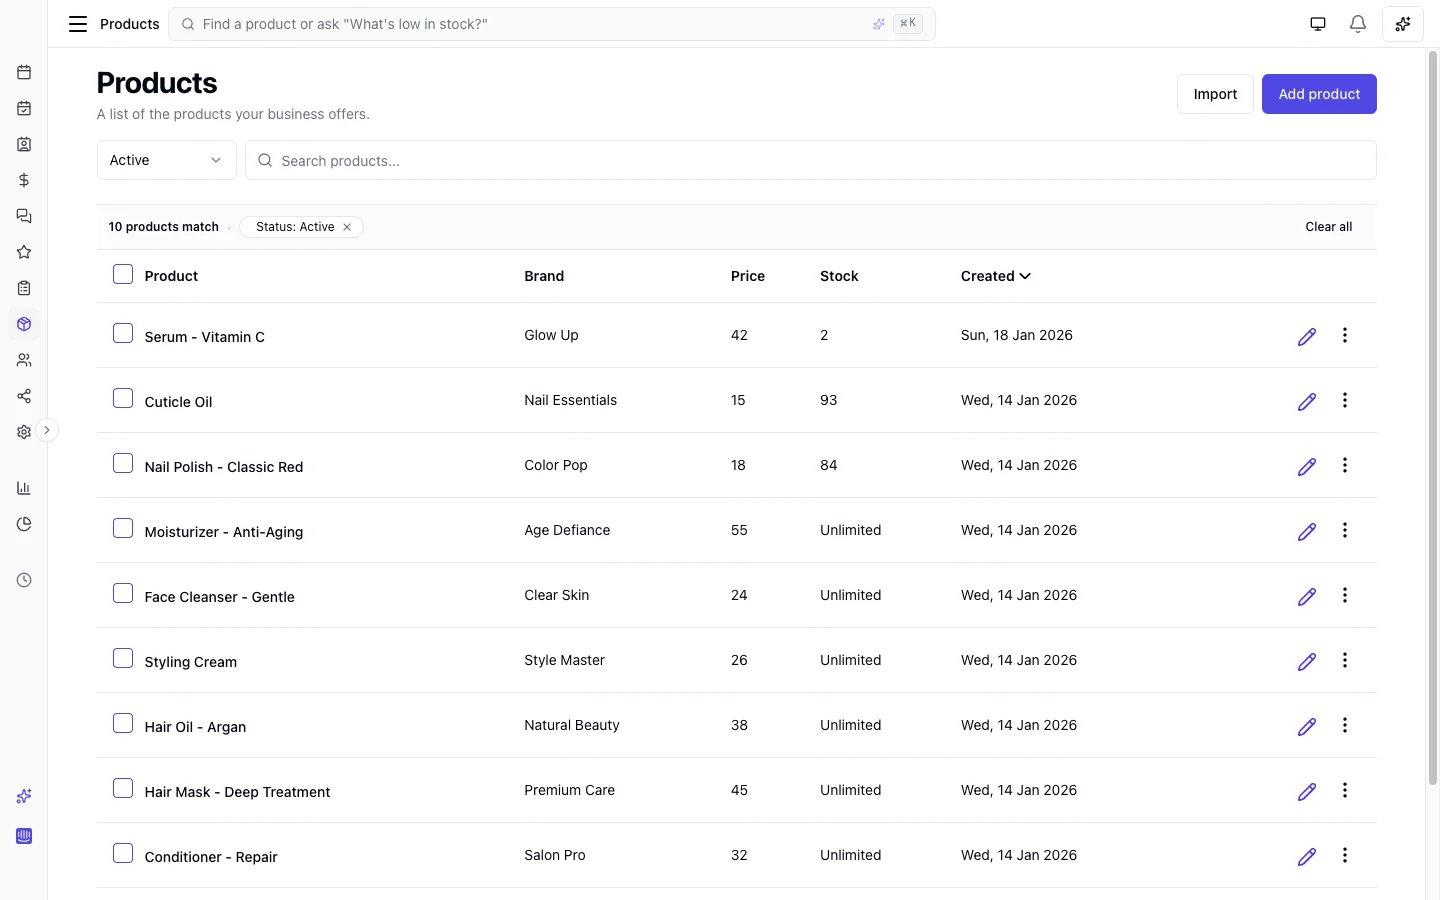
1. Navigate to the **Products** section from the sidebar
2. You'll see a searchable table with all your products displaying:
* Product name
* Brand
* Price
* Stock
* Created
 ### Adding a new product
1. Click the **Add product** button at the top of the product list
2. Fill out the product form:
### Adding a new product
1. Click the **Add product** button at the top of the product list
2. Fill out the product form:
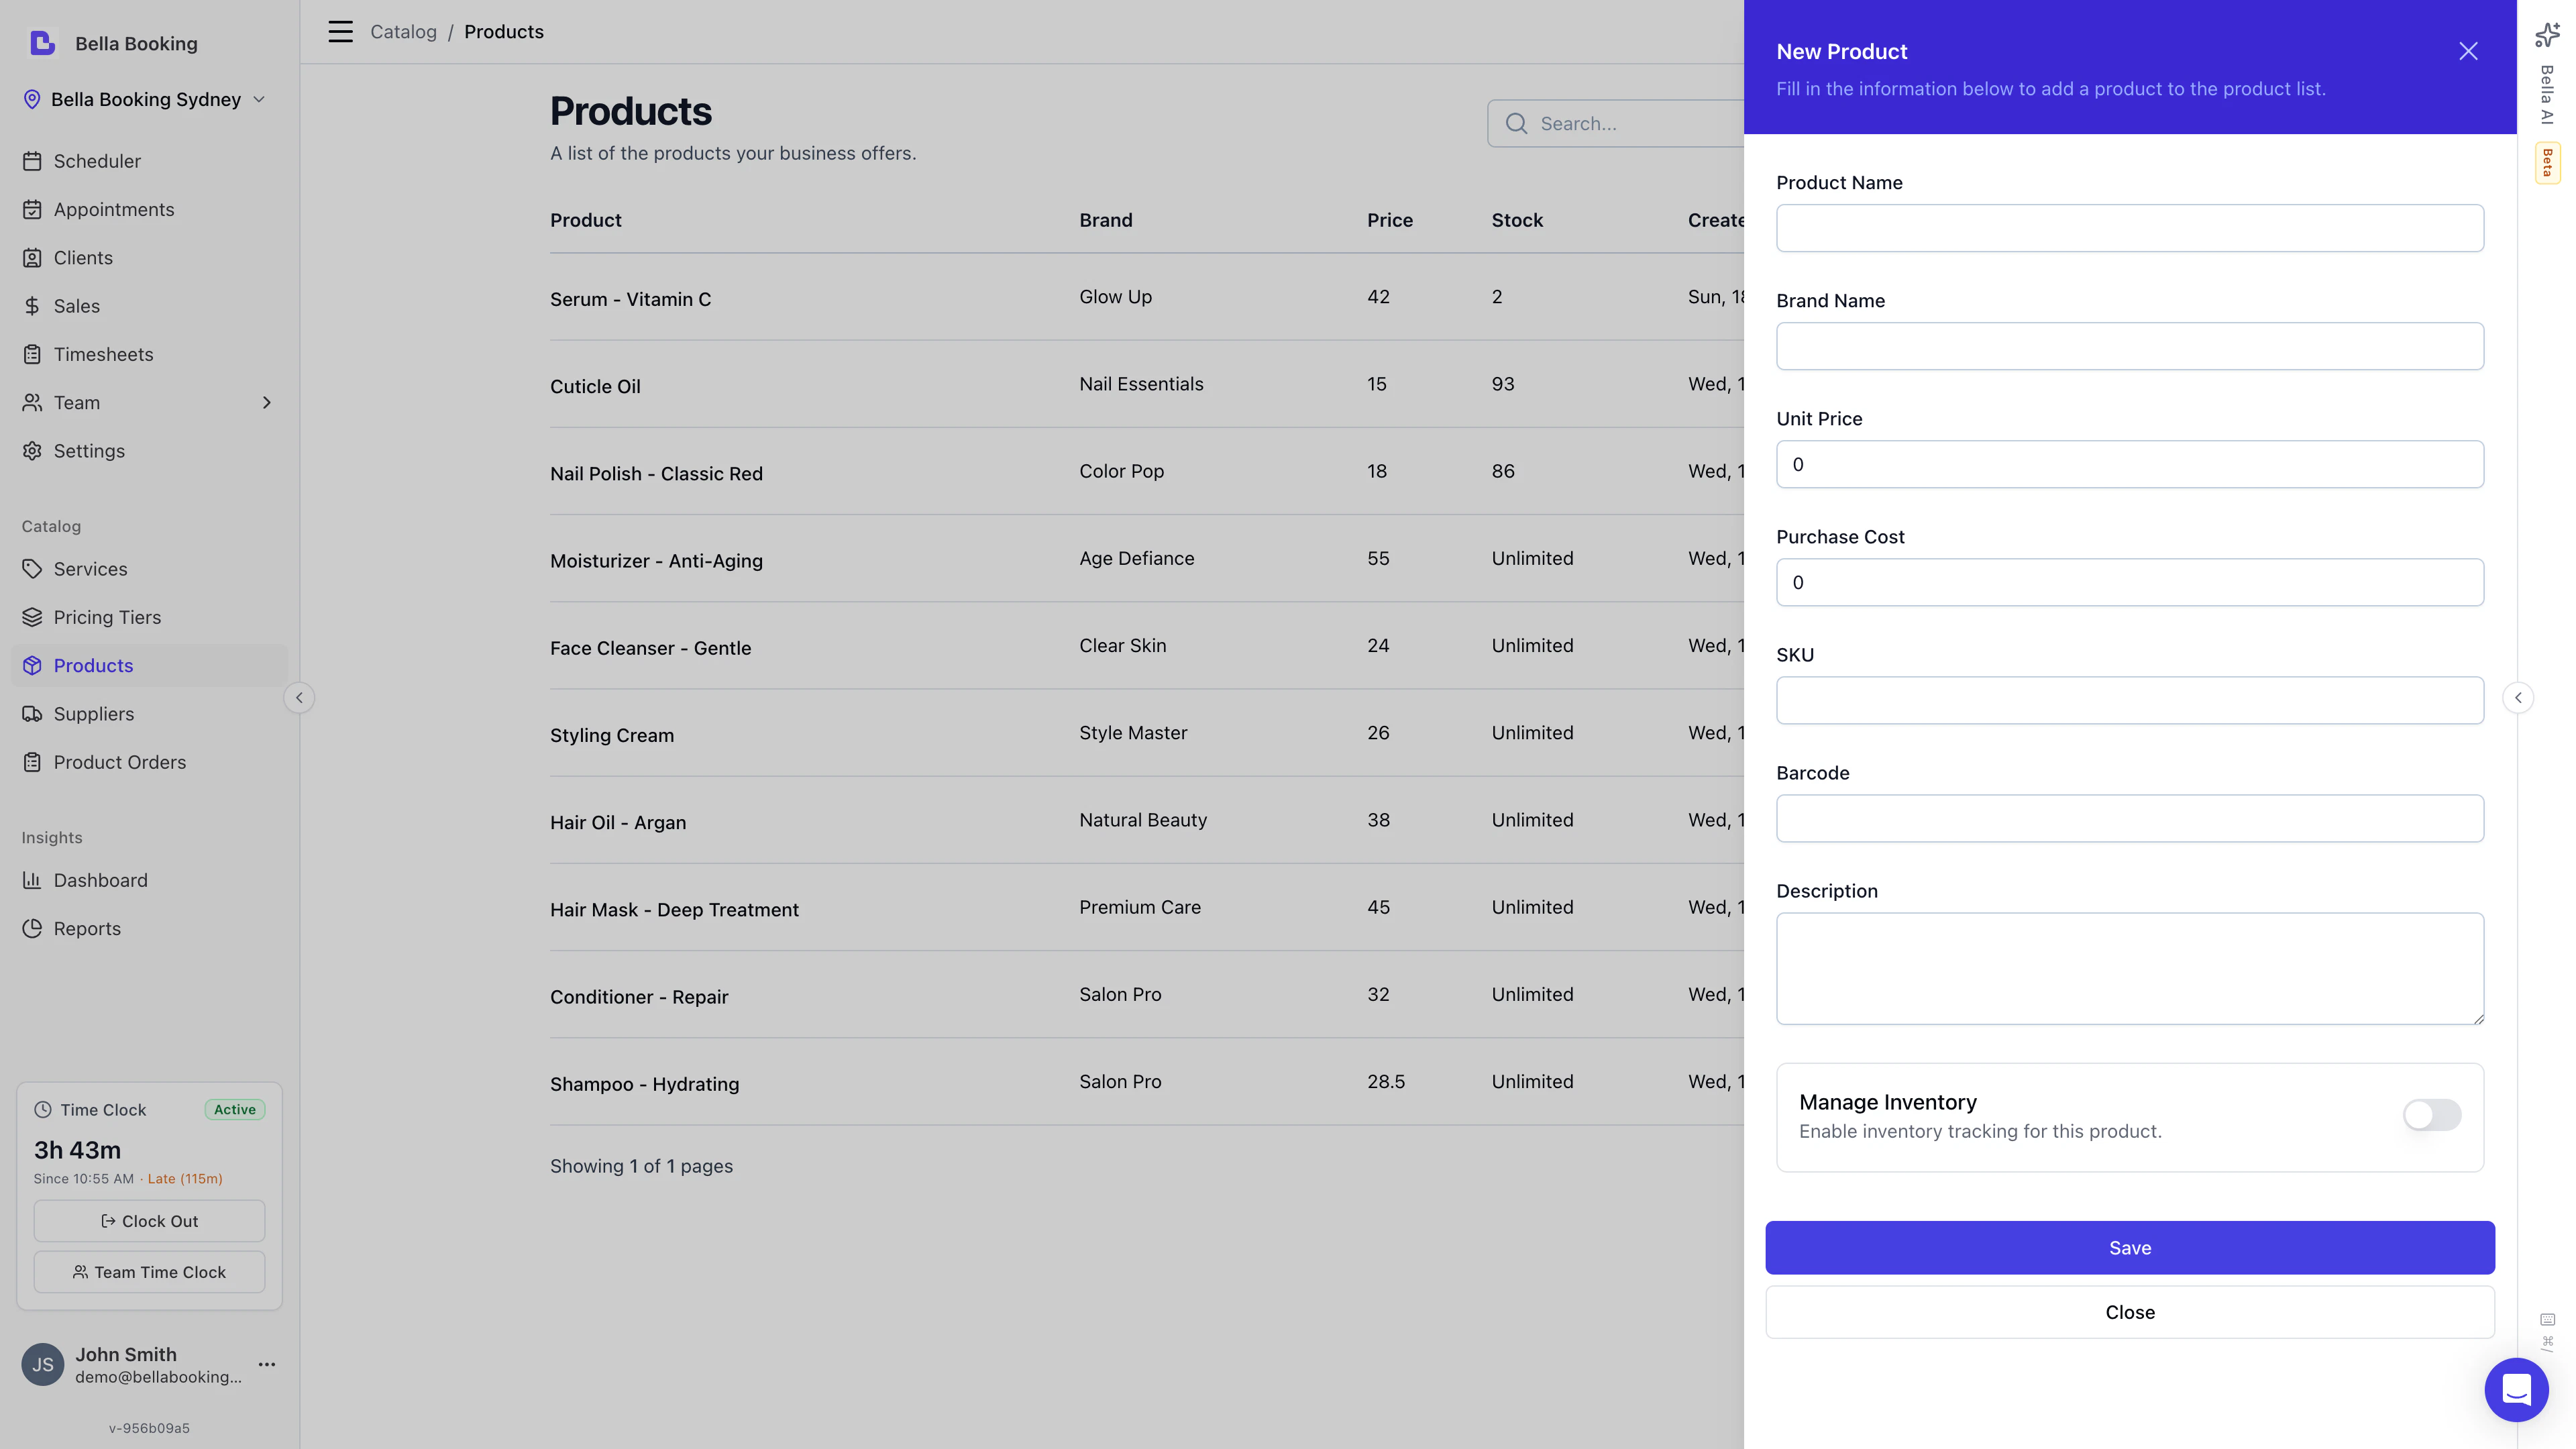 * **Product name** (required): The display name for this product
* **Brand name** (optional): Product manufacturer or brand name
* **Unit price** (required): The price you charge clients for one unit
* **Purchase cost** (required): Your cost to purchase or produce this product
* **SKU** (optional): Stock Keeping Unit for internal tracking
* **Barcode** (optional): Product barcode for scanning systems
* **Description** (optional): Detailed information about the product
* **Manage inventory** (required): enable/disable tracking inventory count
* **Stock quantity** (required if Manage inventory enabled): Current inventory count
3. Click **Save** to add the product to your inventory
### Editing a product
1. In the product list, locate the product you want to modify
2. Click the **Edit** icon to open the product details
3. Update any field
4. Click **Save** to apply changes
### Adjusting stock levels
When you receive new inventory or need to correct stock counts:
1. Open the product you want to update
2. Click the **Edit** icon to open the product details
3. Update the **Stock quantity** field, Enter the new total quantity (not the change amount)
4. Save the changes
**Best Practice:** Conduct regular inventory counts to ensure accuracy.
### Importing products in bulk
If you have a large product catalogue, import it from a spreadsheet instead of adding products one by one. Click **Import** on the **Products** page, match your columns, fix any flagged rows, and confirm. The required fields are **product name** and **unit price** — brand, purchase cost, SKU, barcode and description are optional.
See [Importing Products from a CSV](/products/import) for the full step-by-step walkthrough with screenshots.
***
### Archiving a product
Products cannot be deleted directly — they must be archived first. Archiving hides the product from the active list while preserving all records.
1. Find the product in your list
2. Click the **three-dot menu** and select **Archive**
3. Confirm in the dialog
The product is now hidden from the active list. Past sales that included this product are not affected.
To restore or permanently delete an archived product, use the status filter to view archived products, then click the three-dot menu and select **Restore** or **Permanently delete**.
Permanent deletion is only available for archived products with no sales history. Products that have been sold can only be archived, not permanently deleted.
***
## Selling products
Products can be sold in two ways:
### 1. During an appointment (checkout)
When a client completes their appointment and you're ready to check them out:
1. Open the appointment in the Scheduler
2. Click **Checkout**
3. The checkout screen shows:
* Services rendered (already listed)
* Option to add products
4. Click **Add product**
5. Search for and select the product(s)
6. Enter quantity and team member that did the sale
7. The system automatically:
* Adds the product price to the total
* Deducts quantity from inventory
8. Complete the payment process
### 2. Standalone product sale
If a client purchases products without an appointment:
1. Go to the **Sales** section
2. Click **Add sale**
3. Select the client
4. In the items section, click **Add product**
5. Search for and select products
6. Enter quantities and team member performed the sale for each product
7. Save the sale
Inventory is automatically updated when products are sold.
### 3. Product shop
You can also sell products online through your booking page. Clients browse your product catalogue, add items to their cart, and pay via Stripe. Two fulfilment modes are available:
* **Collect in business** — the client picks up the order at your location
* **Reserve for next appointment** — the order is set aside and handed over at the client's upcoming appointment
To set up the online shop, see [Sell Online](/products/sell-online). Incoming client orders are fulfilled from **Sales → Client orders** — see [fulfilling orders](/products/sell-online#fulfil-orders-in-the-dashboard). To restock from your suppliers, see [Supplier orders](/products/product-orders).
***
## FAQs
**Q: What happens if I try to sell a product that's out of stock?**
A: In-person sales are never blocked — the sale goes through and the stock count goes negative so you can spot and correct it. In the online shop, out-of-stock products are hidden from clients automatically, and checkout checks stock again before payment.
**Q: Can I set different prices for the same product?**
A: You would need to create separate product entries (e.g., "Shampoo - Retail" and "Shampoo - Bulk").
**Q: How do I track products with variants (different sizes or colours)?**
A: Create a separate product entry for each variant (e.g., "Lavender Oil — 50ml" and "Lavender Oil — 100ml"). Each entry keeps its own price and stock count.
**Q: What if I forget to adjust inventory after receiving a shipment?**
A: Edit the product and update the stock quantity at any time.
**Q: How do I see which products are selling best?**
A: Use the Sales reports or Dashboard analytics to view product sales performance.
***
With effective product management, you can create an additional revenue stream for your business while providing clients with convenient access to the products they need.
* **Product name** (required): The display name for this product
* **Brand name** (optional): Product manufacturer or brand name
* **Unit price** (required): The price you charge clients for one unit
* **Purchase cost** (required): Your cost to purchase or produce this product
* **SKU** (optional): Stock Keeping Unit for internal tracking
* **Barcode** (optional): Product barcode for scanning systems
* **Description** (optional): Detailed information about the product
* **Manage inventory** (required): enable/disable tracking inventory count
* **Stock quantity** (required if Manage inventory enabled): Current inventory count
3. Click **Save** to add the product to your inventory
### Editing a product
1. In the product list, locate the product you want to modify
2. Click the **Edit** icon to open the product details
3. Update any field
4. Click **Save** to apply changes
### Adjusting stock levels
When you receive new inventory or need to correct stock counts:
1. Open the product you want to update
2. Click the **Edit** icon to open the product details
3. Update the **Stock quantity** field, Enter the new total quantity (not the change amount)
4. Save the changes
**Best Practice:** Conduct regular inventory counts to ensure accuracy.
### Importing products in bulk
If you have a large product catalogue, import it from a spreadsheet instead of adding products one by one. Click **Import** on the **Products** page, match your columns, fix any flagged rows, and confirm. The required fields are **product name** and **unit price** — brand, purchase cost, SKU, barcode and description are optional.
See [Importing Products from a CSV](/products/import) for the full step-by-step walkthrough with screenshots.
***
### Archiving a product
Products cannot be deleted directly — they must be archived first. Archiving hides the product from the active list while preserving all records.
1. Find the product in your list
2. Click the **three-dot menu** and select **Archive**
3. Confirm in the dialog
The product is now hidden from the active list. Past sales that included this product are not affected.
To restore or permanently delete an archived product, use the status filter to view archived products, then click the three-dot menu and select **Restore** or **Permanently delete**.
Permanent deletion is only available for archived products with no sales history. Products that have been sold can only be archived, not permanently deleted.
***
## Selling products
Products can be sold in two ways:
### 1. During an appointment (checkout)
When a client completes their appointment and you're ready to check them out:
1. Open the appointment in the Scheduler
2. Click **Checkout**
3. The checkout screen shows:
* Services rendered (already listed)
* Option to add products
4. Click **Add product**
5. Search for and select the product(s)
6. Enter quantity and team member that did the sale
7. The system automatically:
* Adds the product price to the total
* Deducts quantity from inventory
8. Complete the payment process
### 2. Standalone product sale
If a client purchases products without an appointment:
1. Go to the **Sales** section
2. Click **Add sale**
3. Select the client
4. In the items section, click **Add product**
5. Search for and select products
6. Enter quantities and team member performed the sale for each product
7. Save the sale
Inventory is automatically updated when products are sold.
### 3. Product shop
You can also sell products online through your booking page. Clients browse your product catalogue, add items to their cart, and pay via Stripe. Two fulfilment modes are available:
* **Collect in business** — the client picks up the order at your location
* **Reserve for next appointment** — the order is set aside and handed over at the client's upcoming appointment
To set up the online shop, see [Sell Online](/products/sell-online). Incoming client orders are fulfilled from **Sales → Client orders** — see [fulfilling orders](/products/sell-online#fulfil-orders-in-the-dashboard). To restock from your suppliers, see [Supplier orders](/products/product-orders).
***
## FAQs
**Q: What happens if I try to sell a product that's out of stock?**
A: In-person sales are never blocked — the sale goes through and the stock count goes negative so you can spot and correct it. In the online shop, out-of-stock products are hidden from clients automatically, and checkout checks stock again before payment.
**Q: Can I set different prices for the same product?**
A: You would need to create separate product entries (e.g., "Shampoo - Retail" and "Shampoo - Bulk").
**Q: How do I track products with variants (different sizes or colours)?**
A: Create a separate product entry for each variant (e.g., "Lavender Oil — 50ml" and "Lavender Oil — 100ml"). Each entry keeps its own price and stock count.
**Q: What if I forget to adjust inventory after receiving a shipment?**
A: Edit the product and update the stock quantity at any time.
**Q: How do I see which products are selling best?**
A: Use the Sales reports or Dashboard analytics to view product sales performance.
***
With effective product management, you can create an additional revenue stream for your business while providing clients with convenient access to the products they need.