> ## Documentation Index
> Fetch the complete documentation index at: https://docs.bellabooking.com/llms.txt
> Use this file to discover all available pages before exploring further.
# Locations
> Manage all locations, branches or sites where your business operates
## Introduction
Locations represent the physical or virtual places where your services are offered (for example, different salons, clinics, or studios). Each location can have its own address, timezone, currency, and contact information. Keeping your location list accurate is essential for correct appointment times, reporting, and team allocation.
***
## Key Features
* **View Locations:** See all active business locations in a card-based list with key details
* **Add Locations:** Create new locations as your business expands to new branches
* **Edit Locations:** Update location details including address, contact information, timezone, and currency
* **Archive or Delete Locations:** Retire branches you no longer use — archiving keeps their history and is reversible; permanent deletion removes them entirely
***
## Accessing Locations
Locations are managed on the **Business settings** page.
1. In the main sidebar, go to **Settings**
2. Select **Business settings**
How your location details appear depends on your account:
* **Single location** (most businesses): the location's full profile — address, contact details, timezone, currency, website and social links — is shown inline, ready to edit.
* **Multiple locations:** a **Locations** section lists every branch as a card, with an **Add location** button in the top-right.
Locations previously had their own **Settings → Locations** page. They're now part of **Business settings** — the old link redirects there automatically.
***
## Understanding the Locations List
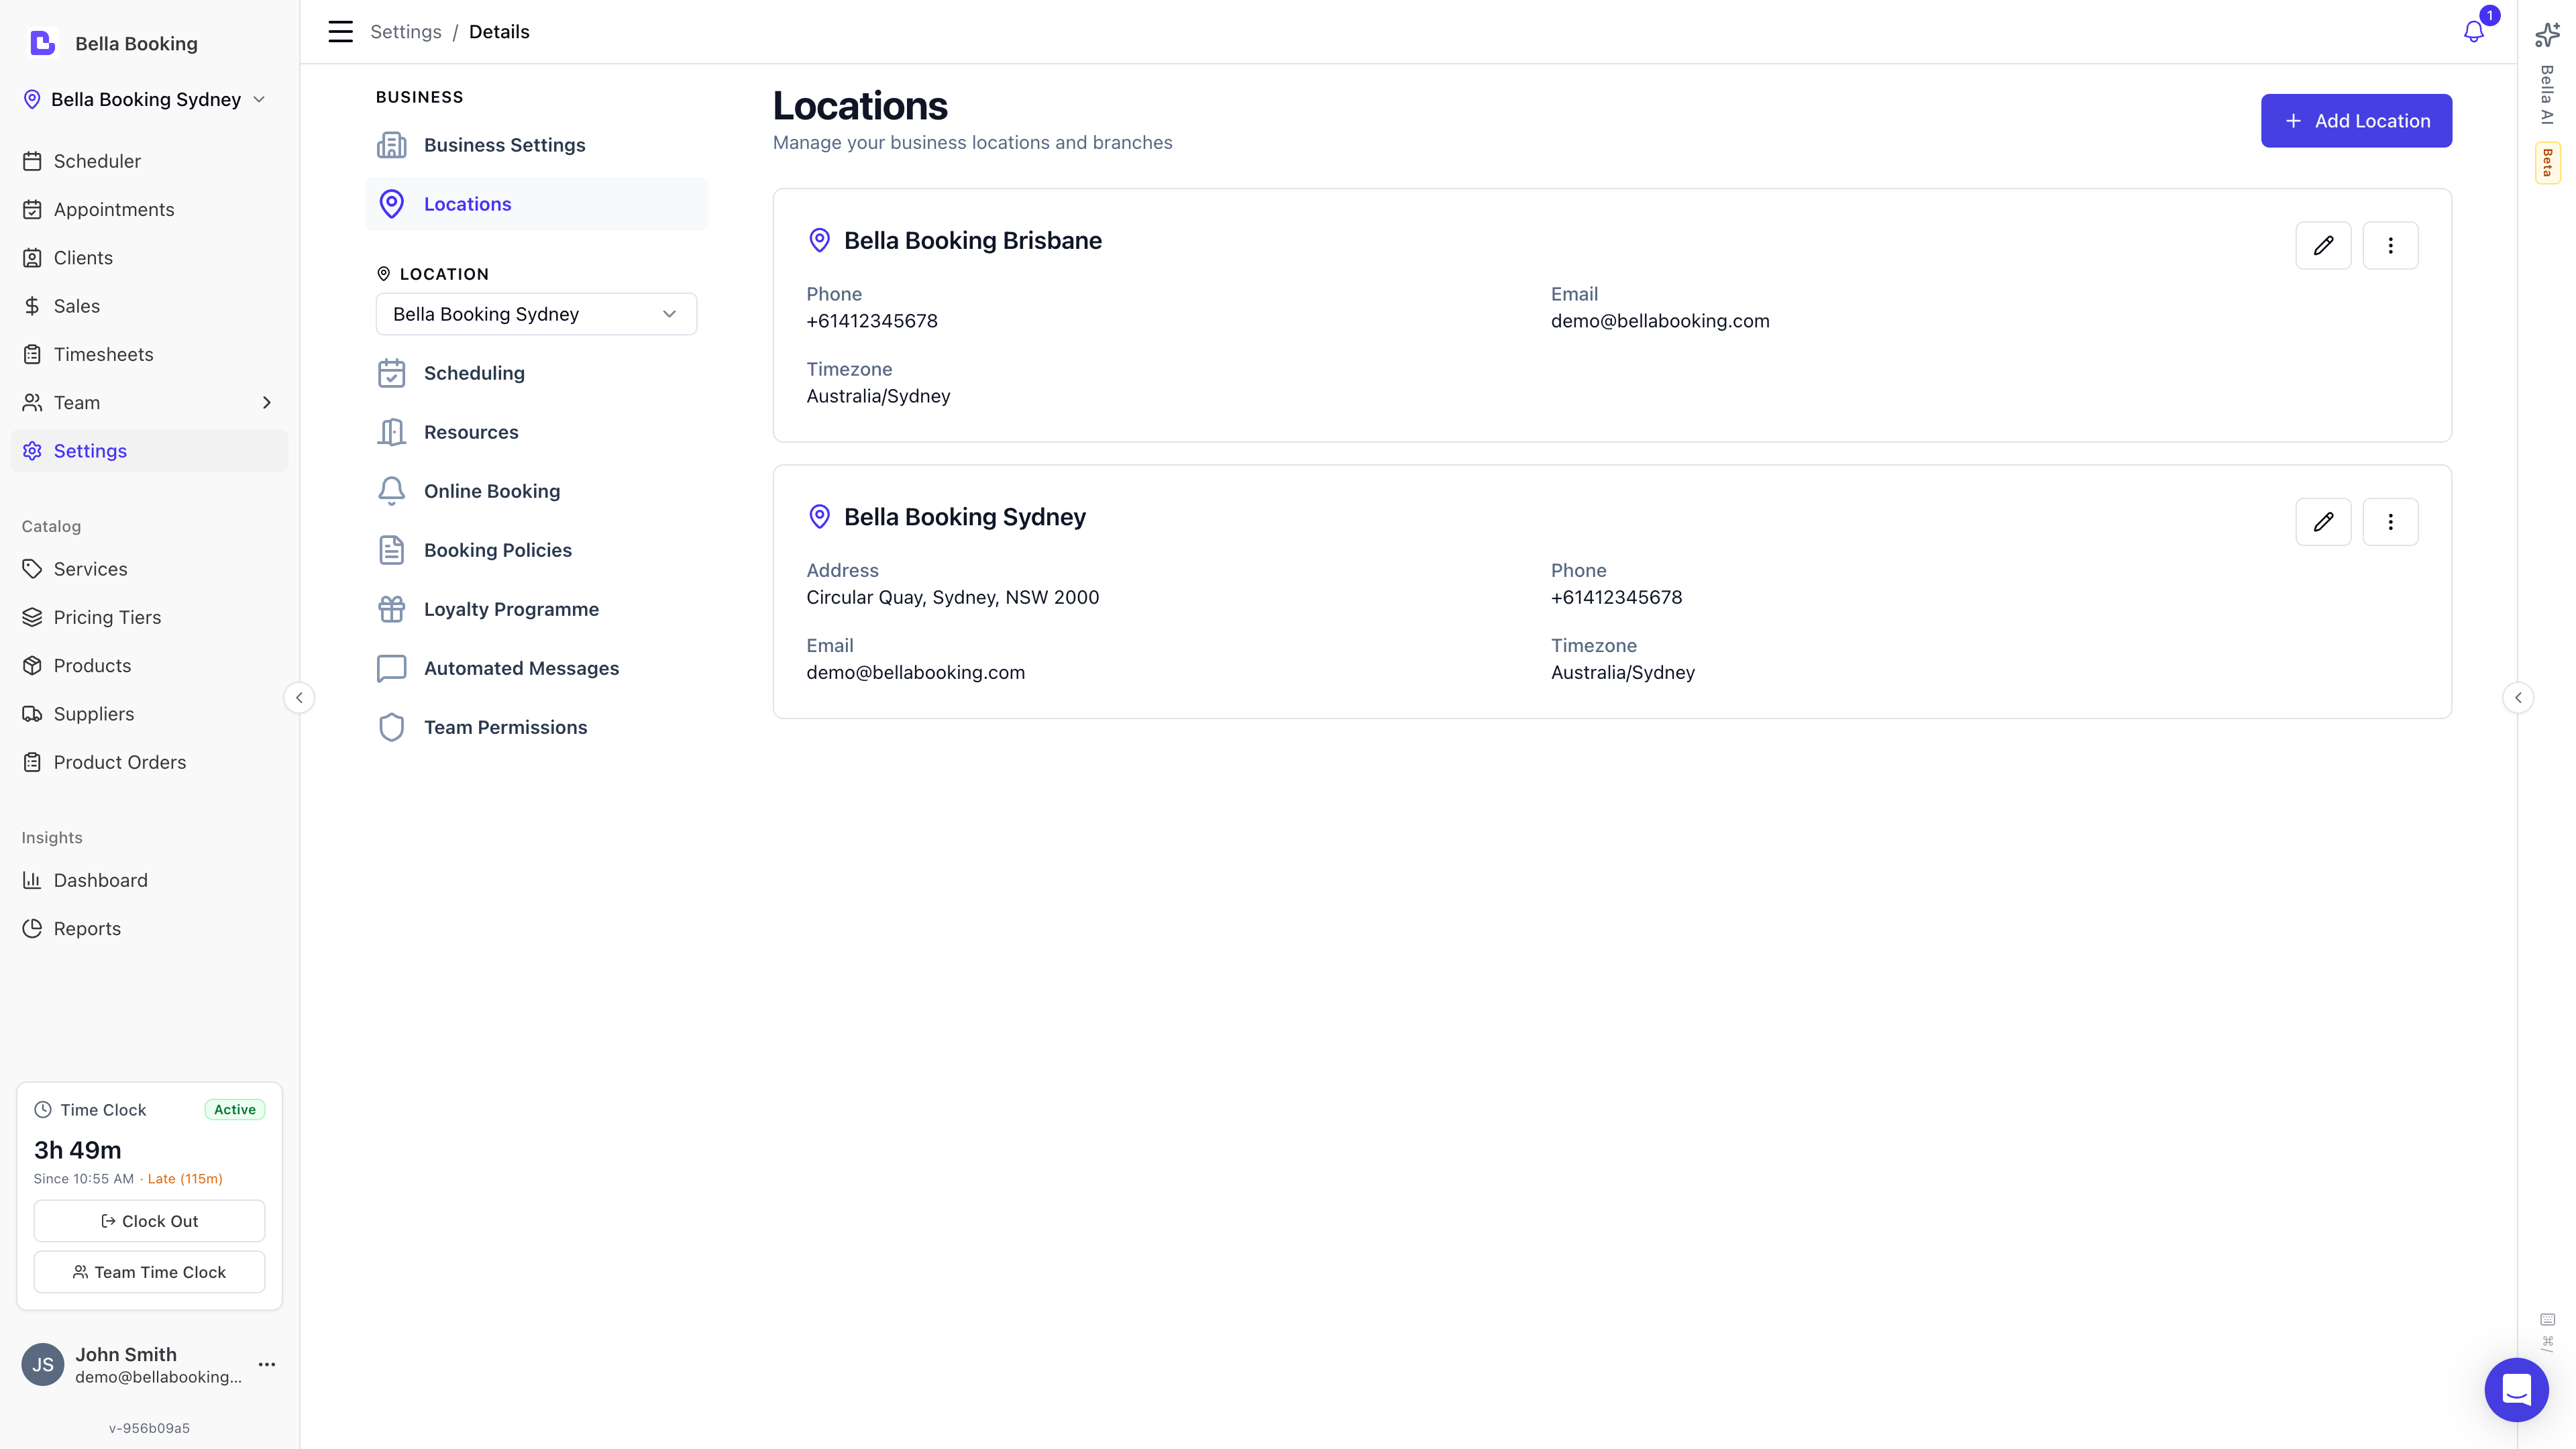 Each location is displayed as a card showing:
* **Location Name** (e.g., "Main Office", "Bondi Branch")
* **Address** (if provided): Street address, city, state, and postcode combined
* **Phone number** (if provided)
* **Email** (if provided)
* **Timezone** (e.g., "Australia/Sydney")
Each location card has:
* An **Edit** button (pencil icon) on the right side
* A **More Options** menu (three dots icon) with **Archive** and **Permanently delete** options
### Location activity at a glance
Each location also shows a quick activity summary so you can gauge how every branch is performing without leaving the page:
* **Revenue (last 30 days)** — sales taken at the location over the past 30 days, shown in the location's own currency
* **Appointments (last 30 days)** — how busy the location has been
* **Clients** — total clients on the location's books
* **Team** — active team members at the location
* **Reviews** — average rating and the number of published reviews
* **Memberships** — active memberships and their combined monthly value
* An **online booking** badge showing whether the location is currently accepting online bookings
These figures refresh periodically (roughly hourly), so they can lag the live dashboard by a short while. A brand-new location shows them once its first refresh has run.
***
## Adding a New Location
1. Open **Settings → Business settings**
2. Click the **Add location** button at the top-right of the Locations section
3. A slideover panel opens on the right side with the location form
4. Fill in the location details:
**Required Fields:**
* **Location Name** – The internal name your team will see when booking (e.g., "Main Office", "Bondi Branch")
* **Country** – Select from the dropdown (defaults to "AU" for Australia)
* **Timezone** – Select from timezones available for the selected country (defaults to "Australia/Sydney")
* **Currency** – Select the currency for this location (defaults to "AUD")
**Optional Fields:**
* **Website** – Your business website URL
* **About** – A description of this location
* **Phone number** – Contact phone number for this location
* **Email** – Contact email address for this location
* **Street address** – Physical street address
* **City** – City or town name
* **State** – State, province, or region
* **Postcode** – ZIP or postal code
5. Click **Create location** at the bottom of the form
6. You'll see a success message: "Location created successfully"
7. The slideover closes and the new location appears in your locations list
***
## Locations and your plan
The **Multi-Location** plan is billed per location, so the number of locations your plan covers is part of your subscription. You manage that number yourself — there's no need to contact us.
**Choosing your number of locations when you subscribe**
When you subscribe to the Multi-Location plan, the plan card lets you choose how many locations you're signing up for (starting from the number you already run) and shows the total before you continue to checkout. You can change this at any time afterwards — see below.
**See how many locations your plan covers**
Go to **Settings → Billing**. On a Multi-Location plan you'll see a **Locations** line showing how many locations you're billed for and the price per location.
**Add or remove a location on your plan**
1. Open **Settings → Billing**
2. Under **Locations on your plan**, use the **+** and **−** buttons to set the number of locations you want
3. Click **Update** — the change applies straight away and is prorated on your next invoice (adding a location charges the prorated difference now; removing one credits your next invoice)
Once your plan covers the extra location, head back to **Business settings** and add its details with **Add location**.
You can't reduce your plan below the number of locations you're currently using — archive a location first, then lower the count. If you're on a single-location plan and want to run more than one location, [contact our team](mailto:hello@bellabooking.com) to move to Multi-Location.
***
## Editing an Existing Location
1. In **Settings → Business settings**, find the location you want to update
2. Click the **Edit** button (pencil icon) on the right side of the location card
3. A slideover panel opens with the location form pre-filled with current values
4. Update any fields as needed:
* Location name, website, about
* Contact details (phone, email)
* Address fields (street, city, state, postcode)
* Country, timezone, or currency
5. Click **Update Location** at the bottom of the form
6. You'll see a success message: "Location updated successfully"
7. The slideover closes and your changes are reflected in the locations list
***
## Archiving and Deleting a Location
When you close a branch you have two options from the location card's **More Options** menu (three dots): **Archive** (the usual choice) or **Permanently Delete**.
### Archive a location (recommended)
Archiving retires a branch without losing any of its history. The location is hidden from active use and online booking, while its past appointments, sales, and reports are all preserved — and you can restore it later at any time.
1. In **Settings → Business settings**, find the location
2. Open the **More Options** menu (three dots) and select **Archive**
3. Confirm in the dialog
A location can be archived as long as:
* It has **no upcoming appointments** — future bookings that are still Booked or Confirmed. **Cancelled, archived, and past appointments don't block archiving** — they're history that archiving keeps. Cancel or archive any remaining upcoming bookings first (you're closing the branch, so they can't go ahead).
* It has **no pending product orders** — receive or cancel them first.
* It isn't your **only** active location — every account must keep at least one.
So a closed branch whose only remaining appointments are cancelled or in the past can be archived straight away.
### Restore an archived location
Use the status filter on the Locations list to show archived locations, then open the **More Options** menu and select **Restore**.
### Permanently delete a location
Permanent deletion removes the location for good and cannot be undone.
1. Open the **More Options** menu and select **Permanently delete**
2. **Type the exact location name** in the confirmation field to enable the button
3. Click **Permanently delete** to confirm
To protect your records, a location can only be permanently deleted when it has **no appointment, product-order, or sales history at all** — including cancelled and past records. Most closed branches keep some history, so the right action for them is **Archive**, which takes them out of day-to-day use while keeping the records intact. If you genuinely need a branch with history removed entirely, contact the support team.
***
## Best Practices and Tips
* **Clear Naming:** Keep location names clear and consistent (e.g., include suburb or city) so your team can easily select the correct branch when scheduling
* **Timezone Accuracy:** Double-check the **Timezone** when creating a new location to avoid incorrect appointment times, especially if you operate across different regions or countries
* **Regular Review:** Regularly review your Locations list to remove closed branches and update any address changes before they impact clients
* **Complete Information:** Fill in contact details (phone, email) for each location so clients can reach the correct branch
* **Currency Selection:** Ensure the currency matches the location's region for accurate pricing and reporting
Each location is displayed as a card showing:
* **Location Name** (e.g., "Main Office", "Bondi Branch")
* **Address** (if provided): Street address, city, state, and postcode combined
* **Phone number** (if provided)
* **Email** (if provided)
* **Timezone** (e.g., "Australia/Sydney")
Each location card has:
* An **Edit** button (pencil icon) on the right side
* A **More Options** menu (three dots icon) with **Archive** and **Permanently delete** options
### Location activity at a glance
Each location also shows a quick activity summary so you can gauge how every branch is performing without leaving the page:
* **Revenue (last 30 days)** — sales taken at the location over the past 30 days, shown in the location's own currency
* **Appointments (last 30 days)** — how busy the location has been
* **Clients** — total clients on the location's books
* **Team** — active team members at the location
* **Reviews** — average rating and the number of published reviews
* **Memberships** — active memberships and their combined monthly value
* An **online booking** badge showing whether the location is currently accepting online bookings
These figures refresh periodically (roughly hourly), so they can lag the live dashboard by a short while. A brand-new location shows them once its first refresh has run.
***
## Adding a New Location
1. Open **Settings → Business settings**
2. Click the **Add location** button at the top-right of the Locations section
3. A slideover panel opens on the right side with the location form
4. Fill in the location details:
**Required Fields:**
* **Location Name** – The internal name your team will see when booking (e.g., "Main Office", "Bondi Branch")
* **Country** – Select from the dropdown (defaults to "AU" for Australia)
* **Timezone** – Select from timezones available for the selected country (defaults to "Australia/Sydney")
* **Currency** – Select the currency for this location (defaults to "AUD")
**Optional Fields:**
* **Website** – Your business website URL
* **About** – A description of this location
* **Phone number** – Contact phone number for this location
* **Email** – Contact email address for this location
* **Street address** – Physical street address
* **City** – City or town name
* **State** – State, province, or region
* **Postcode** – ZIP or postal code
5. Click **Create location** at the bottom of the form
6. You'll see a success message: "Location created successfully"
7. The slideover closes and the new location appears in your locations list
***
## Locations and your plan
The **Multi-Location** plan is billed per location, so the number of locations your plan covers is part of your subscription. You manage that number yourself — there's no need to contact us.
**Choosing your number of locations when you subscribe**
When you subscribe to the Multi-Location plan, the plan card lets you choose how many locations you're signing up for (starting from the number you already run) and shows the total before you continue to checkout. You can change this at any time afterwards — see below.
**See how many locations your plan covers**
Go to **Settings → Billing**. On a Multi-Location plan you'll see a **Locations** line showing how many locations you're billed for and the price per location.
**Add or remove a location on your plan**
1. Open **Settings → Billing**
2. Under **Locations on your plan**, use the **+** and **−** buttons to set the number of locations you want
3. Click **Update** — the change applies straight away and is prorated on your next invoice (adding a location charges the prorated difference now; removing one credits your next invoice)
Once your plan covers the extra location, head back to **Business settings** and add its details with **Add location**.
You can't reduce your plan below the number of locations you're currently using — archive a location first, then lower the count. If you're on a single-location plan and want to run more than one location, [contact our team](mailto:hello@bellabooking.com) to move to Multi-Location.
***
## Editing an Existing Location
1. In **Settings → Business settings**, find the location you want to update
2. Click the **Edit** button (pencil icon) on the right side of the location card
3. A slideover panel opens with the location form pre-filled with current values
4. Update any fields as needed:
* Location name, website, about
* Contact details (phone, email)
* Address fields (street, city, state, postcode)
* Country, timezone, or currency
5. Click **Update Location** at the bottom of the form
6. You'll see a success message: "Location updated successfully"
7. The slideover closes and your changes are reflected in the locations list
***
## Archiving and Deleting a Location
When you close a branch you have two options from the location card's **More Options** menu (three dots): **Archive** (the usual choice) or **Permanently Delete**.
### Archive a location (recommended)
Archiving retires a branch without losing any of its history. The location is hidden from active use and online booking, while its past appointments, sales, and reports are all preserved — and you can restore it later at any time.
1. In **Settings → Business settings**, find the location
2. Open the **More Options** menu (three dots) and select **Archive**
3. Confirm in the dialog
A location can be archived as long as:
* It has **no upcoming appointments** — future bookings that are still Booked or Confirmed. **Cancelled, archived, and past appointments don't block archiving** — they're history that archiving keeps. Cancel or archive any remaining upcoming bookings first (you're closing the branch, so they can't go ahead).
* It has **no pending product orders** — receive or cancel them first.
* It isn't your **only** active location — every account must keep at least one.
So a closed branch whose only remaining appointments are cancelled or in the past can be archived straight away.
### Restore an archived location
Use the status filter on the Locations list to show archived locations, then open the **More Options** menu and select **Restore**.
### Permanently delete a location
Permanent deletion removes the location for good and cannot be undone.
1. Open the **More Options** menu and select **Permanently delete**
2. **Type the exact location name** in the confirmation field to enable the button
3. Click **Permanently delete** to confirm
To protect your records, a location can only be permanently deleted when it has **no appointment, product-order, or sales history at all** — including cancelled and past records. Most closed branches keep some history, so the right action for them is **Archive**, which takes them out of day-to-day use while keeping the records intact. If you genuinely need a branch with history removed entirely, contact the support team.
***
## Best Practices and Tips
* **Clear Naming:** Keep location names clear and consistent (e.g., include suburb or city) so your team can easily select the correct branch when scheduling
* **Timezone Accuracy:** Double-check the **Timezone** when creating a new location to avoid incorrect appointment times, especially if you operate across different regions or countries
* **Regular Review:** Regularly review your Locations list to remove closed branches and update any address changes before they impact clients
* **Complete Information:** Fill in contact details (phone, email) for each location so clients can reach the correct branch
* **Currency Selection:** Ensure the currency matches the location's region for accurate pricing and reporting