> ## Documentation Index
> Fetch the complete documentation index at: https://docs.bellabooking.com/llms.txt
> Use this file to discover all available pages before exploring further.
# Online Booking Settings
> Customise your booking page appearance with layout templates, brand palettes, and drag-and-drop section ordering
## Introduction
The **Appearance Editor** lets you customise how your online booking page looks and feels. From a single split-pane view, you can change your layout, set your brand palette, reorder sections, upload images, and preview the result in real time.
**Note:** This page covers **appearance and branding** settings. For booking **policies and rules** (minimum notice, cancellation, reschedule, confirmation, payment, and other booking options), see [Booking policies](/settings/booking-policies). For service add-ons, see [Service Catalogue](/service-catalog).
***
## Accessing the Appearance Editor
1. In the main sidebar, go to **Settings**
2. Select **Online booking** from the settings menu
This takes you directly to the Appearance Editor.
**Access:** Admin and Owner only
***
## The Editor
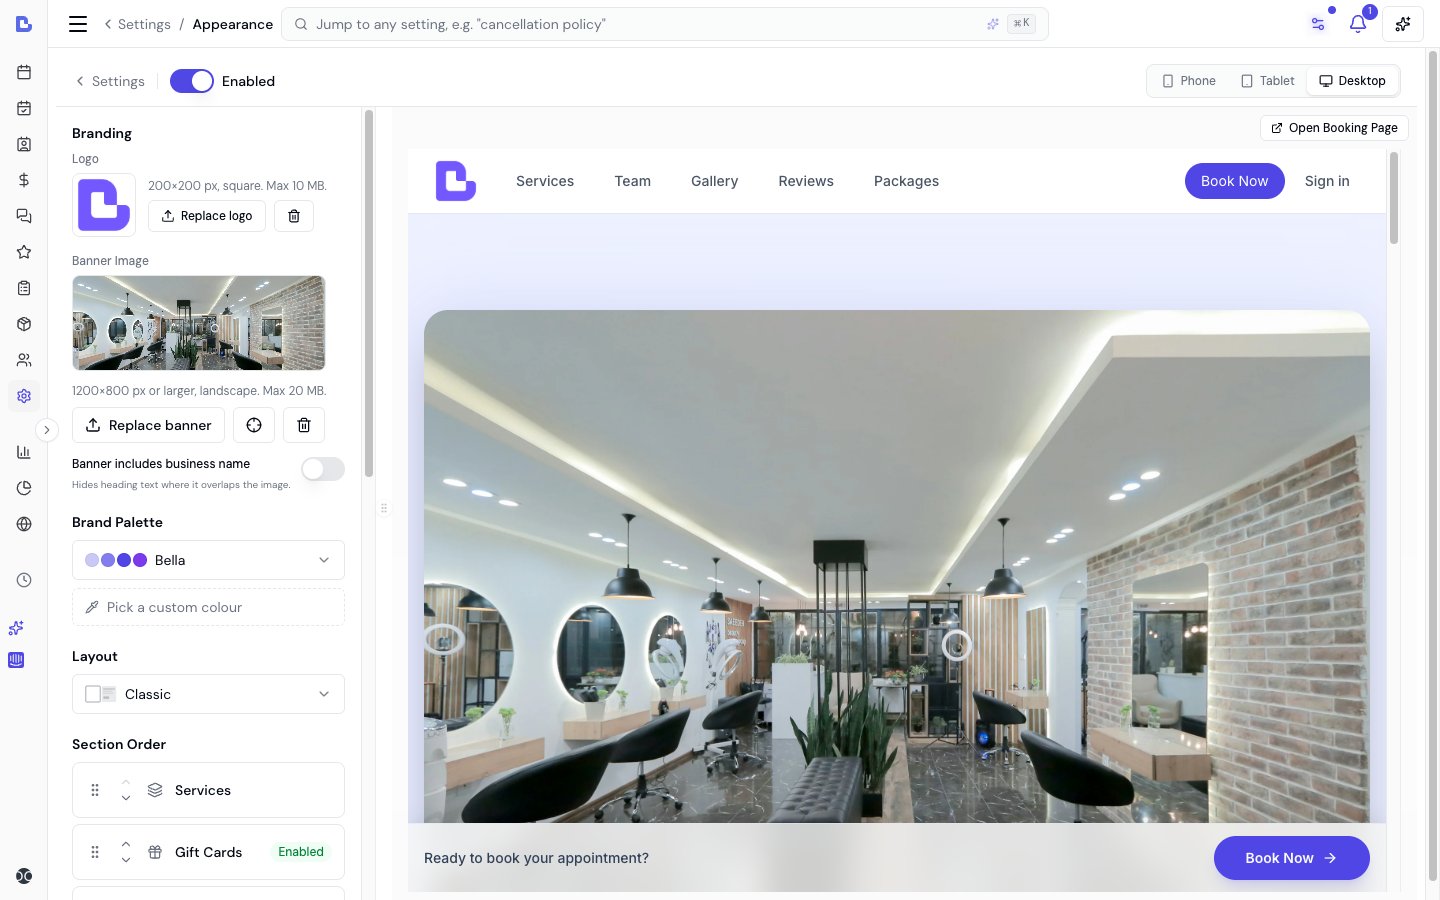 The editor is split into two panels:
* **Left panel** — all your appearance controls (branding, palette, layout, sections, gallery, text & wording)
* **Right panel** — a live preview of your booking page that updates as you make changes
Use the **device switcher** (Phone, Tablet, Desktop) at the top right to see how your page looks on different screen sizes. You can also drag the divider between panels to resize them.
***
## Enable/Disable Online Booking
The toggle at the top of the editor controls whether your booking page is accessible to clients.
* **Enabled** — your booking page is live and accepting appointments
* **Disabled** — clients see a message that online booking is temporarily unavailable; existing appointments are unaffected
This toggle takes effect immediately.
***
## Branding
### Logo
Upload your business logo (200x200 px, square, max 10 MB). The logo appears in your booking page navigation bar. Click **Replace logo** to change it or the delete button to remove it.
### Banner Image
Upload a banner image that appears prominently at the top of your booking page. For best results:
* **Minimum size:** 1200x800 px
* **Orientation:** landscape (wider than tall)
* **Max file size:** 20 MB
* **Accepted formats:** JPG, PNG, WebP, and HEIC (iPhone photos)
Your image is automatically converted to WebP format on upload for fast loading. HEIC photos straight from an iPhone are converted automatically, and large photos are compressed in your browser before uploading, so uploads stay quick.
### Focal Point
After uploading a banner, click the crosshair icon to open the **Focal Point Picker**.
The editor is split into two panels:
* **Left panel** — all your appearance controls (branding, palette, layout, sections, gallery, text & wording)
* **Right panel** — a live preview of your booking page that updates as you make changes
Use the **device switcher** (Phone, Tablet, Desktop) at the top right to see how your page looks on different screen sizes. You can also drag the divider between panels to resize them.
***
## Enable/Disable Online Booking
The toggle at the top of the editor controls whether your booking page is accessible to clients.
* **Enabled** — your booking page is live and accepting appointments
* **Disabled** — clients see a message that online booking is temporarily unavailable; existing appointments are unaffected
This toggle takes effect immediately.
***
## Branding
### Logo
Upload your business logo (200x200 px, square, max 10 MB). The logo appears in your booking page navigation bar. Click **Replace logo** to change it or the delete button to remove it.
### Banner Image
Upload a banner image that appears prominently at the top of your booking page. For best results:
* **Minimum size:** 1200x800 px
* **Orientation:** landscape (wider than tall)
* **Max file size:** 20 MB
* **Accepted formats:** JPG, PNG, WebP, and HEIC (iPhone photos)
Your image is automatically converted to WebP format on upload for fast loading. HEIC photos straight from an iPhone are converted automatically, and large photos are compressed in your browser before uploading, so uploads stay quick.
### Focal Point
After uploading a banner, click the crosshair icon to open the **Focal Point Picker**.
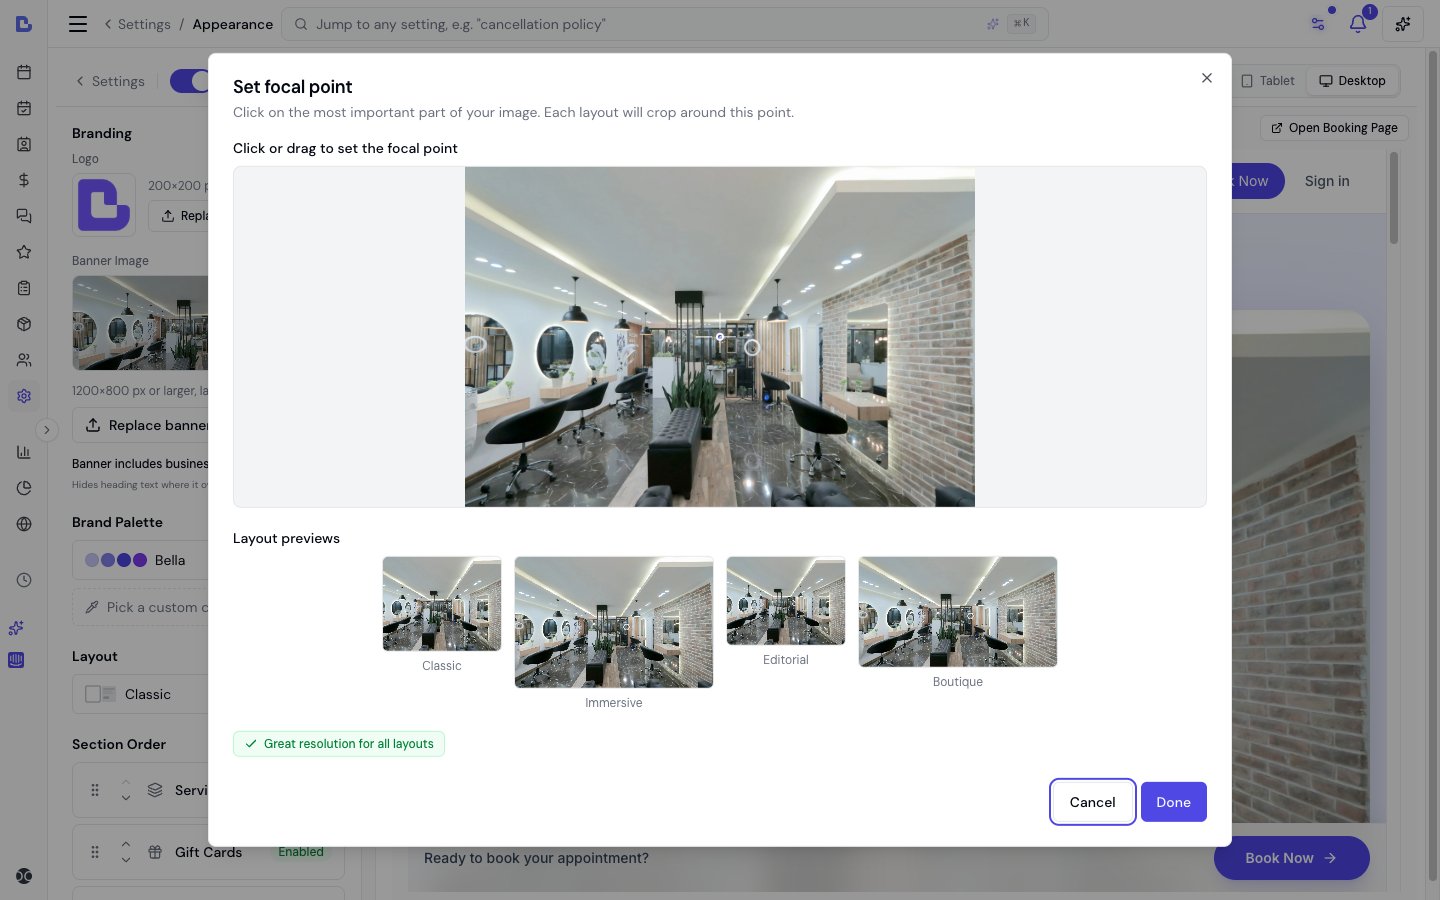 Click on the most important part of your image — the focal point. Each layout template crops your banner differently depending on screen size, and the focal point ensures the key part of your image stays visible across all layouts.
The **Layout previews** below the image show how your banner will appear in each of the four layout templates at their respective aspect ratios.
### Banner Includes Business Name
Toggle this on if your banner image already contains your business name. When enabled, the heading text is hidden where it overlaps the image, preventing a double-up.
***
## Brand Palette
Click on the most important part of your image — the focal point. Each layout template crops your banner differently depending on screen size, and the focal point ensures the key part of your image stays visible across all layouts.
The **Layout previews** below the image show how your banner will appear in each of the four layout templates at their respective aspect ratios.
### Banner Includes Business Name
Toggle this on if your banner image already contains your business name. When enabled, the heading text is hidden where it overlaps the image, preventing a double-up.
***
## Brand Palette
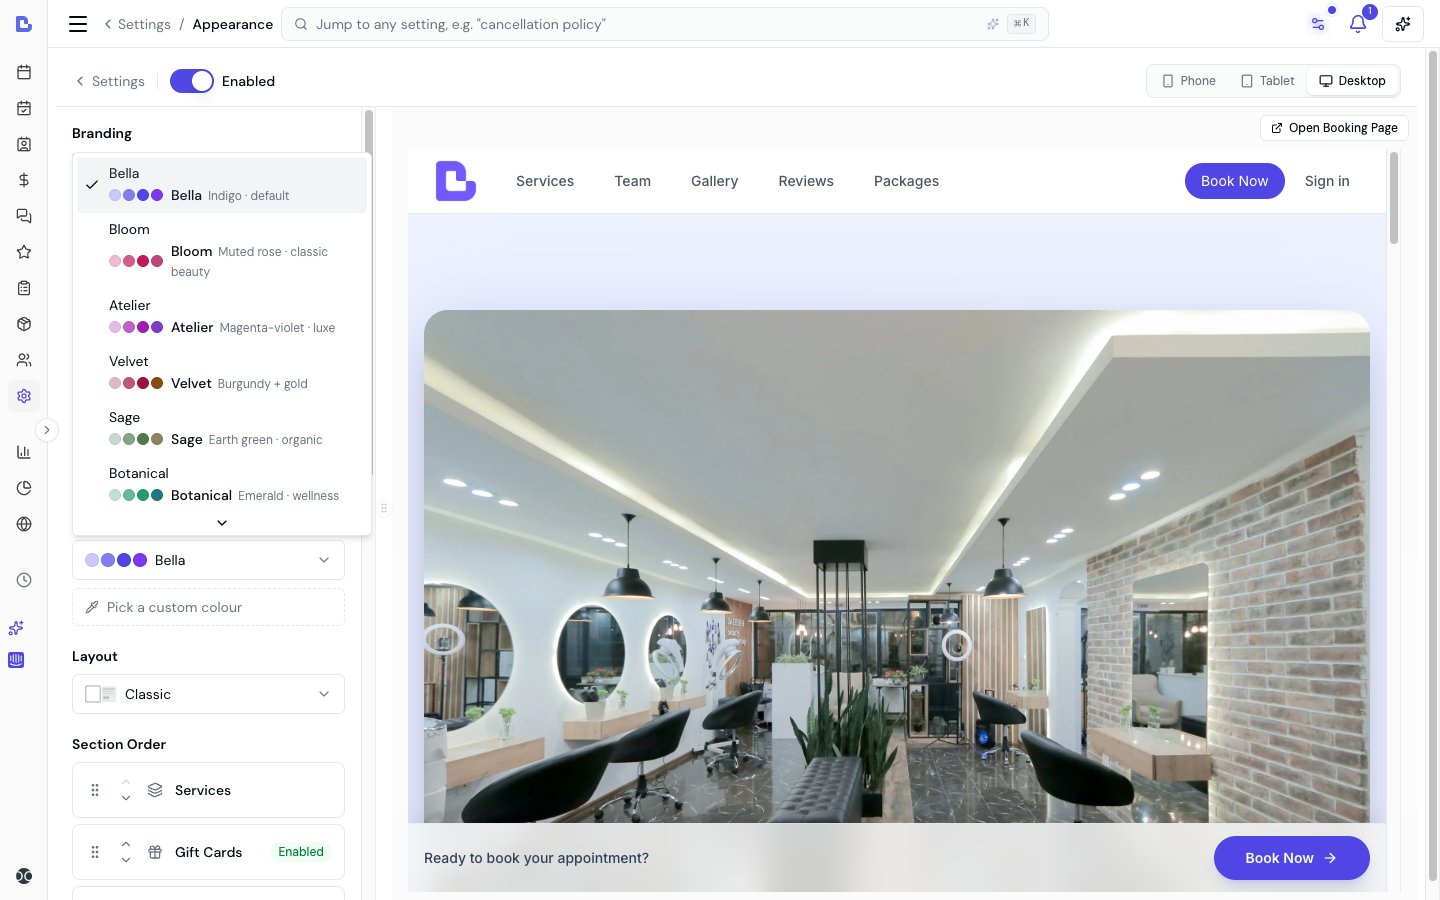 Choose from **10 curated brand palettes** that theme your entire booking page — buttons, links, accents, and highlights all update automatically:
| Palette | Style |
| ---------- | --------------------------- |
| Bella | Purple and indigo (default) |
| Bloom | Warm pink and rose |
| Atelier | Refined taupe and clay |
| Velvet | Rich burgundy and gold |
| Sage | Soft green and earth tones |
| Botanical | Fresh green and natural |
| Dune | Warm sand and amber |
| Onyx | Deep charcoal and slate |
| Coastal | Sky blue and sand |
| Terracotta | Earthy rust and copper |
### Custom Colour
Click **Pick a custom colour** below the dropdown to set your own brand colour using a hex colour picker. The editor shows a contrast ratio to help you ensure readability against white backgrounds.
***
## Layout Templates
Choose from **10 curated brand palettes** that theme your entire booking page — buttons, links, accents, and highlights all update automatically:
| Palette | Style |
| ---------- | --------------------------- |
| Bella | Purple and indigo (default) |
| Bloom | Warm pink and rose |
| Atelier | Refined taupe and clay |
| Velvet | Rich burgundy and gold |
| Sage | Soft green and earth tones |
| Botanical | Fresh green and natural |
| Dune | Warm sand and amber |
| Onyx | Deep charcoal and slate |
| Coastal | Sky blue and sand |
| Terracotta | Earthy rust and copper |
### Custom Colour
Click **Pick a custom colour** below the dropdown to set your own brand colour using a hex colour picker. The editor shows a contrast ratio to help you ensure readability against white backgrounds.
***
## Layout Templates
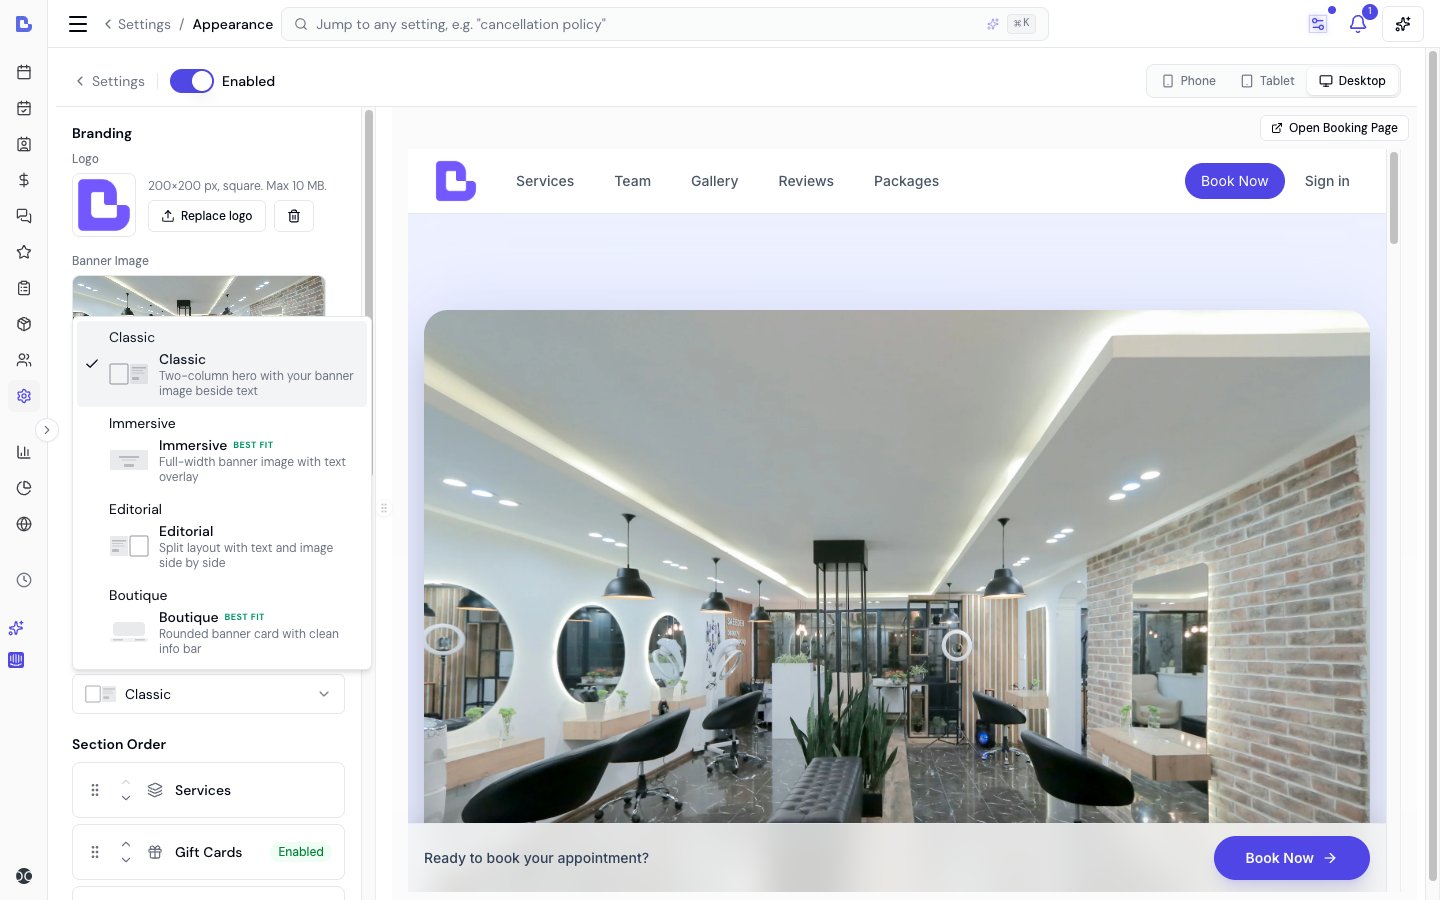 Choose from four layout templates that control how your booking page hero section is arranged:
| Layout | Description | Best for |
| ------------- | ---------------------------------------------------- | ------------------------------------------------------------------------------ |
| **Classic** | Business info on the left, banner on the right | Businesses without a banner image, or those wanting a clean, professional look |
| **Immersive** | Full-width banner with info overlay | Businesses with a strong banner image that want visual impact |
| **Editorial** | Side-by-side split with text left and image right | Businesses that want both text and imagery prominently displayed |
| **Boutique** | Compact centred layout with subtle banner background | Boutique businesses wanting an elegant, minimal aesthetic |
**Preview any layout without saving:** Add `?layout=` to the end of your booking page URL to preview a layout. For example, append `?layout=editorial` so your URL ends with `/yourbusiness?layout=editorial`. This lets you compare layouts before committing.
***
## Section Order
Choose from four layout templates that control how your booking page hero section is arranged:
| Layout | Description | Best for |
| ------------- | ---------------------------------------------------- | ------------------------------------------------------------------------------ |
| **Classic** | Business info on the left, banner on the right | Businesses without a banner image, or those wanting a clean, professional look |
| **Immersive** | Full-width banner with info overlay | Businesses with a strong banner image that want visual impact |
| **Editorial** | Side-by-side split with text left and image right | Businesses that want both text and imagery prominently displayed |
| **Boutique** | Compact centred layout with subtle banner background | Boutique businesses wanting an elegant, minimal aesthetic |
**Preview any layout without saving:** Add `?layout=` to the end of your booking page URL to preview a layout. For example, append `?layout=editorial` so your URL ends with `/yourbusiness?layout=editorial`. This lets you compare layouts before committing.
***
## Section Order
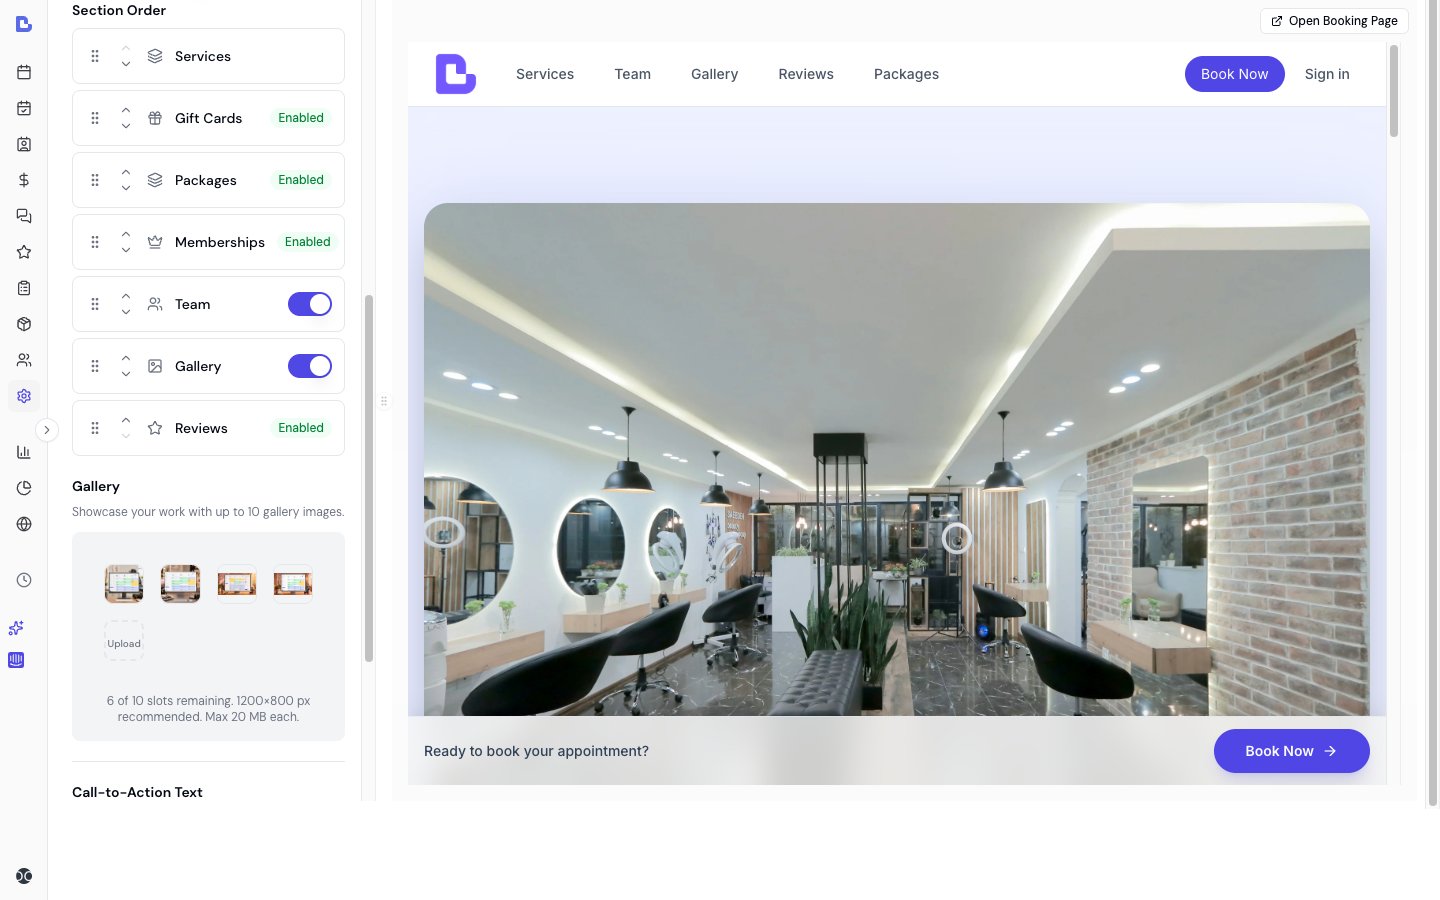 Drag a section row to reorder it — on a touch screen, press and hold the row for a moment, then drag. Tap a row to edit that section's text.
Only sections that actually appear on your booking page are listed. Enable a feature (such as gift cards) or add content (such as your first online package) and its section joins the bottom of the list, ready to drag into place and reword. Team and Gallery always appear here — their show/hide switch lives on the row.
### Available sections
| Section | Controls |
| --------------- | ----------------------------------------------------------------------------------------------------------- |
| **Services** | Always visible — this is the core of your booking page, where clients pick the services and bundles to book |
| **Gift cards** | Shown when the gift cards feature is enabled for your business |
| **Packages** | Shown when Packages feature is enabled |
| **Memberships** | Shown when Memberships feature is enabled |
| **Team** | Toggle on/off — show or hide team member profiles |
| **Gallery** | Toggle on/off — show or hide the photo gallery |
| **Reviews** | Shown when Reviews feature is enabled |
Sections marked **Enabled** are controlled by whether that feature is active for your business. Toggle switches let you show or hide the Team and Gallery sections independently.
***
## Opening Hours
Under **Booking options**, the **Show opening hours** switch controls whether your weekly hours appear on the booking page — in the page footer and as an open/closed badge near the top. It's on by default.
Turn it off if you're appointment-only or your hours vary, so visitors don't see a fixed weekly schedule. This only changes what's displayed — it doesn't affect which times clients can actually book, which are still set by your working hours and team schedules.
***
## Gallery
Upload up to **10 gallery images** to showcase your work and space. The gallery appears as a masonry layout on your booking page with a full-screen lightbox when clients click an image.
* **Recommended:** 1200 px or wider, high-resolution photos
* **Max file size:** 20 MB each
* **Accepted formats:** JPG, PNG, WebP, and HEIC (iPhone photos)
Gallery images are automatically converted to WebP on upload, and HEIC photos from an iPhone are converted and compressed in your browser first — so you can upload straight from your phone. You can delete individual images by hovering and clicking the delete button.
**What to include:**
* Your business space and interior
* Work samples and before/after results (with client permission)
* Team members at work
* Product displays
***
## Announcement Banner
Add a highlighted message that appears above the Book now button on your booking page — perfect for holiday closures, a parking change, "please arrive 5 minutes early", or a seasonal promo.
Type your message under **Announcement banner** in the controls panel and click **Save all text**. Leave it empty to hide the banner — a blank announcement never shows anything on the page, so you can turn it off any time by clearing the text.
The message supports line breaks and is capped at 500 characters. It appears just above the booking button on every layout and screen size.
***
## Text & Wording
Make your booking page sound like you — most of the copy on the page can be reworded.
**Page-level text** (in the **Text & wording** group at the bottom of the controls panel):
* **Book now button** — the main booking button shown in the menu, the header and the booking bar (up to 28 characters, e.g. "Our Services / Book Online"). Default: "Book Now"
* **Booking bar prompt** — the line beside the button in the floating booking bar. Default: "Ready to book your appointment?"
* **Call-to-action heading** — default: "Ready when you are"
* **Call-to-action description** — default: "Pick a time that suits you."
**Section text** — click any section row under **Section order** to open its text editor: the heading and subtitle (Services, Team, Gallery, Reviews), and for Gift cards, Packages, Memberships and Products also the promo card text and the page heading shown when clients open that area.
Leave any field empty to use the default. Click **Save all text** after editing — every unsaved text change saves together, and the live preview updates straight away.
**Tips:**
* Keep headings short and action-oriented
* Make descriptions benefit-focused
* Match your brand voice and tone
***
## Saving Changes
* **Logo, banner, and gallery** — saved automatically after upload
* **Enable/disable toggle** — saved automatically
* **Brand palette, layout, section order, and toggles** — saved automatically when changed
* **Announcement banner and text & wording** — click **Save all text** after editing
***
## FAQs
**Q: What happens if I disable online bookings?**
A: Your booking page becomes inaccessible. Clients see a message that online booking is temporarily unavailable. Existing appointments remain unaffected.
**Q: Can I change the wording on the Book Now button?**
A: Yes. Go to **Settings > Online booking > Appearance** and edit **Book now button** under **Text & wording**. The new label (up to 28 characters) applies everywhere the button appears — the menu, the page header and the booking bar.
**Q: Can I change my booking page URL?**
A: Your booking URL is automatically generated based on your business name. Contact support if you need to change it.
**Q: I have multiple locations — can one link let clients choose a location?**
A: Each location has its own booking page with its own URL, so clients book directly with the right location. There isn't a combined page that asks the client to pick a location first — share each location's link where it's most relevant (for example, on the matching location page of your website, or in that location's social profiles).
**Q: Which layout should I choose?**
A: If you have a strong banner image, try **Immersive** or **Editorial**. Without a banner, **Classic** works best. For boutique or high-end businesses, **Boutique** gives an elegant, minimal feel. Use the `?layout=` URL parameter to preview each without saving.
**Q: Do I need to upload all images (logo, banner, gallery)?**
A: No, all are optional. However, a complete booking page with branding elements creates the best client experience.
**Q: Can I use a custom brand colour?**
A: Yes. Click **Pick a custom colour** below the palette dropdown. You can enter any hex colour value. The editor shows the contrast ratio to ensure your colour is readable.
**Q: What is the focal point?**
A: The focal point tells each layout template where the most important part of your banner image is. Different layouts crop your banner at different aspect ratios — the focal point ensures the key area stays visible in every crop.
**Q: Where do I configure cancellation policies and payment settings?**
A: All booking policies are configured in **Settings > Booking policies**. See [Booking policies](/settings/booking-policies) for details.
**Q: Where do I configure whether clients can choose team members?**
A: This is controlled per service in the [Service Catalogue](/service-catalog) and globally in **Settings > Booking policies** under the booking options section.
**Q: How do I preview my booking page on different devices?**
A: Use the device switcher (Phone, Tablet, Desktop) at the top right of the Appearance Editor to see how your page looks at different screen sizes. You can also click **Open booking page** to view the full page in a new tab.
**Q: How do I show a temporary notice, like a holiday closure, on my booking page?**
A: Use the **Announcement banner** field above **Text & wording**. Type your message and click **Save all text** — it appears as a highlighted note above the Book now button on every layout. Clear the text and save again to hide it.
Drag a section row to reorder it — on a touch screen, press and hold the row for a moment, then drag. Tap a row to edit that section's text.
Only sections that actually appear on your booking page are listed. Enable a feature (such as gift cards) or add content (such as your first online package) and its section joins the bottom of the list, ready to drag into place and reword. Team and Gallery always appear here — their show/hide switch lives on the row.
### Available sections
| Section | Controls |
| --------------- | ----------------------------------------------------------------------------------------------------------- |
| **Services** | Always visible — this is the core of your booking page, where clients pick the services and bundles to book |
| **Gift cards** | Shown when the gift cards feature is enabled for your business |
| **Packages** | Shown when Packages feature is enabled |
| **Memberships** | Shown when Memberships feature is enabled |
| **Team** | Toggle on/off — show or hide team member profiles |
| **Gallery** | Toggle on/off — show or hide the photo gallery |
| **Reviews** | Shown when Reviews feature is enabled |
Sections marked **Enabled** are controlled by whether that feature is active for your business. Toggle switches let you show or hide the Team and Gallery sections independently.
***
## Opening Hours
Under **Booking options**, the **Show opening hours** switch controls whether your weekly hours appear on the booking page — in the page footer and as an open/closed badge near the top. It's on by default.
Turn it off if you're appointment-only or your hours vary, so visitors don't see a fixed weekly schedule. This only changes what's displayed — it doesn't affect which times clients can actually book, which are still set by your working hours and team schedules.
***
## Gallery
Upload up to **10 gallery images** to showcase your work and space. The gallery appears as a masonry layout on your booking page with a full-screen lightbox when clients click an image.
* **Recommended:** 1200 px or wider, high-resolution photos
* **Max file size:** 20 MB each
* **Accepted formats:** JPG, PNG, WebP, and HEIC (iPhone photos)
Gallery images are automatically converted to WebP on upload, and HEIC photos from an iPhone are converted and compressed in your browser first — so you can upload straight from your phone. You can delete individual images by hovering and clicking the delete button.
**What to include:**
* Your business space and interior
* Work samples and before/after results (with client permission)
* Team members at work
* Product displays
***
## Announcement Banner
Add a highlighted message that appears above the Book now button on your booking page — perfect for holiday closures, a parking change, "please arrive 5 minutes early", or a seasonal promo.
Type your message under **Announcement banner** in the controls panel and click **Save all text**. Leave it empty to hide the banner — a blank announcement never shows anything on the page, so you can turn it off any time by clearing the text.
The message supports line breaks and is capped at 500 characters. It appears just above the booking button on every layout and screen size.
***
## Text & Wording
Make your booking page sound like you — most of the copy on the page can be reworded.
**Page-level text** (in the **Text & wording** group at the bottom of the controls panel):
* **Book now button** — the main booking button shown in the menu, the header and the booking bar (up to 28 characters, e.g. "Our Services / Book Online"). Default: "Book Now"
* **Booking bar prompt** — the line beside the button in the floating booking bar. Default: "Ready to book your appointment?"
* **Call-to-action heading** — default: "Ready when you are"
* **Call-to-action description** — default: "Pick a time that suits you."
**Section text** — click any section row under **Section order** to open its text editor: the heading and subtitle (Services, Team, Gallery, Reviews), and for Gift cards, Packages, Memberships and Products also the promo card text and the page heading shown when clients open that area.
Leave any field empty to use the default. Click **Save all text** after editing — every unsaved text change saves together, and the live preview updates straight away.
**Tips:**
* Keep headings short and action-oriented
* Make descriptions benefit-focused
* Match your brand voice and tone
***
## Saving Changes
* **Logo, banner, and gallery** — saved automatically after upload
* **Enable/disable toggle** — saved automatically
* **Brand palette, layout, section order, and toggles** — saved automatically when changed
* **Announcement banner and text & wording** — click **Save all text** after editing
***
## FAQs
**Q: What happens if I disable online bookings?**
A: Your booking page becomes inaccessible. Clients see a message that online booking is temporarily unavailable. Existing appointments remain unaffected.
**Q: Can I change the wording on the Book Now button?**
A: Yes. Go to **Settings > Online booking > Appearance** and edit **Book now button** under **Text & wording**. The new label (up to 28 characters) applies everywhere the button appears — the menu, the page header and the booking bar.
**Q: Can I change my booking page URL?**
A: Your booking URL is automatically generated based on your business name. Contact support if you need to change it.
**Q: I have multiple locations — can one link let clients choose a location?**
A: Each location has its own booking page with its own URL, so clients book directly with the right location. There isn't a combined page that asks the client to pick a location first — share each location's link where it's most relevant (for example, on the matching location page of your website, or in that location's social profiles).
**Q: Which layout should I choose?**
A: If you have a strong banner image, try **Immersive** or **Editorial**. Without a banner, **Classic** works best. For boutique or high-end businesses, **Boutique** gives an elegant, minimal feel. Use the `?layout=` URL parameter to preview each without saving.
**Q: Do I need to upload all images (logo, banner, gallery)?**
A: No, all are optional. However, a complete booking page with branding elements creates the best client experience.
**Q: Can I use a custom brand colour?**
A: Yes. Click **Pick a custom colour** below the palette dropdown. You can enter any hex colour value. The editor shows the contrast ratio to ensure your colour is readable.
**Q: What is the focal point?**
A: The focal point tells each layout template where the most important part of your banner image is. Different layouts crop your banner at different aspect ratios — the focal point ensures the key area stays visible in every crop.
**Q: Where do I configure cancellation policies and payment settings?**
A: All booking policies are configured in **Settings > Booking policies**. See [Booking policies](/settings/booking-policies) for details.
**Q: Where do I configure whether clients can choose team members?**
A: This is controlled per service in the [Service Catalogue](/service-catalog) and globally in **Settings > Booking policies** under the booking options section.
**Q: How do I preview my booking page on different devices?**
A: Use the device switcher (Phone, Tablet, Desktop) at the top right of the Appearance Editor to see how your page looks at different screen sizes. You can also click **Open booking page** to view the full page in a new tab.
**Q: How do I show a temporary notice, like a holiday closure, on my booking page?**
A: Use the **Announcement banner** field above **Text & wording**. Type your message and click **Save all text** — it appears as a highlighted note above the Book now button on every layout. Clear the text and save again to hide it.