> ## Documentation Index
> Fetch the complete documentation index at: https://docs.bellabooking.com/llms.txt
> Use this file to discover all available pages before exploring further.
# Scheduling Settings
> Configure opening hours and scheduling preferences for your business
## Introduction
The **Scheduling Settings** page allows you to configure your business opening hours for each day of the week. These hours serve as the **fallback default** working hours for your team members.
***
## How Opening Hours Work
Opening hours act as a **fallback** for team member availability. When a team member has no personal schedule, your account's opening hours are used instead. The system calculates availability using the following precedence (highest to lowest priority):
1. **Time off** - Blocks availability entirely for the specified period
2. **Custom Working Hours** - Per-date overrides for individual team members
3. **Team Member Default Schedule** - The team member's regular weekly schedule
4. **Account Opening hours** - Used only when a team member has no schedule configured
**Important:** If a team member has their own default working hours set, the account opening hours will NOT apply to them. Each team member's schedule takes precedence over the account-level settings.
When a team member is using inherited hours, an **"Account default"** label appears above their shifts on the Working hours tab and the Team schedule grid. On the Team schedule grid, inherited hours appear in a muted style to distinguish them from explicitly configured schedules.
### When Account Opening Hours Apply
Account opening hours are used when:
* A team member has no default working hours configured at all
* A team member's schedule doesn't include a specific day (falls back to account settings for that day)
### When Account Opening Hours Don't Apply
Account opening hours are **ignored** when:
* A team member has their own default working hours that cover that day
* Custom hours have been set for that specific date
***
## Opening Hours
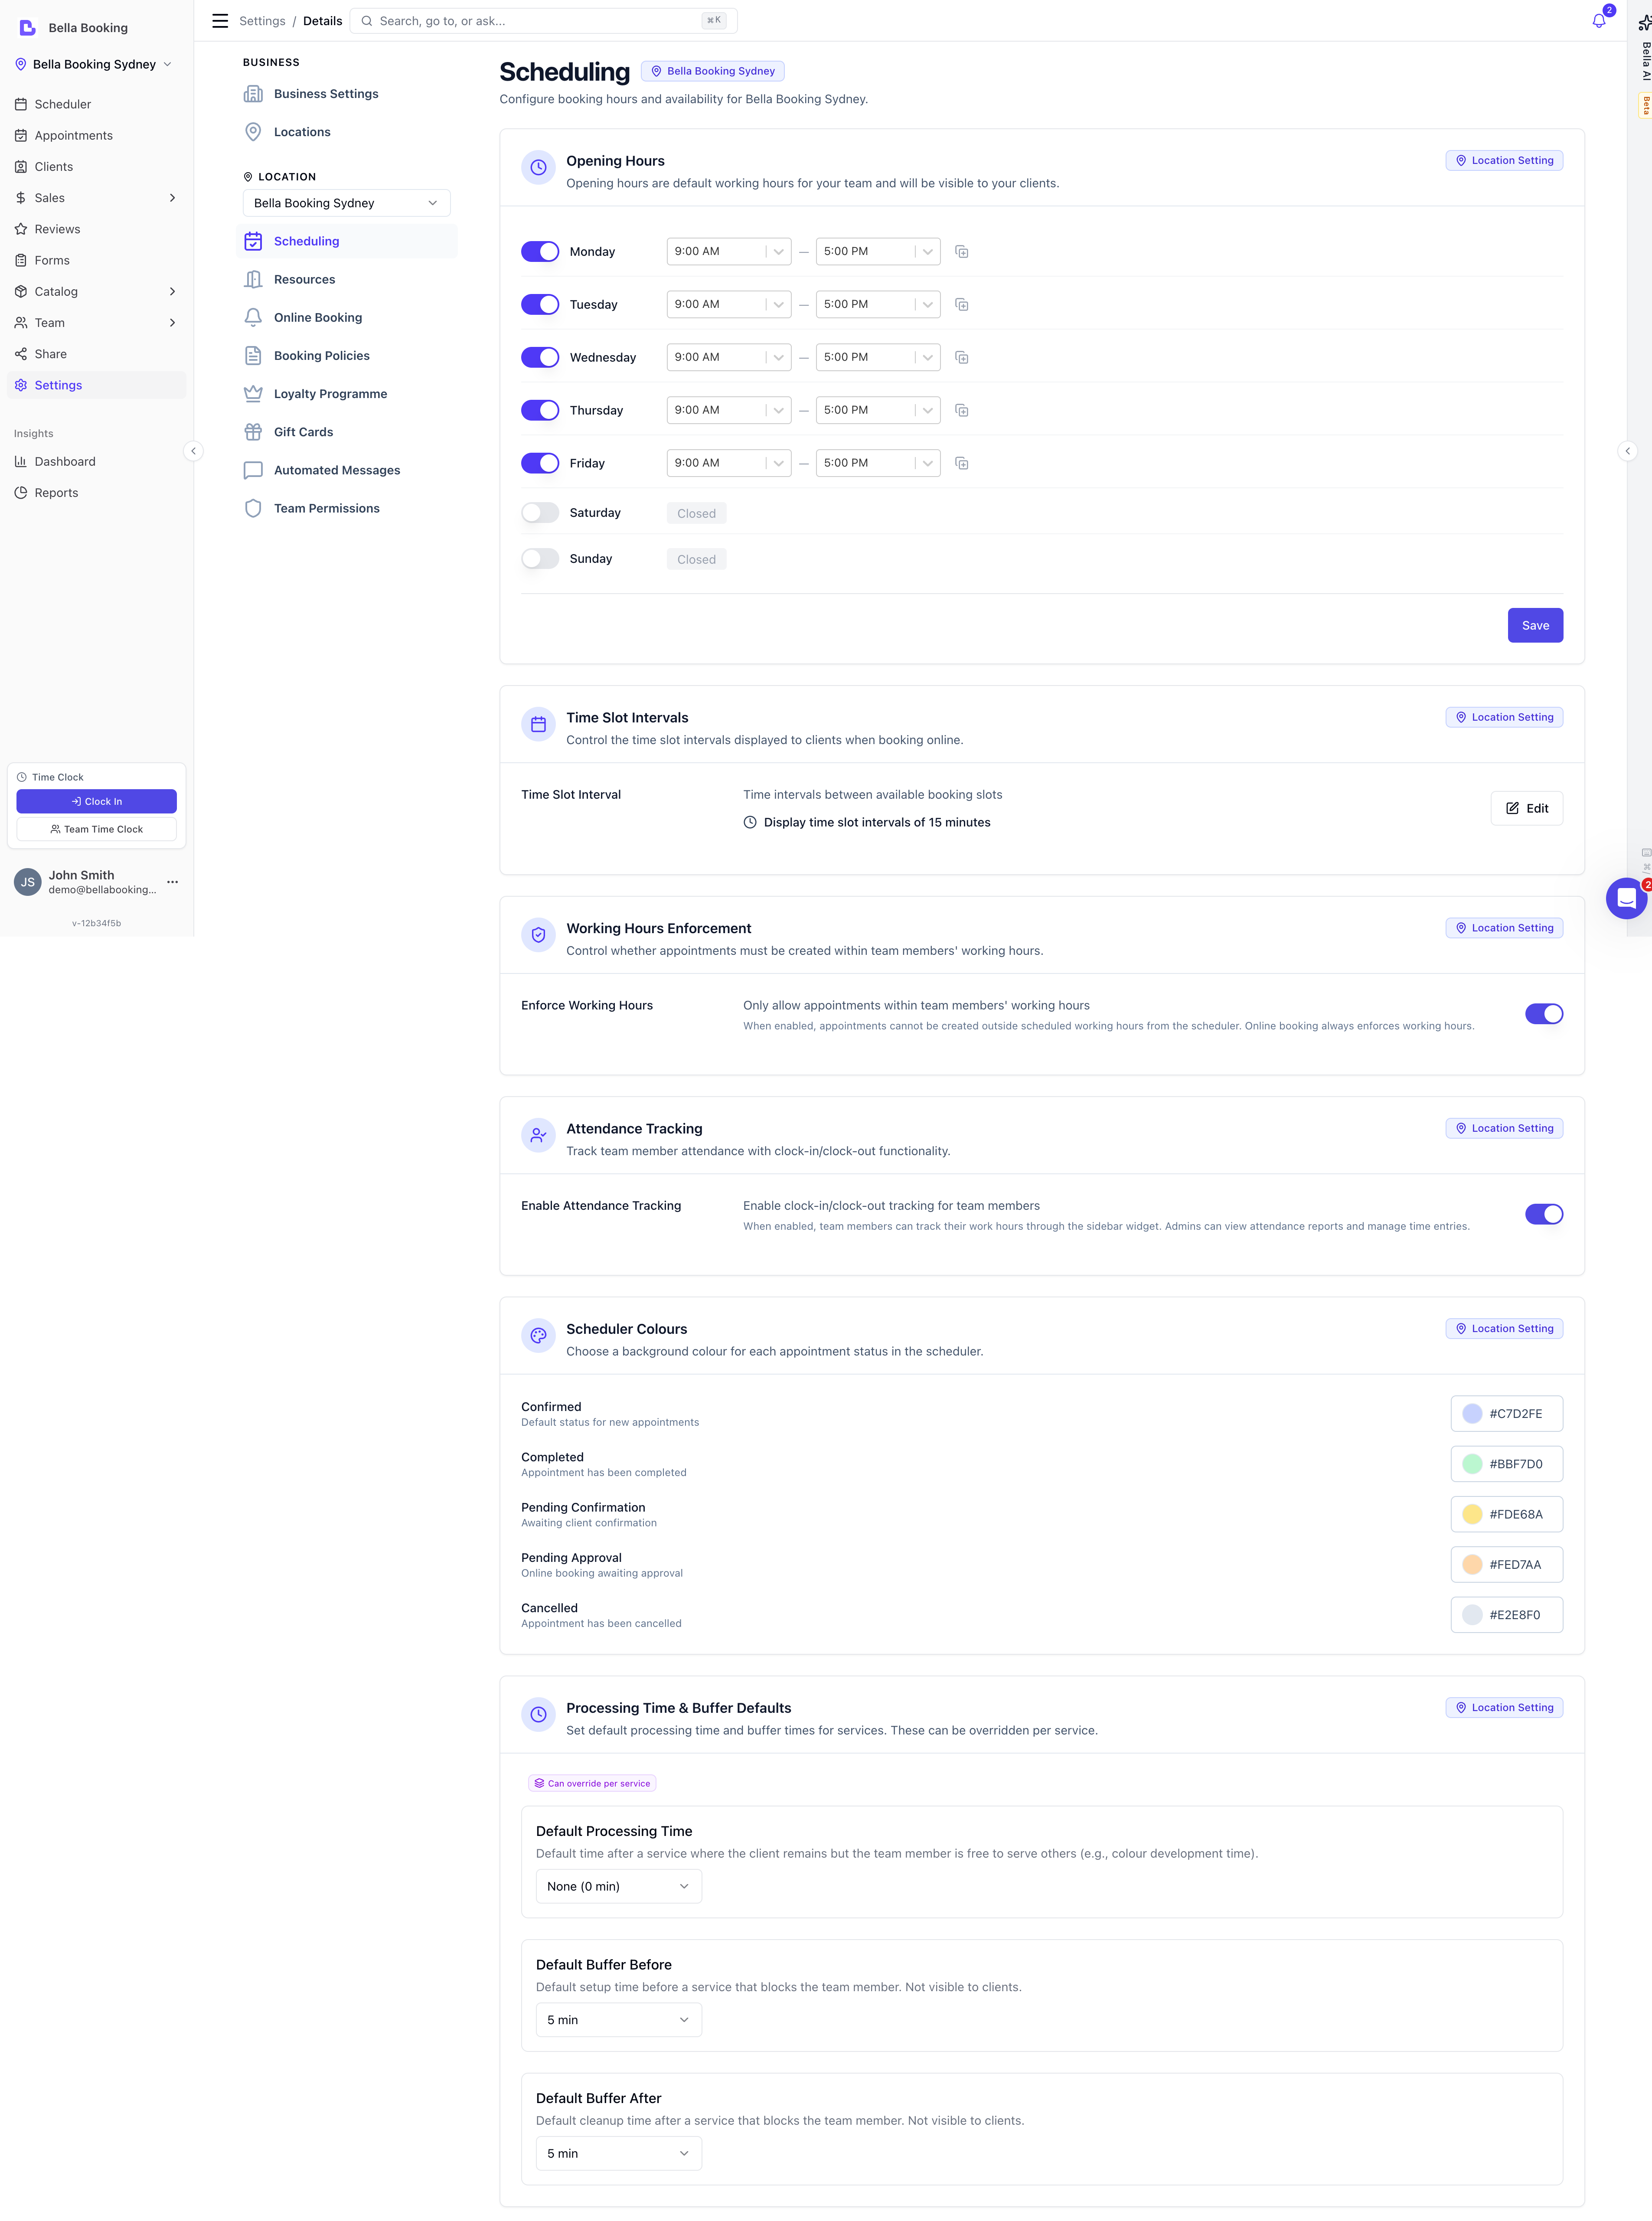
Set your business operating hours for each day of the week. You can configure different hours for each day or mark specific days as closed.
### Configuring Opening Hours
1. Navigate to **Settings** → **Scheduling**
2. In the **Opening hours** section, you'll see all seven days of the week (Monday through Sunday)
3. For each day:
* Use the **toggle switch** to mark the day as open or closed
* For open days, select the **start time** and **end time** from the dropdowns
4. Click **Save** to apply your changes
 ### Apply to All Days
Use the copy icon next to any open day's time settings to quickly apply those hours to all other open days. This only copies the times to days that are already marked as open — it won't change closed days to open.
**Tip:** This is useful when most of your business days share the same operating hours. Set one day's hours, then click the copy icon to apply them across all open days.
***
## Time Slot Interval
The **Time slot interval** — the spacing between the start times clients can pick when booking online — is now set under **Settings** → **Booking policies**. See [Booking policies → Time slot interval](/settings/booking-policies#time-slot-interval).
***
## Closing Your Business Temporarily or Permanently
To prevent all bookings for your location:
1. Navigate to **Settings** → **Scheduling**
2. Toggle **all seven days** to closed (off)
3. Click **Save**
**Important considerations:**
* This only affects team members who rely on account opening hours as their fallback
* Team members with their own default working hours will **still show availability** unless their schedules are also updated
* For complete closure, you must also update each team member's schedule (see [Team Schedule](/teams/team-schedule))
### For Temporary Closures
For holidays or short closures, use the **Set not working** feature on the [Team Schedule](/teams/team-schedule#set-not-working-bulk-action) page. This lets you select a date range and multiple team members at once, creating time off entries for everyone in one action — much faster than adding individual time off for each team member. This preserves your regular schedule configuration and makes it easy to resume normal operations.
### For Permanent or Long-Term Closure
If ending availability after a specific date (e.g., closing at end of year):
1. Set account opening hours to closed for all days (safety net)
2. For each team member, set a new default schedule starting on the closure date with no shifts
See [Planning Future Schedule Changes](/teams/team-schedule#planning-future-schedule-changes) for detailed instructions.
***
## Working Hours Enforcement
Control whether appointments from the scheduler must fall within team members' working hours.
### How It Works
When **Enforce working hours** is enabled:
* **Scheduler cells** outside a team member's working hours are visually dimmed and show a `not-allowed` cursor — clicking them is blocked
* **Appointment form** — if the selected time falls outside working hours (e.g., a long service extends past the end of the day), the warning turns red and the **Schedule** / **Update** button is disabled
* The **Working hours** overlay in the scheduler is automatically turned on and cannot be toggled off, so team members' hours are always visible
When **Enforce working hours** is disabled (the default):
* Appointments can be created at any time from the scheduler, even outside working hours
* The **Working hours** overlay can be toggled on or off from the scheduler header for informational purposes
**Note:** Online booking always enforces working hours regardless of this setting. This setting only controls behaviour for business users creating appointments from the scheduler.
### Enabling Working Hours Enforcement
1. Navigate to **Settings** → **Scheduling**
2. Scroll to the **Working hours enforcement** section
3. Toggle **Enforce working hours** on
4. The setting takes effect immediately
### Working Hours Overlay in the Scheduler
In **Day** and **Week** views, the scheduler can display a visual overlay that dims time slots outside each team member's working hours. This overlay is controlled by the **Working hours** toggle in the scheduler header.
* When **Enforce working hours** is enabled, the overlay is always on and the toggle is disabled
* When **Enforce working hours** is disabled, the overlay defaults to off but can be toggled on for informational purposes
***
## Opening Hours & Online Booking
Account opening hours play a special role in online booking availability. Understanding this relationship helps avoid common configuration issues.
### How Online Booking Slots Are Generated
When a client selects a date on your online booking page, the system:
1. **Collects all team members' actual working hours** for that day, resolving the full hierarchy (custom hours > personal schedule > account opening hours as fallback)
2. **Generates candidate time slots** from the union of all team members' working hours
3. **Shows only slots** where at least one eligible team member is available and the full service duration fits within their working hours
This means online booking slots are driven by **actual team member availability**. If a team member has a personal schedule that includes Saturday (even if account hours don't), Saturday slots will appear for that team member.
### How Account Opening Hours Affect Online Booking
Account opening hours serve as a **fallback** for team members without personal schedules. They do not act as a hard boundary:
* **Team member with a personal schedule:** Their own hours are used, regardless of account hours
* **Team member without a personal schedule:** Account opening hours are used as their working hours
### Example
* Account opening hours: Monday-Friday 9:00 AM - 5:00 PM, Saturday-Sunday closed
* Team member "Sarah" has a personal schedule: Monday-Saturday 9:00 AM - 5:00 PM
* Team member "James" has no personal schedule (uses account defaults)
**Result:** Sarah's Saturday slots appear on the online booking page. James has no Saturday availability (account hours are closed). Monday-Friday shows slots for both.
***
## Processing Time & Buffer Defaults
Set location-level default values for processing time and buffer times. These defaults are inherited by all services unless a service explicitly overrides them.
### What Are Processing Time and Buffer Time?
* **Processing Time**: Time after the active service where the client remains but the team member is free to serve others (e.g., colour development, treatment absorption). Visible to clients.
* **Buffer Before**: Setup time before a service that blocks the team member. Not visible to clients.
* **Buffer After**: Cleanup time after a service that blocks the team member. Not visible to clients.
For a detailed explanation of how these compose together, see [Service Timing Concepts](/concepts/timing).
### Configuring Defaults
1. Navigate to **Settings** → **Scheduling**
2. Scroll to the **Processing time & buffer defaults** section
3. Set each value using the dropdown:
* **Default processing time**: Choose from 0 to 120 minutes
* **Default buffer before**: Choose from 0 to 60 minutes
* **Default buffer after**: Choose from 0 to 60 minutes
4. Changes save automatically
### How Defaults Are Inherited
When a service has **"Use default"** selected for any of these values, it inherits the location-level default. The resolution order is:
1. **Bundle override** (if the service is part of a bundle with a custom value)
2. **Service-level value** (if an explicit value is set on the service)
3. **Location default** (the value set here)
4. **0 minutes** (if no default is configured)
### When to Use Defaults
**Set a default processing time when:**
* Most services at your location require similar processing time (e.g., a colour salon where most services need 30 minutes for colour development)
* You want to avoid setting processing time individually on every service
**Set default buffer times when:**
* All services need consistent setup/cleanup time (e.g., 10 minutes between clients for room sanitisation)
* You want to ensure team members always have preparation time between appointments
**Leave defaults at 0 when:**
* Processing and buffer times vary significantly across services
* You prefer to configure these per service individually
***
## Resources
Resources are physical assets like rooms, chairs, or equipment that can be assigned to services and appointments.
### Enabling Resources
1. Navigate to **Settings** → **Scheduling**
2. Find the **Resources** toggle
3. Turn it **On** to enable resources for this location
Once enabled, you can manage resources directly from this page.
For detailed information on setting up and using resources, see [Resources](/resources).
***
## Attendance Tracking
Attendance tracking allows your team to clock in and out, recording work hours for payroll and reporting.
### Enabling Attendance Tracking
1. Navigate to **Settings** → **Scheduling**
2. Find the **Attendance tracking** toggle
3. Turn it **On** to enable for this location
Once enabled:
* The **Time clock** widget appears in the sidebar for all team members with access
* The **Timesheets** page becomes available in the sidebar
* The **Attendance** report appears under Reports
* Admins can set up **clock-in PINs** for team members (see [Clock-in PIN](/teams/index#clock-in-pin))
***
## Scheduler Colours
Customise the background colour used for appointment statuses, check-in, blocked time, and non-working hours in the scheduler. This makes it easy to distinguish between confirmed, completed, pending, cancelled appointments, clients who are waiting or being served, blocked time slots, and time outside working hours at a glance.
### Default Colours
Each entry has a default colour that is used unless you choose a different one:
| Entry | Default Colour |
| -------------------- | -------------- |
| Confirmed | Indigo |
| Completed | Green |
| Pending confirmation | Amber |
| Pending approval | Orange |
| Cancelled | Slate |
| Blocked time | Light Slate |
| Waiting | Teal |
| In progress | Purple |
| Non-working hours | Slate |
Cancelled appointments only appear on the calendar once **Cancelled** is ticked under **Filters → Status** in the scheduler header — it is off by default. The Cancelled colour applies to those cards when **Colour by** is set to Status. See [Filters](/scheduler#filters-status-booking-source-tags).
**Waiting** and **In progress** are the [check-in](/appointments/index#checking-in-a-client) colours, not statuses. When you colour the scheduler by status, checking a client in switches their appointment to the Waiting colour, and starting their service switches it to In progress — taking precedence over the status colour while the client is with you. After checkout the appointment returns to its status colour (Completed). See [Colour by status or by service](#colour-by-status-or-by-service) below for how this looks when you colour by service instead.
**Non-working hours** shades the empty grid (not appointment tiles) outside your team's working hours — shown in the Day and Week team view when the **Working hours** overlay is on. The default has clear contrast against working hours in both light and dark mode, and a colour you choose applies to both.
### Colour by status or by service
The scheduler's **Colour by** toggle decides which colours you see. Find it under the sliders icon in the scheduler toolbar, alongside the other display settings:
* **Status** — appointments take their status colour, or their check-in colour while a client is waiting or in progress.
* **Service** — appointments keep the colour of their service or service category. In the Day, 3 days and Week views the status or check-in colour appears as a thin strip along the top of the appointment; in Month and Agenda views it's shown by the appointment's icons instead.
So if your appointments are currently showing service colours and you want them to change colour by status, switch **Colour by** to **Status**. Service colours themselves are set per service — see [Scheduler Colour](/service-catalog/index#scheduler-colour).
### Changing a Colour
1. Navigate to **Settings** → **Scheduling**
2. Scroll to the **Scheduler colours** section
3. Click the colour button next to the entry you want to change
4. In the popover, either:
* Select a **preset colour** from the swatch grid
* Use the **custom colour** picker to choose any colour
5. The change saves automatically
### Resetting a Colour
To reset a single entry back to its default colour:
1. Click the colour button next to the entry
2. Click **Reset to default** at the bottom of the popover
This option only appears when you have set a custom colour for that entry.
***
### Apply to All Days
Use the copy icon next to any open day's time settings to quickly apply those hours to all other open days. This only copies the times to days that are already marked as open — it won't change closed days to open.
**Tip:** This is useful when most of your business days share the same operating hours. Set one day's hours, then click the copy icon to apply them across all open days.
***
## Time Slot Interval
The **Time slot interval** — the spacing between the start times clients can pick when booking online — is now set under **Settings** → **Booking policies**. See [Booking policies → Time slot interval](/settings/booking-policies#time-slot-interval).
***
## Closing Your Business Temporarily or Permanently
To prevent all bookings for your location:
1. Navigate to **Settings** → **Scheduling**
2. Toggle **all seven days** to closed (off)
3. Click **Save**
**Important considerations:**
* This only affects team members who rely on account opening hours as their fallback
* Team members with their own default working hours will **still show availability** unless their schedules are also updated
* For complete closure, you must also update each team member's schedule (see [Team Schedule](/teams/team-schedule))
### For Temporary Closures
For holidays or short closures, use the **Set not working** feature on the [Team Schedule](/teams/team-schedule#set-not-working-bulk-action) page. This lets you select a date range and multiple team members at once, creating time off entries for everyone in one action — much faster than adding individual time off for each team member. This preserves your regular schedule configuration and makes it easy to resume normal operations.
### For Permanent or Long-Term Closure
If ending availability after a specific date (e.g., closing at end of year):
1. Set account opening hours to closed for all days (safety net)
2. For each team member, set a new default schedule starting on the closure date with no shifts
See [Planning Future Schedule Changes](/teams/team-schedule#planning-future-schedule-changes) for detailed instructions.
***
## Working Hours Enforcement
Control whether appointments from the scheduler must fall within team members' working hours.
### How It Works
When **Enforce working hours** is enabled:
* **Scheduler cells** outside a team member's working hours are visually dimmed and show a `not-allowed` cursor — clicking them is blocked
* **Appointment form** — if the selected time falls outside working hours (e.g., a long service extends past the end of the day), the warning turns red and the **Schedule** / **Update** button is disabled
* The **Working hours** overlay in the scheduler is automatically turned on and cannot be toggled off, so team members' hours are always visible
When **Enforce working hours** is disabled (the default):
* Appointments can be created at any time from the scheduler, even outside working hours
* The **Working hours** overlay can be toggled on or off from the scheduler header for informational purposes
**Note:** Online booking always enforces working hours regardless of this setting. This setting only controls behaviour for business users creating appointments from the scheduler.
### Enabling Working Hours Enforcement
1. Navigate to **Settings** → **Scheduling**
2. Scroll to the **Working hours enforcement** section
3. Toggle **Enforce working hours** on
4. The setting takes effect immediately
### Working Hours Overlay in the Scheduler
In **Day** and **Week** views, the scheduler can display a visual overlay that dims time slots outside each team member's working hours. This overlay is controlled by the **Working hours** toggle in the scheduler header.
* When **Enforce working hours** is enabled, the overlay is always on and the toggle is disabled
* When **Enforce working hours** is disabled, the overlay defaults to off but can be toggled on for informational purposes
***
## Opening Hours & Online Booking
Account opening hours play a special role in online booking availability. Understanding this relationship helps avoid common configuration issues.
### How Online Booking Slots Are Generated
When a client selects a date on your online booking page, the system:
1. **Collects all team members' actual working hours** for that day, resolving the full hierarchy (custom hours > personal schedule > account opening hours as fallback)
2. **Generates candidate time slots** from the union of all team members' working hours
3. **Shows only slots** where at least one eligible team member is available and the full service duration fits within their working hours
This means online booking slots are driven by **actual team member availability**. If a team member has a personal schedule that includes Saturday (even if account hours don't), Saturday slots will appear for that team member.
### How Account Opening Hours Affect Online Booking
Account opening hours serve as a **fallback** for team members without personal schedules. They do not act as a hard boundary:
* **Team member with a personal schedule:** Their own hours are used, regardless of account hours
* **Team member without a personal schedule:** Account opening hours are used as their working hours
### Example
* Account opening hours: Monday-Friday 9:00 AM - 5:00 PM, Saturday-Sunday closed
* Team member "Sarah" has a personal schedule: Monday-Saturday 9:00 AM - 5:00 PM
* Team member "James" has no personal schedule (uses account defaults)
**Result:** Sarah's Saturday slots appear on the online booking page. James has no Saturday availability (account hours are closed). Monday-Friday shows slots for both.
***
## Processing Time & Buffer Defaults
Set location-level default values for processing time and buffer times. These defaults are inherited by all services unless a service explicitly overrides them.
### What Are Processing Time and Buffer Time?
* **Processing Time**: Time after the active service where the client remains but the team member is free to serve others (e.g., colour development, treatment absorption). Visible to clients.
* **Buffer Before**: Setup time before a service that blocks the team member. Not visible to clients.
* **Buffer After**: Cleanup time after a service that blocks the team member. Not visible to clients.
For a detailed explanation of how these compose together, see [Service Timing Concepts](/concepts/timing).
### Configuring Defaults
1. Navigate to **Settings** → **Scheduling**
2. Scroll to the **Processing time & buffer defaults** section
3. Set each value using the dropdown:
* **Default processing time**: Choose from 0 to 120 minutes
* **Default buffer before**: Choose from 0 to 60 minutes
* **Default buffer after**: Choose from 0 to 60 minutes
4. Changes save automatically
### How Defaults Are Inherited
When a service has **"Use default"** selected for any of these values, it inherits the location-level default. The resolution order is:
1. **Bundle override** (if the service is part of a bundle with a custom value)
2. **Service-level value** (if an explicit value is set on the service)
3. **Location default** (the value set here)
4. **0 minutes** (if no default is configured)
### When to Use Defaults
**Set a default processing time when:**
* Most services at your location require similar processing time (e.g., a colour salon where most services need 30 minutes for colour development)
* You want to avoid setting processing time individually on every service
**Set default buffer times when:**
* All services need consistent setup/cleanup time (e.g., 10 minutes between clients for room sanitisation)
* You want to ensure team members always have preparation time between appointments
**Leave defaults at 0 when:**
* Processing and buffer times vary significantly across services
* You prefer to configure these per service individually
***
## Resources
Resources are physical assets like rooms, chairs, or equipment that can be assigned to services and appointments.
### Enabling Resources
1. Navigate to **Settings** → **Scheduling**
2. Find the **Resources** toggle
3. Turn it **On** to enable resources for this location
Once enabled, you can manage resources directly from this page.
For detailed information on setting up and using resources, see [Resources](/resources).
***
## Attendance Tracking
Attendance tracking allows your team to clock in and out, recording work hours for payroll and reporting.
### Enabling Attendance Tracking
1. Navigate to **Settings** → **Scheduling**
2. Find the **Attendance tracking** toggle
3. Turn it **On** to enable for this location
Once enabled:
* The **Time clock** widget appears in the sidebar for all team members with access
* The **Timesheets** page becomes available in the sidebar
* The **Attendance** report appears under Reports
* Admins can set up **clock-in PINs** for team members (see [Clock-in PIN](/teams/index#clock-in-pin))
***
## Scheduler Colours
Customise the background colour used for appointment statuses, check-in, blocked time, and non-working hours in the scheduler. This makes it easy to distinguish between confirmed, completed, pending, cancelled appointments, clients who are waiting or being served, blocked time slots, and time outside working hours at a glance.
### Default Colours
Each entry has a default colour that is used unless you choose a different one:
| Entry | Default Colour |
| -------------------- | -------------- |
| Confirmed | Indigo |
| Completed | Green |
| Pending confirmation | Amber |
| Pending approval | Orange |
| Cancelled | Slate |
| Blocked time | Light Slate |
| Waiting | Teal |
| In progress | Purple |
| Non-working hours | Slate |
Cancelled appointments only appear on the calendar once **Cancelled** is ticked under **Filters → Status** in the scheduler header — it is off by default. The Cancelled colour applies to those cards when **Colour by** is set to Status. See [Filters](/scheduler#filters-status-booking-source-tags).
**Waiting** and **In progress** are the [check-in](/appointments/index#checking-in-a-client) colours, not statuses. When you colour the scheduler by status, checking a client in switches their appointment to the Waiting colour, and starting their service switches it to In progress — taking precedence over the status colour while the client is with you. After checkout the appointment returns to its status colour (Completed). See [Colour by status or by service](#colour-by-status-or-by-service) below for how this looks when you colour by service instead.
**Non-working hours** shades the empty grid (not appointment tiles) outside your team's working hours — shown in the Day and Week team view when the **Working hours** overlay is on. The default has clear contrast against working hours in both light and dark mode, and a colour you choose applies to both.
### Colour by status or by service
The scheduler's **Colour by** toggle decides which colours you see. Find it under the sliders icon in the scheduler toolbar, alongside the other display settings:
* **Status** — appointments take their status colour, or their check-in colour while a client is waiting or in progress.
* **Service** — appointments keep the colour of their service or service category. In the Day, 3 days and Week views the status or check-in colour appears as a thin strip along the top of the appointment; in Month and Agenda views it's shown by the appointment's icons instead.
So if your appointments are currently showing service colours and you want them to change colour by status, switch **Colour by** to **Status**. Service colours themselves are set per service — see [Scheduler Colour](/service-catalog/index#scheduler-colour).
### Changing a Colour
1. Navigate to **Settings** → **Scheduling**
2. Scroll to the **Scheduler colours** section
3. Click the colour button next to the entry you want to change
4. In the popover, either:
* Select a **preset colour** from the swatch grid
* Use the **custom colour** picker to choose any colour
5. The change saves automatically
### Resetting a Colour
To reset a single entry back to its default colour:
1. Click the colour button next to the entry
2. Click **Reset to default** at the bottom of the popover
This option only appears when you have set a custom colour for that entry.
***