> ## Documentation Index
> Fetch the complete documentation index at: https://docs.bellabooking.com/llms.txt
> Use this file to discover all available pages before exploring further.
# Team
> The **Team section** in Bella Booking lets you view, manage, and organise your team efficiently.
## Introduction
The **Team section** in Bella Booking lets you view, manage, and organise your team efficiently. Whether you're adding new team members, updating contact details, managing work schedules, or handling time off, this section provides all the tools you need in one place. Beginners and intermediate users will find intuitive controls and smart workflows to make team administration easy.
***
## Key features
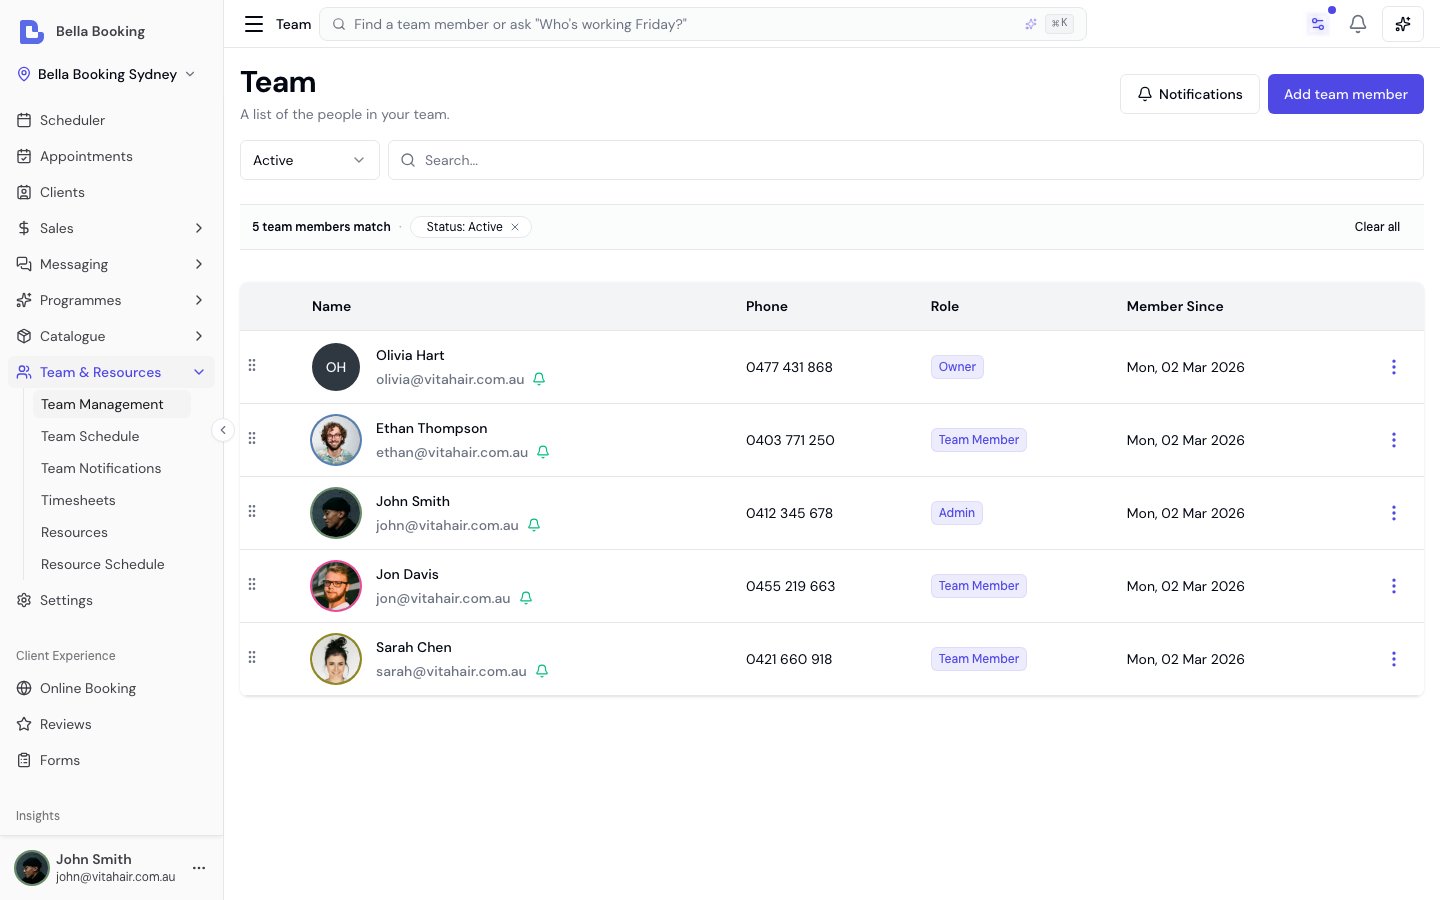
* **Team List View**: Displays all team members with columns for Name, Phone, and Member since.
* **Column order**: Drag team members to set the left-to-right order of their columns on the [scheduler](/scheduler/index) (and in booking pickers).
* **Member Management**: Easily add, edit, archive, and manage team members.
* **Profile Photos & Colours**: Upload photos and assign custom colours for visual identification in the scheduler.
* **Working hours**: Set regular weekly shifts or add custom hours by date for each member.
* **Time off**: Schedule vacation and other leaves with specific dates, times, and descriptions.
* **Team schedule**: View and manage all team members' schedules in a visual grid (see [Team schedule](/teams/team-schedule) for details).
* **Notification preferences**: Configure how each team member is notified about bookings — by email, SMS, in-app (bell), and push — and which events trigger a notification. A member is notified about their assigned appointments; those with full appointment access can also choose to be notified about *all* appointments, not just their own. Admins can manage preferences for any team member, or team members can configure their own.
* **Notification Settings**: A consolidated view to manage notification preferences for all team members at once from one page.
* **Clock-in PIN**: Assign PINs so team members can clock in/out on a shared device without needing their own login.
* **Google Calendar sync**: Choose how each team member's calendar syncs — push Bella Booking appointments to Google, pull personal events back as blocked time, or both. New connections start push-only (see [Google Calendar sync](/teams/google-calendar-sync) for details).
* **Calendar feed**: Subscribe to a team member's appointments in external calendar apps (Google Calendar, Apple Calendar, Outlook).
***
## Step-by-step usage instructions
### 1. Viewing your team
* Go to **Team & resources** > **Team management** from the sidebar.
* You'll see a table with each member's name (with avatar showing their scheduler colour), contact details, and the date they joined.
* Use the search bar at the top to quickly filter members by name or contact info.
 ***
### Reordering team members (scheduler column order)
The order of team members on this list is the same order as their columns on the [scheduler](/scheduler/index) (left to right), and the order they appear in booking pickers.
1. Open **Team** with the status filter set to **Active** (reordering is disabled while All, Archived, or a search filter is active)
2. Hover a row and drag using the grip icon on the left
3. Drop the team member in the position you want — the new order saves automatically
4. Open the [scheduler](/scheduler/index) to see the updated column order
Team members who have never been dragged sort alphabetically by name until you set an order.
***
### 3. Adding a team member
1. Click **Add team member** at the top right of the table.
2. Fill out the form:
* **First name** (required)
* **Last name** (optional)
* **Email** (required if access is enabled)
* **Phone number** (optional)
* **Access enabled**: Toggle to allow system login
* **Online booking enabled**: Toggle to allow clients to book this team member via the online booking portal. This is independent of service qualification — a team member can still be qualified to perform services (and booked from the dashboard) with this turned off; it only controls whether clients can choose them online
* **Hide from scheduler**: Toggle on for someone who doesn't take appointments — a receptionist, manager or bookkeeper. They're kept off the scheduler columns, the team schedule and the appointment pickers
* **Role** (required if access is enabled): Select the member's role (Team Member, Receptionist, or Admin). Each role has customisable permissions — see [Team permissions](/settings/team-permissions) for details
3. Click **Save** to add the new member. The team list will update automatically.
Your plan includes a set number of team members per location (unlimited on Professional). Only team members who appear on the scheduler or can be booked online count towards it. Someone with **Hide from scheduler** on and **Online booking enabled** off doesn't count, so you can add them even when your plan is full — see [Team member limit](/settings/billing#team-member-limit).
***
### Reordering team members (scheduler column order)
The order of team members on this list is the same order as their columns on the [scheduler](/scheduler/index) (left to right), and the order they appear in booking pickers.
1. Open **Team** with the status filter set to **Active** (reordering is disabled while All, Archived, or a search filter is active)
2. Hover a row and drag using the grip icon on the left
3. Drop the team member in the position you want — the new order saves automatically
4. Open the [scheduler](/scheduler/index) to see the updated column order
Team members who have never been dragged sort alphabetically by name until you set an order.
***
### 3. Adding a team member
1. Click **Add team member** at the top right of the table.
2. Fill out the form:
* **First name** (required)
* **Last name** (optional)
* **Email** (required if access is enabled)
* **Phone number** (optional)
* **Access enabled**: Toggle to allow system login
* **Online booking enabled**: Toggle to allow clients to book this team member via the online booking portal. This is independent of service qualification — a team member can still be qualified to perform services (and booked from the dashboard) with this turned off; it only controls whether clients can choose them online
* **Hide from scheduler**: Toggle on for someone who doesn't take appointments — a receptionist, manager or bookkeeper. They're kept off the scheduler columns, the team schedule and the appointment pickers
* **Role** (required if access is enabled): Select the member's role (Team Member, Receptionist, or Admin). Each role has customisable permissions — see [Team permissions](/settings/team-permissions) for details
3. Click **Save** to add the new member. The team list will update automatically.
Your plan includes a set number of team members per location (unlimited on Professional). Only team members who appear on the scheduler or can be booked online count towards it. Someone with **Hide from scheduler** on and **Online booking enabled** off doesn't count, so you can add them even when your plan is full — see [Team member limit](/settings/billing#team-member-limit).
 **Note:** Profile photos and scheduler colours can only be added after creating the team member by editing their profile.
#### Profile photos and avatars
Team member profile photo appear throughout the system and on your online booking page, helping clients recognise and choose their preferred service provider.
**Uploading a Photo:**
1. Edit an existing team member (photos cannot be added when creating a new team member)
2. Click the **Edit** icon on the profile photo placeholder at the top of the form
3. Select an image from your device or drag and drop
4. **File requirements:**
* Format: JPG, PNG, WEBP, or HEIC (iPhone photos, converted automatically)
* File size: Maximum 5 MB
5. **Crop and adjust your photo:**
* Use the zoom slider to zoom in or out on your image
* Drag the image to reposition it within the circular crop area
* The preview shows exactly how the avatar will appear
6. Click **Upload** to save the cropped photo
7. Click **Save** on the team member form to apply all changes
**Removing or Changing a Photo:**
1. Edit the team member's profile
2. Click the **Edit** icon on the current photo
3. Choose **Replace** to upload a new photo or **Delete** to remove it
4. Click **Save** on the team member form to apply changes
#### Scheduler colour
Each team member can have a custom colour assigned for visual identification across the system. This colour appears:
* As a **coloured ring** around their avatar in the team list
* As a **coloured ring** around their avatar in the team schedule grid
* As a **coloured border** on their appointments in the scheduler
* In the **scheduler header** when viewing by team member
**Setting a Scheduler Colour:**
1. Edit an existing team member
2. Scroll down to the **Scheduler colour** section
3. Click on the colour picker to choose a colour
4. Click **Save** to apply the colour
**Clearing a Scheduler Colour:**
1. Edit the team member's profile
2. In the **Scheduler colour** section, click **Clear**
3. Click **Save** to apply changes
When no custom colour is set, team members display with a default grey colour for consistency across the system.
#### Receipt note (registration or provider number)
Each team member can have a **receipt note** — a short line that prints beneath their name on the client's receipt, against each service they performed. It's most often used for a **practitioner registration, licence, or provider number** (for example a physiotherapy, chiropractic, or remedial-massage registration number) so clients can claim a private-health-fund or insurance rebate from the receipt. This is standing text that appears on every receipt the team member is credited on — for a one-off message on a single receipt, use the [receipt note typed at checkout](/settings/receipts#adding-a-note-to-a-single-receipt) instead.
1. Edit the team member's profile
2. Enter the number or note in the **Receipt note** field
3. Click **Save**
The note is snapshotted onto each sale at checkout, so a receipt always shows the note that was in place when the sale happened. Leave it empty to show nothing. See [Receipts & invoices](/settings/receipts#claiming-a-rebate-health-funds-insurance) for how the receipt supports rebate claims.
***
### 4. Viewing & editing a team member
**Viewing the detail page:**
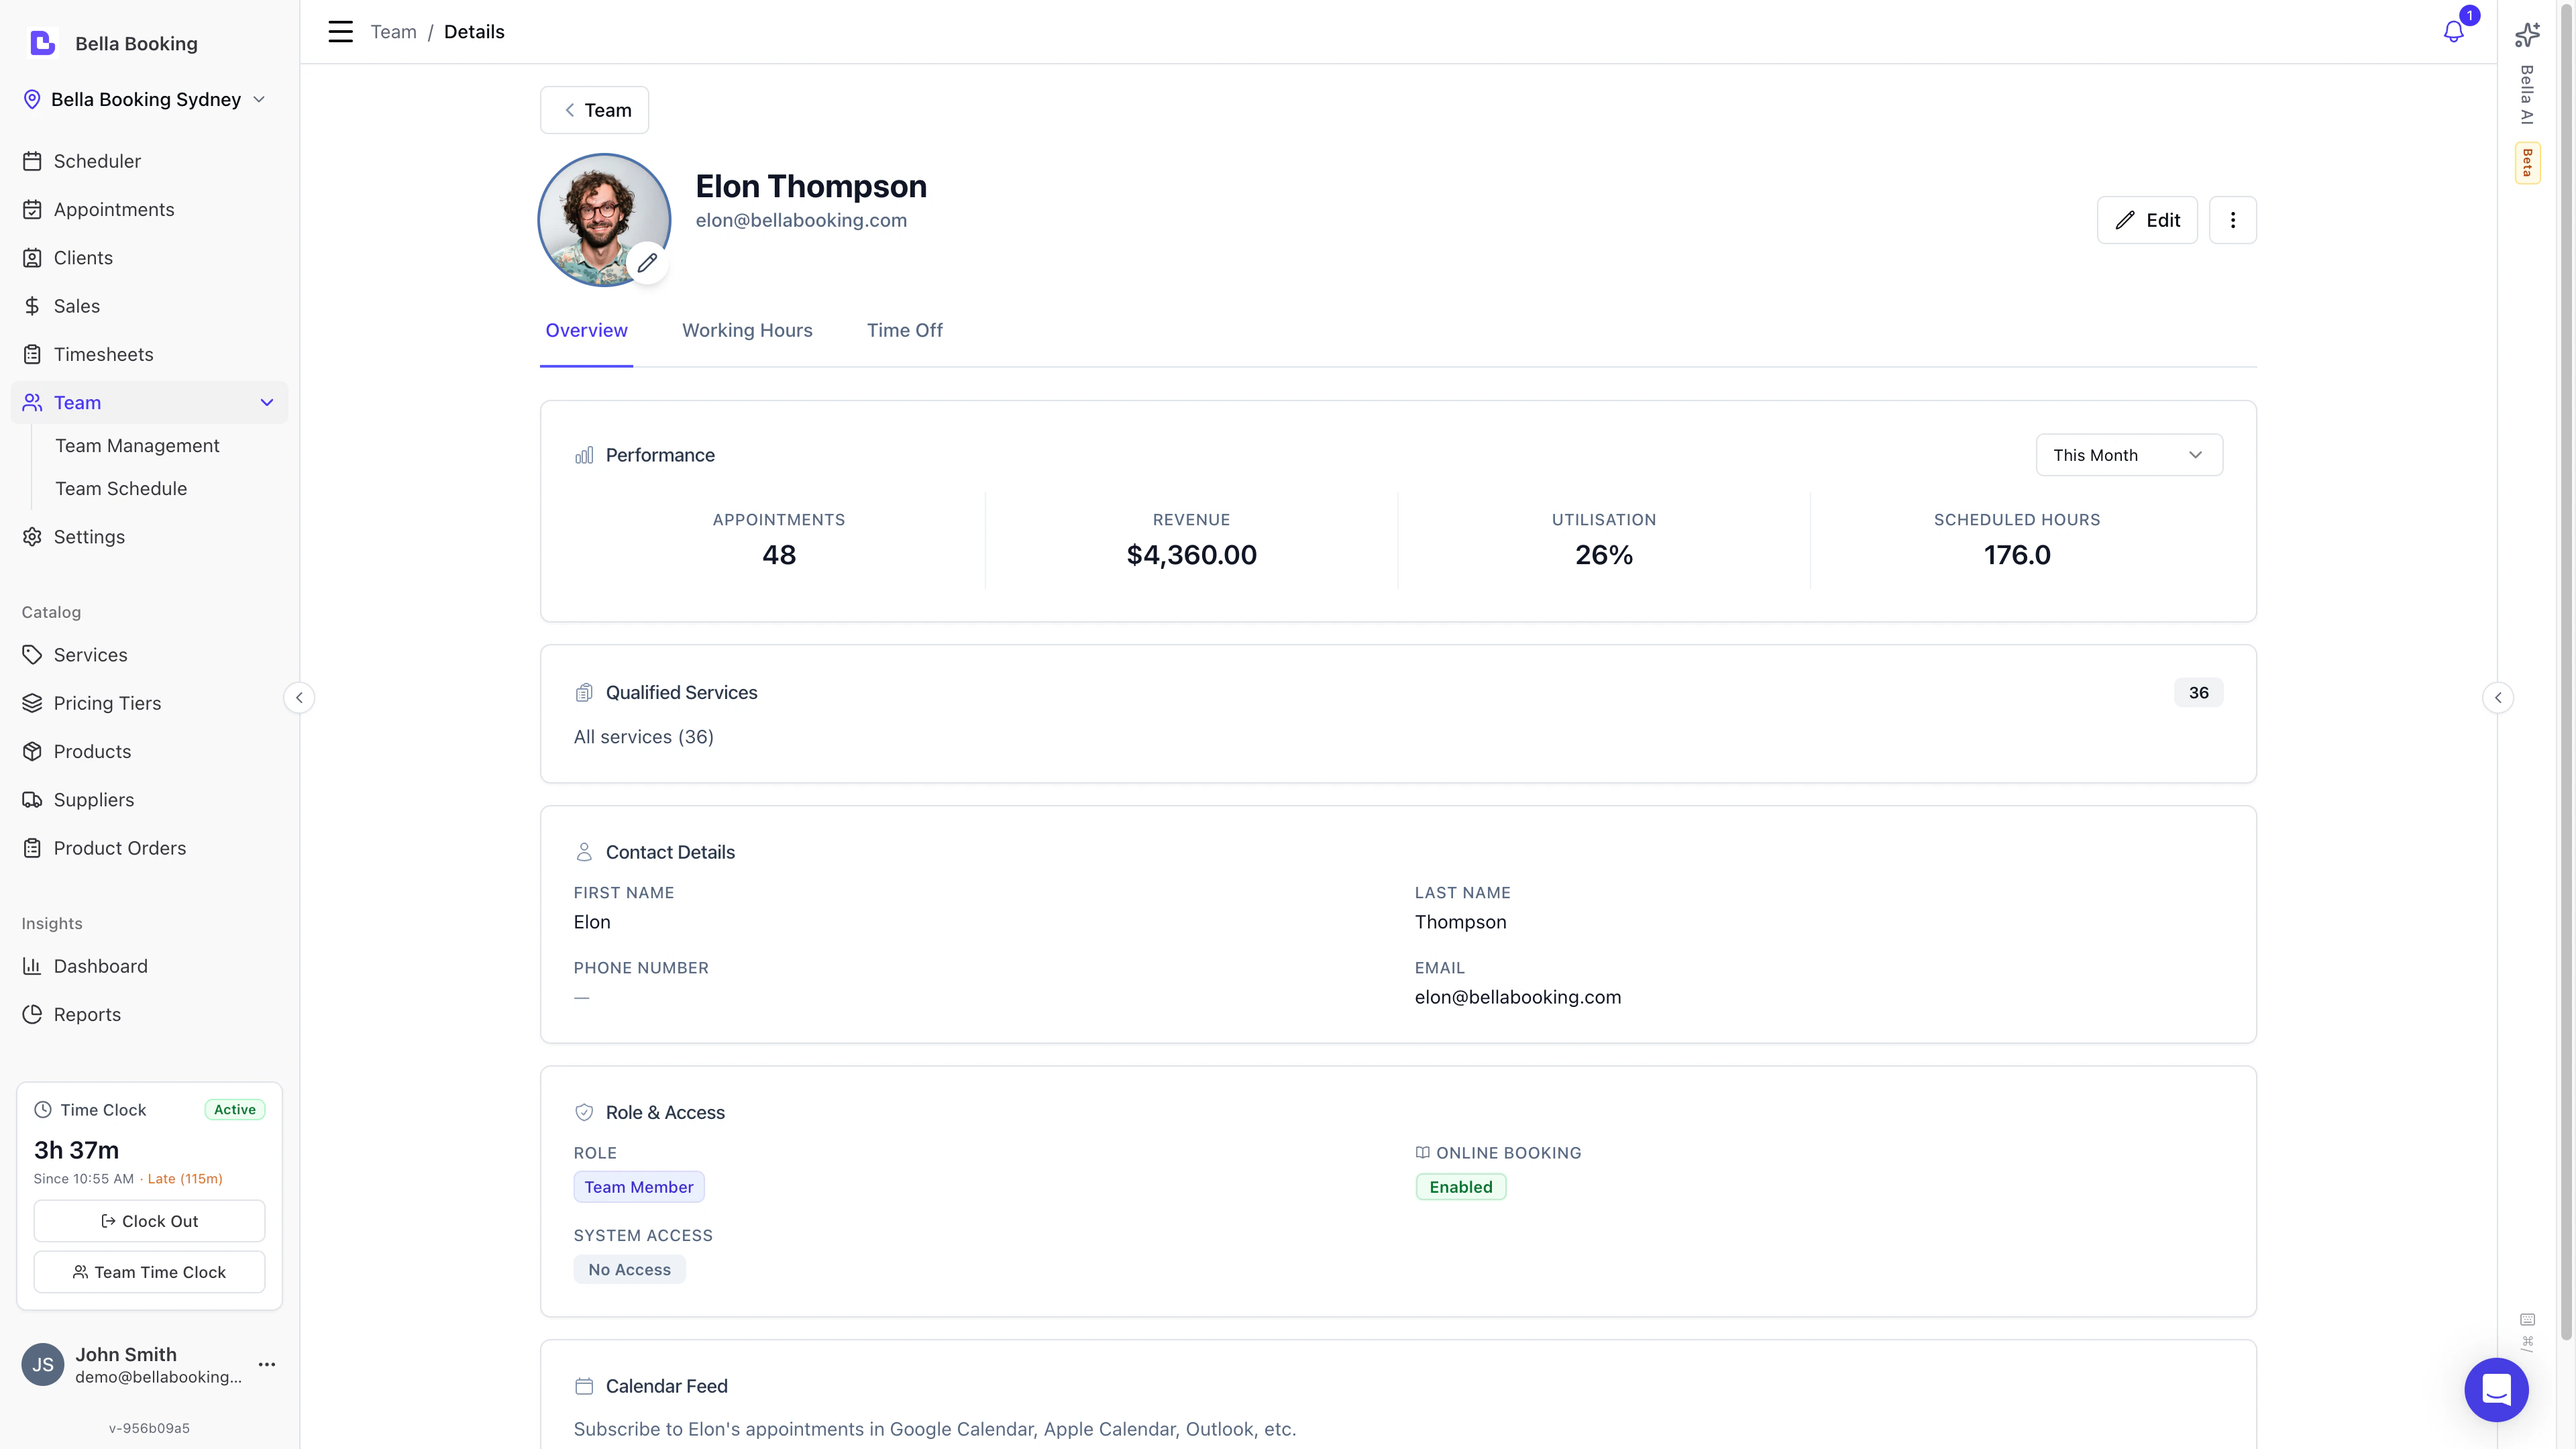
Click on a team member's **name** in the table to open their detail page. The detail page has five tabs:
* **Overview**: Performance stats, qualified services, contact details, role & access, calendar feed
* **Working hours**: Default and custom working hours
* **Time off**: Scheduled leave and time off
* **Calendar**: [Google Calendar sync](/teams/google-calendar-sync) connection and preferences
* **Notifications**: Email, SMS, in-app and push notification preferences, including which appointments (assigned or all) trigger them
**Quick editing via slideover:**
1. In the team table, click the **Edit** (pencil) icon to open the edit slideover.
2. Update any fields:
* Personal information (name, email, phone)
* Access status (enable/disable login)
* Role and permissions
* Profile photo/avatar
* Scheduler colour
* Online booking enabled and Hide from scheduler
* Notification preferences (email, SMS, in-app and push channels, the appointments scope, and event types)
3. Click **Save** and your changes will appear in the list.
***
### 5. Resending access email
If a team member didn't receive their initial access email or needs it sent again:
1. In the team table, locate the team member
2. Click the **Edit** (pencil) icon
3. If the team member has access enabled, you'll see a **Resend access email** button
4. Click **Resend access email**
5. A confirmation message will appear
6. The access email will be sent to the team member's email address
**When to Use:**
* Team member didn't receive the initial access email
* Team member lost their login credentials
* Email address was updated and access needs to be re-sent
* Team member requests a new access email
**Note:** The access email contains login instructions and a link to set up their account. Make sure the team member's email address is correct before resending.
***
### 6. Notification preferences
Each team member can be notified about bookings via **Email**, **SMS**, **In-App** (bell icon), and **Push** (device) notifications. By default a member is notified about the appointments **assigned to them**. A member with full appointment access (the *appointments: view all* permission) can additionally switch on **All appointments** to be notified about **every appointment** at the business — including ones team members create at the till — not just those assigned to them. This is **off by default** (opt-in), and applies uniformly across all four channels. Admins can configure these preferences for any team member, and team members can also manage their own preferences.
#### Default behaviour
When a new team member is created, they automatically receive default notification preferences:
* **Email**: Enabled (if the team member has an email address)
* **SMS**: Disabled
* **In-App**: Enabled
* **Event types**: Confirmed appointment, Cancelled, and Rescheduled
#### Configuring notifications for a team member
There are two ways to configure a team member's notification preferences:
**From the team member detail page:**
1. Click on a team member's name to open their detail page
2. Select the **Notifications** tab
3. Toggle channels on or off:
* **Email notifications**: Requires an email address on the team member's profile
* **SMS notifications**: Requires a phone number on the team member's profile
* **In-app notifications**: Shows events in the bell icon within the app
* **Push notifications**: Sends OS notifications to the member's subscribed devices
4. Choose what triggers a notification:
* **All appointments** (shown only for members with full appointment access): notify about every appointment at the business — including ones team members create at the till — not just those assigned to them. Off by default — switch it on to opt in.
* Event types: Confirmed appointment, Pending approval, Awaiting deposit, Awaiting card, Pending confirmation / deposit, Cancelled, Rescheduled, New waitlist, Waitlist match, Incomplete booking, Client checked in, Tip received (if tips are enabled), Form completed (if forms are enabled), New order (if the product shop is enabled), New review (if reviews are enabled)
5. Click **Save notification preferences**
**From the edit slideover:**
1. Click the **Edit** (pencil) icon on a team member
2. Scroll down to the **Notifications** section at the bottom
3. Configure channels and event types as above
4. Click **Save notification preferences**
**Note:** The notification preferences save separately from other team member details, so you can update notifications without affecting other settings.
#### Notification settings page
For a consolidated view of all team members' notification preferences:
1. Go to the **Team** section
2. Click the **Notifications** button in the top toolbar
3. View and edit notification channels and event types for all team members in a matrix grid
4. Click **Save** next to any team member whose preferences you've changed
This page is ideal for quickly auditing and configuring notifications across your entire team.
#### Self-Service
Team members who have app access can manage their own notification preferences:
1. Click the **bell icon** in the top navigation
2. Select **My notification preferences**
3. Configure their preferred channels and event types
4. Click **Save preferences**
Both admin and team member edits update the same settings — there is a single source of truth.
#### Notification sound
The in-app bell can also play a **sound** when something new arrives, so you don't have to watch the screen. To turn the audible alert on or off:
1. Click the **bell icon** in the top navigation
2. Click the **speaker icon** in the panel header
When it's on, Bella plays a short chime each time your unread count goes up — and vibrates as well, on phones and tablets that support it. You'll hear a test chime the moment you switch it on, so you know it's working. Click the speaker icon again to mute it.
* **Off by default.** Each person turns the sound on for themselves — it's never on without someone asking for it.
* **Remembered per device and per browser.** You can have the sound on at the front desk and off on your phone. Switching it on doesn't turn it on for anyone else on your team.
* **It follows your bell.** You hear a chime for exactly what reaches your bell, so the channels and event types above decide what you hear. If you switch **In-app notifications** off, nothing reaches the bell and the sound never plays.
The sound is tied to the notification bell, so it covers the business events
listed above — appointments confirmed, cancelled or rescheduled, waitlist
entries, check-ins, tips, completed forms, product orders and reviews. It does
**not** play when a client replies in the [Messages](/messages) inbox; those
arrive as a badge on the sidebar instead.
***
## Managing working hours
Working hours determine when a team member is available for appointments. Bella Booking uses a flexible system that allows you to set default weekly schedules and override them for specific dates when needed.
### Understanding working hours inheritance
Working hours follow a priority system:
1. **Time off** (Highest Priority) - If a team member has time off scheduled, they are unavailable
2. **Custom Working hours** - Override default hours for a specific date
3. **Team Member Default Hours** - The member's regular weekly schedule
4. **Account Default Hours** (Lowest Priority) - Falls back to your business's default schedule
This means if you set default hours for a team member, those override the account-level defaults. If you then set custom hours for a specific date, those override the member's defaults for that day only.
***
### Setting default working hours
Default working hours define a team member's regular weekly schedule. Once set, these hours apply automatically to future dates.
#### Accessing default working hours
**From the team member profile:**
1. Go to **Team** from the sidebar
2. Click **Edit** on the team member
3. Select the **Working hours** tab
4. You'll see the current week's schedule with each day's shifts
**From the Team schedule page:**
1. Go to **Team** → **Schedule**
2. Click the settings icon next to a team member
3. Select **Edit Default Schedule**
#### Setting up a weekly schedule
1. In the **Working hours** tab, you'll see a weekly view showing Monday through Sunday
2. For each day, you can set one or more shifts (work periods)
3. Each shift has a **Start time** and **End time**
4. Times are available in 15-minute increments
**Example Schedule:**
* Monday: 9:00 AM - 5:00 PM
* Tuesday: 9:00 AM - 5:00 PM
* Wednesday: 10:00 AM - 6:00 PM
* Thursday: 9:00 AM - 5:00 PM
* Friday: 9:00 AM - 1:00 PM
* Saturday & Sunday: No shifts (off days)
#### Split shifts (multiple shifts per day)
For team members who work split shifts (e.g., morning and afternoon with a long break):
1. Click **Add a shift** on the relevant day
2. Set the first shift (e.g., 9:00 AM - 12:00 PM)
3. Set the second shift (e.g., 2:00 PM - 6:00 PM)
4. The gap between shifts (12:00 PM - 2:00 PM) will not be available for bookings
#### Setting recurring (fixed) days off
To make a team member **regularly unavailable on the same day each week** (for example, always off on Mondays), leave that day with **no shifts** in their default weekly schedule. A weekday with no shifts is treated as a recurring day off and repeats automatically — there's nothing else to turn on.
* **Recurring weekly day off** → remove all shifts from that weekday in the **Working hours** tab (as with Saturday and Sunday in the example above). It applies every week. On the [Team schedule](/teams/team-schedule) grid these show as "No Shifts" (or "Off (recurring)" for alternating-week schedules).
* **One-off or date-range leave** (a single day, a holiday, a few weeks) → use **Time off** instead. Time off takes specific dates, overrides working hours for that period, and always takes priority over the weekly schedule.
* **A whole-team closure** (public holiday, business closure) → use the **Set not working** bulk action on the [Team schedule](/teams/team-schedule#set-not-working-bulk-action) page to set several team members off for a date range in one step, instead of adding time off for each person individually.
There is no separate per-day "lock" toggle, and no setting that stops a team member editing their own hours — who can manage working hours is governed by each team member's role.
**Use Case:** This is perfect for lunch breaks, mid-day appointments, or team members who work morning and evening shifts.
#### Future-dated schedule changes
You can schedule a change to default working hours to take effect on a future date:
1. In the Working hours tab, select a **Start date**
2. Configure the new weekly schedule
3. Click **Save**
4. The new schedule will automatically apply from that date onwards
**Example:** If you know a team member is changing from full-time to part-time starting next month, you can set up their new schedule in advance.
#### Apply to all days
When configuring working hours, use the **copy icon** next to any day's time settings to quickly apply those hours to all other open days. This saves time when most working days share the same schedule.
#### Saving default hours
1. Configure the weekly schedule as needed
2. Set the **Start date** (defaults to the beginning of the current week)
3. Click **Save** to apply the changes
4. The schedule will take effect from the start date
***
### Setting custom working hours
Custom working hours let you override the default schedule for a specific date. This is perfect for one-off changes like:
* Starting work late or early
* Finishing early for an appointment
* Working on a normally off day
* Covering for a colleague
#### When to use custom hours vs default hours
| Scenario | Use |
| ------------------------------------- | ------------------------------------------------------------------ |
| Team member's regular weekly schedule | Default Hours |
| Permanent schedule change | Default Hours (with future start date) |
| One-off late start | Custom hours |
| Working extra shift this Saturday | Custom hours |
| Different hours during holiday period | Custom hours for each day, or Default Hours with future start date |
#### Setting custom hours
**From the team member profile:**
1. Go to **Team** → **Edit** the team member
2. In the **Working hours** tab, find the day you want to modify
3. Click the menu (three dots) next to that day
4. Select **Custom hours**
5. Set the **Date** (confirms the specific date)
6. Add one or more shifts with start and end times
7. Click **Save**
**From the Team schedule page:**
1. Go to **Team** → **Schedule**
2. Find the team member and date in the grid
3. Click on the cell or use the quick menu
4. Select **Edit this day**
5. Configure the custom hours
6. Click **Save**
#### Visual indicators for custom hours
Custom hours are clearly marked in the system:
* In the **Working hours** tab: Shows an "Overridden" badge next to days with custom hours
* In the **Team schedule** grid: Shows a "Custom" badge on days with custom hours
#### Clearing custom hours
To remove custom hours and revert to the default schedule:
**From the Working hours tab:**
1. Click the menu on the day with custom hours
2. Select **Delete Custom hours**
3. The day reverts to the default schedule
**From Team schedule:**
1. Click on the cell with custom hours
2. Select **Clear custom hours** from the menu
3. The schedule reverts to defaults
***
## Managing time off
Time off allows you to record when team members are unavailable due to leave, holidays, or other absences. Unlike custom hours (which modify when someone works), time off blocks out availability entirely.
### Time off types
Bella Booking supports the following types of time off:
| Type | Use For |
| ------------------ | ----------------------------------------------------- |
| **Annual leave** | Holidays, vacation days, planned time off |
| **Sick leave** | Illness, medical appointments |
| **Personal leave** | Personal matters, family emergencies |
| **Training** | Product training, workshops, professional development |
| **Other** | Jury duty, bereavement, or any other reason |
### All-day vs partial time off
**All-Day Time off:**
* Blocks the entire day
* Team member is completely unavailable
* No appointments can be booked
**Partial Time off:**
* Blocks a specific time range (e.g., 9:00 AM - 12:00 PM)
* Team member is available outside that time range
* Perfect for medical appointments, school pickups, etc.
### Adding time off
**From the team member profile:**
1. Go to **Team** → **Edit** the team member
2. Select the **Time off** tab
3. Click **Add time off**
4. Fill in the details:
* **Type**: Select the type of time off (Annual leave, Sick leave, Personal leave, Training, or Other)
* **All day**: Toggle on for full-day time off, off for partial
* **Start date**: When the time off begins
* **End Date**: When the time off ends (same as start for single day)
* **Start Time / End Time** (if partial): The specific hours unavailable
* **Description** (optional): Notes about the time off
5. Click **Add time off** to save
When adding all-day time off, if the team member has existing booked or
confirmed appointments during the selected dates, a warning will appear
showing the number of conflicting appointments. Review and reschedule these
appointments before proceeding.
**From the Team schedule page:**
1. Go to **Team** → **Schedule**
2. Find the team member and date
3. Click on the cell or use the quick menu
4. Select **Add time off**
5. Complete the form and save
### Single day vs multi-day time off
**Single Day:**
* Set the same date for both Start Date and End Date
* Can be all-day or partial
**Multi-Day (Date Range):**
* Set different Start and End dates
* All days in the range are affected
* For partial time off over multiple days:
* First day: Time off starts at the specified start time
* Middle days: Full day time off
* Last day: Time off ends at the specified end time
**Example Multi-Day Partial Time off:**
* Start Date: Monday, Start Time: 2:00 PM
* End Date: Wednesday, End Time: 10:00 AM
* Result:
* Monday: Available until 2:00 PM, then off
* Tuesday: Off all day
* Wednesday: Off until 10:00 AM, then available
### Viewing time off
**From Team Member Profile:**
* Go to **Team** → **Edit** the team member
* Select the **Time off** tab
* See all scheduled time off with type, dates, times, and descriptions
**From Team schedule:**
* Time off is displayed in the schedule grid
* All-day time off shows "Time off" badge
* Partial time off shows the unavailable time range
### How time off affects availability
When time off is scheduled:
1. **Online booking**: Clients cannot book during time off periods
2. **Scheduler**: Time slots during time off are blocked
3. **Availability Calculation**: System automatically excludes time off periods
4. **Working hours**: Time off takes precedence over all working hours settings
For partial time off with remaining work hours, the system shows both:
* The time off period (in grey)
* The remaining available work hours (in colour)
### Deleting time off
1. Go to the **Time off** tab in the team member's profile
2. Find the time off entry you want to remove
3. Click the **Delete** icon
4. Confirm the deletion
5. The time off is removed and availability is restored
**From Team schedule:**
1. Click on the time off cell
2. Select **Delete time off**
3. Confirm the deletion
***
## Calendar feed
Looking for a sync that can also pull your personal Google events into Bella Booking as blocked time? See [Google Calendar sync](/teams/google-calendar-sync), where each team member chooses two-way, push-only, or pull-only.
The Calendar feed feature allows team members to subscribe to their appointments in external calendar applications like Google Calendar, Apple Calendar, or Microsoft Outlook. Unlike the one-time iCal export (available on the [Appointments](/appointments) page), the calendar feed is a subscription URL that automatically syncs new and updated appointments.
### How it works
When you generate a calendar feed URL for a team member:
1. A unique, secure URL is created for that team member
2. The URL can be added to any calendar application that supports iCal subscriptions
3. The calendar app will automatically fetch and display the team member's appointments
4. New appointments, changes, and cancellations sync automatically (refresh frequency depends on the calendar app)
### Generating a calendar feed URL
1. Go to **Team** from the sidebar
2. Click on a team member's name to view their profile
3. In the **Overview** tab, scroll down to the **Calendar feed** section
4. Click **Get calendar URL**
5. Copy the generated URL using the copy button
### Adding to calendar applications
**Google Calendar:**
1. Open Google Calendar
2. Click the **+** next to "Other calendars" in the left sidebar
3. Select **From URL**
4. Paste the calendar feed URL
5. Click **Add calendar**
**Apple Calendar (macOS):**
1. Open Calendar
2. Go to **File** → **New Calendar Subscription**
3. Paste the calendar feed URL
4. Click **Subscribe**
5. Configure refresh frequency and other options
**Microsoft Outlook:**
1. Open Outlook Calendar
2. Go to **Add calendar** → **Subscribe from web**
3. Paste the calendar feed URL
4. Click **Import**
### What's included in the feed
Each appointment in the calendar feed includes:
* **Event title**: Client name and service(s)
* **Date and time**: Appointment start and end time (in your business timezone)
* **Description**: Client contact details (phone, email), service details with prices, appointment notes, and total
### Security considerations
**Keep the calendar feed URL private.** Anyone with this link can view
appointment details including client names, contact information, and service
details. Do not share the URL publicly.
* The URL contains a unique secure token that grants access to the team member's appointments
* If you believe a URL has been compromised, you can regenerate it (this will invalidate the old URL)
* Calendar applications cannot modify appointments—the feed is read-only
### Regenerating a calendar feed URL
If you need to invalidate an existing calendar feed URL (e.g., if it was shared accidentally):
1. Generate a new URL by clicking **Get calendar URL** again
2. The system will create a new unique URL
3. The old URL will no longer work
4. Update any calendar subscriptions with the new URL
### Feed refresh and sync
* Calendar applications typically refresh external feeds every 12-24 hours
* Some applications allow you to configure refresh frequency
* The feed includes appointments from 30 days in the past to 90 days in the future
* Cancelled appointments are automatically excluded from the feed
***
## Clock-in PIN
When attendance tracking is enabled, you can assign a **clock-in PIN** to team members so they can clock in and out on a shared front-desk device without needing their own login.
This is especially useful for team members who do not have system access enabled — they can simply walk up to the shared device, enter their PIN, and record their attendance.
### Setting a clock-in PIN
1. Go to the **Team** section from the sidebar
2. Open the options menu (three dots) next to the team member
3. Select **Set PIN**
4. Enter a 4 to 6 digit numeric PIN
5. Click **Save PIN**
### Changing or removing a PIN
1. Open the options menu next to the team member
2. Select **Change PIN**
3. Enter a new PIN and click **Save PIN**, or click **Remove PIN** to clear it
### Using the team time clock
Once PINs are set up, admins and owners can access the **Team time clock** from the Time clock widget in the sidebar. This opens a modal where team members can:
1. Select their name from the list
2. Enter their 4-digit PIN
3. Clock in or clock out
The Team time clock shows each team member's current status (clocked in, not clocked in, hours worked today) and handles both clock-in and clock-out flows including selecting a clock-out reason (End of shift, Break, or Other).
The **Set PIN** option only appears in the team member menu when attendance
tracking is enabled in your scheduling settings.
***
## Archiving, restoring, and deleting a team member
Bella Booking uses an **archive-first** approach to team member management. You cannot delete a team member directly — you must archive them first.
The business **Owner** cannot be archived.
### Archiving
**From the team list:**
1. Open the three-dot menu next to the member in the team table.
2. Select **Archive**.
3. Confirm in the dialog. The member is archived and no longer appears in the active team list.
**From the team member's profile page:**
1. Open the team member's profile by clicking their name.
2. Click the **three-dot menu** in the header (top-right).
3. Select **Archive**.
4. Confirm in the dialog.
Archived team members cannot be assigned to new appointments and do not appear in the scheduler.
Archiving also removes their access to Bella. If the member had a login, it is revoked for that location the moment they are archived — they can no longer sign in there. Members who work at more than one of your locations keep their access to the others; archive them at each location you want them removed from.
The business **Owner** cannot be archived.
### Viewing archived team members
Use the status filter on the **Team** page to show archived members. Archived members are displayed with a visual indicator.
### Restoring
**From the team list:**
1. Filter the team list to show archived members.
2. Click the three-dot menu next to the archived member.
3. Select **Restore**.
4. The member returns to the active team list with all their records intact.
**From the team member's profile page:**
1. Open the archived team member's profile.
2. Click the **three-dot menu** in the header.
3. Select **Restore**.
A restored member is immediately available again for any service that qualifies **all team members**. Services set to specific team members work differently: archiving took the member off those lists, and restoring does not put them back — re-add them to the services you want them on.
Their login is not restored automatically either. To give it back, open their profile, turn **Access enabled** back on and save — they keep their original sign-in details.
### Permanently deleting
Permanent deletion is only available for archived team members and can only be done from the team list:
1. Filter the team list to show archived members.
2. Click the three-dot menu next to the archived member.
3. Select **Permanently delete** (shown in red).
4. A confirmation dialog appears — **you must type the member's name** to confirm.
5. Click **Permanently delete** to remove the member.
Permanent deletion cannot be undone. A team member can only be permanently
deleted if they have no appointment history, no sales history, and no waitlist
entries. If they have any records, they can only remain archived.
Archiving is the recommended approach for team members who have left. All past
appointments and records are preserved while archived.
***
## FAQs
**Q: How do I give a team member access to Bella Booking?**
A: When adding or editing a member, enable "Access enabled" and assign them a role (Admin, Receptionist, or Team Member). Make sure to provide their email address for login. Each role has customisable permissions — see [Team permissions](/settings/team-permissions).
**Q: Can I change a team member's role after adding them?**
A: Yes! Edit the team member's profile and change their role, then save. You can choose from Owner, Admin, Receptionist, or Team Member.
**Q: What permissions does each role have?**
A: Each role comes with sensible defaults, but all roles except Owner can be fully customised. Toggle individual permissions across appointments, clients, catalogue, sales, reports, settings, forms, and more. See [Team permissions](/settings/team-permissions) for the full breakdown.
**Q: Can I get a sound or audible alert when a new notification comes in?**
A: Yes. Click the **bell icon** in the top navigation, then the **speaker icon** in the panel header to turn the notification sound on. Bella then plays a chime (and vibrates on phones and tablets that support it) whenever your unread count goes up. It's off until you switch it on, and it's remembered per device — so the front desk can have sound on while your phone stays silent. Click the speaker icon again to mute it. See [Notification Sound](#notification-sound). Note this covers business events that reach the bell — it doesn't chime for client replies in the [Messages](/messages) inbox.
**Q: My notification sound isn't playing — why?**
A: Check three things: the **speaker icon** in the bell panel is on (it's per device, so turning it on elsewhere doesn't carry over); **In-app notifications** are enabled in your notification preferences (with them off, nothing reaches the bell, so nothing chimes); and the event that fired is one of the **event types you've enabled**. Also check your device or browser isn't muted — the chime plays through the browser. Remember it plays when your unread count *rises*, so marking everything as read and getting nothing new means silence is expected.
**Q: How do I record annual leave or vacation for a team member?**
A: Go to the member's Time off tab and use the "Add time off" button. Select "Annual leave" as the type, set the dates, and save.
**Q: What's the difference between Custom hours and Time off?**
A: Custom hours **modify** when someone works on a specific day (e.g., starting late, working extra). Time off **blocks** availability entirely (for leave, holidays, etc.). Use custom hours for schedule adjustments; use time off for absences.
**Q: Can a team member have both custom hours and time off on the same day?**
A: Yes, for partial time off. The system will show both the available work time and the time off period. For all-day time off, availability is completely blocked regardless of any custom hours.
**Q: Is it possible to change a team member's email or phone number?**
A: Click the Edit icon next to the member in the team list. Update the contact info and save.
**Q: Can I delete a team member directly?**
A: No. You must **archive** a team member first. Once archived, you can permanently delete them only if they have no appointment, sales, or waitlist history. Most team members who have worked appointments can only be archived, not deleted. See [Archiving, Restoring, and Deleting a Team Member](#archiving-restoring-and-deleting-a-team-member) for details.
**Q: How do I upload a profile photo for a team member?**
A: When editing a team member (not when adding), click the Profile Photo area and upload an image. Use a professional headshot for best results.
**Q: Do team members without system access appear in the scheduler?**
A: Yes! Team members without access still appear in the scheduler for booking purposes, but they cannot log in to manage appointments.
**Q: What is the scheduler colour for?**
A: The scheduler colour helps visually identify team members throughout the system. It appears as a coloured ring around avatars in the team list and schedule, and as a border on appointments in the scheduler. This makes it easy to quickly see which team member is assigned to each appointment.
**Q: What colour do team members have by default?**
A: Team members without a custom colour set display with a default grey colour. You can assign a custom colour by editing the team member's profile and using the colour picker in the "Scheduler colour" section.
**Q: How do I resend an access email to a team member?**
A: Edit the team member's profile and click the "Resend access email" button. This sends a new access email with login instructions to their email address. Useful if they didn't receive the initial email or need it sent again.
**Q: How do I close the business for a public holiday or temporary closure?**
A: Use the **Set not working** button on the **Team schedule** page (**Team** → **Schedule**). Select the date range and which team members to include, then click **Set not working**. This creates time off for all selected team members at once. See [Team schedule - Set Not Working](/teams/team-schedule#set-not-working-bulk-action) for details.
**Q: Can I set different working hours for different weeks?**
A: Yes! You have two options: (1) Use the Start Date when setting default hours to schedule future schedule changes — the new hours automatically apply from that date. (2) Use **per-day recurrence** to set individual days to their own pattern — every N weeks (e.g. Monday every 2 weeks), or monthly on the nth or last weekday (e.g. the 3rd Tuesday of every month) — all within a single schedule. See [Recurring Day Schedules](/teams/team-schedule#recurring-day-schedules) for details.
**Q: How do I give someone a split shift (e.g., morning and evening)?**
A: When setting working hours (default or custom), click "Add a shift" to add multiple time slots for the same day. For example, add 9:00 AM - 12:00 PM and 4:00 PM - 8:00 PM.
**Q: Where can I see everyone's schedule at once?**
A: Go to **Team** → **Schedule** to see a visual grid of all team members' working hours, time off, and availability. See [Team schedule](/teams/team-schedule) for more details.
**Q: How do I sync a team member's appointments to my phone or computer calendar?**
A: You have two options. For **Google Calendar**, use [Google Calendar sync](/teams/google-calendar-sync) — each team member chooses the direction (appointments push to Google, personal events pull back as blocked time, or both). For **other calendar apps** (Apple Calendar, Outlook), use the Calendar feed — go to the team member's profile, scroll to the "Calendar feed" section in the Overview tab, and click "Get calendar URL". Add this URL to your calendar app as a subscription.
**Q: What's the difference between iCal Export, Calendar feed, and Google Calendar sync?**
A: **iCal Export** (on the Appointments page) downloads a one-time snapshot of appointments as a file. **Calendar feed** (on team member profiles) provides a read-only subscription URL that automatically syncs ongoing appointments to any calendar app. **[Google Calendar sync](/teams/google-calendar-sync)** (on the Calendar tab) is a directional connection — push appointments to Google, pull personal events back as blocked time, or both (each team member's choice).
**Q: How often does the calendar feed update?**
A: The feed always returns current data. However, calendar applications typically refresh external subscriptions every 12-24 hours. Some apps allow you to configure a faster refresh rate.
**Q: Can clients see my calendar feed?**
A: No. The calendar feed URL is only available to team members and administrators from the team member profile. The URL should be kept private as it contains appointment details.
**Q: How do I let team members clock in without giving them a login?**
A: Set a clock-in PIN for the team member via the options menu in the team list. They can then use the Team time clock on a shared device to clock in/out using their PIN — no login required.
**Q: Where do I find the Team time clock?**
A: Admins and owners can access it from the **Time clock** widget in the sidebar (both expanded and collapsed views) or from the Time clock bottom sheet on mobile. Look for the **Team time clock** button.
**Q: What happens if a team member forgets their PIN?**
A: An admin can change or reset their PIN at any time via the team member's options menu → **Change PIN**.
**Q: Can team members without system access use the PIN clock-in?**
A: Yes — that is the primary use case. Team members without login access can clock in/out using only their PIN on a shared device where an admin is logged in.
***
**Note:** Profile photos and scheduler colours can only be added after creating the team member by editing their profile.
#### Profile photos and avatars
Team member profile photo appear throughout the system and on your online booking page, helping clients recognise and choose their preferred service provider.
**Uploading a Photo:**
1. Edit an existing team member (photos cannot be added when creating a new team member)
2. Click the **Edit** icon on the profile photo placeholder at the top of the form
3. Select an image from your device or drag and drop
4. **File requirements:**
* Format: JPG, PNG, WEBP, or HEIC (iPhone photos, converted automatically)
* File size: Maximum 5 MB
5. **Crop and adjust your photo:**
* Use the zoom slider to zoom in or out on your image
* Drag the image to reposition it within the circular crop area
* The preview shows exactly how the avatar will appear
6. Click **Upload** to save the cropped photo
7. Click **Save** on the team member form to apply all changes
**Removing or Changing a Photo:**
1. Edit the team member's profile
2. Click the **Edit** icon on the current photo
3. Choose **Replace** to upload a new photo or **Delete** to remove it
4. Click **Save** on the team member form to apply changes
#### Scheduler colour
Each team member can have a custom colour assigned for visual identification across the system. This colour appears:
* As a **coloured ring** around their avatar in the team list
* As a **coloured ring** around their avatar in the team schedule grid
* As a **coloured border** on their appointments in the scheduler
* In the **scheduler header** when viewing by team member
**Setting a Scheduler Colour:**
1. Edit an existing team member
2. Scroll down to the **Scheduler colour** section
3. Click on the colour picker to choose a colour
4. Click **Save** to apply the colour
**Clearing a Scheduler Colour:**
1. Edit the team member's profile
2. In the **Scheduler colour** section, click **Clear**
3. Click **Save** to apply changes
When no custom colour is set, team members display with a default grey colour for consistency across the system.
#### Receipt note (registration or provider number)
Each team member can have a **receipt note** — a short line that prints beneath their name on the client's receipt, against each service they performed. It's most often used for a **practitioner registration, licence, or provider number** (for example a physiotherapy, chiropractic, or remedial-massage registration number) so clients can claim a private-health-fund or insurance rebate from the receipt. This is standing text that appears on every receipt the team member is credited on — for a one-off message on a single receipt, use the [receipt note typed at checkout](/settings/receipts#adding-a-note-to-a-single-receipt) instead.
1. Edit the team member's profile
2. Enter the number or note in the **Receipt note** field
3. Click **Save**
The note is snapshotted onto each sale at checkout, so a receipt always shows the note that was in place when the sale happened. Leave it empty to show nothing. See [Receipts & invoices](/settings/receipts#claiming-a-rebate-health-funds-insurance) for how the receipt supports rebate claims.
***
### 4. Viewing & editing a team member
**Viewing the detail page:**
Click on a team member's **name** in the table to open their detail page. The detail page has five tabs:
* **Overview**: Performance stats, qualified services, contact details, role & access, calendar feed
* **Working hours**: Default and custom working hours
* **Time off**: Scheduled leave and time off
* **Calendar**: [Google Calendar sync](/teams/google-calendar-sync) connection and preferences
* **Notifications**: Email, SMS, in-app and push notification preferences, including which appointments (assigned or all) trigger them
**Quick editing via slideover:**
1. In the team table, click the **Edit** (pencil) icon to open the edit slideover.
2. Update any fields:
* Personal information (name, email, phone)
* Access status (enable/disable login)
* Role and permissions
* Profile photo/avatar
* Scheduler colour
* Online booking enabled and Hide from scheduler
* Notification preferences (email, SMS, in-app and push channels, the appointments scope, and event types)
3. Click **Save** and your changes will appear in the list.
***
### 5. Resending access email
If a team member didn't receive their initial access email or needs it sent again:
1. In the team table, locate the team member
2. Click the **Edit** (pencil) icon
3. If the team member has access enabled, you'll see a **Resend access email** button
4. Click **Resend access email**
5. A confirmation message will appear
6. The access email will be sent to the team member's email address
**When to Use:**
* Team member didn't receive the initial access email
* Team member lost their login credentials
* Email address was updated and access needs to be re-sent
* Team member requests a new access email
**Note:** The access email contains login instructions and a link to set up their account. Make sure the team member's email address is correct before resending.
***
### 6. Notification preferences
Each team member can be notified about bookings via **Email**, **SMS**, **In-App** (bell icon), and **Push** (device) notifications. By default a member is notified about the appointments **assigned to them**. A member with full appointment access (the *appointments: view all* permission) can additionally switch on **All appointments** to be notified about **every appointment** at the business — including ones team members create at the till — not just those assigned to them. This is **off by default** (opt-in), and applies uniformly across all four channels. Admins can configure these preferences for any team member, and team members can also manage their own preferences.
#### Default behaviour
When a new team member is created, they automatically receive default notification preferences:
* **Email**: Enabled (if the team member has an email address)
* **SMS**: Disabled
* **In-App**: Enabled
* **Event types**: Confirmed appointment, Cancelled, and Rescheduled
#### Configuring notifications for a team member
There are two ways to configure a team member's notification preferences:
**From the team member detail page:**
1. Click on a team member's name to open their detail page
2. Select the **Notifications** tab
3. Toggle channels on or off:
* **Email notifications**: Requires an email address on the team member's profile
* **SMS notifications**: Requires a phone number on the team member's profile
* **In-app notifications**: Shows events in the bell icon within the app
* **Push notifications**: Sends OS notifications to the member's subscribed devices
4. Choose what triggers a notification:
* **All appointments** (shown only for members with full appointment access): notify about every appointment at the business — including ones team members create at the till — not just those assigned to them. Off by default — switch it on to opt in.
* Event types: Confirmed appointment, Pending approval, Awaiting deposit, Awaiting card, Pending confirmation / deposit, Cancelled, Rescheduled, New waitlist, Waitlist match, Incomplete booking, Client checked in, Tip received (if tips are enabled), Form completed (if forms are enabled), New order (if the product shop is enabled), New review (if reviews are enabled)
5. Click **Save notification preferences**
**From the edit slideover:**
1. Click the **Edit** (pencil) icon on a team member
2. Scroll down to the **Notifications** section at the bottom
3. Configure channels and event types as above
4. Click **Save notification preferences**
**Note:** The notification preferences save separately from other team member details, so you can update notifications without affecting other settings.
#### Notification settings page
For a consolidated view of all team members' notification preferences:
1. Go to the **Team** section
2. Click the **Notifications** button in the top toolbar
3. View and edit notification channels and event types for all team members in a matrix grid
4. Click **Save** next to any team member whose preferences you've changed
This page is ideal for quickly auditing and configuring notifications across your entire team.
#### Self-Service
Team members who have app access can manage their own notification preferences:
1. Click the **bell icon** in the top navigation
2. Select **My notification preferences**
3. Configure their preferred channels and event types
4. Click **Save preferences**
Both admin and team member edits update the same settings — there is a single source of truth.
#### Notification sound
The in-app bell can also play a **sound** when something new arrives, so you don't have to watch the screen. To turn the audible alert on or off:
1. Click the **bell icon** in the top navigation
2. Click the **speaker icon** in the panel header
When it's on, Bella plays a short chime each time your unread count goes up — and vibrates as well, on phones and tablets that support it. You'll hear a test chime the moment you switch it on, so you know it's working. Click the speaker icon again to mute it.
* **Off by default.** Each person turns the sound on for themselves — it's never on without someone asking for it.
* **Remembered per device and per browser.** You can have the sound on at the front desk and off on your phone. Switching it on doesn't turn it on for anyone else on your team.
* **It follows your bell.** You hear a chime for exactly what reaches your bell, so the channels and event types above decide what you hear. If you switch **In-app notifications** off, nothing reaches the bell and the sound never plays.
The sound is tied to the notification bell, so it covers the business events
listed above — appointments confirmed, cancelled or rescheduled, waitlist
entries, check-ins, tips, completed forms, product orders and reviews. It does
**not** play when a client replies in the [Messages](/messages) inbox; those
arrive as a badge on the sidebar instead.
***
## Managing working hours
Working hours determine when a team member is available for appointments. Bella Booking uses a flexible system that allows you to set default weekly schedules and override them for specific dates when needed.
### Understanding working hours inheritance
Working hours follow a priority system:
1. **Time off** (Highest Priority) - If a team member has time off scheduled, they are unavailable
2. **Custom Working hours** - Override default hours for a specific date
3. **Team Member Default Hours** - The member's regular weekly schedule
4. **Account Default Hours** (Lowest Priority) - Falls back to your business's default schedule
This means if you set default hours for a team member, those override the account-level defaults. If you then set custom hours for a specific date, those override the member's defaults for that day only.
***
### Setting default working hours
Default working hours define a team member's regular weekly schedule. Once set, these hours apply automatically to future dates.
#### Accessing default working hours
**From the team member profile:**
1. Go to **Team** from the sidebar
2. Click **Edit** on the team member
3. Select the **Working hours** tab
4. You'll see the current week's schedule with each day's shifts
**From the Team schedule page:**
1. Go to **Team** → **Schedule**
2. Click the settings icon next to a team member
3. Select **Edit Default Schedule**
#### Setting up a weekly schedule
1. In the **Working hours** tab, you'll see a weekly view showing Monday through Sunday
2. For each day, you can set one or more shifts (work periods)
3. Each shift has a **Start time** and **End time**
4. Times are available in 15-minute increments
**Example Schedule:**
* Monday: 9:00 AM - 5:00 PM
* Tuesday: 9:00 AM - 5:00 PM
* Wednesday: 10:00 AM - 6:00 PM
* Thursday: 9:00 AM - 5:00 PM
* Friday: 9:00 AM - 1:00 PM
* Saturday & Sunday: No shifts (off days)
#### Split shifts (multiple shifts per day)
For team members who work split shifts (e.g., morning and afternoon with a long break):
1. Click **Add a shift** on the relevant day
2. Set the first shift (e.g., 9:00 AM - 12:00 PM)
3. Set the second shift (e.g., 2:00 PM - 6:00 PM)
4. The gap between shifts (12:00 PM - 2:00 PM) will not be available for bookings
#### Setting recurring (fixed) days off
To make a team member **regularly unavailable on the same day each week** (for example, always off on Mondays), leave that day with **no shifts** in their default weekly schedule. A weekday with no shifts is treated as a recurring day off and repeats automatically — there's nothing else to turn on.
* **Recurring weekly day off** → remove all shifts from that weekday in the **Working hours** tab (as with Saturday and Sunday in the example above). It applies every week. On the [Team schedule](/teams/team-schedule) grid these show as "No Shifts" (or "Off (recurring)" for alternating-week schedules).
* **One-off or date-range leave** (a single day, a holiday, a few weeks) → use **Time off** instead. Time off takes specific dates, overrides working hours for that period, and always takes priority over the weekly schedule.
* **A whole-team closure** (public holiday, business closure) → use the **Set not working** bulk action on the [Team schedule](/teams/team-schedule#set-not-working-bulk-action) page to set several team members off for a date range in one step, instead of adding time off for each person individually.
There is no separate per-day "lock" toggle, and no setting that stops a team member editing their own hours — who can manage working hours is governed by each team member's role.
**Use Case:** This is perfect for lunch breaks, mid-day appointments, or team members who work morning and evening shifts.
#### Future-dated schedule changes
You can schedule a change to default working hours to take effect on a future date:
1. In the Working hours tab, select a **Start date**
2. Configure the new weekly schedule
3. Click **Save**
4. The new schedule will automatically apply from that date onwards
**Example:** If you know a team member is changing from full-time to part-time starting next month, you can set up their new schedule in advance.
#### Apply to all days
When configuring working hours, use the **copy icon** next to any day's time settings to quickly apply those hours to all other open days. This saves time when most working days share the same schedule.
#### Saving default hours
1. Configure the weekly schedule as needed
2. Set the **Start date** (defaults to the beginning of the current week)
3. Click **Save** to apply the changes
4. The schedule will take effect from the start date
***
### Setting custom working hours
Custom working hours let you override the default schedule for a specific date. This is perfect for one-off changes like:
* Starting work late or early
* Finishing early for an appointment
* Working on a normally off day
* Covering for a colleague
#### When to use custom hours vs default hours
| Scenario | Use |
| ------------------------------------- | ------------------------------------------------------------------ |
| Team member's regular weekly schedule | Default Hours |
| Permanent schedule change | Default Hours (with future start date) |
| One-off late start | Custom hours |
| Working extra shift this Saturday | Custom hours |
| Different hours during holiday period | Custom hours for each day, or Default Hours with future start date |
#### Setting custom hours
**From the team member profile:**
1. Go to **Team** → **Edit** the team member
2. In the **Working hours** tab, find the day you want to modify
3. Click the menu (three dots) next to that day
4. Select **Custom hours**
5. Set the **Date** (confirms the specific date)
6. Add one or more shifts with start and end times
7. Click **Save**
**From the Team schedule page:**
1. Go to **Team** → **Schedule**
2. Find the team member and date in the grid
3. Click on the cell or use the quick menu
4. Select **Edit this day**
5. Configure the custom hours
6. Click **Save**
#### Visual indicators for custom hours
Custom hours are clearly marked in the system:
* In the **Working hours** tab: Shows an "Overridden" badge next to days with custom hours
* In the **Team schedule** grid: Shows a "Custom" badge on days with custom hours
#### Clearing custom hours
To remove custom hours and revert to the default schedule:
**From the Working hours tab:**
1. Click the menu on the day with custom hours
2. Select **Delete Custom hours**
3. The day reverts to the default schedule
**From Team schedule:**
1. Click on the cell with custom hours
2. Select **Clear custom hours** from the menu
3. The schedule reverts to defaults
***
## Managing time off
Time off allows you to record when team members are unavailable due to leave, holidays, or other absences. Unlike custom hours (which modify when someone works), time off blocks out availability entirely.
### Time off types
Bella Booking supports the following types of time off:
| Type | Use For |
| ------------------ | ----------------------------------------------------- |
| **Annual leave** | Holidays, vacation days, planned time off |
| **Sick leave** | Illness, medical appointments |
| **Personal leave** | Personal matters, family emergencies |
| **Training** | Product training, workshops, professional development |
| **Other** | Jury duty, bereavement, or any other reason |
### All-day vs partial time off
**All-Day Time off:**
* Blocks the entire day
* Team member is completely unavailable
* No appointments can be booked
**Partial Time off:**
* Blocks a specific time range (e.g., 9:00 AM - 12:00 PM)
* Team member is available outside that time range
* Perfect for medical appointments, school pickups, etc.
### Adding time off
**From the team member profile:**
1. Go to **Team** → **Edit** the team member
2. Select the **Time off** tab
3. Click **Add time off**
4. Fill in the details:
* **Type**: Select the type of time off (Annual leave, Sick leave, Personal leave, Training, or Other)
* **All day**: Toggle on for full-day time off, off for partial
* **Start date**: When the time off begins
* **End Date**: When the time off ends (same as start for single day)
* **Start Time / End Time** (if partial): The specific hours unavailable
* **Description** (optional): Notes about the time off
5. Click **Add time off** to save
When adding all-day time off, if the team member has existing booked or
confirmed appointments during the selected dates, a warning will appear
showing the number of conflicting appointments. Review and reschedule these
appointments before proceeding.
**From the Team schedule page:**
1. Go to **Team** → **Schedule**
2. Find the team member and date
3. Click on the cell or use the quick menu
4. Select **Add time off**
5. Complete the form and save
### Single day vs multi-day time off
**Single Day:**
* Set the same date for both Start Date and End Date
* Can be all-day or partial
**Multi-Day (Date Range):**
* Set different Start and End dates
* All days in the range are affected
* For partial time off over multiple days:
* First day: Time off starts at the specified start time
* Middle days: Full day time off
* Last day: Time off ends at the specified end time
**Example Multi-Day Partial Time off:**
* Start Date: Monday, Start Time: 2:00 PM
* End Date: Wednesday, End Time: 10:00 AM
* Result:
* Monday: Available until 2:00 PM, then off
* Tuesday: Off all day
* Wednesday: Off until 10:00 AM, then available
### Viewing time off
**From Team Member Profile:**
* Go to **Team** → **Edit** the team member
* Select the **Time off** tab
* See all scheduled time off with type, dates, times, and descriptions
**From Team schedule:**
* Time off is displayed in the schedule grid
* All-day time off shows "Time off" badge
* Partial time off shows the unavailable time range
### How time off affects availability
When time off is scheduled:
1. **Online booking**: Clients cannot book during time off periods
2. **Scheduler**: Time slots during time off are blocked
3. **Availability Calculation**: System automatically excludes time off periods
4. **Working hours**: Time off takes precedence over all working hours settings
For partial time off with remaining work hours, the system shows both:
* The time off period (in grey)
* The remaining available work hours (in colour)
### Deleting time off
1. Go to the **Time off** tab in the team member's profile
2. Find the time off entry you want to remove
3. Click the **Delete** icon
4. Confirm the deletion
5. The time off is removed and availability is restored
**From Team schedule:**
1. Click on the time off cell
2. Select **Delete time off**
3. Confirm the deletion
***
## Calendar feed
Looking for a sync that can also pull your personal Google events into Bella Booking as blocked time? See [Google Calendar sync](/teams/google-calendar-sync), where each team member chooses two-way, push-only, or pull-only.
The Calendar feed feature allows team members to subscribe to their appointments in external calendar applications like Google Calendar, Apple Calendar, or Microsoft Outlook. Unlike the one-time iCal export (available on the [Appointments](/appointments) page), the calendar feed is a subscription URL that automatically syncs new and updated appointments.
### How it works
When you generate a calendar feed URL for a team member:
1. A unique, secure URL is created for that team member
2. The URL can be added to any calendar application that supports iCal subscriptions
3. The calendar app will automatically fetch and display the team member's appointments
4. New appointments, changes, and cancellations sync automatically (refresh frequency depends on the calendar app)
### Generating a calendar feed URL
1. Go to **Team** from the sidebar
2. Click on a team member's name to view their profile
3. In the **Overview** tab, scroll down to the **Calendar feed** section
4. Click **Get calendar URL**
5. Copy the generated URL using the copy button
### Adding to calendar applications
**Google Calendar:**
1. Open Google Calendar
2. Click the **+** next to "Other calendars" in the left sidebar
3. Select **From URL**
4. Paste the calendar feed URL
5. Click **Add calendar**
**Apple Calendar (macOS):**
1. Open Calendar
2. Go to **File** → **New Calendar Subscription**
3. Paste the calendar feed URL
4. Click **Subscribe**
5. Configure refresh frequency and other options
**Microsoft Outlook:**
1. Open Outlook Calendar
2. Go to **Add calendar** → **Subscribe from web**
3. Paste the calendar feed URL
4. Click **Import**
### What's included in the feed
Each appointment in the calendar feed includes:
* **Event title**: Client name and service(s)
* **Date and time**: Appointment start and end time (in your business timezone)
* **Description**: Client contact details (phone, email), service details with prices, appointment notes, and total
### Security considerations
**Keep the calendar feed URL private.** Anyone with this link can view
appointment details including client names, contact information, and service
details. Do not share the URL publicly.
* The URL contains a unique secure token that grants access to the team member's appointments
* If you believe a URL has been compromised, you can regenerate it (this will invalidate the old URL)
* Calendar applications cannot modify appointments—the feed is read-only
### Regenerating a calendar feed URL
If you need to invalidate an existing calendar feed URL (e.g., if it was shared accidentally):
1. Generate a new URL by clicking **Get calendar URL** again
2. The system will create a new unique URL
3. The old URL will no longer work
4. Update any calendar subscriptions with the new URL
### Feed refresh and sync
* Calendar applications typically refresh external feeds every 12-24 hours
* Some applications allow you to configure refresh frequency
* The feed includes appointments from 30 days in the past to 90 days in the future
* Cancelled appointments are automatically excluded from the feed
***
## Clock-in PIN
When attendance tracking is enabled, you can assign a **clock-in PIN** to team members so they can clock in and out on a shared front-desk device without needing their own login.
This is especially useful for team members who do not have system access enabled — they can simply walk up to the shared device, enter their PIN, and record their attendance.
### Setting a clock-in PIN
1. Go to the **Team** section from the sidebar
2. Open the options menu (three dots) next to the team member
3. Select **Set PIN**
4. Enter a 4 to 6 digit numeric PIN
5. Click **Save PIN**
### Changing or removing a PIN
1. Open the options menu next to the team member
2. Select **Change PIN**
3. Enter a new PIN and click **Save PIN**, or click **Remove PIN** to clear it
### Using the team time clock
Once PINs are set up, admins and owners can access the **Team time clock** from the Time clock widget in the sidebar. This opens a modal where team members can:
1. Select their name from the list
2. Enter their 4-digit PIN
3. Clock in or clock out
The Team time clock shows each team member's current status (clocked in, not clocked in, hours worked today) and handles both clock-in and clock-out flows including selecting a clock-out reason (End of shift, Break, or Other).
The **Set PIN** option only appears in the team member menu when attendance
tracking is enabled in your scheduling settings.
***
## Archiving, restoring, and deleting a team member
Bella Booking uses an **archive-first** approach to team member management. You cannot delete a team member directly — you must archive them first.
The business **Owner** cannot be archived.
### Archiving
**From the team list:**
1. Open the three-dot menu next to the member in the team table.
2. Select **Archive**.
3. Confirm in the dialog. The member is archived and no longer appears in the active team list.
**From the team member's profile page:**
1. Open the team member's profile by clicking their name.
2. Click the **three-dot menu** in the header (top-right).
3. Select **Archive**.
4. Confirm in the dialog.
Archived team members cannot be assigned to new appointments and do not appear in the scheduler.
Archiving also removes their access to Bella. If the member had a login, it is revoked for that location the moment they are archived — they can no longer sign in there. Members who work at more than one of your locations keep their access to the others; archive them at each location you want them removed from.
The business **Owner** cannot be archived.
### Viewing archived team members
Use the status filter on the **Team** page to show archived members. Archived members are displayed with a visual indicator.
### Restoring
**From the team list:**
1. Filter the team list to show archived members.
2. Click the three-dot menu next to the archived member.
3. Select **Restore**.
4. The member returns to the active team list with all their records intact.
**From the team member's profile page:**
1. Open the archived team member's profile.
2. Click the **three-dot menu** in the header.
3. Select **Restore**.
A restored member is immediately available again for any service that qualifies **all team members**. Services set to specific team members work differently: archiving took the member off those lists, and restoring does not put them back — re-add them to the services you want them on.
Their login is not restored automatically either. To give it back, open their profile, turn **Access enabled** back on and save — they keep their original sign-in details.
### Permanently deleting
Permanent deletion is only available for archived team members and can only be done from the team list:
1. Filter the team list to show archived members.
2. Click the three-dot menu next to the archived member.
3. Select **Permanently delete** (shown in red).
4. A confirmation dialog appears — **you must type the member's name** to confirm.
5. Click **Permanently delete** to remove the member.
Permanent deletion cannot be undone. A team member can only be permanently
deleted if they have no appointment history, no sales history, and no waitlist
entries. If they have any records, they can only remain archived.
Archiving is the recommended approach for team members who have left. All past
appointments and records are preserved while archived.
***
## FAQs
**Q: How do I give a team member access to Bella Booking?**
A: When adding or editing a member, enable "Access enabled" and assign them a role (Admin, Receptionist, or Team Member). Make sure to provide their email address for login. Each role has customisable permissions — see [Team permissions](/settings/team-permissions).
**Q: Can I change a team member's role after adding them?**
A: Yes! Edit the team member's profile and change their role, then save. You can choose from Owner, Admin, Receptionist, or Team Member.
**Q: What permissions does each role have?**
A: Each role comes with sensible defaults, but all roles except Owner can be fully customised. Toggle individual permissions across appointments, clients, catalogue, sales, reports, settings, forms, and more. See [Team permissions](/settings/team-permissions) for the full breakdown.
**Q: Can I get a sound or audible alert when a new notification comes in?**
A: Yes. Click the **bell icon** in the top navigation, then the **speaker icon** in the panel header to turn the notification sound on. Bella then plays a chime (and vibrates on phones and tablets that support it) whenever your unread count goes up. It's off until you switch it on, and it's remembered per device — so the front desk can have sound on while your phone stays silent. Click the speaker icon again to mute it. See [Notification Sound](#notification-sound). Note this covers business events that reach the bell — it doesn't chime for client replies in the [Messages](/messages) inbox.
**Q: My notification sound isn't playing — why?**
A: Check three things: the **speaker icon** in the bell panel is on (it's per device, so turning it on elsewhere doesn't carry over); **In-app notifications** are enabled in your notification preferences (with them off, nothing reaches the bell, so nothing chimes); and the event that fired is one of the **event types you've enabled**. Also check your device or browser isn't muted — the chime plays through the browser. Remember it plays when your unread count *rises*, so marking everything as read and getting nothing new means silence is expected.
**Q: How do I record annual leave or vacation for a team member?**
A: Go to the member's Time off tab and use the "Add time off" button. Select "Annual leave" as the type, set the dates, and save.
**Q: What's the difference between Custom hours and Time off?**
A: Custom hours **modify** when someone works on a specific day (e.g., starting late, working extra). Time off **blocks** availability entirely (for leave, holidays, etc.). Use custom hours for schedule adjustments; use time off for absences.
**Q: Can a team member have both custom hours and time off on the same day?**
A: Yes, for partial time off. The system will show both the available work time and the time off period. For all-day time off, availability is completely blocked regardless of any custom hours.
**Q: Is it possible to change a team member's email or phone number?**
A: Click the Edit icon next to the member in the team list. Update the contact info and save.
**Q: Can I delete a team member directly?**
A: No. You must **archive** a team member first. Once archived, you can permanently delete them only if they have no appointment, sales, or waitlist history. Most team members who have worked appointments can only be archived, not deleted. See [Archiving, Restoring, and Deleting a Team Member](#archiving-restoring-and-deleting-a-team-member) for details.
**Q: How do I upload a profile photo for a team member?**
A: When editing a team member (not when adding), click the Profile Photo area and upload an image. Use a professional headshot for best results.
**Q: Do team members without system access appear in the scheduler?**
A: Yes! Team members without access still appear in the scheduler for booking purposes, but they cannot log in to manage appointments.
**Q: What is the scheduler colour for?**
A: The scheduler colour helps visually identify team members throughout the system. It appears as a coloured ring around avatars in the team list and schedule, and as a border on appointments in the scheduler. This makes it easy to quickly see which team member is assigned to each appointment.
**Q: What colour do team members have by default?**
A: Team members without a custom colour set display with a default grey colour. You can assign a custom colour by editing the team member's profile and using the colour picker in the "Scheduler colour" section.
**Q: How do I resend an access email to a team member?**
A: Edit the team member's profile and click the "Resend access email" button. This sends a new access email with login instructions to their email address. Useful if they didn't receive the initial email or need it sent again.
**Q: How do I close the business for a public holiday or temporary closure?**
A: Use the **Set not working** button on the **Team schedule** page (**Team** → **Schedule**). Select the date range and which team members to include, then click **Set not working**. This creates time off for all selected team members at once. See [Team schedule - Set Not Working](/teams/team-schedule#set-not-working-bulk-action) for details.
**Q: Can I set different working hours for different weeks?**
A: Yes! You have two options: (1) Use the Start Date when setting default hours to schedule future schedule changes — the new hours automatically apply from that date. (2) Use **per-day recurrence** to set individual days to their own pattern — every N weeks (e.g. Monday every 2 weeks), or monthly on the nth or last weekday (e.g. the 3rd Tuesday of every month) — all within a single schedule. See [Recurring Day Schedules](/teams/team-schedule#recurring-day-schedules) for details.
**Q: How do I give someone a split shift (e.g., morning and evening)?**
A: When setting working hours (default or custom), click "Add a shift" to add multiple time slots for the same day. For example, add 9:00 AM - 12:00 PM and 4:00 PM - 8:00 PM.
**Q: Where can I see everyone's schedule at once?**
A: Go to **Team** → **Schedule** to see a visual grid of all team members' working hours, time off, and availability. See [Team schedule](/teams/team-schedule) for more details.
**Q: How do I sync a team member's appointments to my phone or computer calendar?**
A: You have two options. For **Google Calendar**, use [Google Calendar sync](/teams/google-calendar-sync) — each team member chooses the direction (appointments push to Google, personal events pull back as blocked time, or both). For **other calendar apps** (Apple Calendar, Outlook), use the Calendar feed — go to the team member's profile, scroll to the "Calendar feed" section in the Overview tab, and click "Get calendar URL". Add this URL to your calendar app as a subscription.
**Q: What's the difference between iCal Export, Calendar feed, and Google Calendar sync?**
A: **iCal Export** (on the Appointments page) downloads a one-time snapshot of appointments as a file. **Calendar feed** (on team member profiles) provides a read-only subscription URL that automatically syncs ongoing appointments to any calendar app. **[Google Calendar sync](/teams/google-calendar-sync)** (on the Calendar tab) is a directional connection — push appointments to Google, pull personal events back as blocked time, or both (each team member's choice).
**Q: How often does the calendar feed update?**
A: The feed always returns current data. However, calendar applications typically refresh external subscriptions every 12-24 hours. Some apps allow you to configure a faster refresh rate.
**Q: Can clients see my calendar feed?**
A: No. The calendar feed URL is only available to team members and administrators from the team member profile. The URL should be kept private as it contains appointment details.
**Q: How do I let team members clock in without giving them a login?**
A: Set a clock-in PIN for the team member via the options menu in the team list. They can then use the Team time clock on a shared device to clock in/out using their PIN — no login required.
**Q: Where do I find the Team time clock?**
A: Admins and owners can access it from the **Time clock** widget in the sidebar (both expanded and collapsed views) or from the Time clock bottom sheet on mobile. Look for the **Team time clock** button.
**Q: What happens if a team member forgets their PIN?**
A: An admin can change or reset their PIN at any time via the team member's options menu → **Change PIN**.
**Q: Can team members without system access use the PIN clock-in?**
A: Yes — that is the primary use case. Team members without login access can clock in/out using only their PIN on a shared device where an admin is logged in.
***