Introduction
The Clients section serves as your comprehensive database for client management. Easily add, update, search, import, and organise client profiles to keep all contact and history information at your fingertips, supporting smooth and efficient operations.Key Features
- Client List View: See all clients in a table, including Name, Phone, and Client Since.
- Client Statistics: View total revenue, appointment count, cancellation count, and no-show count for each client.
- Add Client: Create new profiles with full contact and notification preferences.
- Search: Find any client instantly by name or phone number.
- Import: Bring in multiple clients at once using a CSV spreadsheet.
- Export: Export your client list to CSV for backups or external use.
- Edit & Details: View and update client information, files, and appointments using an interactive side panel.
- Archive & Delete: Archive clients to hide them from the active list, restore them later, or permanently delete archived clients with no history.
- Note & Document Visibility: Separate note fields for private (team-only), client-visible, and client-written notes. Documents can be marked as public or private.
- Document Management: Upload, view, and delete files attached to client profiles.
- Family Members: Link dependents and family members to a client’s account, manage relationships, and book appointments on their behalf.
- Loyalty: View a client’s loyalty points balance, transaction history, and available rewards. Manually adjust points when needed.
Step-by-Step Usage Instructions
1. Adding a New Client
- Go to the Clients section in the main sidebar.
- Click the
Add clientbutton (top-right). - In the side panel, enter:
- First Name (required)
- Last Name (optional)
- Email (optional, for appointment notifications)
- Phone Number (optional, for appointment notifications)
- Notes (optional, for internal business notes)
- Notification Preferences: Select whether to send booking reminders via SMS and/or email for this client.
- Once all fields are filled, click
Saveat the bottom of the panel. - The new client now appears at the top of your client list.
2. Viewing and Editing a Client’s Details
- Locate the desired client:
- Use the Search bar at the top to type part of their name or phone number.
- Or, navigate through the paginated list with Next/Previous.
- Click any client row in the list. This opens the side panel with six tabs:
- Details: View/edit personal info, notes, and notification settings. Make changes and click
Saveto update. - Files: Attach files (e.g., consent forms, photos) to this client’s profile by clicking
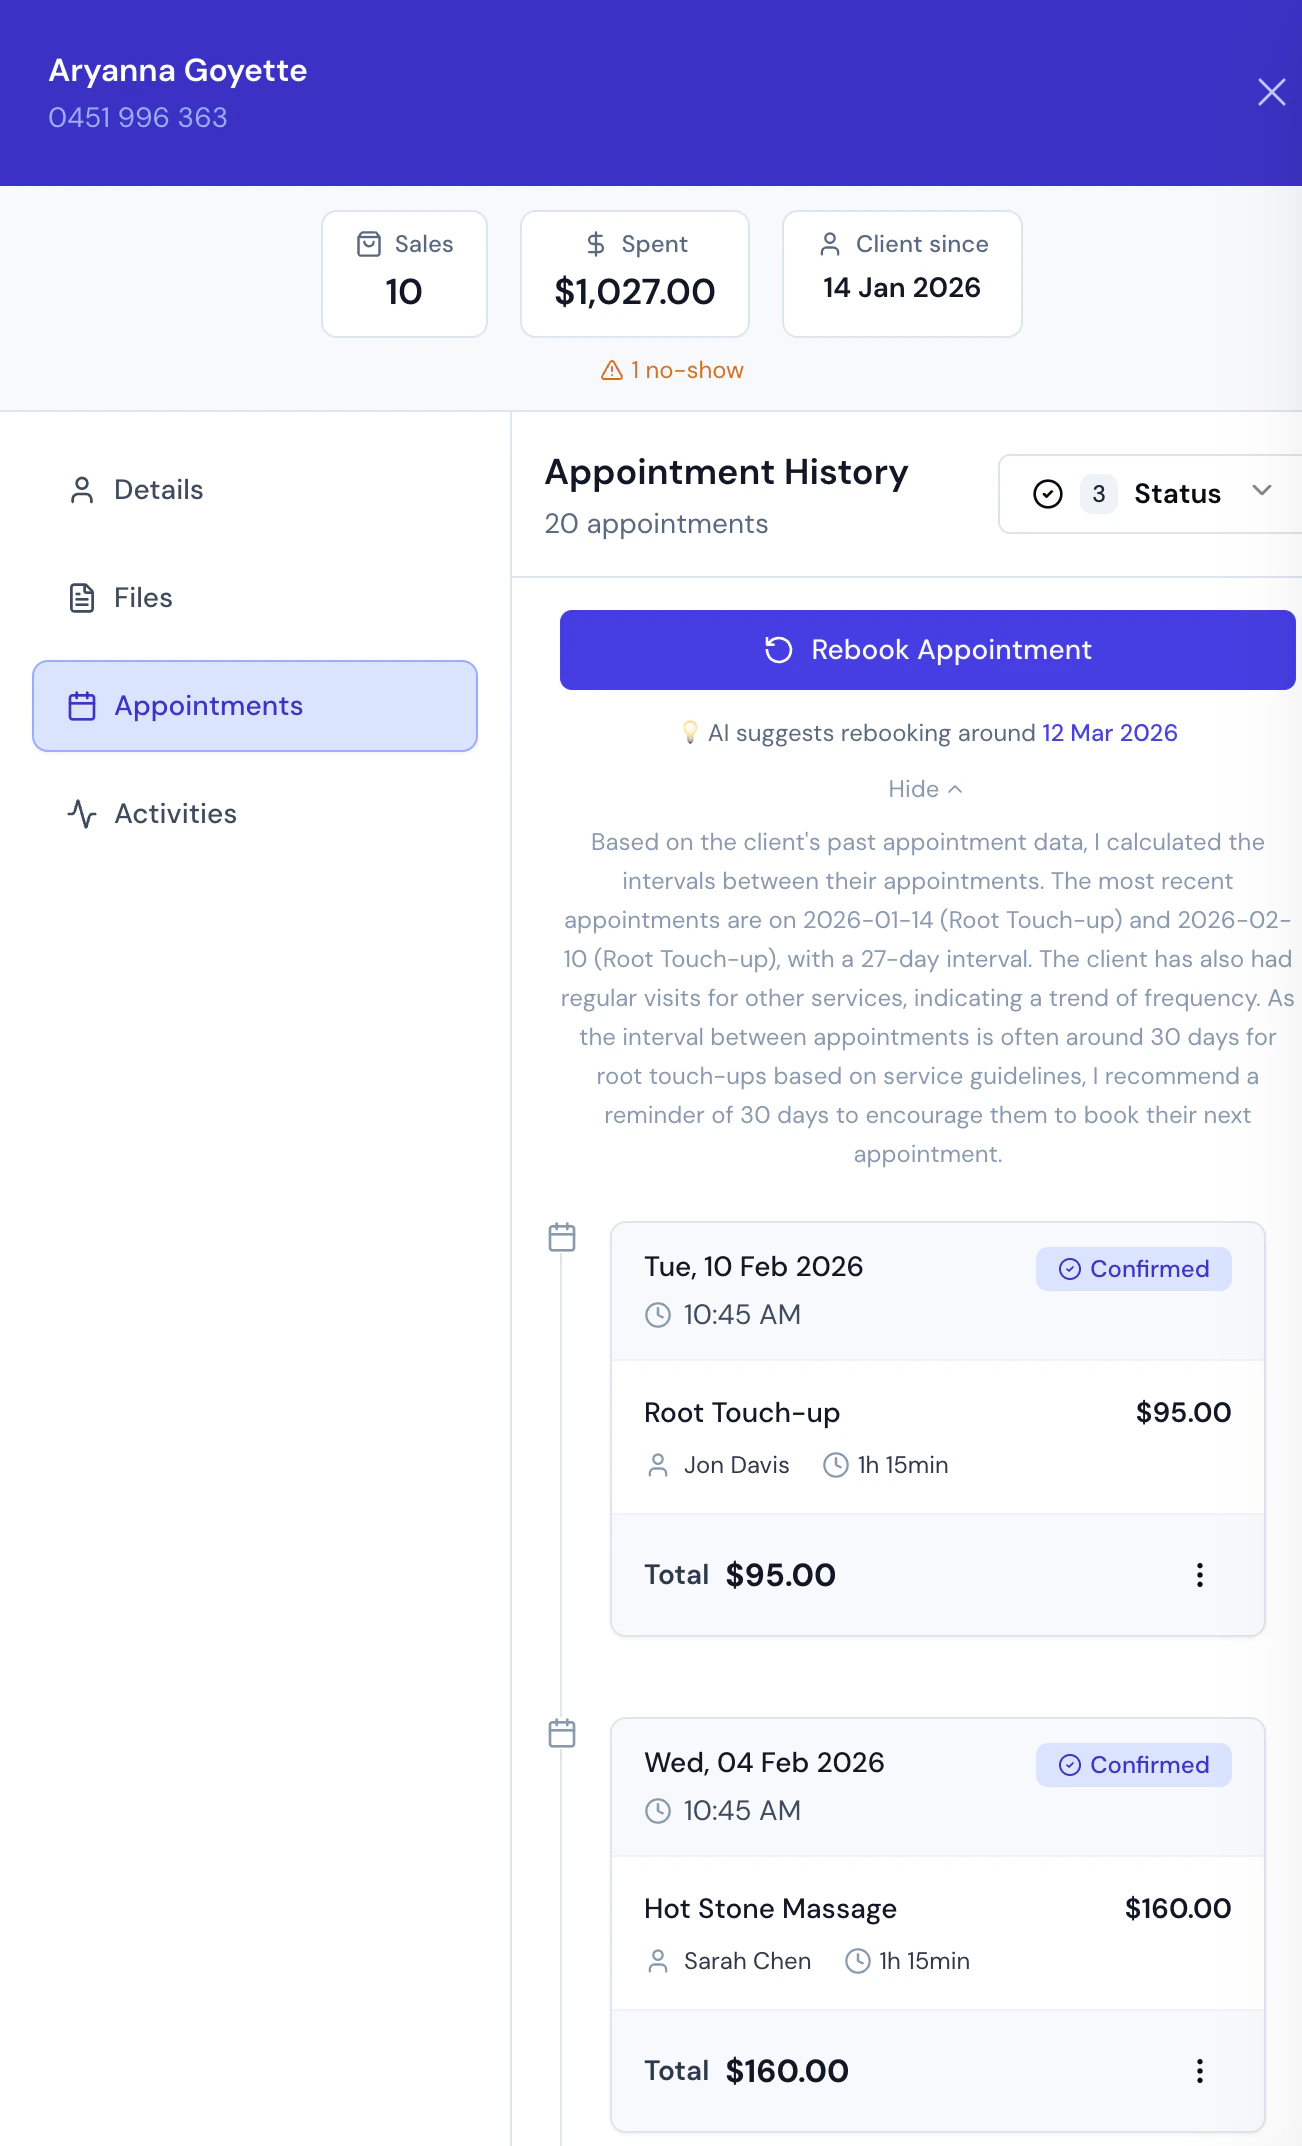
Add. - Appointments: See a list of the client’s past and upcoming appointments.
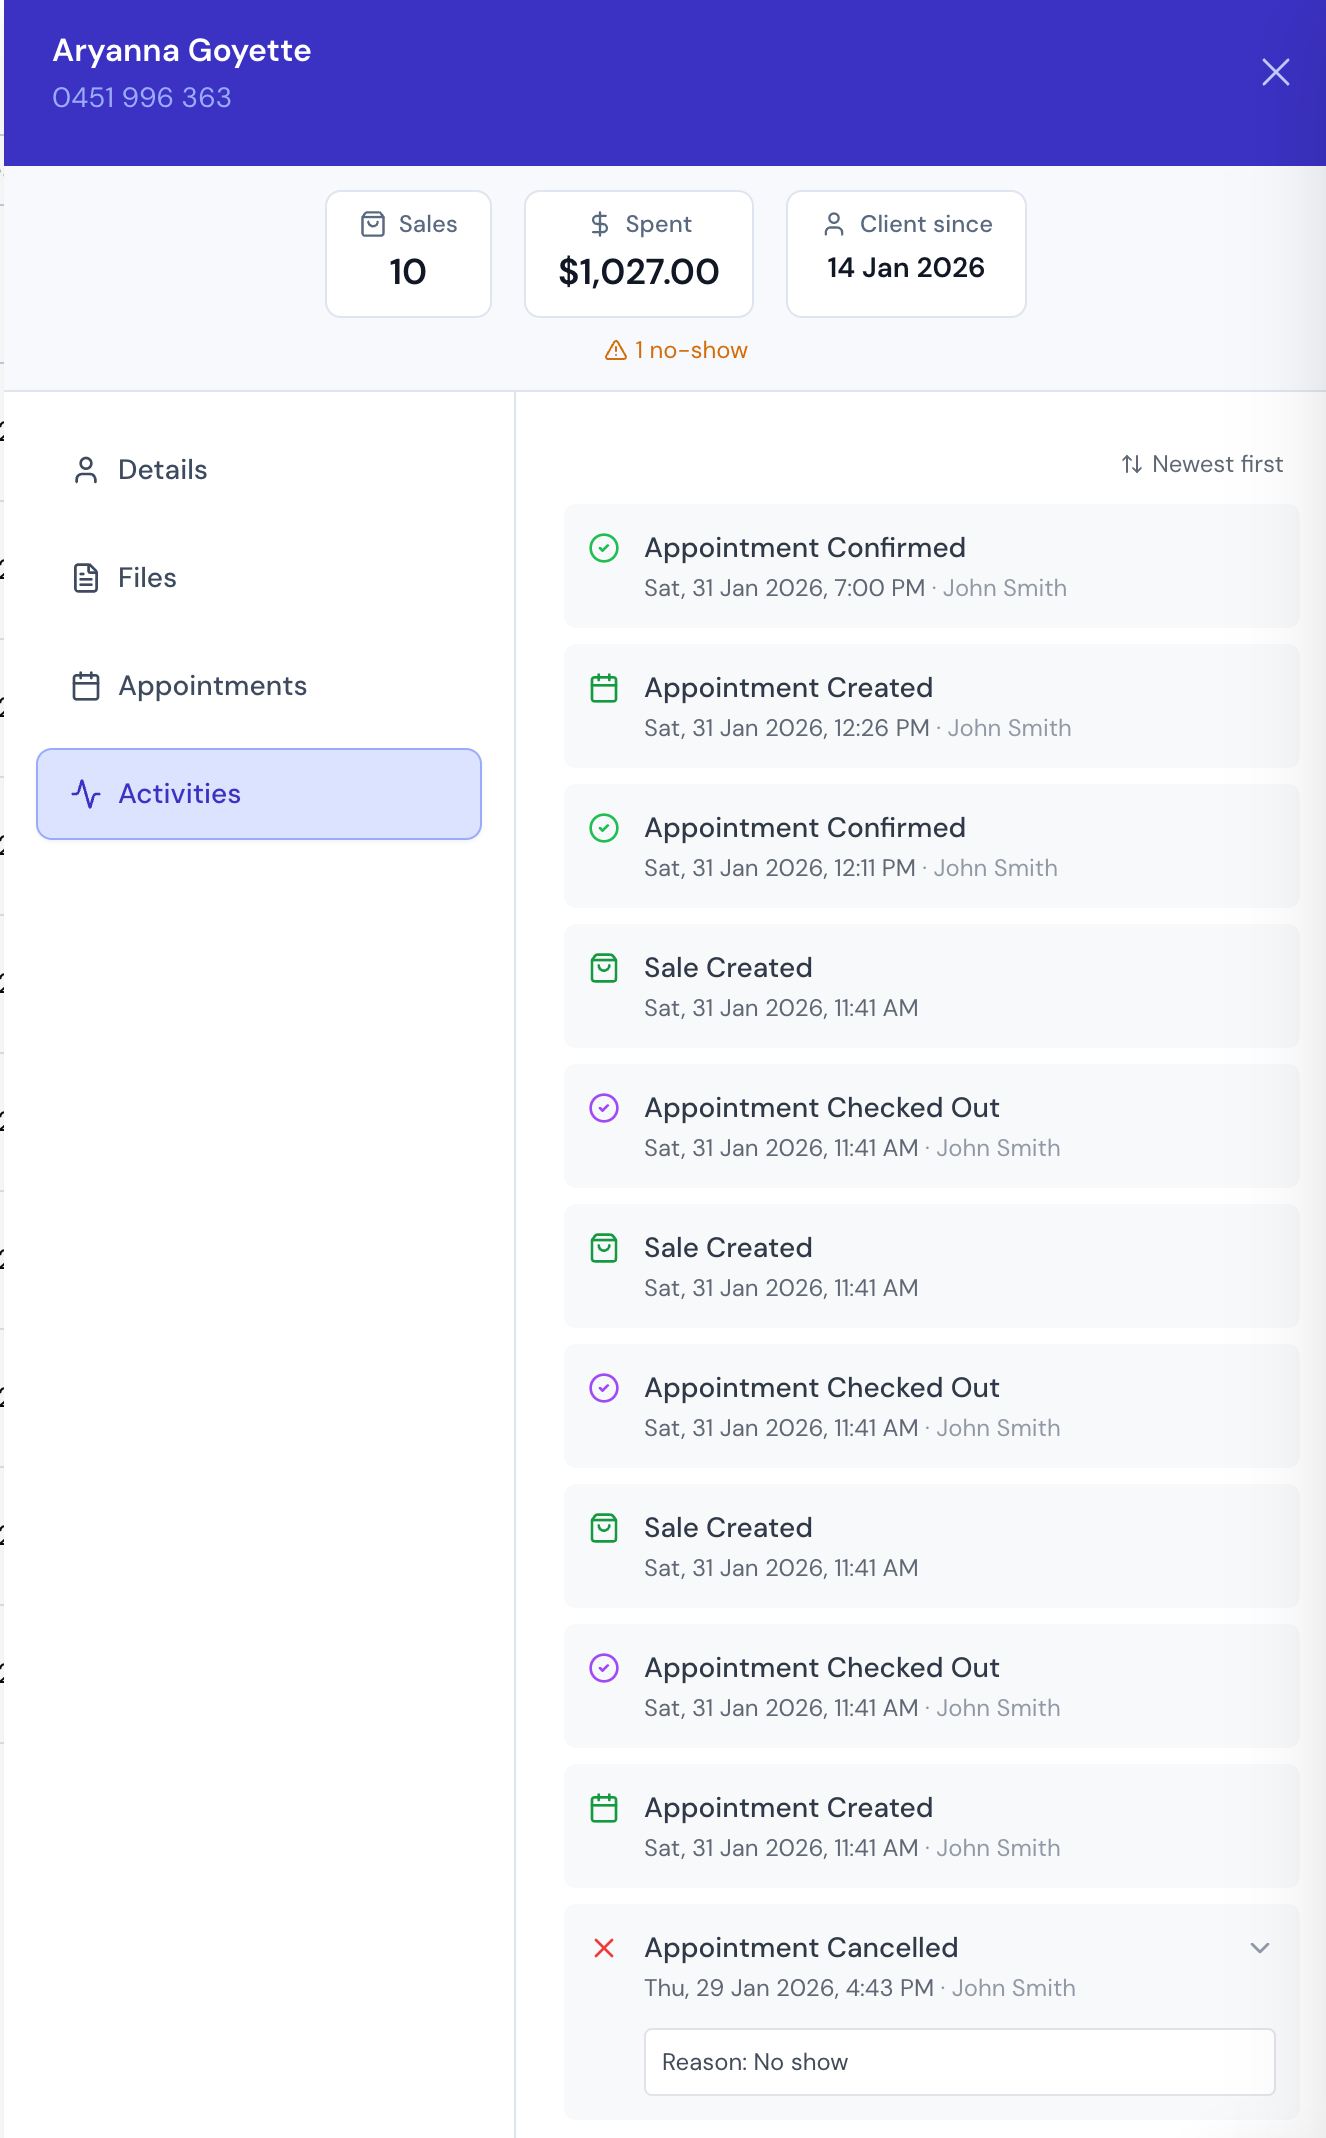
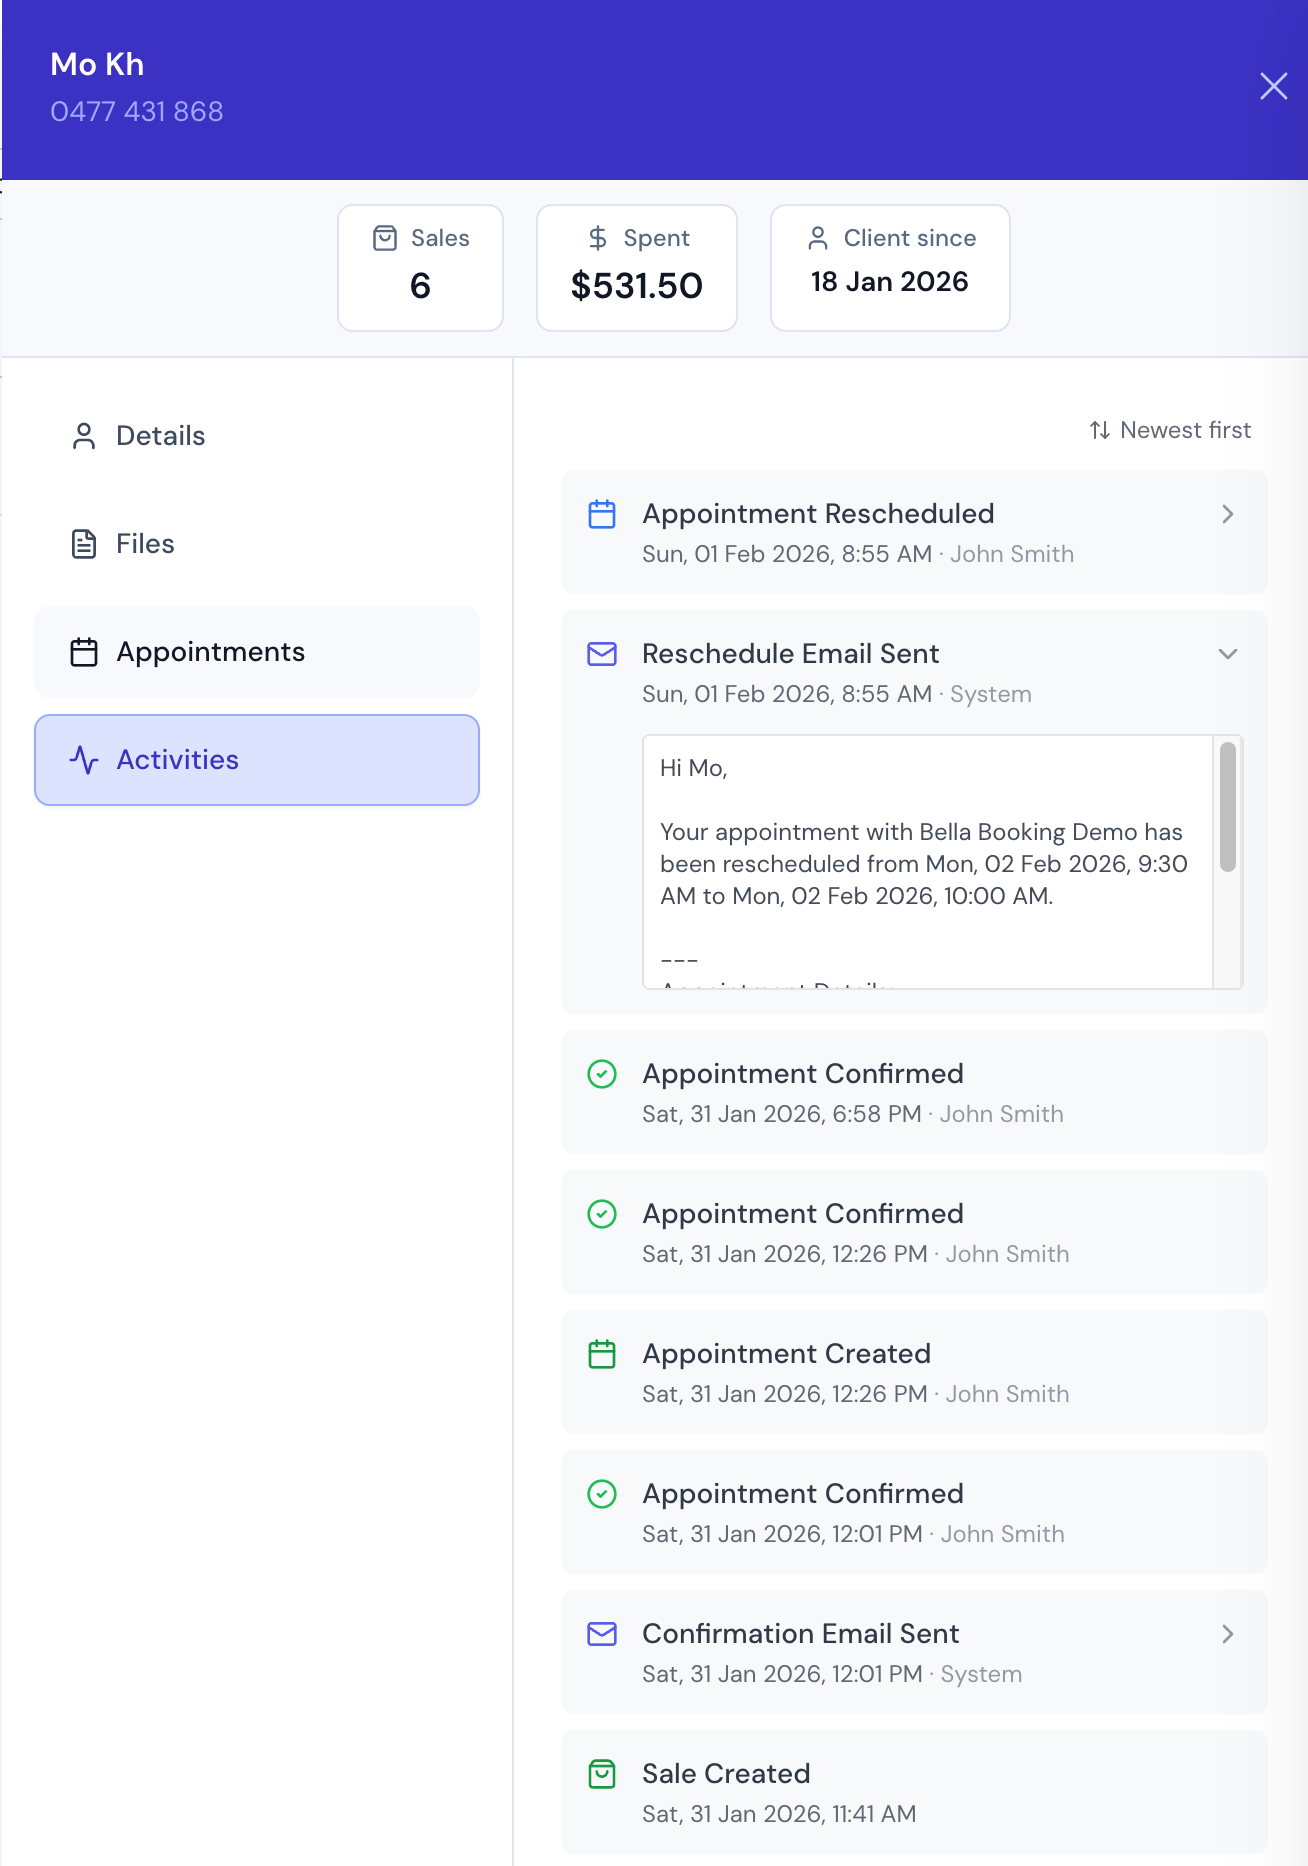
- Activities: View a chronological history of all activities related to this client, including appointment creation, confirmations, reschedules, cancellations, and notifications sent.
- Family: Manage family members and dependents linked to this client. Add, edit, or remove family relationships.
- Loyalty: View the client’s loyalty points balance, available rewards, and full transaction history. Owners and Admins can manually adjust points. See Loyalty Programme for details.
- Details: View/edit personal info, notes, and notification settings. Make changes and click
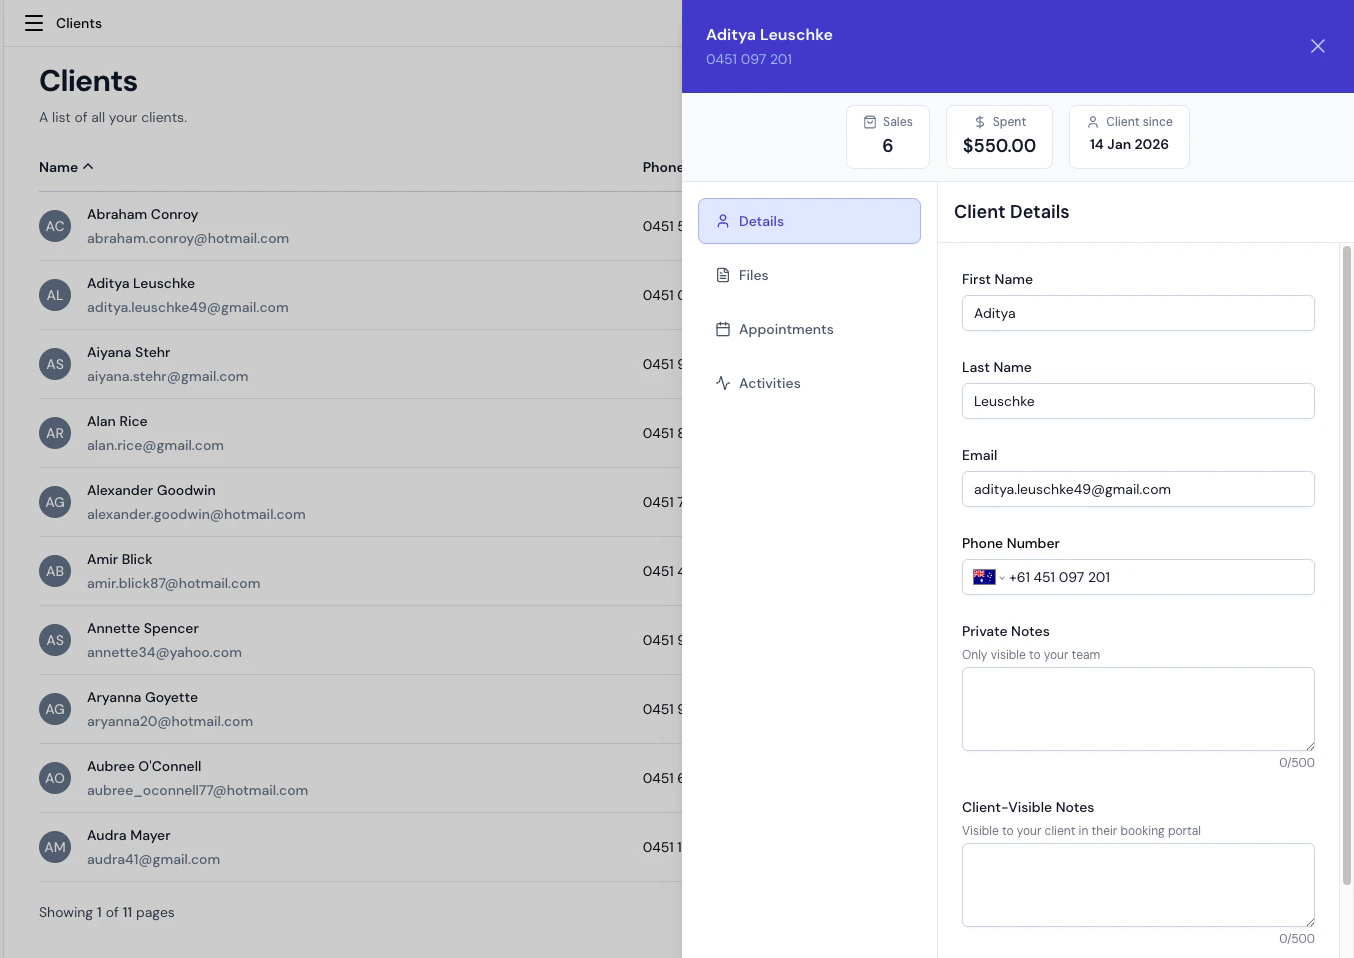
Client Statistics
When viewing a client’s details, you can see key statistics at a glance:| Statistic | Description |
|---|---|
| Total Spent | Total revenue from this client’s completed appointments |
| Appointments | Total number of appointments (all statuses) |
| Cancellations | Number of cancelled appointments |
| No-Shows | Number of no-show appointments |
| Client Since | Date when the client was first added |
- Identify your most valuable clients by total spend
- Track appointment history and patterns
- Monitor cancellation and no-show rates per client
- Make informed decisions about client management
Note and Document Visibility
Clients and appointments each have separate note fields to control who can see what: Note fields:| Field | Who can see it | Who can edit it |
|---|---|---|
| Private Notes | Your team only | Owners and Admins |
| Client-Visible Notes | Your team and the client (via their booking portal) | Owners and Admins |
| Client Notes | Your team and the client | The client themselves (via the booking portal) |
- Private Notes are for internal information like colour formulas, medical details, or personal preferences.
- Client-Visible Notes appear to the client when they view their appointment in the booking portal. Use these for pre-appointment instructions or aftercare advice.
- Client Notes are written by the client themselves and appear in their profile and appointments.
- Documents uploaded to a client or appointment have a public/private toggle.
- Private documents (default) are visible only to your team.
- Public documents are also visible to the client in their booking portal.
3. Importing Clients (CSV Upload)
- In the Clients section, click the
Importbutton. - Download the provided template CSV to see required fields and formatting.
- Fill in your client data in the CSV. Save the file.
- Back in Bella Booking, upload the completed CSV file.
- Review the mapped fields, resolve any validation issues, and confirm import.
- Newly imported clients will appear in your client list.
4. Archiving, Restoring, and Deleting Clients
Bella Booking uses an archive-first approach to client management. You cannot delete a client directly — you must archive them first. This protects against accidental data loss.Archiving a Client
Archiving hides a client from the active list while preserving all their records (appointments, history, notes, documents, family links, and loyalty points). From the client list:- Find the client you wish to archive.
- Click the three-dot menu next to their row.
- Select Archive.
- Confirm in the dialog. The client is now hidden from the active list.
- Open the client’s side panel by clicking their row.
- Click the three-dot menu at the bottom of the Details tab (next to the Save button).
- Select Archive.
- Confirm in the dialog.
Viewing Archived Clients
- On the Clients page, use the Status filter dropdown at the top of the table.
- Select Archived to see only archived clients, or All to see both active and archived clients.
- Archived clients are displayed with an “Archived” badge next to their name.
Restoring an Archived Client
From the client list:- Filter the client list to show archived clients using the status filter.
- Click the three-dot menu next to the archived client.
- Select Restore.
- The client returns to the active list with all their records intact.
- Open the archived client’s side panel.
- Click the three-dot menu at the bottom of the Details tab.
- Select Restore.
Archiving is reversible. All appointment history, notes, documents, family members, and loyalty points are preserved while archived.
What You Cannot Do with an Archived Client
While a client is archived:- Their profile details are read-only — you cannot edit their information
- You cannot create new appointments for them
- You cannot upload or delete files from their profile
- You cannot adjust their loyalty points
- Activity history and loyalty history are view-only
Permanently Deleting a Client
Permanent deletion is only available for archived clients and has strict requirements: From the client list:- Filter the client list to show archived clients.
- Click the three-dot menu next to the archived client.
- Select Permanently Delete (shown in red).
- A confirmation dialog appears. You must type the client’s full name to confirm.
- Click Permanently Delete to remove the client and all their data.
- Open the archived client’s side panel.
- Click the three-dot menu at the bottom of the Details tab.
- Select Permanently Delete (shown in red).
- Confirm in the dialog.
In practice, most clients who have ever had an appointment cannot be permanently deleted. Archiving is the recommended way to manage inactive clients.
5. Handling Duplicate Clients
There is no automated duplicate detection or merge feature in Bella Booking. If you have duplicate client records, follow these steps:Identifying Duplicates
- Use the Search bar to search by name, phone number, or email.
- Try partial searches (e.g., “Sarah J” or “0412”) to catch variations in spelling or formatting.
- Compare the client profiles to confirm which records are duplicates.
Resolving Duplicates
- Choose the primary profile — keep the one with the most complete information, appointment history, and loyalty points.
- Copy important notes from the duplicate profile into the primary profile’s notes field.
- Reassign future appointments — if the duplicate has upcoming appointments, cancel them and rebook under the primary profile.
- Update family links — if the duplicate is linked to family members, remove the links and re-add them under the primary profile.
- Archive the duplicate — once all important data is consolidated, archive the duplicate client.
- Permanently delete (optional) — if the duplicate has no appointment, sales, or waitlist history, you can permanently delete it after archiving. If it has history, leave it archived.
There is no way to merge two client profiles or transfer appointment history between them. Always consolidate notes and rebook future appointments before archiving the duplicate.
6. Managing Client Files and Documents
Each client profile can have attached files such as consent forms, photos, or any relevant documents.Viewing Client Files
- Click on a client to open their side panel
- Navigate to the Files tab
- You’ll see a list of all documents attached to this client, including:
- File name
- File type
- Upload date
Uploading Files to a Client Profile
- Open the client’s side panel
- Go to the Files tab
- Click Add to browse for files on your computer
- Select a file to upload
- File Requirements:
- Maximum size: 5 MB per file
- Allowed file types:
- Documents: PDF, DOC, DOCX, TXT
- Images: JPG, PNG, WEBP
- Spreadsheets: XLS, XLSX
- Wait for the upload to complete
- The file appears in the client’s file list
Downloading Client Files
- In the Files tab of a client’s side panel
- Find the file you want to download and click on it to open the preview window
- Click the Download button to download the file
- The file will download to your device
Deleting Client Files
- In the Files tab
- Locate the file you want to remove and click on Toggle menu (three dots)
- Click the Delete
- Confirm the deletion
- Note: Once deleted, the file cannot be recovered
- Use clear, descriptive file names before uploading (e.g., “consent-form-2024.pdf”)
- Organise files by date or type for easy retrieval
- Regularly review and remove outdated files
- Keep file sizes under 5 MB (the system limit)
- Ensure sensitive documents comply with privacy regulations
7. Managing Family Members
The Family tab lets you link dependents and family members to a client\u2019s account. This is useful for parents booking on behalf of children, partners sharing an account, or any situation where one client manages appointments for others.Relationship Types
When adding a family member, you choose a relationship type:| Relationship | Description |
|---|---|
| Child | A minor or dependent child |
| Spouse | A married partner |
| Partner | An unmarried partner |
| Sibling | A brother or sister |
| Parent | A parent of the client |
| Friend | A friend |
| Pet | A pet |
| Other | Any other relationship |
Adding a Family Member
- Open a client\u2019s side panel and go to the Family tab.
- Click the Add button (or Add Family Member if no members exist yet).
- In the dialog, fill in:
- First Name (required)
- Last Name (optional)
- Email (optional)
- Phone Number (optional)
- Relationship select from the dropdown (defaults to Child)
- Click Add Family Member to save.
- The new family member is created as a separate client record and linked to the primary client.
Viewing Family Members
Each family member card shows:- Name and relationship badge
- Email and phone number (if provided)
- A View Profile link to open the family member’s own client record
Editing a Relationship
- Click the three-dot menu on a family member card.
- Select Edit Relationship.
- Choose a new relationship type from the dropdown.
- Click Save.
Removing a Family Member
- Click the three-dot menu on a family member card.
- Select Remove from Family.
- Confirm the removal.
8. Viewing Loyalty Points
The Loyalty tab shows a client’s loyalty programme activity when the Loyalty Programme is enabled. If the programme is paused, the tab displays a message that existing points are preserved.Points Balance
Two cards are displayed at the top:- Available: The client’s current redeemable points balance
- Lifetime: Total points the client has earned over time (includes points that have been redeemed or expired)
Available Rewards
Below the balance, each active reward is listed with:- Reward name and discount value (e.g., “$5.00 off · 100 pts”)
- A Can redeem badge if the client has enough points
- A Need X more badge showing the shortfall if they don’t
Adjusting Points Manually
Owners and Admins see an Adjust Points button below the rewards list. Clicking it opens a dialog where you can:- Toggle between Add points and Deduct points
- Enter the Number of points
- Enter a Reason (required — recorded for the audit trail)
- Click Add points or Deduct points to confirm
Transaction History
A chronological list of all point changes for this client. Each entry shows:- Transaction type badge (Earned, Redeemed, Expired, Adjustment, Reversed, or Restored)
- Description — service names for earned points, reward name for redemptions, or reason for manual adjustments
- Date the transaction occurred
- Expiry date (for earned and adjustment transactions, if points expiration is configured)
- Points amount (+/- with colour coding)
| Transaction type | What it means |
|---|---|
| Earned | Points awarded when an appointment was checked out |
| Redeemed | Points spent on a reward at checkout |
| Expired | Points that expired after the configured period |
| Adjustment | Points manually added or deducted by staff |
| Reversed | Earned points taken back because a completed appointment was cancelled |
| Restored | Redeemed points returned because a completed appointment was cancelled or refunded |
FAQs
Q: Do I need all fields to add a new client? A: Only the first name is required. Last name, email, and phone are optional. Q: Can I customise notification settings per client? A: Yes. While adding or editing, use the notification toggles for SMS and email notifications. Q: How do I correct a bulk import mistake? A: You can edit individual clients after import. To remove an imported client, archive them first, then permanently delete if they have no history. Q: Can I delete a client directly? A: No. You must archive a client first. Once archived, you can permanently delete them only if they have no appointment history, sales history, or waitlist entries. See Archiving, Restoring, and Deleting Clients for details. Q: What happens when I archive a client? A: The client is hidden from the active list and online booking, but all their records are preserved. You can restore them at any time. Archiving is fully reversible. Q: Why can’t I permanently delete a client? A: Permanent deletion requires the client to have no appointment history, no sales history, and no waitlist entries — even archived or cancelled ones. This is by design to preserve your business records. If the client has any history, archiving is the recommended approach. Q: How do I handle duplicate client records? A: There is no automated merge feature. Consolidate important notes into the primary profile, rebook any future appointments, then archive the duplicate. See Handling Duplicate Clients for the full process. Q: Can I filter by more than name or phone? A: Currently, the search is by name or phone only. You can also filter by status (Active, Archived, or All). Q: Can I export my client list? A: Yes! Click the Export CSV button at the top of the clients table to download your entire client list including names, emails, phone numbers, and join dates. Q: How do I attach a document to a client? A: In the side panel, go to the Files tab, then click Add to add documents or photos directly to that client’s profile. Q: Is there a quick way to see all of a client’s appointments? A: Click on a client and open the Appointments tab in the side panel. Q: How can I see what actions have been taken for a client? A: Click on a client and open the Activities tab in the side panel. This shows a chronological history of all activities including appointment creation, confirmations, reschedules, cancellations, and notifications sent. Q: What file types can I upload to a client profile? A: You can upload PDF, DOC, DOCX, TXT, JPG, PNG, WEBP, XLS, and XLSX files. Each file must be under 5 MB. Q: Can I recover a deleted client file? A: No, once a file is deleted from a client profile, it cannot be recovered. Always double-check before deleting important documents.Additional Tips
- Use the Import function for fast migration when first setting up your account.
- Regularly update client notes for personal touches that always impress.
- Double-check notification preferences if clients are missing reminder emails or texts.
- Use Search for rapid access, especially during busy shifts.
- Archive clients who haven’t visited in a long time to keep your active list clean — you can always restore them later.
- Before archiving, cancel or complete any outstanding appointments and remove active waitlist entries.
- When dealing with duplicates, always consolidate information into the primary profile before archiving the duplicate.
With these tools, managing your clients in Bella Booking will be seamless and efficient. If you ever need further help, use the in-app chat (bottom right) to contact support.