Introduction
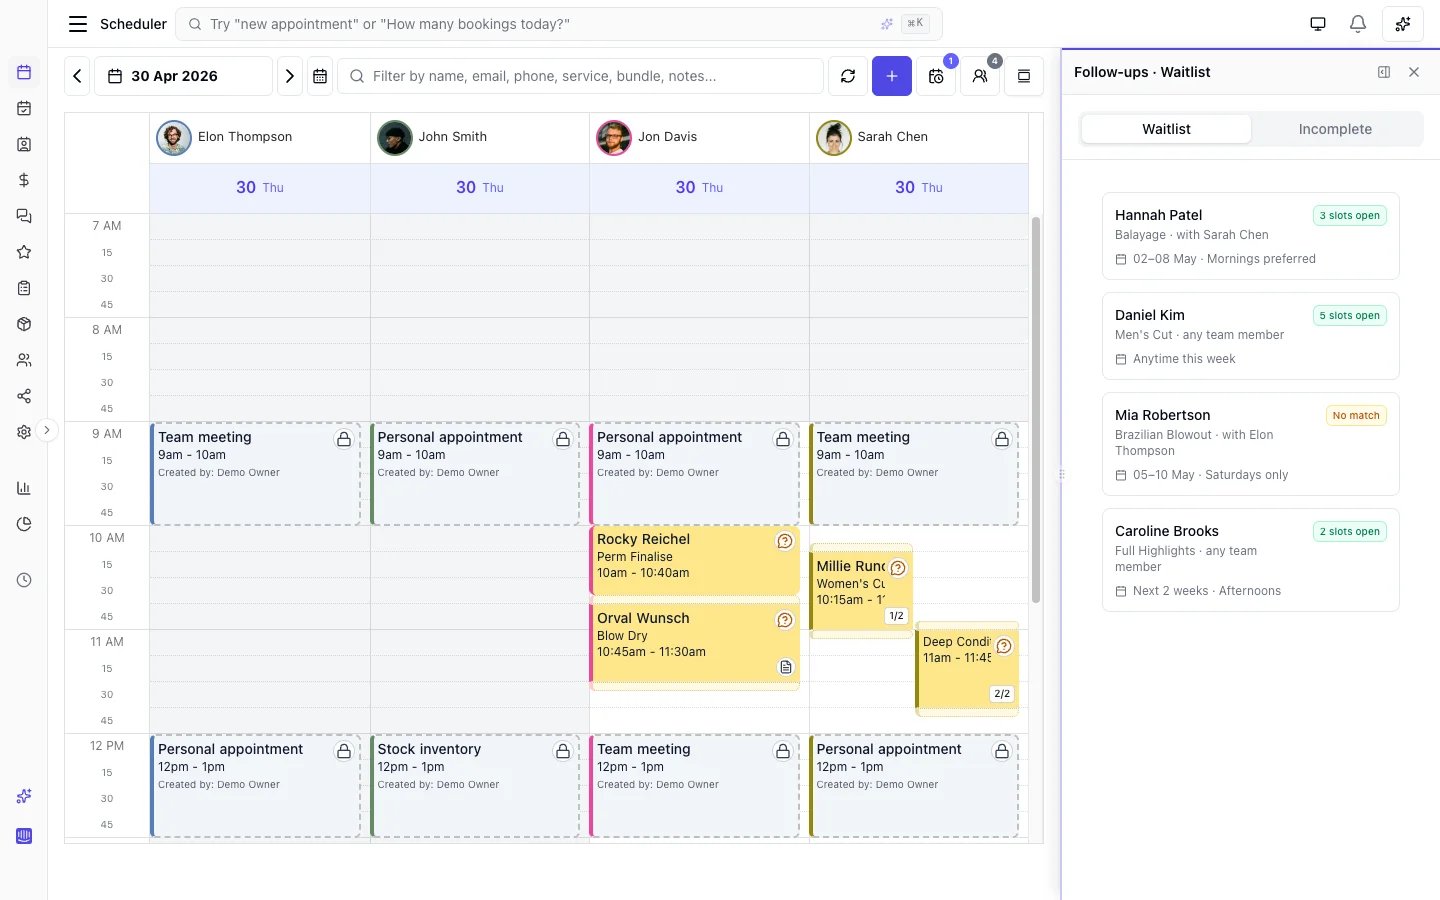
The Waitlist feature allows you to add clients who are waiting for specific services or time slots. When an appointment is cancelled or rescheduled, the system automatically matches the freed slot against waitlist entries and notifies your team. You can then contact the client and convert the waitlist entry into an appointment. The waitlist lives inside the scheduler’s Follow-ups side panel alongside the Incomplete Bookings tab — both surface pending client intent that hasn’t converted to an appointment yet.Key Features
- Client Waitlist Management: Track clients waiting for appointments
- Preferred Time Windows: Clients can specify multiple preferred date/time ranges
- Service Selection: Link waitlist entries to specific services or bundles
- Automatic Slot Matching: System automatically matches cancellations and reschedules with waitlist entries
- Match Notifications: Receive notifications when a freed slot matches a waitlist entry
- Quick Booking: Convert waitlist entries to appointments seamlessly
Step-by-Step Usage Instructions
Adding a Client to the Waitlist
- Navigate to the Scheduler section
- Click the Follow-ups button in the scheduler header (this opens the combined Waitlist + Incomplete Bookings panel; the Waitlist tab is selected by default)
- Click Add
- Fill in the waitlist entry form:
- Search for an existing client or create a new one
- Start typing the client’s name to search
- Click “Create” to add a new client on the fly
- Add one or more preferred time windows
- For each preferred time, specify:
- Date: The desired appointment date
- Start Time: Earliest acceptable time
- End Time: Latest acceptable time
- Click Add Time to add additional preferred time windows
- Remove unwanted time slots with the trash icon
- Click Add Service to select services the client wants
- Choose from individual services or service bundles
- Services from bundles are grouped together with a bundle badge
- Remove services by clicking the trash icon
- Add any special requests, preferences, or important information
- Example: “Prefers morning appointments” or “Flexible on service provider”
- Click Save to add the client to the waitlist
Viewing the Waitlist
- In the Scheduler section, click the Follow-ups button
- Make sure the Waitlist tab is selected (it’s the default); the adjacent Incomplete tab lists incomplete bookings
- The panel shows all pending waitlist entries
- Each entry displays:
- Client name
- Requested services
- Preferred time windows
- Date added to waitlist
- Notes (if any)
Editing a Waitlist Entry
- Open the Follow-ups panel and switch to the Waitlist tab
- Click on the waitlist entry you want to modify
- Update any fields:
- Change preferred times
- Add or remove services
- Update notes
- Click Update to save changes
Automatic Slot Matching
When an appointment is cancelled or rescheduled, the system automatically checks the waitlist for matching entries. How matching works:- The system identifies the freed date, time, and team member from the cancelled or rescheduled appointment
- It finds waitlist entries whose preferred time windows overlap with the freed slot
- It validates that the team member is available (no roster conflicts, blocked time, or other appointments)
- It checks that the team member can perform at least one of the requested services
- Matching entries are flagged with the available slot details (date, time, and team member name)
- Your team receives a notification that matches were found
- Available date and time range
- Team member name
- A description such as “Monday, 27 Jan, 2:00 PM – 3:00 PM with Sarah”
- Click Dismiss on a slot match if the client is no longer interested or you cannot fill the slot
- Stale matches are automatically dismissed when:
- The slot date has passed
- The team member is no longer available for that time
- The team member can no longer perform the requested services
- Matches are revalidated each time you open the waitlist panel
Booking from the Waitlist
When you see a slot match or want to book a waitlist entry manually:- Open the Follow-ups panel and switch to the Waitlist tab
- Review entries — matched entries display the available slot details
- Contact the client to confirm availability
- If confirmed, click the Actions menu on the waitlist entry and select Book
- The appointment form opens with the client and services pre-filled from the waitlist
- Select the date, time, and team member(s) for the appointment
- Click Save to create the appointment
- The appointment is created with all waitlist details pre-filled
- The waitlist entry status automatically changes from “Waiting” to “Booked”
- The waitlist entry is linked to the appointment (you can view the appointment from the waitlist)
- The waitlist entry remains in the system for record-keeping
Removing from Waitlist
Manually remove a client from the waitlist when:- They no longer need the service
- They’ve booked elsewhere
- They’re no longer interested
- Open the Follow-ups panel and switch to the Waitlist tab
- Find the entry to remove
- Click the Actions menu and select Delete
- Confirm the deletion
Online Booking Waitlist
Clients can also join your waitlist directly through online booking when no time slots are available.Enabling Online Waitlist
- Go to Settings → Booking Policies
- Scroll to Booking Options section
- Toggle on Allow clients to join waitlist
- Optional: Override this setting per service in the Service Catalogue
How Online Waitlist Works
When online waitlist is enabled:- Client selects services and a date in online booking
- If no time slots are available, they see a “Join the waitlist” option
- Client can add optional notes (e.g., “Morning preferred”, “Team member preference: Sarah”)
- After joining, client receives a confirmation notification
- Entry appears in your Scheduler waitlist panel
- When a cancellation or reschedule matches the entry, your team is notified. Contact the client and book from the waitlist
Online vs Staff-Created Entries
Online waitlist entries appear identically to staff-created entries in your waitlist panel. Both include:- Client name and contact information
- Preferred date(s)
- Services requested
- Notes
- Date added
Business Notifications
You receive notifications in these scenarios:- New Waitlist Entry: When a client joins the waitlist (online or staff-created if enabled). Sent to your business email/SMS if configured in Settings → Automated Messages → Business Notifications.
- Waitlist Slot Match: When a cancellation or reschedule frees a slot that matches one or more waitlist entries. This is an in-app notification that appears in your notification bell.
Policies and best practices
- When to enable online waitlist: Enable in Settings → Booking Policies under Allow clients to join waitlist for services where demand often exceeds availability. You can override per service (e.g. disable for walk-in or express services).
- Act on match notifications: When the system notifies you of a slot match, contact the client promptly to offer the slot. Dismiss the match if the client declines.
- Review regularly: Check the waitlist periodically and remove or update entries when clients have booked elsewhere or are no longer interested.
- Order of contact: Entries show the date added. Contact earlier entries first as a general rule when multiple clients match an open slot.
- Per-service control: Configure “Allow join waitlist” per service in the Service Catalogue so only relevant services show the waitlist option online.