Introduction
The Automated Messages section allows you to manage automated notifications sent to clients via SMS and/or email. These messages keep clients informed and reduce no-shows through timely reminders. If you have Messages Plus enabled, automated messages also appear in the client’s conversation thread in the Messages inbox, giving you a complete communication history in one place.Message Types
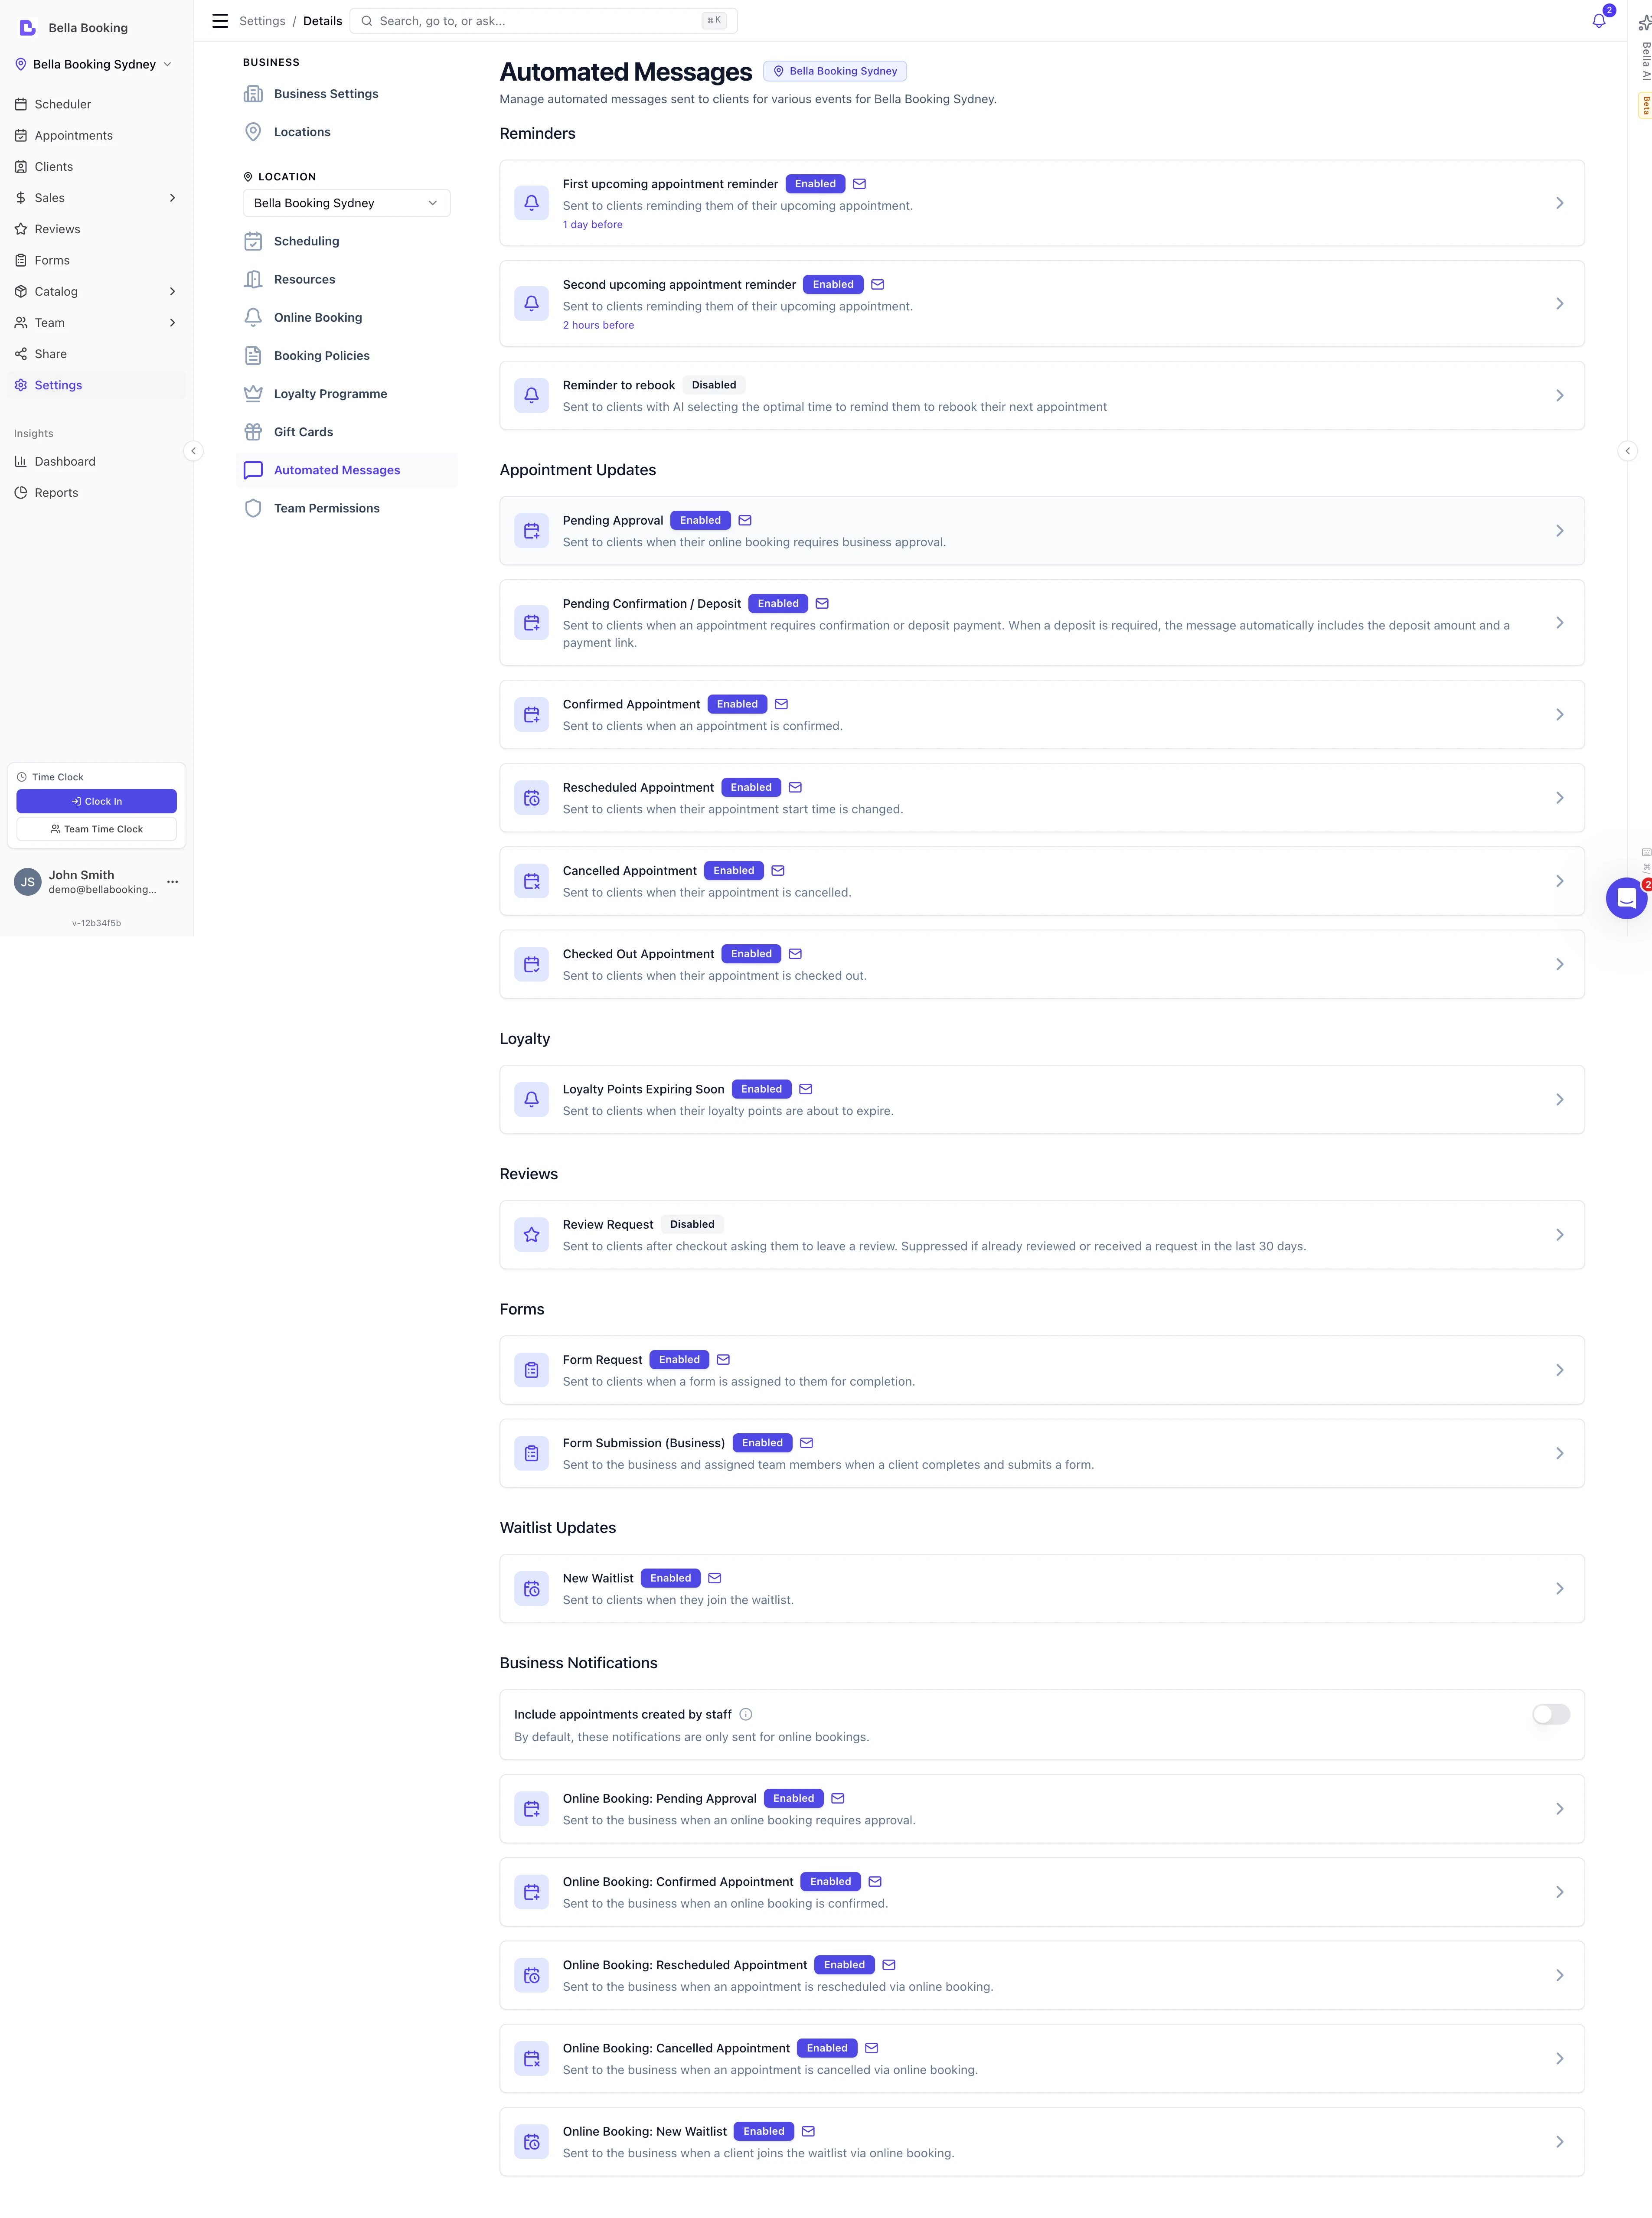
1. Reminders
First Upcoming Appointment Reminder:- Sent before the appointment (timing configurable)
- Reminds clients of their scheduled appointment
- Common timing: 24 hours or 48 hours before appointment
- When creating or editing an appointment within the reminder window, staff can choose to send it immediately or skip it via the Notifications section on the form
- Optional secondary reminder closer to appointment time
- Reduces last-minute no-shows
- Common timing: 2-4 hours before appointment
- Same per-appointment override options as the first reminder
- AI-powered timing to encourage rebooking
- Sent after appointment completion
- Helps maintain client retention
- System automatically selects optimal send time
- Sent automatically when an authenticated client starts an online booking but doesn’t finish
- Triggers 10 minutes after the client abandons the Review step — aligned with the client-side review-session countdown
- Includes a
{{ResumeBookingLink}}/{{ResumeBookingButton}}that takes the client back to their saved selections - Opt-in by default — Email and SMS channels start disabled so you choose when to turn the reminder on
- Fires once per draft. If the client re-engages and abandons again, a fresh reminder can fire
- Only sent to clients with a verified phone number — anonymous visitors are never contacted
- Pairs with the Follow-ups panel’s Incomplete tab for manual follow-up. See Incomplete Bookings
2. Appointment Updates
Pending Confirmation / Deposit:- Sent immediately when an appointment requires client confirmation or deposit payment
- Sent when confirmation policy is enabled, or when a deposit is required
- Includes
{{ConfirmAppointmentButton}}or{{ConfirmAppointmentLink}}for easy confirmation - When a deposit is required: the button text automatically changes to “Pay Deposit & Confirm” (amber style instead of green), a deposit amount callout is injected, and the link redirects to the appointment details page where the client can pay
- The
{{DepositAmountRequired}}variable is available and automatically shows the deposit amount (e.g., “Deposit required: $50.00”) when a deposit is needed; empty otherwise - Client must confirm (or pay the deposit) to secure their booking
- Sent immediately when an online booking requires business approval
- Only sent when “Require Approval for Online Bookings” is enabled
- Informs the client their booking request has been received and is awaiting review
- Client receives a separate “Confirmed Appointment” notification once you approve
- Sent immediately when an appointment is confirmed
- Confirms booking details (date, time, services, team member)
- Provides appointment details for client records
- For auto-confirm accounts: sent when appointment is created
- For require-confirmation accounts: sent after client confirms
- Sent when an appointment start time is changed
- Shows new date/time and updated details
- Includes previous date/time for reference (using
{{PreviousDateTime}}variable) - Confirms the change was successful
- Sent when an appointment is cancelled
- Confirms cancellation
- Sent after appointment checkout is completed
- Thanks the client and summarises their appointment — acts as their receipt
- Staff can skip it for an individual checkout using the Notifications control on the checkout panel; your global setting stays unchanged
3. Waitlist Updates
New Waitlist:- Sent when a client is added to the waitlist
- Confirms waitlist entry
4. Loyalty Notifications
These messages are sent to clients related to the loyalty programme. This section only appears when the Loyalty Programme is enabled. Loyalty Points Expiring Soon:- Sent to clients when their loyalty points are about to expire
- Triggered 30 days before the earliest expiring points
- Each client receives at most one notification per 30-day period
- Includes the total number of expiring points and the earliest expiry date
{{Points}}- Total number of points about to expire{{ExpirationDate}}- Earliest expiry date for the expiring points
5. Gift Card Notifications
These messages are sent when a gift card is purchased and paid for. This section only appears when Gift Cards are enabled. Gift Card Delivery:- Sent to the gift card recipient once payment is confirmed
- Contains the gift card code, amount, expiry date, and the sender’s personal message (if provided)
- Sent by email to the recipient’s email address
{{RecipientName}}- Gift card recipient’s name{{SenderName}}- Name of the person who sent the gift card{{GiftCardCode}}- Styled gift card code card (email) or plain code (SMS){{GiftCardCodePlain}}- Plain-text gift card code (e.g., BELLA-A2K9-M7L3){{Amount}}- Formatted gift card value (e.g., $50.00){{ExpiryDate}}- Expiry date of the gift card (e.g., 15 March 2027){{PersonalMessage}}- Optional personal message from the sender (empty if none was provided)
6. Package Notifications
These messages are sent when a client purchases a prepaid package. This section only appears when Prepaid Packages are enabled. Package Purchase Confirmation:- Sent to the client when their package purchase is confirmed (payment completed)
- Contains the package name, included services with session counts, price, and expiry date
- Includes a link to view their packages online
{{PackageName}}- Name of the purchased package (e.g., 10 Haircut Pack){{PackagePurchasePrice}}- Formatted price with currency (e.g., $450.00){{PackageExpiryDate}}- Expiry date or “No expiry”{{PackageServices}}- Formatted list of services (e.g., 10 × Women’s Haircut, 5 × Blow Dry){{PackageCard}}- Styled card showing package name, services, price, and expiry (email only){{ViewMyPackagesButton}}- Button linking to the client’s My Packages page (email only)
7. Online Shop Notifications
These messages are sent in response to online product orders placed through your booking page. This section only appears when the Online Shop is enabled. Order Received:- Sent to the client as soon as their payment succeeds
- Contains the order number, line items, total paid, fulfilment mode, and your pickup instructions (when Collect in business)
- Tells the client what happens next — collect in person, or wait for their upcoming appointment
- Sent to the client when you click Mark ready for collection in Sales → Client Orders
- Only fires for Collect in business orders — Reserve for next appointment orders skip this step and are handed over at the appointment
- Contains the order number, line items, and pickup instructions
- Sent to the business location email/SMS and to the assigned team members when a paid order comes in
- Lets the team know an order needs prepping (Collect in business) or setting aside for an appointment (Reserve for next appointment)
- Contains the client name, order number, line items, total, fulfilment mode, and — for reserve orders — the linked appointment
{{OrderNumber}}- Short identifier shown to the client and on the order detail page (e.g., “ORD-A2K9-M7L3”){{FulfilmentMode}}- Human-readable mode (“Collect in business” or “Reserve for next appointment”){{PickupInstructions}}- Your business-level pickup instructions (empty when no instructions are configured or when the mode is Reserve for next appointment){{LineItems}}- Renders the product receipt with quantities and prices (email shows a styled table; SMS shows a compact list)
8. Membership Notifications
These messages are sent to clients in response to membership lifecycle events. This section only appears when Memberships are enabled. Membership Activated:- Sent when the first payment is confirmed and the membership becomes active
- Contains the membership name, price, billing cycle, and a link to view the membership online
- Includes a styled membership card in email showing the key details at a glance
- Sent when a renewal payment attempt fails
- Prompts the client to update their payment method to keep the membership active
- Includes a button linking to the client’s membership page where they can update payment details
- Sent when the membership is cancelled or expires
- Confirms the cancellation to the client
{{MembershipName}}- Name of the membership plan (e.g., “Gold Membership”){{MembershipPrice}}- Formatted membership price with currency (e.g., “$99.00”){{BillingCycleDisplay}}- Human-readable billing cycle (e.g., “monthly”, “every 3 months”){{MembershipCard}}- Styled membership summary card showing name, price, and billing cycle (email only){{ViewMyMembershipButton}}- Button linking to the client’s My Membership page (email only){{UpdatePaymentButton}}- Button linking to the client’s membership page to update payment details (email only; used in payment failed messages)
9. Business Notifications
These messages are sent to your business (location email/SMS) rather than to clients.Include Appointments Created by Staff
By default, business notifications are only sent for appointments created via online booking. You can enable notifications for all appointments (including those created by staff in the dashboard) using the toggle at the top of the Business Notifications section. When disabled (default):- Notifications only sent for online bookings
- Labels show “Online Booking: New Appointment”, etc.
- Notifications sent for ALL appointments, regardless of how they were created
- Labels change to “New Appointment”, “Cancelled”, etc. (without “Online Booking:” prefix)
- Useful if you want to be notified of all appointment activity, including staff-created bookings
New Appointment:
- Sent when a new appointment is created (or confirmed, depending on configuration)
- By default: only online bookings; when toggle enabled: all appointments
- Notifies staff of new bookings
- When a deposit is required, the notification includes the deposit amount via
{{DepositAmountRequired}}
- Sent when an online booking requires business approval
- Notifies staff that a booking needs to be reviewed
- Sent when an appointment is cancelled
- By default: only online cancellations; when toggle enabled: all cancellations
- Notifies staff of cancellations
- Sent when an appointment is rescheduled
- By default: only online reschedules; when toggle enabled: all reschedules
- Notifies staff of reschedules
- Sent when a client joins the waitlist
- By default: only online waitlist entries; when toggle enabled: all waitlist entries
- Includes client name, phone, preferred date, and services
10. Form Notifications
These messages are sent in relation to forms. This section only appears when Forms are enabled. Form Request (Client):- Sent to the client when a staff member sends them a form to complete
- Contains the form name and a link to fill it out
- Triggered from the client profile or appointment actions when staff selects “Send Form”
- Sent to the client to confirm their completed form has been received
- Email only by default — you can switch on SMS for this message if you prefer
- Includes the form name
- Sent when a client submits a completed form
- Notifies the business location email/SMS and the assigned team members
- Includes the client name and form name
{{FormName}}- Name of the form template (e.g., “Hair Consultation”){{FormLink}}- Direct link to the form for the client to complete (for form request messages only){{FormLinkButton}}- Email only - Styled button linking to the form (for form request messages only)
11. Tip Notifications
These messages are sent to your business when a client leaves a tip after an appointment. This section only appears when Tips are enabled in your payment settings. Tip Received (Business):- Sent when a client leaves a tip via the online booking portal
- Notifies the business location email/SMS and the team member who received the tip
- Includes the tip amount and team member name
{{TipAmount}}- Formatted tip amount with currency (e.g., “15.00 AUD”){{TeamMemberName}}- Name of the team member who received the tip
12. Review Requests
These messages are sent to clients after their appointment is checked out, inviting them to leave a review. This section only appears when Client Reviews are enabled (Professional plan). Review Request:- Sent after appointment checkout (timing configurable)
- Includes a direct link for the client to leave a review
- Uses neutral wording with no incentives
- Can also be sent manually from the appointment actions menu
{{ReviewLink}}- Direct link to the review submission page
- Sent to your business (location email/SMS) and the reviewed appointment’s team member(s) when a client submits a new review
- Also appears in the in-app notification bell, which links straight to the Reviews page
- Includes the rating, the client’s name, and the review text
- Email on, SMS off by default — adjust each channel like any other notification. The bell alert always appears, regardless of the email/SMS channels
{{Rating}}- The review’s star rating out of 5{{ReviewText}}- The text the client wrote (empty for a rating-only review){{TeamMemberName}}- The team member(s) on the reviewed appointment
13. Birthday Greeting
A warm, automated message sent to each client around their birthday. Sending requires Messages Plus — the message appears in your Automated Messages list on every plan, but it only goes out while Messages Plus is active. Birthday Greeting:- Sent automatically on the client’s birthday, at around 9 am in your business’s timezone
- Treated as an announcement, not marketing — it goes to every client who hasn’t opted out of announcements, so you don’t need a separate marketing opt-in to send a friendly birthday note
- Email and SMS, both off by default — turn on whichever channel(s) you’d like once you’ve added a personal touch to the wording
- Each client receives it at most once per year, even if you change the message or it runs more than once on the day
- Respects each client’s notification preferences. Both channels need Messages Plus to send; within it, email is included (no message credits) while SMS is metered and needs an active dedicated number (the same rule as campaigns) — without one, the SMS is skipped and only the email goes out
- Only sent to clients who have a date of birth on file (see Capturing a client’s birthday below)
- Clients born on 29 February receive their greeting on 28 February in non-leap years
{{FirstName}}- Client’s first name{{LastName}}- Client’s last name{{BusinessName}}- Your business name{{OnlineBookingUrl}}- A link to your booking page so the client can book a visit to celebrate{{RewardAmount}}- The birthday reward amount (e.g. “10%” or “$15”), if a reward is set up{{RewardExpiry}}- The date the reward expires{{OfferCode}}- The code to enter, when the reward is delivered as a code
- Sent once, a few days before the birthday reward expires, and only if the client hasn’t used it yet
- Automatically suppressed the moment the client redeems the reward
- Requires Messages Plus to send, like the greeting
- Only sent to clients who are eligible for the reward — clients excluded from the reward never receive it
{{FirstName}}- Client’s first name{{LastName}}- Client’s last name{{BusinessName}}- Your business name{{RewardAmount}}- The birthday reward amount (e.g. “10%” or “$15”){{RewardExpiry}}- The date the reward expires{{OfferCode}}- The code to enter, when the reward is delivered as a code
Capturing a client’s birthday
A client’s date of birth (the year is optional) can be recorded in a few ways — by your team, or by clients themselves through online booking:- Client profile - open a client and edit their details; the birthday sits alongside their contact information
- Client import - map a Date of birth column when importing clients from a spreadsheet or another system. Bella reads the day, month and year and interprets ambiguous numeric dates using your business’s country format
- Online booking profile - a signed-in client can add or update their own birthday from their account on your booking page
- Family members - a birthday can be recorded for each family member a client adds through online booking
- After booking - once a client finishes booking, the confirmation screen invites them to add their birthday (they can skip it)
The birthday reward
Turn the greeting into a genuine treat with the birthday reward — set it up once on the Birthday Programme page (under Messaging, alongside Campaigns). The reward is applied automatically for the client when they book — there’s no code to remember — or you can deliver it as a code the client enters instead. You control:- The discount — a percentage off, or a fixed amount off
- How long it lasts — a number of days from the client’s birthday (30 by default, roughly their birthday month)
- Who gets it — all clients, or a filtered audience; you can also exclude an individual client from their profile (they still receive the greeting, just not the discount)
- An optional minimum spend
{{RewardAmount}}, {{RewardExpiry}} and (in code mode) {{OfferCode}} variables.
14. Campaign Notifications
SMS Campaign Completed (Business) and Email Campaign Completed (Business):- Sent to the team member who initiated the campaign once all messages have been dispatched — each channel has its own editable notification
- Contains the campaign name, sent/failed/skipped counts, completion time, and a link to the full results
- Configurable in Automated Messages like any other notification type
{{CampaignName}}- Name of the campaign{{TotalRecipients}}- Total number of recipients in the campaign{{SentCount}}- Number of messages successfully sent{{FailedCount}}- Number of messages that failed to send{{SkippedCount}}- Number of messages skipped (e.g., missing contact details or consent){{CompletedAt}}- Formatted completion date and time{{CampaignLink}}- Link to view the full campaign results
Message Configuration Options
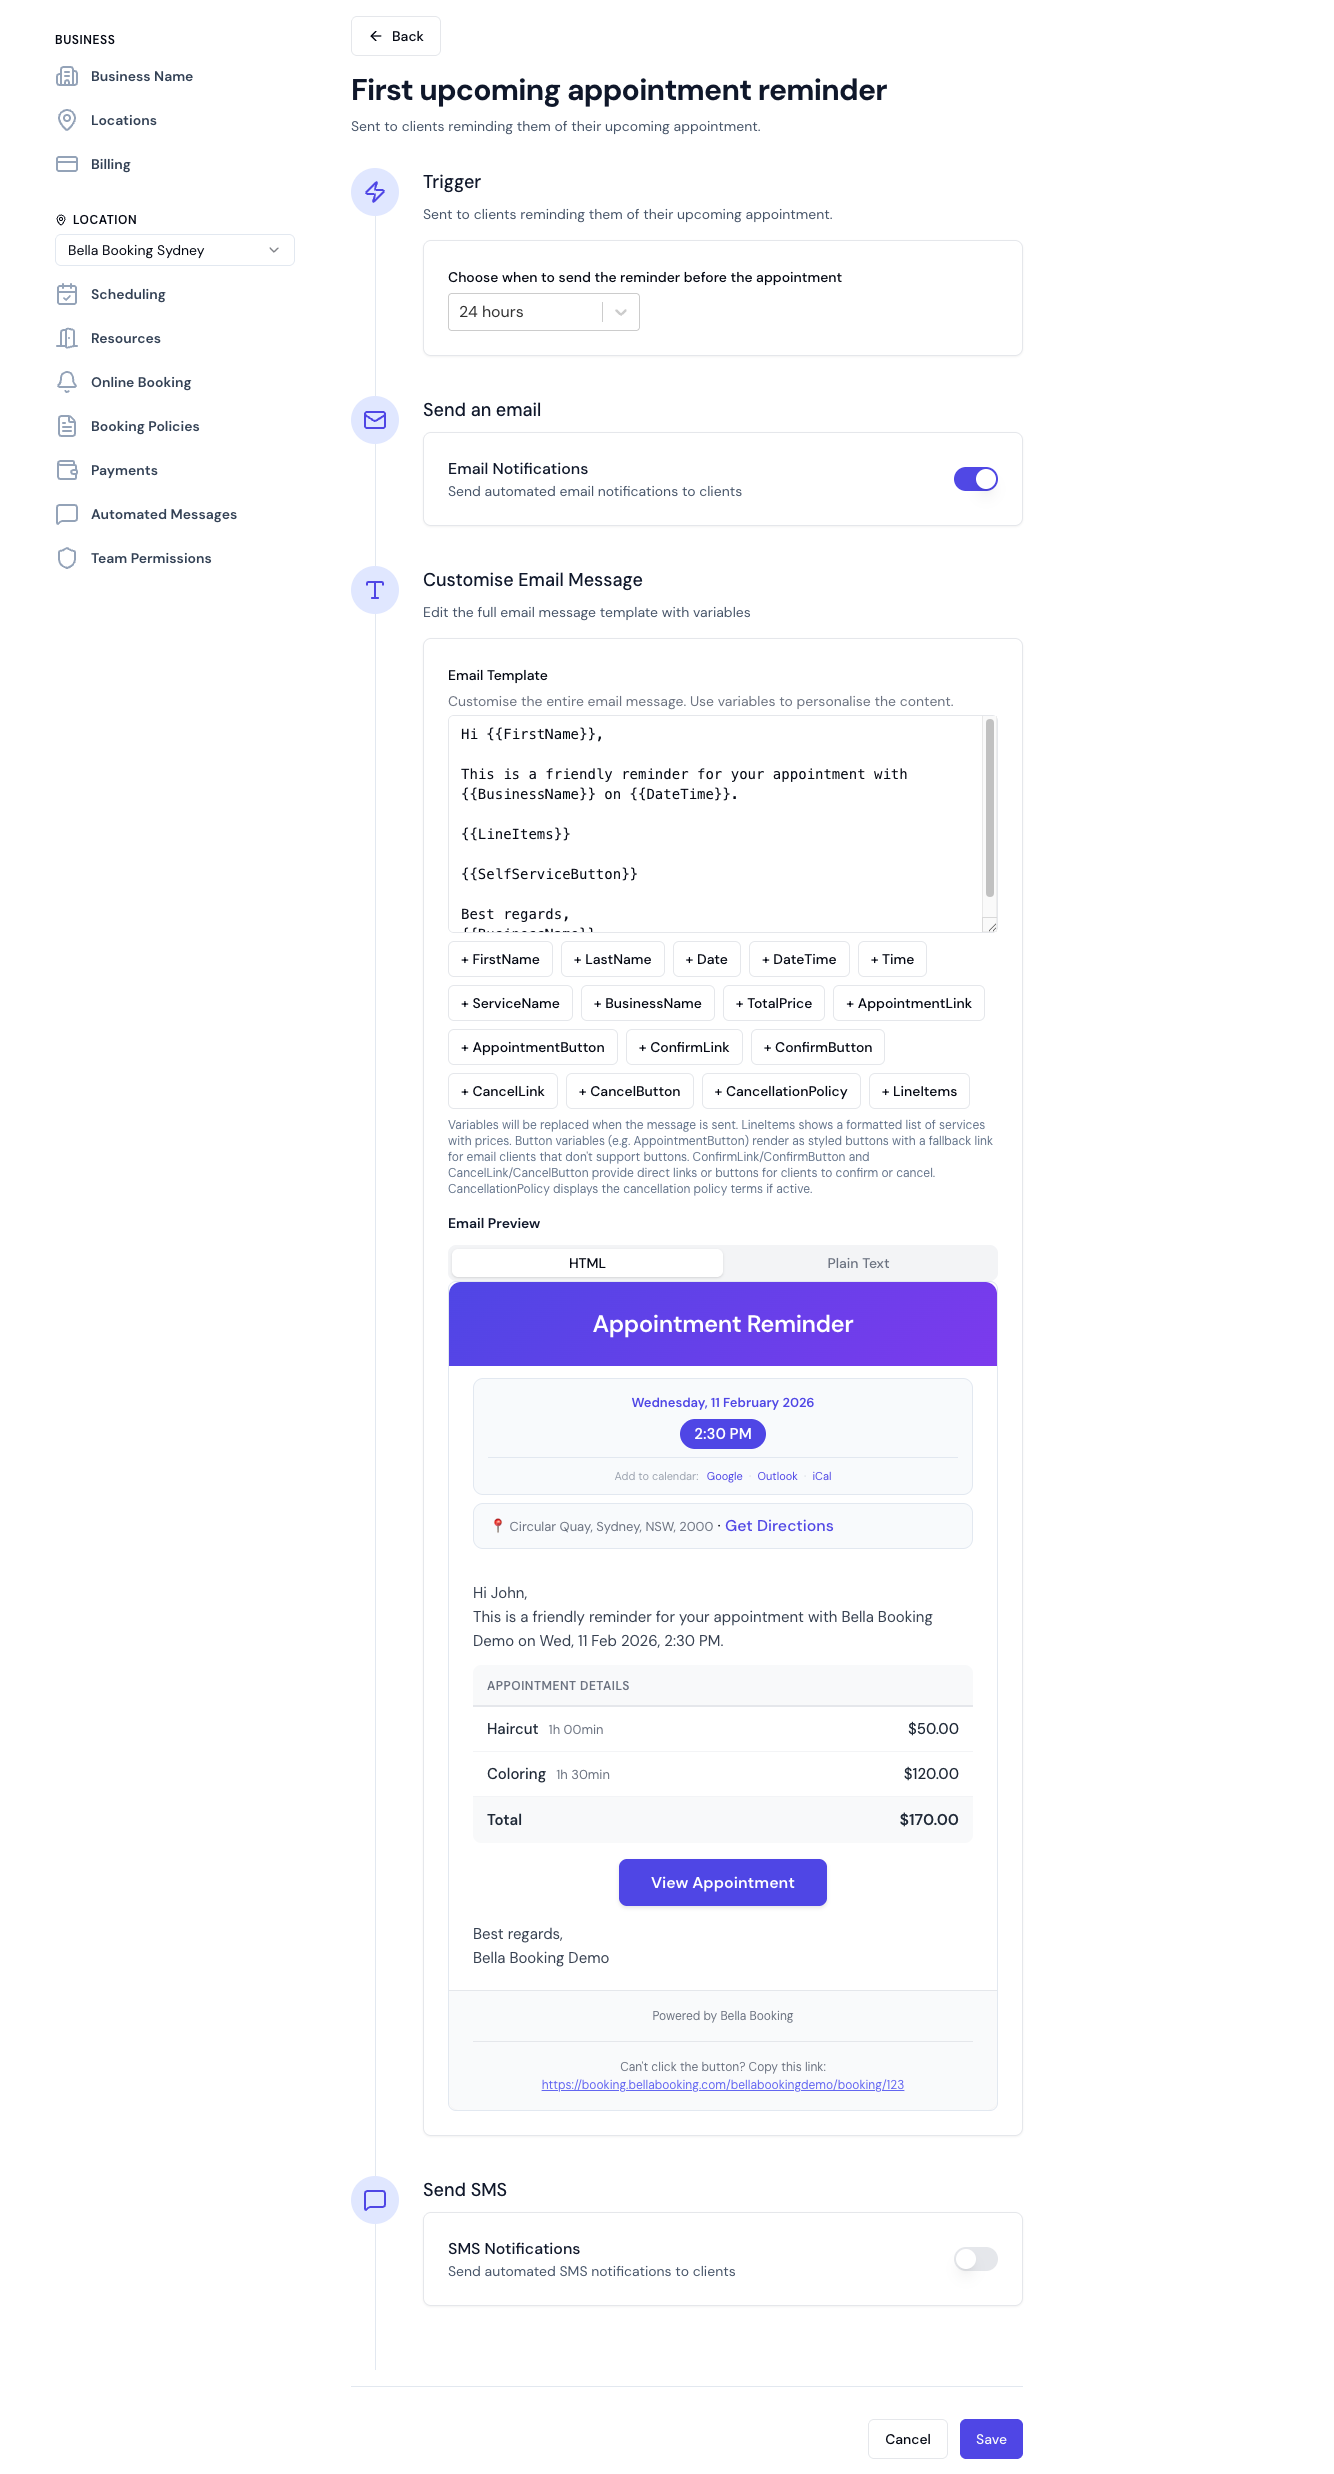
- Toggle the message on or off
- Disabled messages won’t be sent to clients
- SMS, Email, or both
- Based on your subscription and client contact preferences
- Hours or days before appointment
- Custom timing per reminder type
- Customise the message greeting with your preferred greeting
- Add custom instructions that will appear in the email body before appointment details
- Create fully customised message templates using variables
- Personalise messages to match your brand voice
- Use template variables for dynamic content
Template Customisation
Bella Booking allows full customisation of SMS and email templates using template variables. This gives you complete control over your message content and branding.Available Template Variables
You can use these variables in your custom templates:{{FirstName}}- Client’s first name{{LastName}}- Client’s last name{{BusinessName}}- Your business name{{Date}}- Formatted date (Mon, 18 Nov 2025){{Time}}- Formatted time (2:05 PM){{DateTime}}- Formatted date and time (Mon, 18 Nov 2025, 2:05 PM){{PreviousDate}}- Previous date for rescheduled appointments (Mon, 18 Nov 2025){{PreviousTime}}- Previous time for rescheduled appointments (2:05 PM){{PreviousDateTime}}- Previous date and time for rescheduled appointments (Mon, 18 Nov 2025, 2:05 PM){{ServiceName}}- Service name(s){{TotalPrice}}- Formatted total price{{LineItems}}- Formatted line items (email only){{SelfServiceLink}}- Link to appointment details page (view, confirm, or cancel){{SelfServiceButton}}- Email only - Styled button linking to appointment details page{{CancelAppointmentLink}}- Direct link to cancel appointment (shows confirmation dialog){{CancelAppointmentButton}}- Email only - Styled button to cancel appointment (outline/red style){{ConfirmAppointmentLink}}- Link to confirm appointment. When deposit is required, redirects to appointment details page (for payment) instead of one-click confirmation{{ConfirmAppointmentButton}}- Email only - Styled button to confirm appointment. Green “Confirm Your Appointment” by default; changes to amber “Pay Deposit & Confirm” with deposit amount callout when deposit is required{{DepositAmountRequired}}- Deposit amount with label (e.g., “Deposit required: $50.00”) - for pending confirmation messages when deposit is required; empty otherwise{{CancellationPolicy}}- Human-readable cancellation policy text (if active policy exists){{Reason}}- Cancellation reason with label (e.g., “Reason: No show”) - for cancellation messages only; empty if no reason provided{{PreferredDates}}- Client’s preferred dates for waitlist entries{{PhoneNumber}}- Client’s phone number (for business notifications){{Points}}- Total number of expiring loyalty points (for loyalty expiration messages only){{ExpirationDate}}- Earliest expiry date for loyalty points (for loyalty expiration messages only){{RecipientName}}- Gift card recipient’s name (for gift card delivery messages only){{SenderName}}- Name of the gift card sender (for gift card delivery messages only){{GiftCardCode}}- Styled gift card code card in email, plain code in SMS (for gift card delivery messages only){{GiftCardCodePlain}}- Plain-text gift card code (for gift card delivery messages only){{Amount}}- Formatted gift card value (for gift card delivery messages only){{ExpiryDate}}- Gift card expiry date (for gift card delivery messages only){{PersonalMessage}}- Sender’s personal message (for gift card delivery messages only){{PackageName}}- Name of the purchased package (for package purchase messages only){{PackagePurchasePrice}}- Formatted package price (for package purchase messages only){{PackageExpiryDate}}- Package expiry date or “No expiry” (for package purchase messages only){{PackageServices}}- Formatted service list with session counts (for package purchase messages only){{PackageCard}}- Styled package summary card (for package purchase emails only){{ViewMyPackagesButton}}- Button to view packages online (for package purchase emails only){{MembershipName}}- Name of the membership plan (for membership messages only){{MembershipPrice}}- Formatted membership price with currency (for membership messages only){{BillingCycleDisplay}}- Human-readable billing cycle, e.g. “monthly” (for membership messages only){{MembershipCard}}- Styled membership summary card (for membership emails only){{ViewMyMembershipButton}}- Button to view membership online (for membership emails only){{UpdatePaymentButton}}- Button to update payment details (for membership payment failed emails only){{ResumeBookingLink}}- Link to resume an incomplete online booking (for incomplete booking reminder messages only){{ResumeBookingButton}}- Email only - Styled button linking to the incomplete booking (for incomplete booking reminder messages only){{FormName}}- Name of the form template (for form request and form submission messages only){{FormLink}}- Direct link to the form for the client to complete (for form request messages only){{FormLinkButton}}- Email only - Styled button linking to the form (for form request messages only){{ReviewButton}}- Email only — Styled button linking to the review page (for review request messages only){{BusinessAppointmentLink}}- Link to the appointment in the dashboard (for business notification messages only){{BusinessAppointmentButton}}- Email only — Styled button linking to the appointment in the dashboard (for business notification messages only){{TipAmount}}- Formatted tip amount with currency (for tip received messages only){{TeamMemberName}}- The team member who received the tip, or the team member(s) on the appointment (for tip received and review received messages){{Rating}}- The review’s star rating out of 5 (for review received messages only){{ReviewText}}- The text the client wrote in their review; empty for a rating-only review (for review received messages only){{OrderNumber}}- Short order identifier (for online shop messages only){{FulfilmentMode}}- Human-readable fulfilment mode, “Collect in business” or “Reserve for next appointment” (for online shop messages only){{PickupInstructions}}- Business-level pickup instructions; empty when none are configured or when the order is Reserve for next appointment (for online shop messages only){{CampaignName}}- Name of the campaign (for campaign completed messages only){{TotalRecipients}}- Total number of campaign recipients (for campaign completed messages only){{SentCount}}- Number of messages successfully sent (for campaign completed messages only){{FailedCount}}- Number of messages that failed (for campaign completed messages only){{SkippedCount}}- Number of messages skipped (for campaign completed messages only){{CompletedAt}}- Formatted campaign completion date and time (for campaign completed messages only){{CampaignLink}}- Link to the campaign results page (for campaign completed messages only){{RewardAmount}}- The birthday reward amount, e.g. “10%” or a formatted amount (for birthday greeting and birthday reward reminder messages only){{RewardExpiry}}- The date the birthday reward expires (for birthday greeting and birthday reward reminder messages only){{OfferCode}}- The code the client enters when the reward is in code-delivery mode (for birthday greeting and birthday reward reminder messages only)
| Variable | URL Pattern | Action |
|---|---|---|
{{SelfServiceLink}} | /booking/{id} | Opens appointment details page where clients can view details and choose to confirm or cancel |
{{CancelAppointmentLink}} | /booking/{id}/cancel | Opens cancellation confirmation dialog directly |
{{ConfirmAppointmentLink}} | /booking/{id}/confirm (or /booking/{id} when deposit required) | Confirms the appointment, or redirects to appointment details for deposit payment |
- SelfServiceLink: General-purpose link for appointment management; best for initial booking confirmations
- CancelAppointmentLink: When you want to make cancellation easy but still require confirmation
- ConfirmAppointmentLink: Best for reminder messages when you want clients to confirm with one click
- All date/time variables are automatically formatted using standard formats
- Dates include the day of week (Mon, 18 Nov 2025)
- Times use 12-hour format with AM/PM (2:05 PM)
- Formatting is consistent across all messages
Creating Custom Templates
How to Customise:- Click on any message card to open configuration
- Toggle “Use custom template” if available
- Enter your custom message using variables above
- Preview shows how variables will be replaced
- Save to apply changes
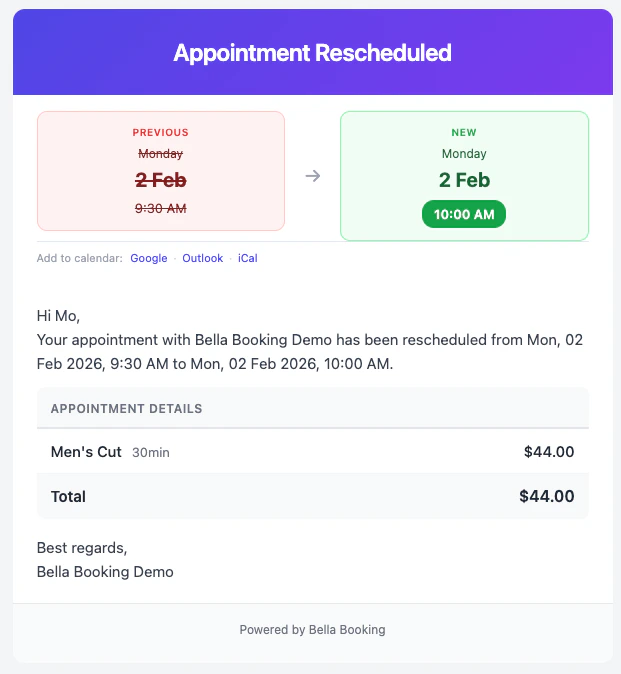
{{PreviousDateTime}} variable is automatically populated with the original appointment date and time when an appointment is rescheduled. This helps clients understand what changed.
Reminder with Confirmation Link:
{{ConfirmAppointmentLink}} in reminder messages when client confirmation is enabled. This helps reduce no-shows by prompting clients to actively confirm their attendance.
Online Booking Waitlist Notification (Business):
{{CancellationPolicy}} variable displays a concise cancellation policy message if one is active. Examples:
- “24 hours notice required, 50% late fee.”
- “48 hours notice required.”
{{Reason}} variable displays the cancellation reason if one was provided (e.g., “Reason: No show” or “Reason: Client requested”). If no reason was recorded, the variable will be empty.
Best Practices:
- Keep SMS messages concise (under 320 characters when possible)
- Use email templates for detailed information
- Always include date and time for appointment-related messages
- Personalise with client’s first name
- Include your business name for brand recognition
- Test templates before enabling to ensure proper formatting
Message Delivery
Client Contact Preferences
Messages are sent based on:- Client’s contact information on file
- Client notification preferences (if set)
- Your message channel settings (SMS, Email, or both)
- SMS: Client must have valid phone number
- Email: Client must have valid email address
Monitoring Message Usage
SMS Consumption:- Track SMS usage in General Settings
- Monitor remaining credits
- Upgrade plan if needed
Troubleshooting Notifications
If a client didn’t receive an expected SMS or email, check the following:1. Check the Appointment Activity History
Open the appointment and scroll to the Activity History section. This shows every notification event with timestamps:- Sent — the notification was delivered to the provider (SendGrid for email, Twilio for SMS)
- Skipped — the notification was not sent, with a reason (e.g., “Client has no phone number”, “SMS notifications disabled”, “Monthly SMS limit reached”)
- Failed — the send attempt failed (provider error)
- Scheduled — a reminder is queued for future delivery
- Suppressed by staff — a reminder, confirmation, or checkout summary was turned off for this specific appointment when it was created, edited, or checked out. Global settings are unaffected
2. Check the Client Profile
Go to Clients, find the client, and check:- Phone number — must be a valid mobile number with country code for SMS
- Email address — must be valid and not hard-bounced (an amber warning appears if the email has bounced)
- Notification Preferences — SMS and Email checkboxes must be ticked for the client to receive notifications via those channels
3. Check Notification Settings
Go to Settings > Automated Messages and verify:- The notification type (e.g., Confirmation, Reminder) is enabled
- The desired channel (SMS, Email, or both) is turned on for that notification type
4. Check SMS Quota
Go to Settings > General to see your remaining SMS credits. If your monthly limit is reached, SMS notifications will be skipped until the next billing cycle. You can purchase additional SMS credit packs from Settings → Messaging.5. Resend a Notification
If a notification was sent but the client didn’t receive it (carrier issue, spam filter), you can resend it:- Open the appointment details
- In the Activity History section, click Resend next to the notification
- A preview will show the message content before you confirm
FAQs
Q: Will clients receive messages if I disable them? A: No. Disabled messages are not sent until you re-enable them. Q: What if a client doesn’t have an email address? A: Email messages won’t be sent. Use SMS-only or collect email addresses during booking. Q: Do automated messages count against my SMS limit? A: Yes. Each SMS sent counts toward your plan’s SMS allotment. If you reach your limit, you can purchase additional SMS credit packs from Settings → Messaging. Q: What happens if I create an appointment within the reminder window (e.g., booking for tomorrow when the reminder is set to 24 hours before)? A: When creating or editing an appointment, a Notifications section appears above the save button showing the status of each reminder. If a reminder’s scheduled time has already passed, the toggle defaults to off and shows “Window passed — toggle to send now”. You can toggle it on to send the reminder immediately when you save. Reminders whose window is still in the future are toggled on by default and will fire at their scheduled time. Q: Can I prevent a specific reminder from being sent for one appointment? A: Yes. When creating or editing an appointment, expand the Notifications section and toggle off any reminder you don’t want sent. For example, if you’ve just spoken to the client on the phone, you can turn off the 24-hour reminder for that appointment only — your global reminder settings stay unchanged. Q: Can I manually send a reminder to a client? A: Yes. Open the appointment details and click the menu (three dots) to find “Send Reminder”. This sends an immediate reminder using your configured reminder template, regardless of whether automated reminders are scheduled. This is useful when:- A client didn’t receive or see their automated reminder
- You want to send an extra reminder closer to the appointment
- You need to resend a reminder that may have failed
- Auto-confirm accounts (no deposit): Only “Confirmed Appointment” is sent when an appointment is created
- Require-confirmation accounts: “Pending Confirmation / Deposit” is sent first, then “Confirmed Appointment” is sent after the client confirms
- Deposit required: “Pending Confirmation / Deposit” is sent with the deposit amount and a payment link. Once the client pays, “Confirmed Appointment” is sent automatically
- Client books → appointment created in “Booked” status
- Pending Confirmation / Deposit is sent with a “Pay Deposit & Confirm” button (amber) and the deposit amount
- The confirmation link redirects to the appointment details page where the client can pay
- Client completes payment → appointment moves to “Confirmed” and Confirmed Appointment is sent