Introduction
The Scheduler is your central calendar and booking management hub. Use it to oversee appointments, assign services, manage team schedules, and keep track of clients. Perfect for individuals and teams, the Scheduler streamlines your daily operations and ensures everyone stays organised.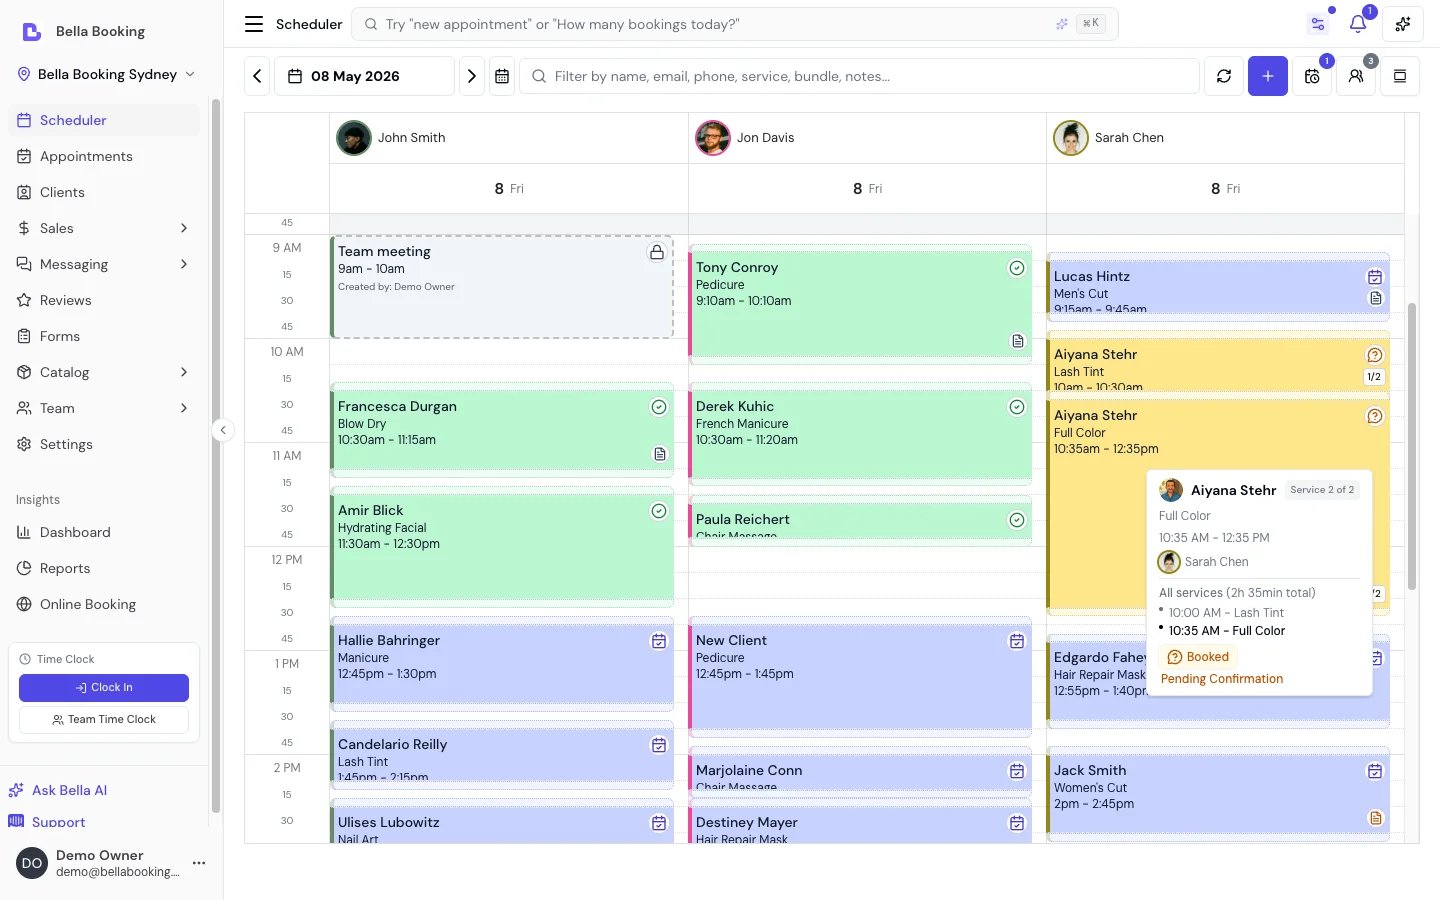
Key Features
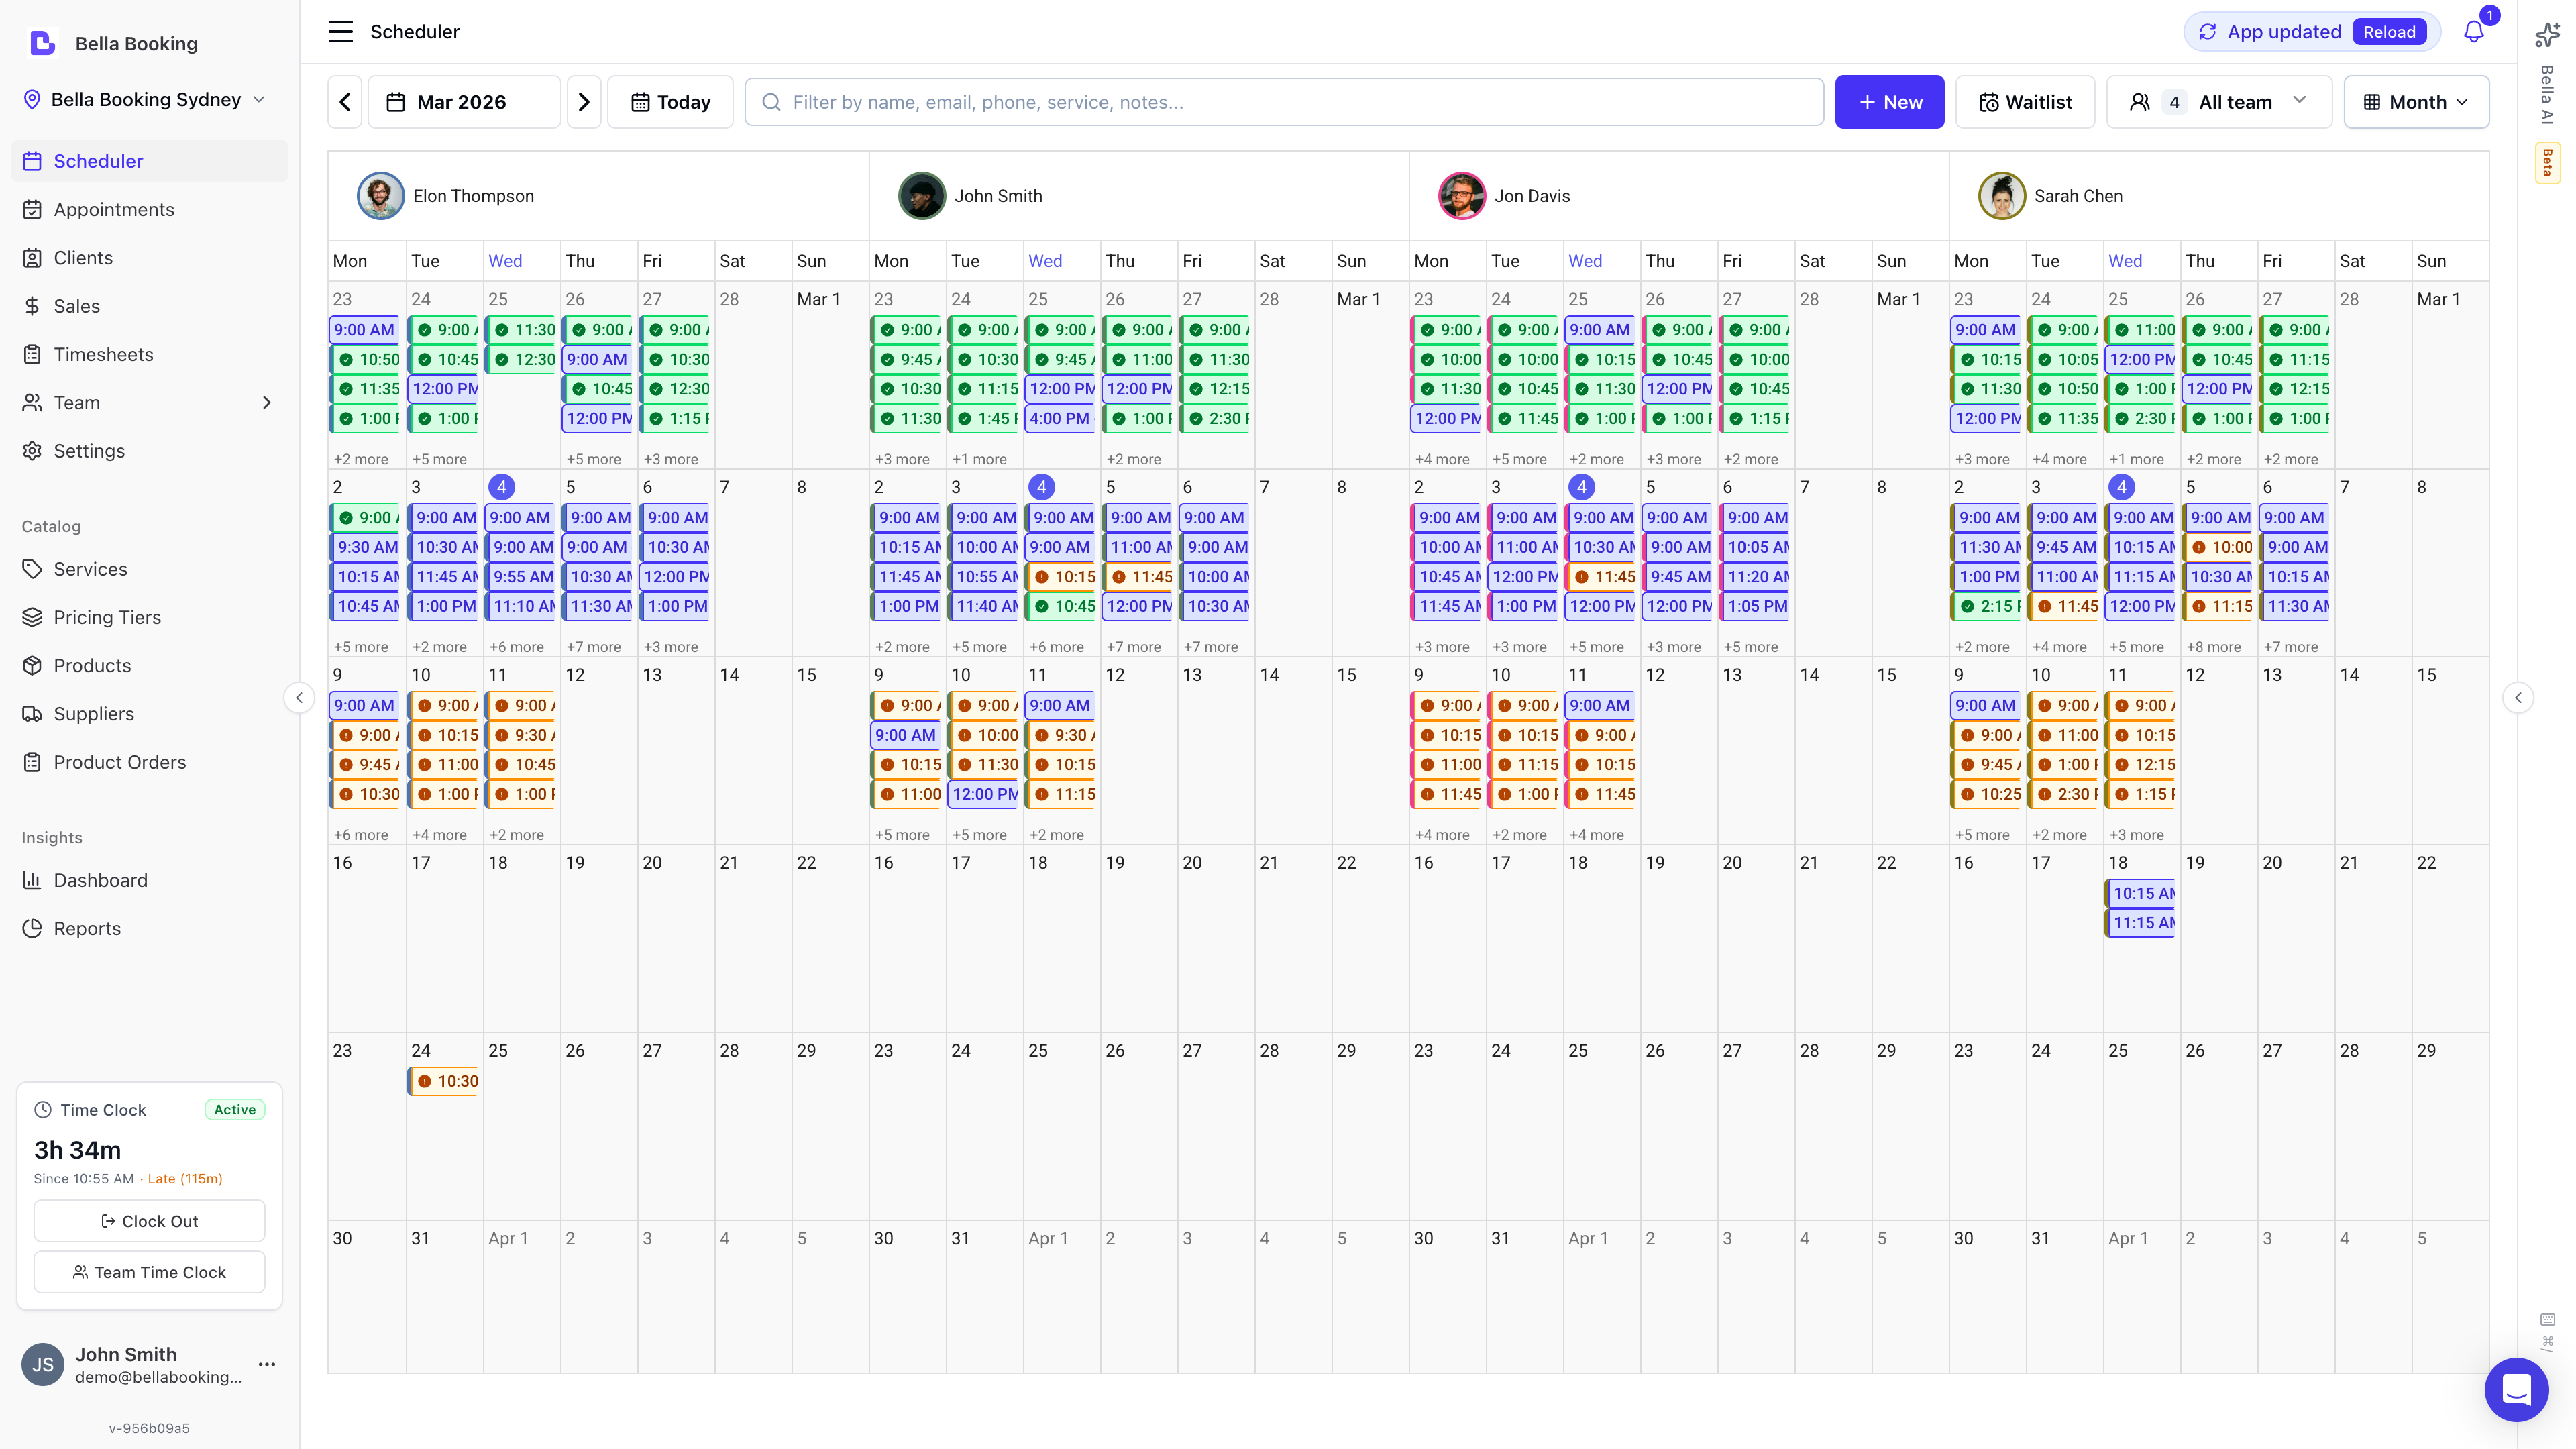
- Multiple Calendar Views: Switch between Day, Week, Month, and Agenda views for optimal visibility of your schedule.
- Team Schedule Management: View and filter appointments by team member. See Team Schedule for managing team working hours.
- Flexible Date Navigation: Quickly move forward or backward by day, week, or month; jump to today with a single click.
- Time Grid (zoom): Adjust how finely the day is divided into rows (60m down to 5m) to see more detail or more of the day at once.
- Waitlist Management: Add, edit, book, or remove clients on the waitlist.
- Incomplete Booking Recovery: Follow up with clients who started an online booking but didn’t finish. See Incomplete Bookings.
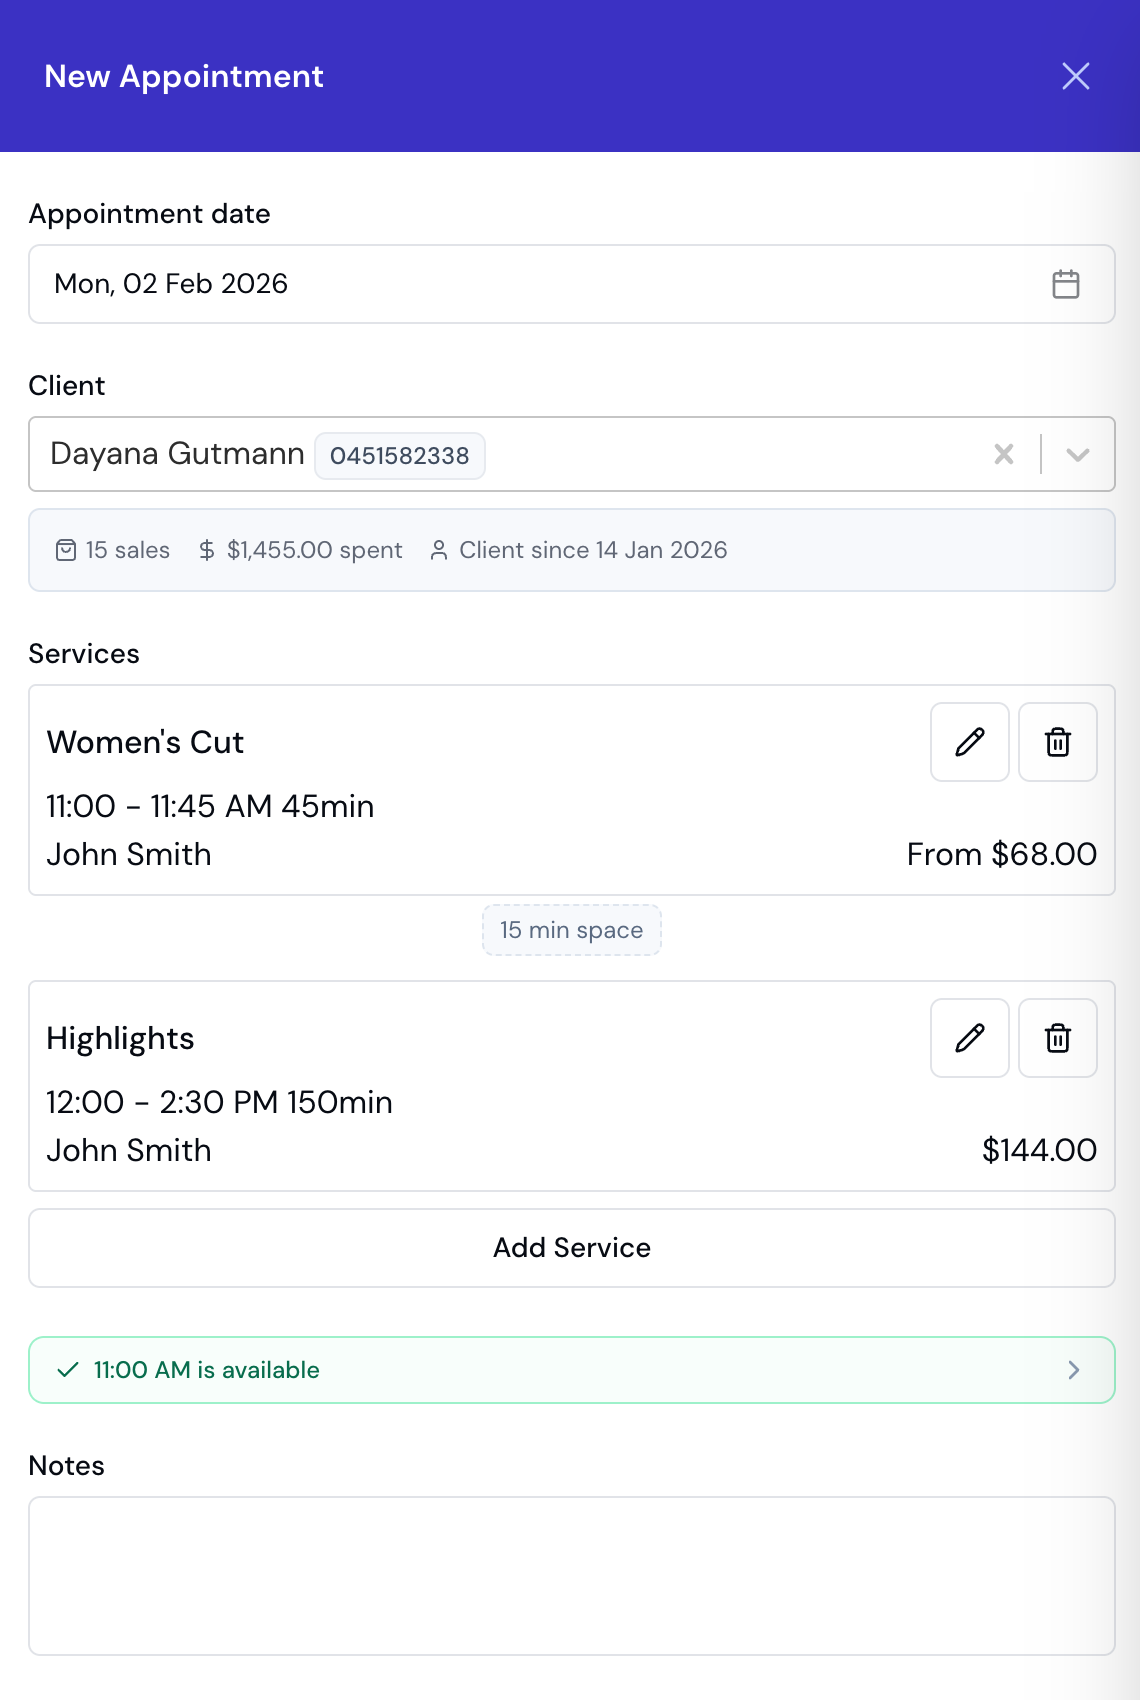
- Comprehensive Appointment Management: Create, edit, reschedule, or cancel appointments; assign multiple services; and add client notes.
- Appointment Series: Create recurring appointments (weekly, fortnightly, monthly) in one step with conflict preview. See Appointment Series.
- Working Hours Overlay: Visualise team members’ working hours directly on the calendar with dimmed cells for unavailable times.
- Smart Rebooking Suggestions: AI-powered suggestions to help clients rebook based on their appointment history.
- Resend Notifications: Resend confirmation or checkout summary notifications to clients at any time.
- Refresh Button: Manually refresh the scheduler data with a single click from the header.
- Customisable Colours: Choose the background colour for appointment statuses (Confirmed, Pending, Completed, etc.) and blocked time to suit your team’s workflow.
Complete Appointment Workflow (End-to-End)
Understanding the full appointment lifecycle helps you manage your business efficiently. Here’s how an appointment flows from booking to completion.1. Creating the Appointment
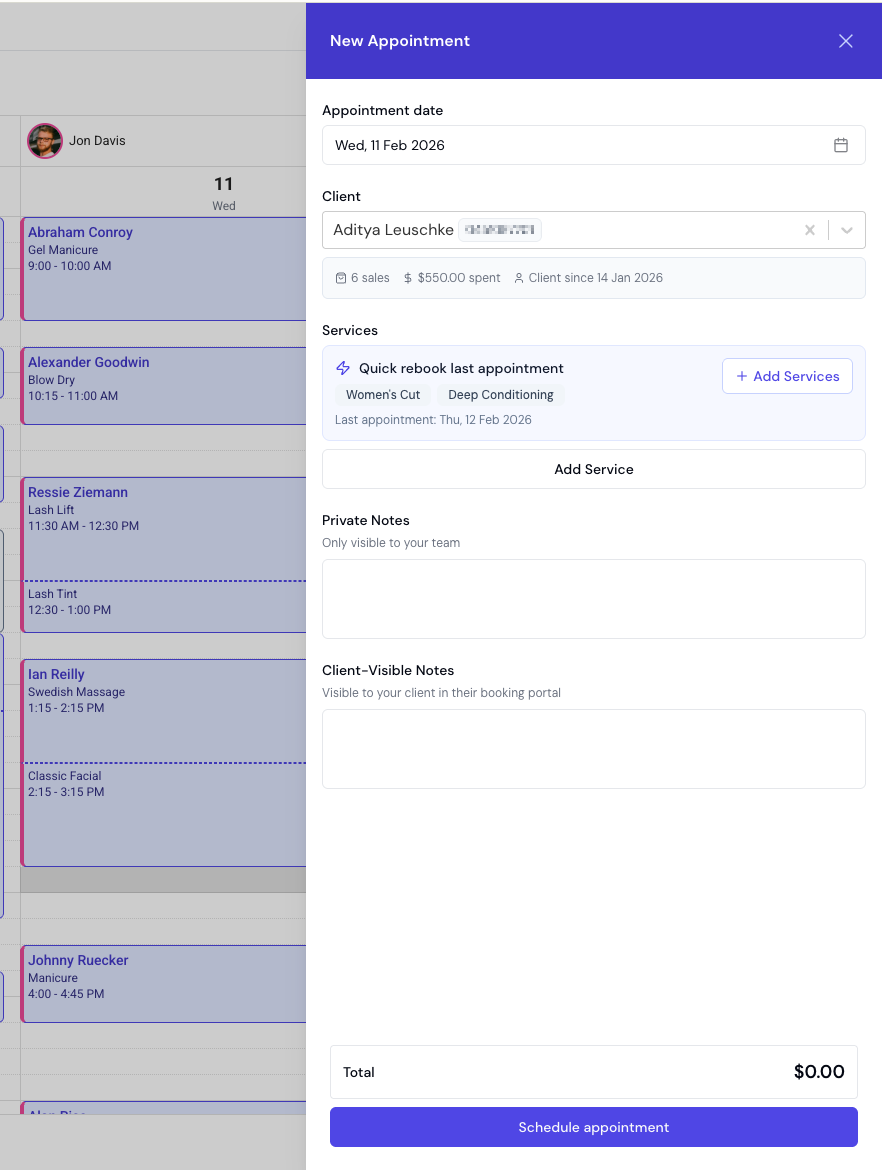
Quick Start:- Click a time slot on the calendar, click
Add Appointmentto open the appointment form - Select or create a client
- Add one or more services (and optional add-ons for each service)
- Assign a team member to perform the service(s)
- Confirm the date and time
- Add any notes (optional)
- Click Save to create the appointment
- Booking confirmation — sends immediately on save. Toggle it off if you don’t want to notify the client (e.g., you just spoke to them on the phone).
- Reminders (e.g., 24h reminder, 2h reminder) — each enabled reminder shows its scheduled send time. If the appointment is within the reminder window (e.g., booking for tomorrow when the reminder is set to 24 hours before), the toggle defaults to off and shows “Window passed — toggle to send now”. Turn it on to send the reminder immediately on save.
- The appointment appears on your calendar with a “Confirmed” status immediately
- Client receives the notifications you selected in the Notifications section
- Appointment is fully confirmed and ready to proceed
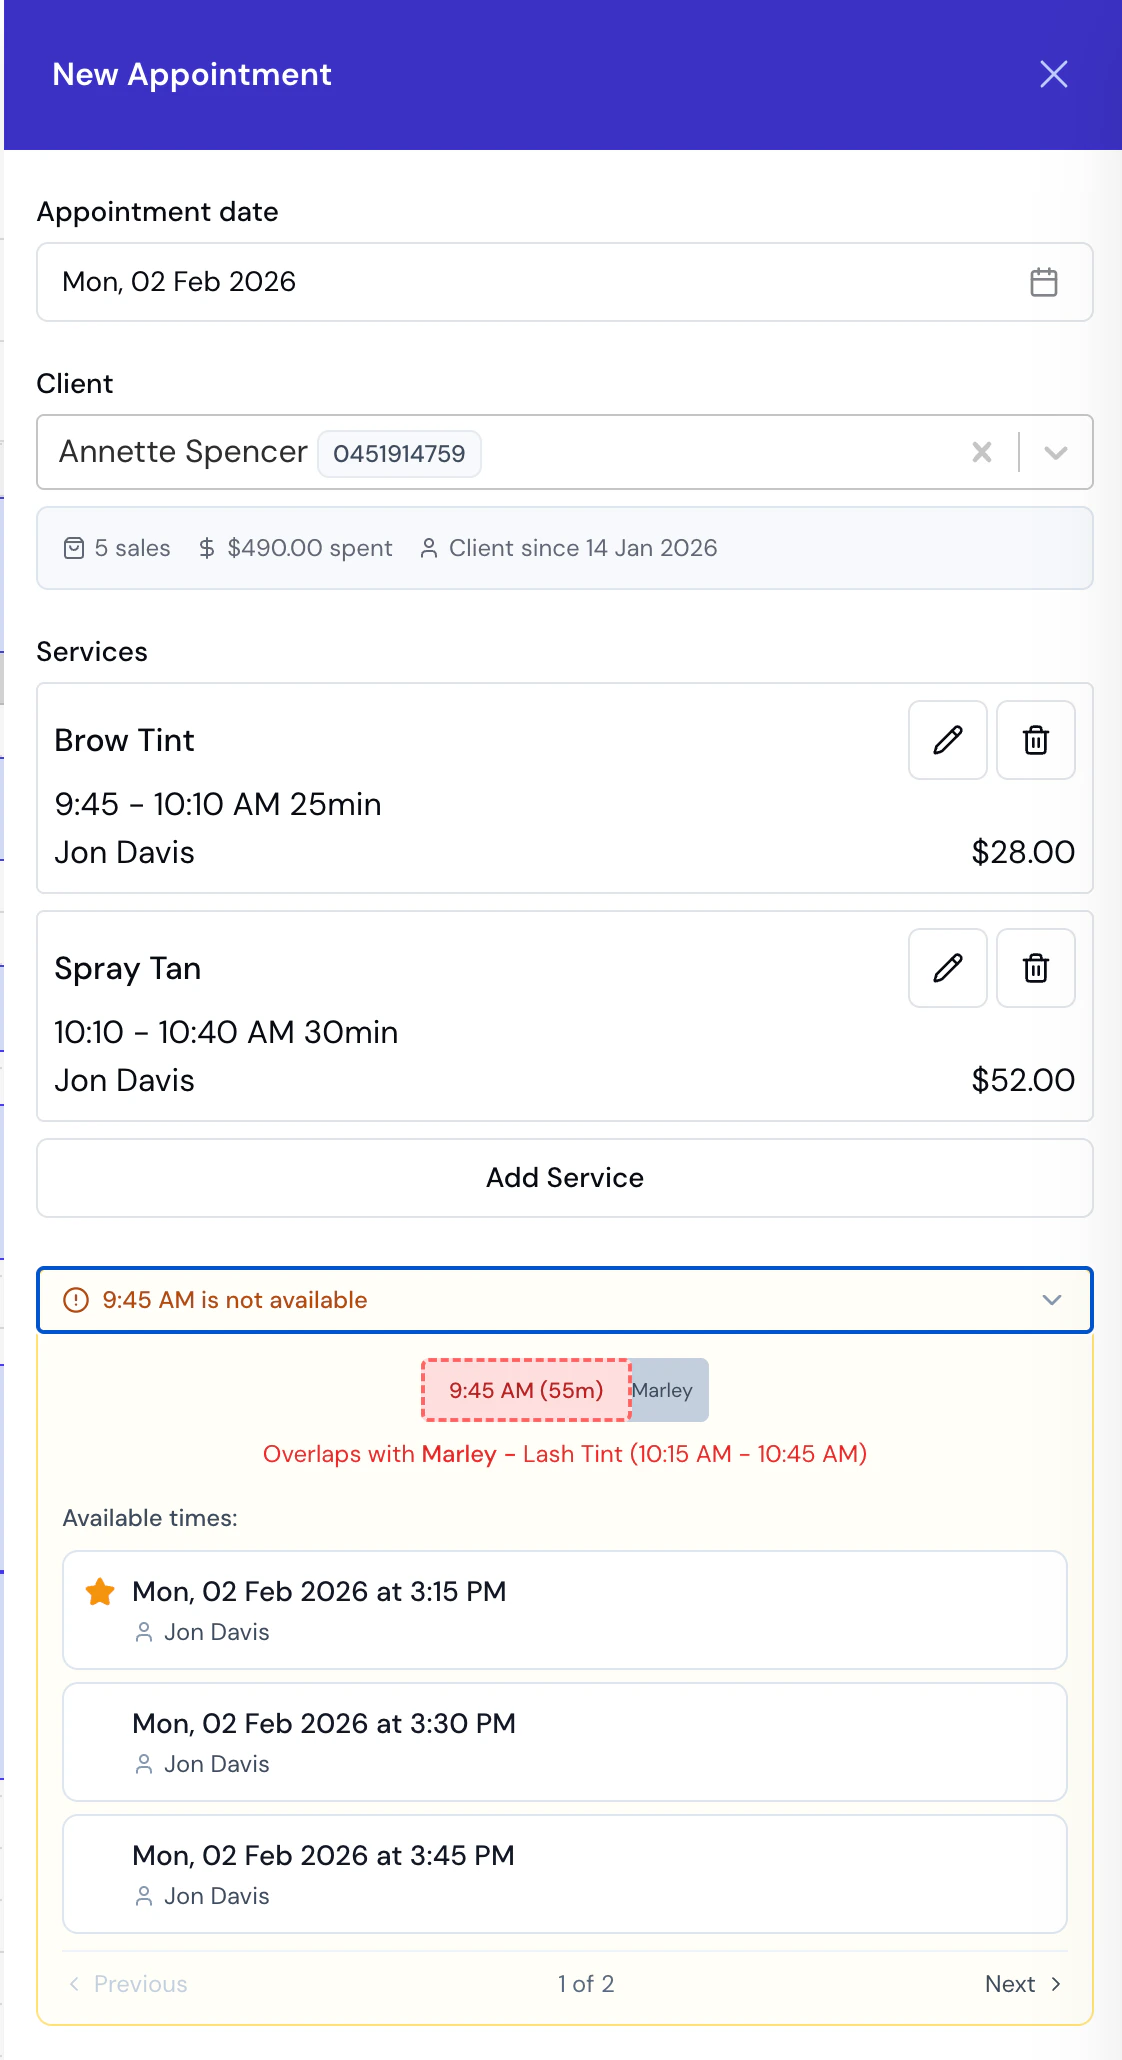
Find a Time
For phone bookings or when a client requests a specific service without a preferred date, use Find a Time:- Click the + New dropdown in the scheduler header and select Find a Time (or press F)
- Select the client — their preferred team member and last appointment details load automatically
- Add one or more services (or click Rebook last appointment to pre-fill from their history)
- Choose a team member preference (preferred team member or any)
- Click Find Available Slots to browse availability across multiple days
- Select a time slot — the appointment form opens pre-filled with all details, ready to save
Days where the client already has an appointment are automatically excluded from the results.
Keyboard Shortcuts
| Shortcut | Action |
|---|---|
| N | Open new appointment form |
| F | Open Find a Time |
| Escape | Close open panel |
| Cmd+Enter (Ctrl+Enter) | Save current form |
- Click Add Walk-In button for clients without prior appointments
- Same appointment creation flow, marked as walk-in
- Useful for tracking spontaneous clients and walk-in business
- Helps distinguish between scheduled and walk-in appointments in reporting
2. Performing the Service
On the day of the appointment:- The appointment appears on the calendar at the scheduled time
- The assigned team member provides the service(s)
- You can add notes during or after the service about what was done
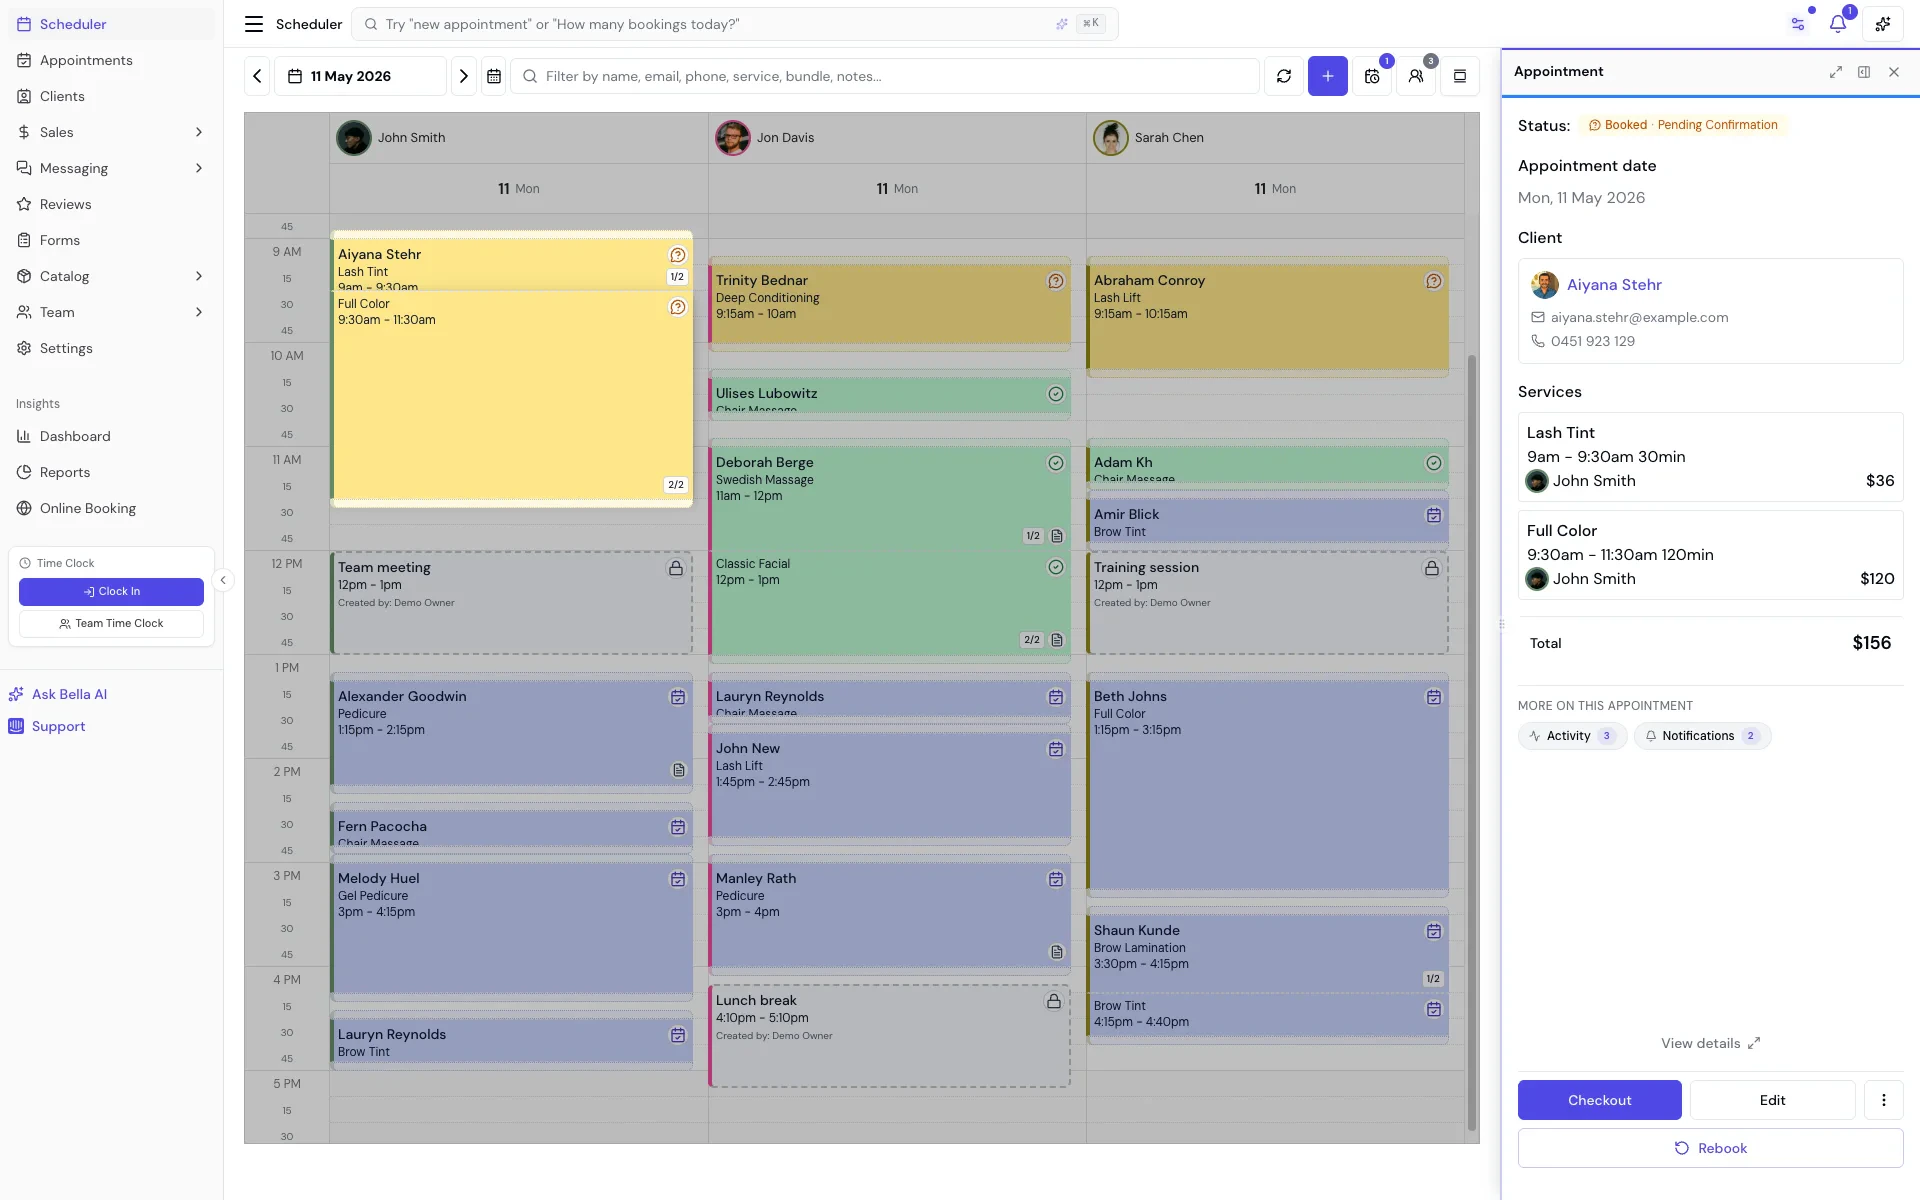
3. Checkout and Payment
When the client is ready to pay:- Open the Appointment: Click on the completed appointment
- Click “Checkout”: This opens the checkout screen
- Review Services: All booked services are automatically listed with their prices, including any selected add-ons
- Add Products (Optional):
- Click Add Product if the client purchased retail items
- Search and select products
- Product prices are added to the total
- Review Subtotal:
- Subtotal displays total of all services (including add-on prices) and products
- Select Payment Method:
- Cash — cash paid at reception
- Card (Manual) — in-person card processed outside Bella (covers EFTPOS)
- Other — bank transfer, voucher, etc.
- Card on File — charge the client’s saved card via Stripe (when available)
- Checkout summary (receipt) — send or skip: By default Bella sends the client a Checkout summary (receipt) when you take payment (by SMS and/or email, depending on your automated-message settings and the client’s contact details). To skip it for this checkout — for example a walk-in who doesn’t want a receipt — expand the Notifications card under Booking controls and switch Checkout summary (receipt) off (it will read “Won’t be sent”). Your global automated-message setting is unchanged.
- Complete the payment: The action button label reflects your selection — for example “Charge Visa ····4242” for Card on File, or “Record Cash Payment” for cash. Clicking it processes the transaction.
- The appointment status automatically changes to “Completed”
- A sale record is automatically created with all services, products, and payment details
- Inventory is updated for any products sold
5. Appointment Status: Booked vs Confirmed
Understanding appointment statuses helps you track appointment lifecycle: Booked Status:- Initial status for online bookings when deposit payment is required
- Appointment is created but not yet confirmed
- Client must complete payment to confirm the appointment
- If payment fails or is not attempted, the client can retry — the appointment is only cancelled by the auto-cancel timer if configured
- Appointments in “Booked” status are still on your calendar but pending confirmation
- Final status indicating appointment is fully confirmed
- Business-created appointments: Always start as “Confirmed” immediately
- Online bookings without deposit: Start as “Confirmed” immediately
- Online bookings with deposit: Start as “Booked”, become “Confirmed” when payment succeeds
- Clients receive confirmation notifications when status changes to “Confirmed”
- Confirmed appointments are guaranteed and ready to proceed
- You can manually confirm appointments if needed
- Click on the appointment and use the confirm option
- Useful for appointments that were created in “Booked” status
- Business User Creates: Booked → Confirmed (immediate)
- Online Booking (No Deposit): Booked → Confirmed (immediate)
- Online Booking (Deposit Required): Booked → (payment succeeds) → Confirmed
4. Automatic Sale Creation
Important: When you complete the checkout process, Bella Booking automatically creates a sale record that includes:- All services performed
- All products sold
- Payment method used
- Total amount paid
- Date and time of transaction
- Link to the original appointment
- Go to the Sales section to view all completed transactions
- Each sale is linked back to its appointment
- You can view, edit, or refund sales from the Sales section
- Complete transaction history for reporting
- Accurate revenue tracking
- Easy refund processing
- Client purchase history
- Team member performance tracking
Step-by-Step Features
Calendar Navigation
- Switch Views:
Use the
Day,Week,Month, orAgendabuttons at the top to select your preferred calendar format.
- Time Grid (zoom): Use the Time Grid control above the calendar grid to set how finely the day is split into rows — 60m, 30m, 15m, 10m, or 5m. See Display & View Controls below for all the header controls.
- Move Through Dates:
Use the forward and backward arrows or the date picker to jump to specific dates.
Click
Todayto return instantly to today’s schedule.
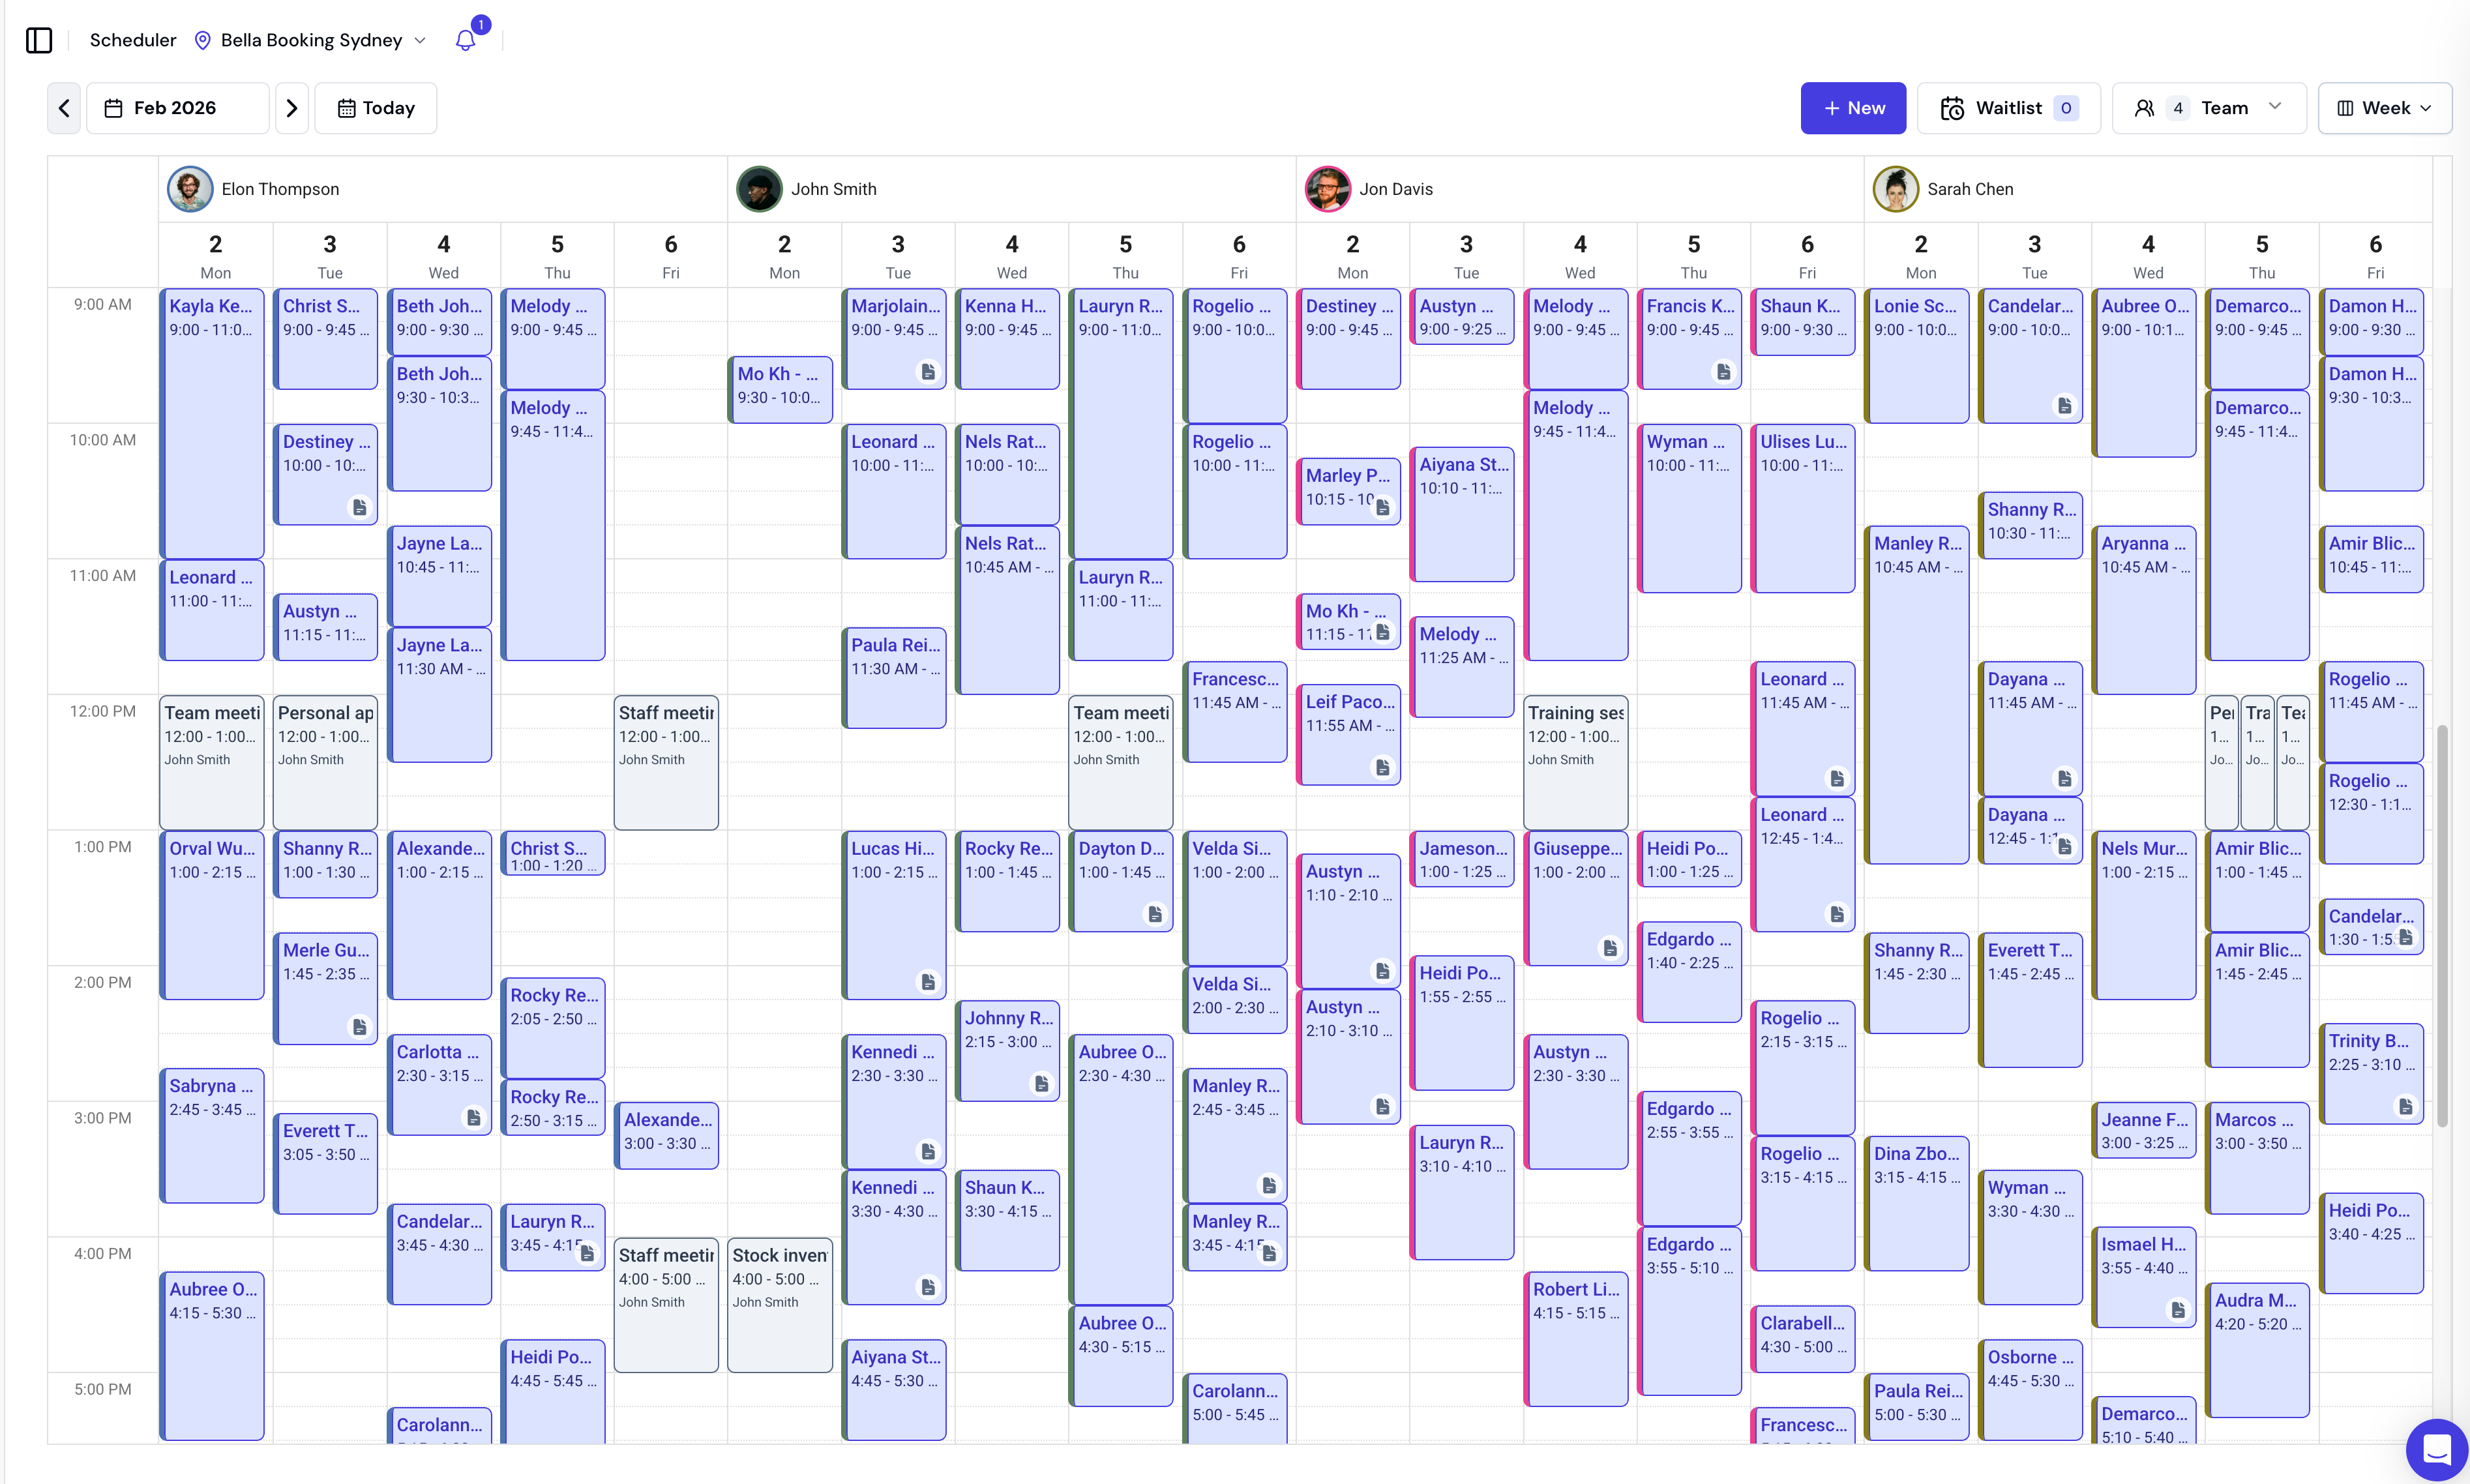
Display & View Controls
The scheduler header holds a few controls that change how the calendar is laid out. They are personal view preferences — they affect only your screen, not your settings and not what clients see.| Control | What it does |
|---|---|
| Day / Week / Month / Agenda | Switch the calendar view. |
| Time Grid | Sets how finely the day is divided into rows — 60m, 30m, 15m, 10m, or 5m per row. A smaller grid (e.g. 5m) shows more detail and makes short appointments easier to place; a larger grid (e.g. 60m) fits more of the day on screen. |
| Drag Lock | Locks appointments in place so you can’t accidentally move them while scrolling or tapping. Turn it off to drag-and-drop again. |
| Hide Weekends | Hides Saturday and Sunday in Week view to focus on the working week. |
| Rotate text on tight space | In Day/Week view, rotates appointment labels so they stay readable when columns get narrow (lots of team members on screen). |
| Working Hours | Dims time outside each team member’s hours — see Working Hours Overlay below. |
| Refresh | Manually reloads the latest appointments. |
Column names come from your team members and resources. Each column is automatically labelled with the team member’s name (or the resource’s name in Resources view) — there is no free-text column rename. To change a column’s label, rename the team member or resource. Use the team & resource filter to choose which columns appear.
On a phone, the scheduler switches to a compact, touch-optimised layout: the header controls tuck into a smaller toolbar and you tap an appointment to open it. Day and Agenda views read best on a small screen. Creating, editing, dragging and checkout all work the same as on desktop.
Team and Resource Filters
The scheduler includes a powerful filter to view appointments by team members, resources, or both. Accessing the Filter: Click the filter button (showing a count badge) in the scheduler header to open the filter dropdown. Filter Presets:| Preset | What It Shows |
|---|---|
| All team | All appointments for all team members (no resource filtering) |
| All resources | Only appointments that have resources assigned |
| All team and resources | Only appointments that have resources assigned |
- Team members: Toggle specific team members on/off to show/hide their columns and appointments
- Resources: Toggle specific resources on/off to filter appointments by resource
- If no resources are selected: All appointments are shown
- If any resources are selected: Only appointments with those resources are shown
Appointments for resource-only services (where no team member is assigned) only appear when viewing by resource. Switch to the Resources grouping mode or select specific resources in the filter to see these appointments. See Resources — Scheduler Resource View for details on switching between team member and resource views.
- Each team member’s avatar displays a coloured ring matching their scheduler colour
- Appointments display a left border in the team member’s colour for quick visual identification
Working Hours Overlay
In Day and Week views, you can display a visual overlay that shows each team member’s working hours directly on the scheduler. Toggling the Overlay:- Click the settings/options area in the scheduler header
- Find the Working Hours toggle
- Turn it on to dim time slots outside each team member’s scheduled hours
- Time slots outside working hours appear dimmed with a striped pattern
- Time slots within working hours remain bright and clear
- Each team member’s column shows their individual schedule
- The overlay is always on and cannot be toggled off
- Dimmed cells show a
not-allowedcursor and cannot be clicked - Clicking a dimmed cell shows a message indicating the team member is not scheduled to work at that time
- If a service’s duration extends past working hours, the appointment form shows a red warning and the submit button is disabled
Editing or Rescheduling an Appointment
- Click on an existing appointment block in the calendar.
- In the appointment detail panel, make edits:
- Change client or services.
- Reassign to another team member.
- Adjust date and time.
- Edit or add notes.
- Save your changes.
Resending Notifications
You can resend appointment notifications to clients directly from the appointment details. How to Resend:- Click on the appointment to open details
- Click the menu icon (three dots) in the appointment panel
- Select Resend Confirmation or Resend Summary depending on the appointment status
| Appointment Status | Notification Sent |
|---|---|
| Booked | Confirmation notification |
| Confirmed | Confirmation notification |
| Completed | Checkout summary notification |
- Client didn’t receive the original notification
- Client needs the appointment details again
- Sending a reminder before the appointment
- Resending the checkout summary/receipt
Cancelling or Deleting an Appointment
Cancelling (recommended):- Open the appointment by clicking it.
- Click the three-dot menu and select Cancel.
- Select a cancellation reason from the dropdown if prompted, and optionally add a cancellation note with additional details.
- Toggle Silent cancellation if you want to cancel without sending any notification to the client.
- The appointment status changes to “Cancelled” and remains visible for reporting.
- Open the appointment by clicking it. Click the Edit button.
- Click the three-dot menu and select Delete.
- Confirm the deletion. The appointment is permanently removed.
- Open a cancelled appointment by clicking it.
- Click the three-dot menu and select Permanently Delete.
- Confirm the action.
Cancelling is recommended over deleting because cancelled appointments are preserved for reporting and history. Deleted appointments are permanently removed.
- Cancellation Policies: If you have cancellation policies configured, they determine refund amounts
- Policy Evaluation: The system evaluates whether the cancellation is made with at least the required notice
- Refund Calculation:
- Cancellations with at least the required notice receive full refunds
- Cancellations with less than the required notice may have fees applied based on your policy
- Automatic Processing: Refunds are processed automatically through Stripe to the original payment method
- Business Override: As a business user, you can override the calculated refund amount for special circumstances
- Default Policy: Your default cancellation policy applies unless overridden at the service level
- Service-Level Overrides: Individual services can have their own cancellation policies
- Multiple Services: When an appointment includes multiple services, the most restrictive policy applies (shortest cancellation period, highest fee percentage)
- If self-service cancellation is enabled, clients can cancel appointments online themselves
- If disabled, clients must contact you directly to cancel
- When a cancellation policy is configured, online cancellation with less than the required notice is only available for appointments with deposit payments
- Appointments cancelled with at least the required notice can be cancelled online regardless of deposit status
- Business users can always cancel appointments regardless of self-service settings or deposit status
Blocked Time Management
Block out time when team members are unavailable for appointments, such as breaks, meetings, or personal time.Adding Blocked Time
- Click on a time slot in the calendar or use the Add Blocked Time button
- Fill in the details:
- Team Member: Select who is unavailable
- Date: Date of the blocked period
- From: When the blocked period begins
- To: When the blocked period ends
- Description (optional): notes about the blocked time like the reason
- Frequency: Change if this blocked time repeats (daily, weekly, etc.)
- Click Save
Blocked time is also visible on the Team Schedule page as amber badges, so managers can see breaks alongside working hours when planning rosters. You can also add breaks directly from the Team Schedule grid using the Add Break action on any cell.
Recurring Blocked Time
For regularly scheduled breaks or time off:- Change the Frequency option
- Select pattern (Every day, Every week, Every fortnight, Every month)
- Set end date for the recurrence or leave open-ended
Editing or Deleting Blocked Time
- Click on a blocked time block in the calendar
- Change any field to modify the details or timing and click Update
- Choose Delete to remove it
Buffer Blocks on the Calendar
When a service or bundle has buffer time configured (Buffer Before or Buffer After), the scheduler displays buffer blocks — grey striped blocks that appear immediately before and/or after the appointment. How buffer blocks look:- Buffer blocks appear as small, muted blocks with a diagonal stripe pattern
- They sit directly adjacent to the appointment they belong to
- Each block displays “Buffer” and the team member’s colour
- Not draggable: Buffer blocks cannot be moved independently. They always move with their parent appointment
- Clicking opens the appointment: Clicking on a buffer block opens the parent appointment’s details panel, not a separate editor
- Visual indicator only: Buffer blocks show when a team member is blocked for setup or cleanup — they are not separate appointments
- Buffer Before: Setup or preparation time before the appointment. The team member is unavailable during this period
- Buffer After: Cleanup or reset time after the appointment. The team member is unavailable during this period
Buffer time is configured per service or bundle in the Service Catalog. Location-level defaults can be set in Scheduling Settings.
Drag-and-Drop Scheduling
The scheduler supports drag-and-drop for quick rescheduling and adjustments.Rescheduling Appointments
- Click and hold on an appointment block
- Drag it to a new time slot
- Release to drop it in the new position to reschedule
Moving Appointments Between Team Members
- Click and drag an appointment
- Drop it in another team member’s column/row
- Release to drop it in the new position to reassign
Adjusting Appointment Duration
- Hover over the bottom edge of an appointment block
- Click and drag to extend or shorten the appointment
- Release when the desired duration is reached
- The system recalculates timing
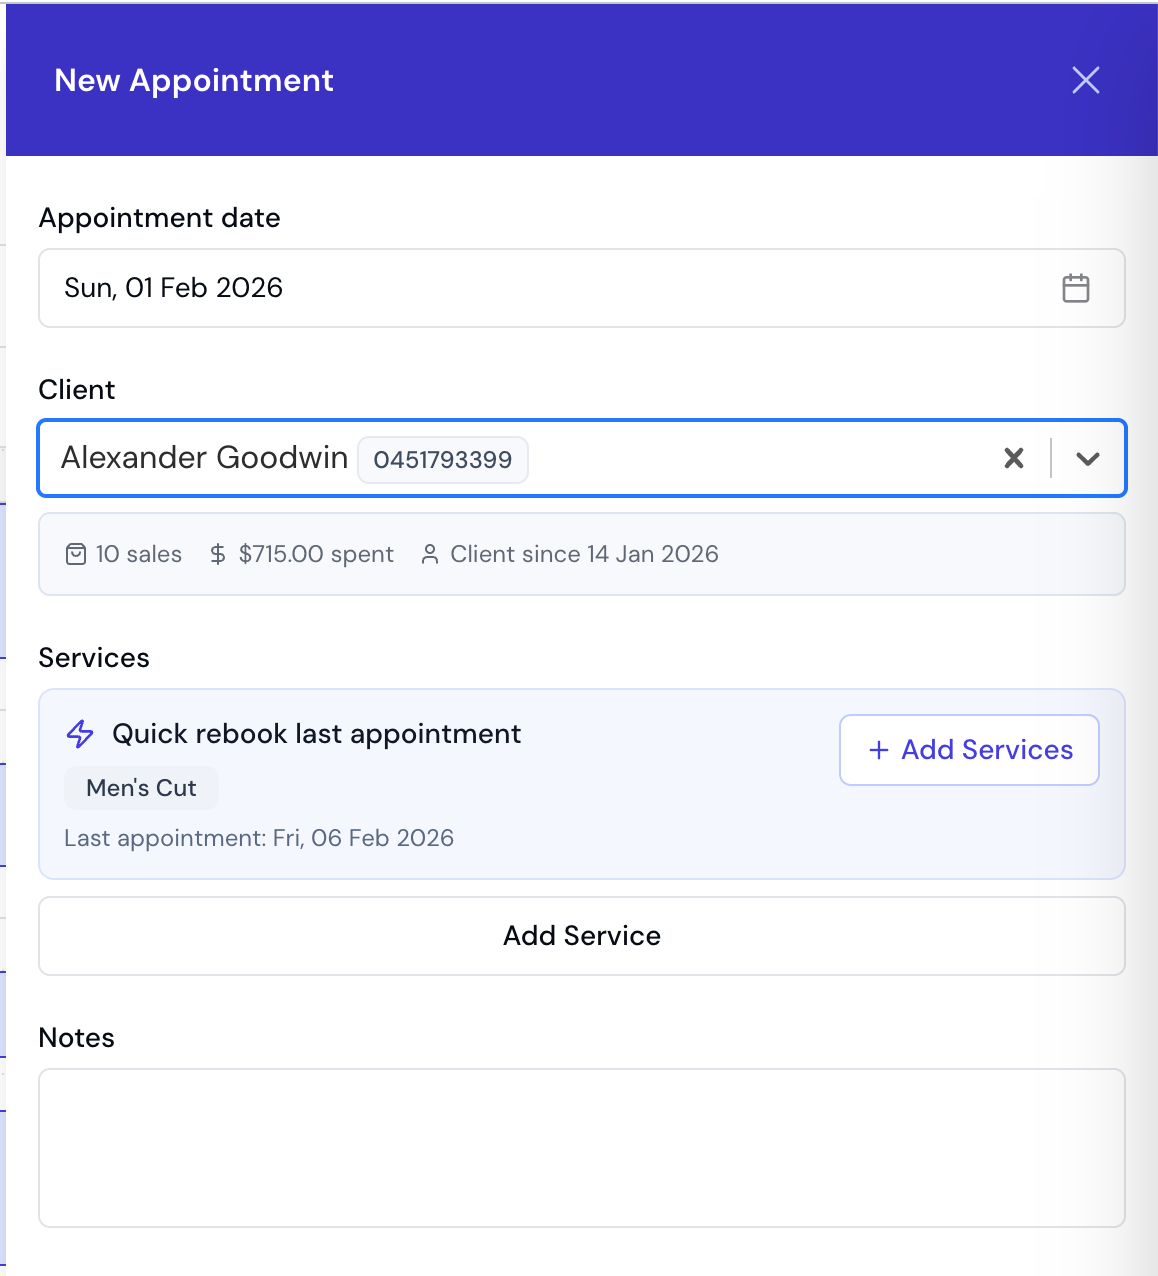
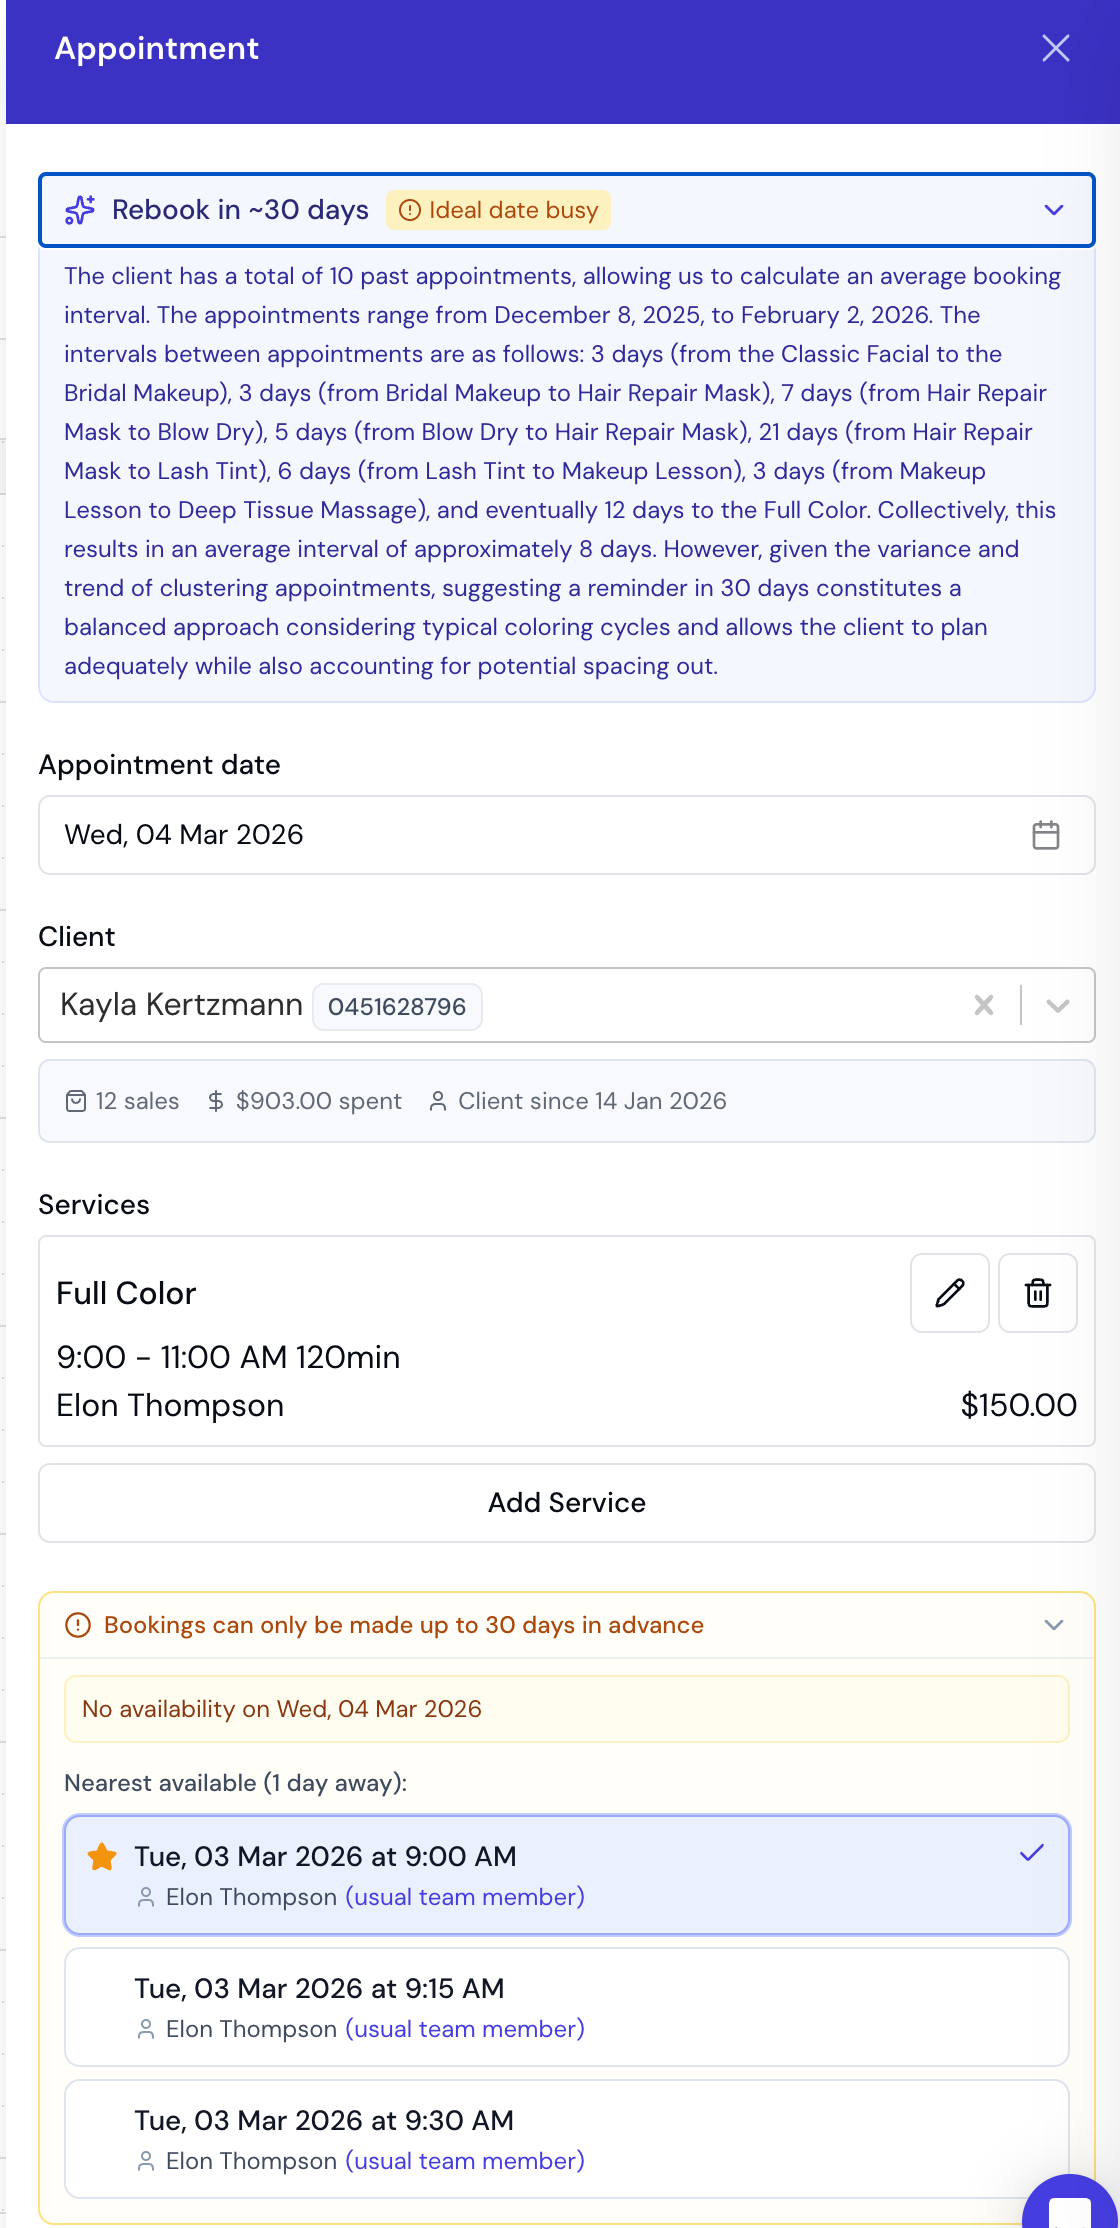
Rebooking Suggestions
Bella Booking can intelligently suggest rebooking options based on a client’s appointment history. How It Works: When you create a new appointment for an existing client:- The system analyses the client’s previous appointments
- It identifies their most frequently booked services
- Suggests the same services and team member combination
- Open the appointment creation form
- Select a client who has previous appointments
- If suggestions are available, you’ll see a “Suggested” section
- Click to apply the suggestion, which pre-fills:
- Previously booked services
- The team member who performed the service
- Adjust the date and time as needed
- Save the appointment
- Faster appointment creation for returning clients
- Consistent service delivery
- Helps maintain client-team member relationships
- Reduces time spent selecting services manually
FAQs
Q: How do I switch between different calendar views? A: Use the Day, Week, Month, or Agenda buttons at the top of the Scheduler. Q: Can I see appointments for only one staff member? A: Yes, use the team filter to display only the selected team member’s appointments. Q: How do I block out time for lunch breaks or meetings? A: Click on a time slot, select “Blocked Time,” fill in the details, and save. You can make it recurring for regular breaks. Q: Can I sell products during appointment checkout? A: Yes. During checkout, click “Add Product” to include retail items in the transaction. Q: Can I delete a recurring blocked time? A: Yes. You can delete a single instance, this and future instances, or all instances of the recurring block. Q: How do rebooking suggestions work? A: When creating a new appointment for an existing client, Bella Booking analyses their appointment history and suggests their most frequently booked services and team members. Click the suggestion to pre-fill the appointment form. Q: Why don’t I see rebooking suggestions for a client? A: Rebooking suggestions are based on completed appointments. New clients or those without recent completed appointments won’t have suggestions available. Q: Why can’t I click on certain time slots? A: If Working Hours Enforcement is enabled, time slots outside a team member’s working hours are blocked. These slots appear dimmed with a striped pattern and show anot-allowed cursor. To create appointments outside working hours, disable the enforcement setting in Settings → Scheduling.
Q: Can I see when team members are available?
A: Yes. In Day or Week view, toggle the Working Hours overlay in the scheduler header. This dims time slots outside each team member’s scheduled hours, giving you a clear visual guide.
Q: Can I resend appointment notifications to a client?
A: Yes! Click on any appointment, then use the menu (three dots) and select “Resend Confirmation” or “Resend Summary”. This sends the appropriate notification via SMS and/or email based on your automated messages settings.
Q: What notification is sent when I resend for a completed appointment?
A: For completed appointments, the checkout summary notification is sent. For booked or confirmed appointments, the confirmation notification is sent.
Q: Why can’t I see a resource-only appointment on the scheduler?
A: Appointments for resource-only services (no team member assigned) only appear in the resource view. Switch to the Resources grouping mode using the filter button in the scheduler header. In team member view, these appointments are not visible because they have no team member column to appear in.
Q: What are the grey striped blocks before or after appointments?
A: Those are buffer blocks. They represent buffer time (setup/cleanup) configured on the service or bundle. Buffer blocks show when a team member is blocked and unavailable for other appointments. They cannot be dragged independently — clicking them opens the parent appointment.
Q: Why can’t I drag a buffer block?
A: Buffer blocks are tied to their parent appointment and cannot be moved separately. To change buffer time, edit the service or bundle configuration in the Service Catalog.