

Introduction
Services is where you define all the services your business offers. Create individual services, group them into bundles, and organise them with categories. Each service can have custom pricing, duration, and be assigned to specific team members.Key features
- Services management: Create, edit, archive, and manage individual services with pricing and duration
- Service Variants: Create named variations of a service (e.g., Short / Medium / Long Hair) with different pricing and durations - including automatic initial vs return client handling
- Service Add-ons: Attach add-on option groups to services (e.g., conditioning treatment, scalp massage), for every variant of the service or only for the variants you tick. Each add-on has its own price and duration. Groups can be optional or required, with single or multi-select
- Group Bookings: Let clients book one service for a small party in a single online booking - each guest gets their own team member at the same time. You set the maximum party size; a time only appears when that many qualified team members are free. The one-toggle alternative to maintaining separate “Couple”/“Double” services
- Service Bundles: Package multiple services together at a bundle price, sequential or parallel - a first-class item that packages, memberships, gift cards and forms can all be scoped to
- Prerequisite services: Require a consultation (or any other service) before a treatment can be booked online - Completed or Booked mode, Any or All when you list more than one
- Service images: Add up to 10 photos to a service so clients can see your work while they choose. The first one is the thumbnail in the booking list, and bundles pick up imagery from the services they include
- Duplicate: Copy a service, with everything on it, when the next one is nearly the same
- Service Categories: Organise services into logical groups for better navigation
- Pricing tiers: Set different prices for the same service based on team member experience level
- Team Assignment: Assign specific services to specific team members
- Drag-and-Drop Ordering: Reorder services and categories for optimal display
- Bulk Import: Import your whole service menu from a CSV - categories are created for you automatically
Services
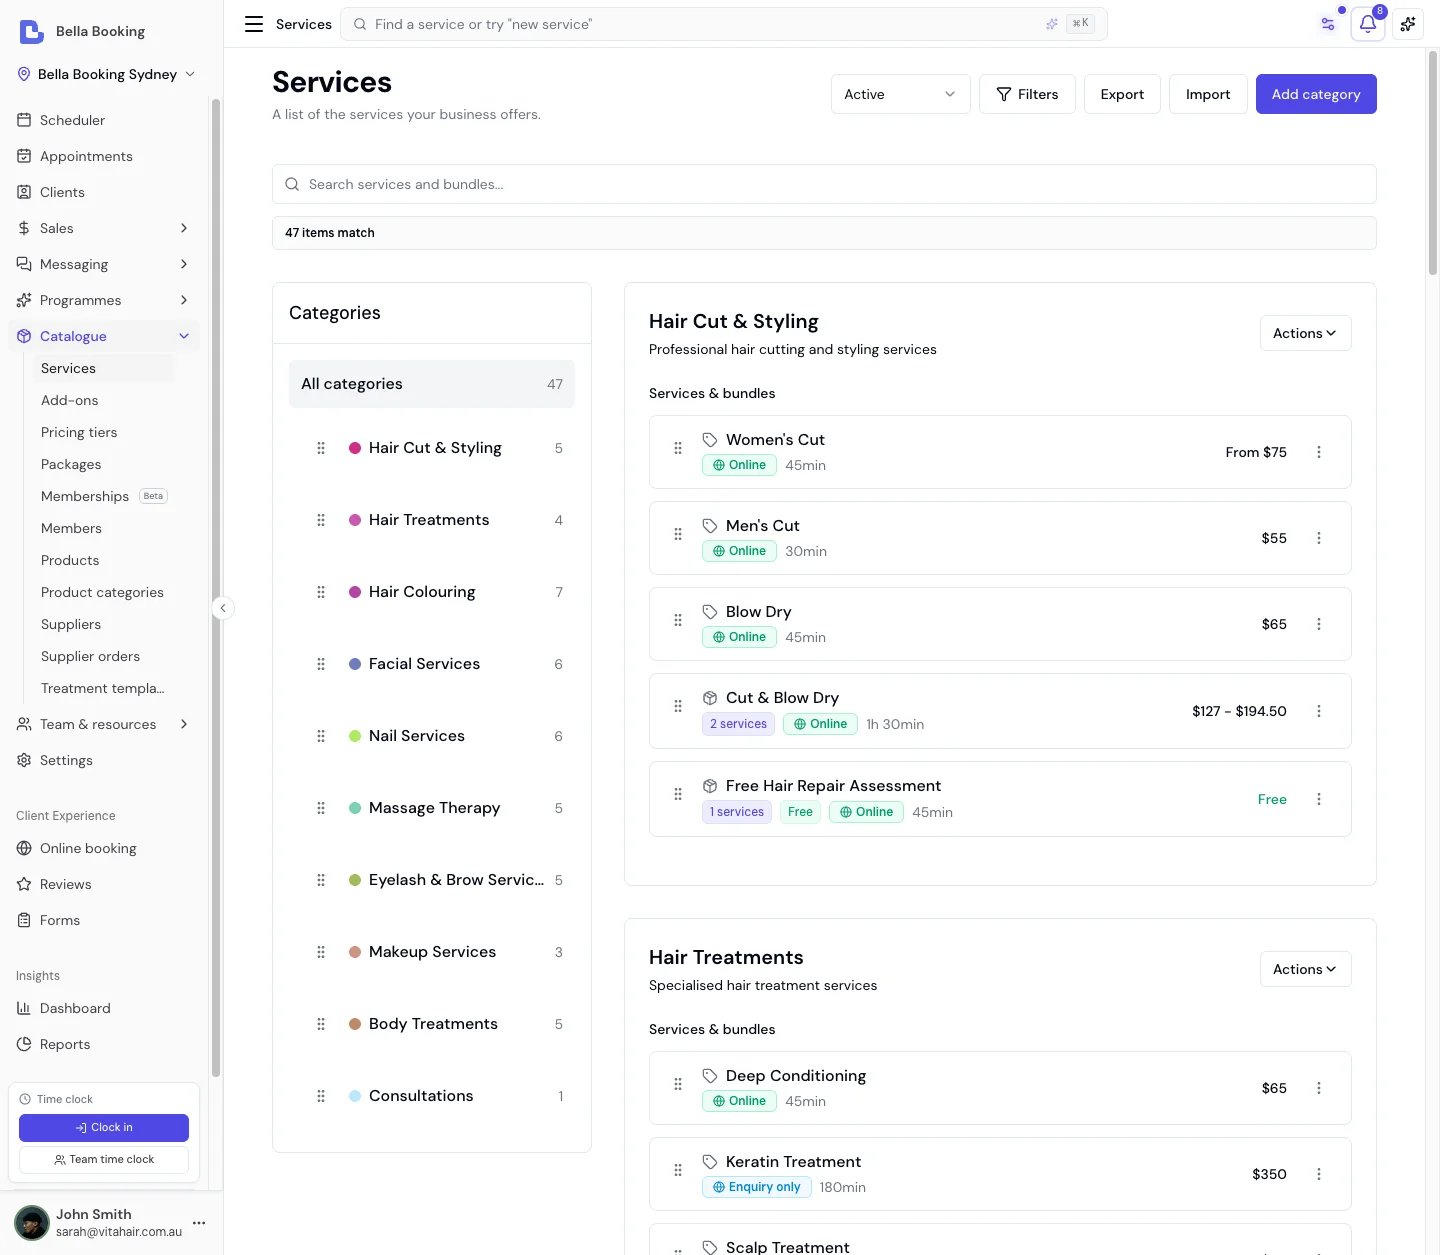
Viewing your services
- Navigate to the Services section from the sidebar
- You’ll see all your services organised by category
- Each service displays:
- Service name
- Duration (in minutes)
- Base price
Adding a new service
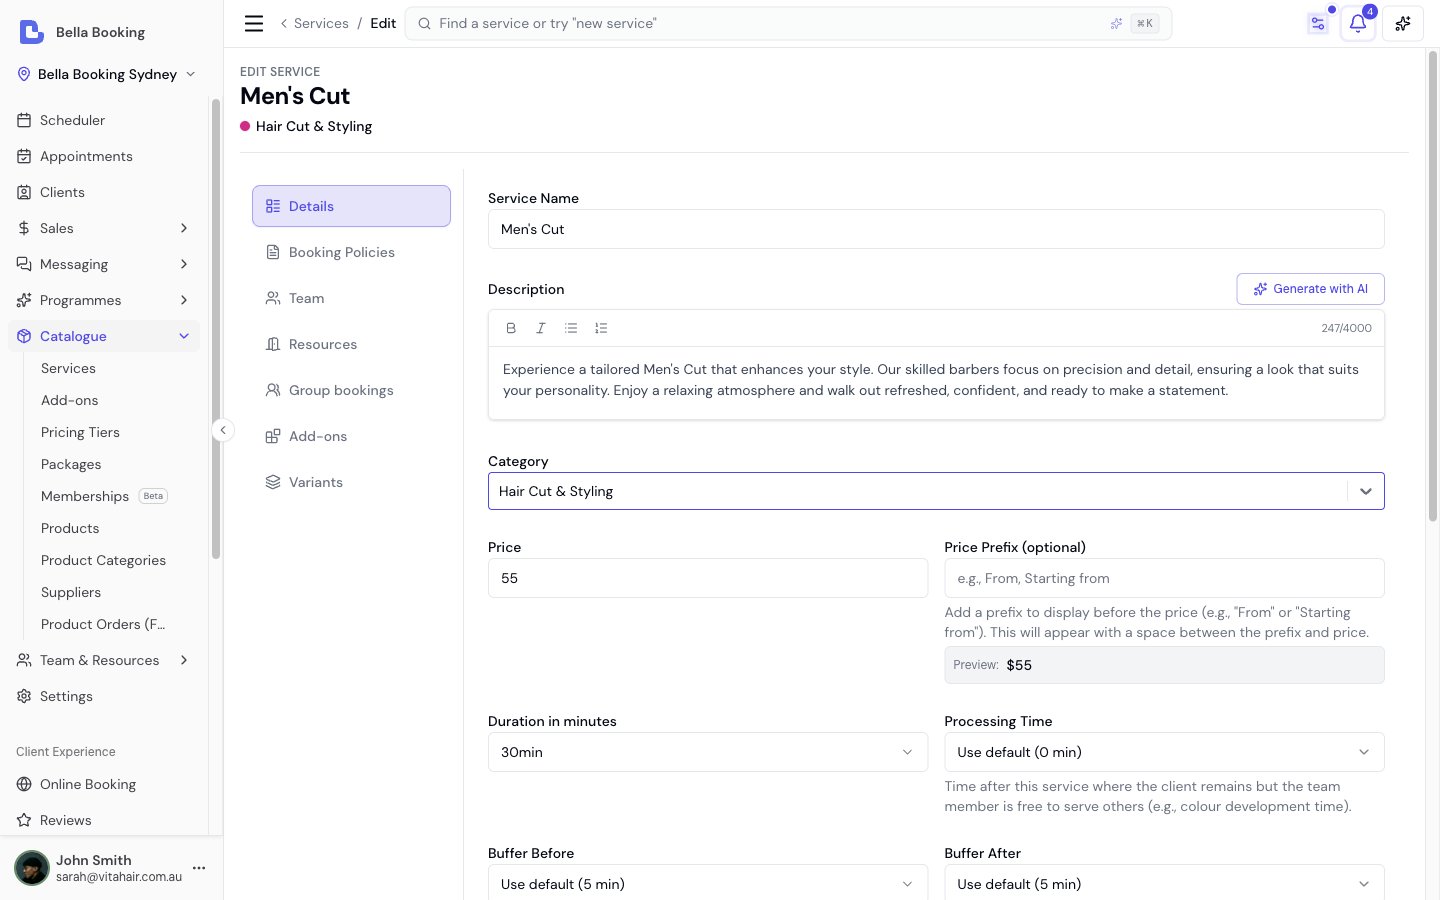
- Click the Add service button at the top of the service list
- In the service form, enter:
- Service name (required): The name of your service (e.g., “Women’s Haircut”)
- Description (optional): Additional details about the service
- Category (required): Select or create a category to organise this service
- Duration (required): Select how long this service takes (in minutes)
- Price (required): The standard price for this service
- Price prefix (optional): Add a prefix to display before the price (e.g., “From” or “Starting from”). When set, the prefix appears before the price with a space between them, in your business’s own currency.
- Example: If you enter “From” as the prefix and set the price to
50, clients will see “From50.00” - Example: If you enter “Starting from” as the prefix and set the price to
30, clients will see “Starting from30.00” - A live preview shows how the price will appear to clients while you’re editing
- Example: If you enter “From” as the prefix and set the price to
- Add-ons (optional): Configure add-on option groups for this service. Each group has a name (e.g., “Treatment”), an optional client-facing prompt (e.g., “Choose your preferred oil”), and one or more selectable options (e.g., “Deep Conditioning +
25, 15 min”). Groups can be marked as required (clients must select before proceeding) or left optional. Multi-select groups support minimum and maximum selection limits. Add-on prices and durations are added to the service total and affect availability calculations. - Team members: Choose who can perform this service - All team members (the default: anyone on your team, including team members you add later) or Specific team members (only the ones you select, with at least one required). This is a skill setting, independent of online booking - a qualified team member still only appears online if their own online-booking is enabled. This setting doesn’t apply to resource-only services (see below)
- Team Member Required (optional): Toggle OFF if this service does not need a team member - for example, float tanks, saunas, tanning beds, or infrared pods where only a resource (room or equipment) is needed. When turned off, the service must have Require resource enabled and at least one eligible resource assigned. See Resource-Only Services for details
- Pricing tiers (optional):
- If you have pricing tiers set up, you can set different prices for different tiers
- For example, a senior stylist might charge more than a junior stylist for the same service
- Minimum notice period (optional):
- Override the default minimum notice period for this specific service
- Select “Use default” to keep your standard setting
- Or select a custom notice period (e.g., 12 hours, 24 hours, 48 hours)
- Useful for services that need more or less preparation time
- Cancellation policy (optional):
- Override the default cancellation policy for this specific service
- Cancellation Period: Set how many hours before appointment cancellation fees apply
- Cancellation Percentage: Set the cancellation fee percentage
- Allow Self-Service Cancellation: Control whether clients can cancel this service online
- Select “Use default” for any setting to keep your standard policy
- Useful for services with different cancellation needs (e.g., wedding packages vs quick trims)
- Payment policy (optional):
- Override the default payment policy for this specific service
- Use default: Apply your standard payment settings
- No upfront payment: No deposit required for this service
- Require deposit: Require a deposit when booking this service
- Fixed amount: Set a specific amount in your currency (e.g.,
50) - Percentage: Set a percentage of the service price (e.g., 25%)
- Fixed amount: Set a specific amount in your currency (e.g.,
- Card on file: The client saves a card to confirm this booking - no money is charged and nothing is held on the card. The saved card lets you charge a late-cancellation or no-show fee if your cancellation policy applies. (A pre-authorised hold on the card is planned but not yet available.) A card asked for by the service, at a location whose own policy is something else, books the appointment first and shows Awaiting Card until the card is saved; under the location’s own Card on file policy no appointment is created until then.
- Useful for high-value services that need a deposit or a card on file regardless of your default settings
- Allow client to choose team member (optional):
- Override whether clients can select their preferred team member when booking this service online
- Select “Use default” to keep your standard setting
- Allow join waitlist (optional):
- Override the location-level waitlist setting for this specific service
- Select “Yes - Allow waitlist for this service” to enable even if location default is disabled
- Select “No - Don’t allow waitlist for this service” to disable even if location default is enabled
- Select “Use default” to follow the location setting
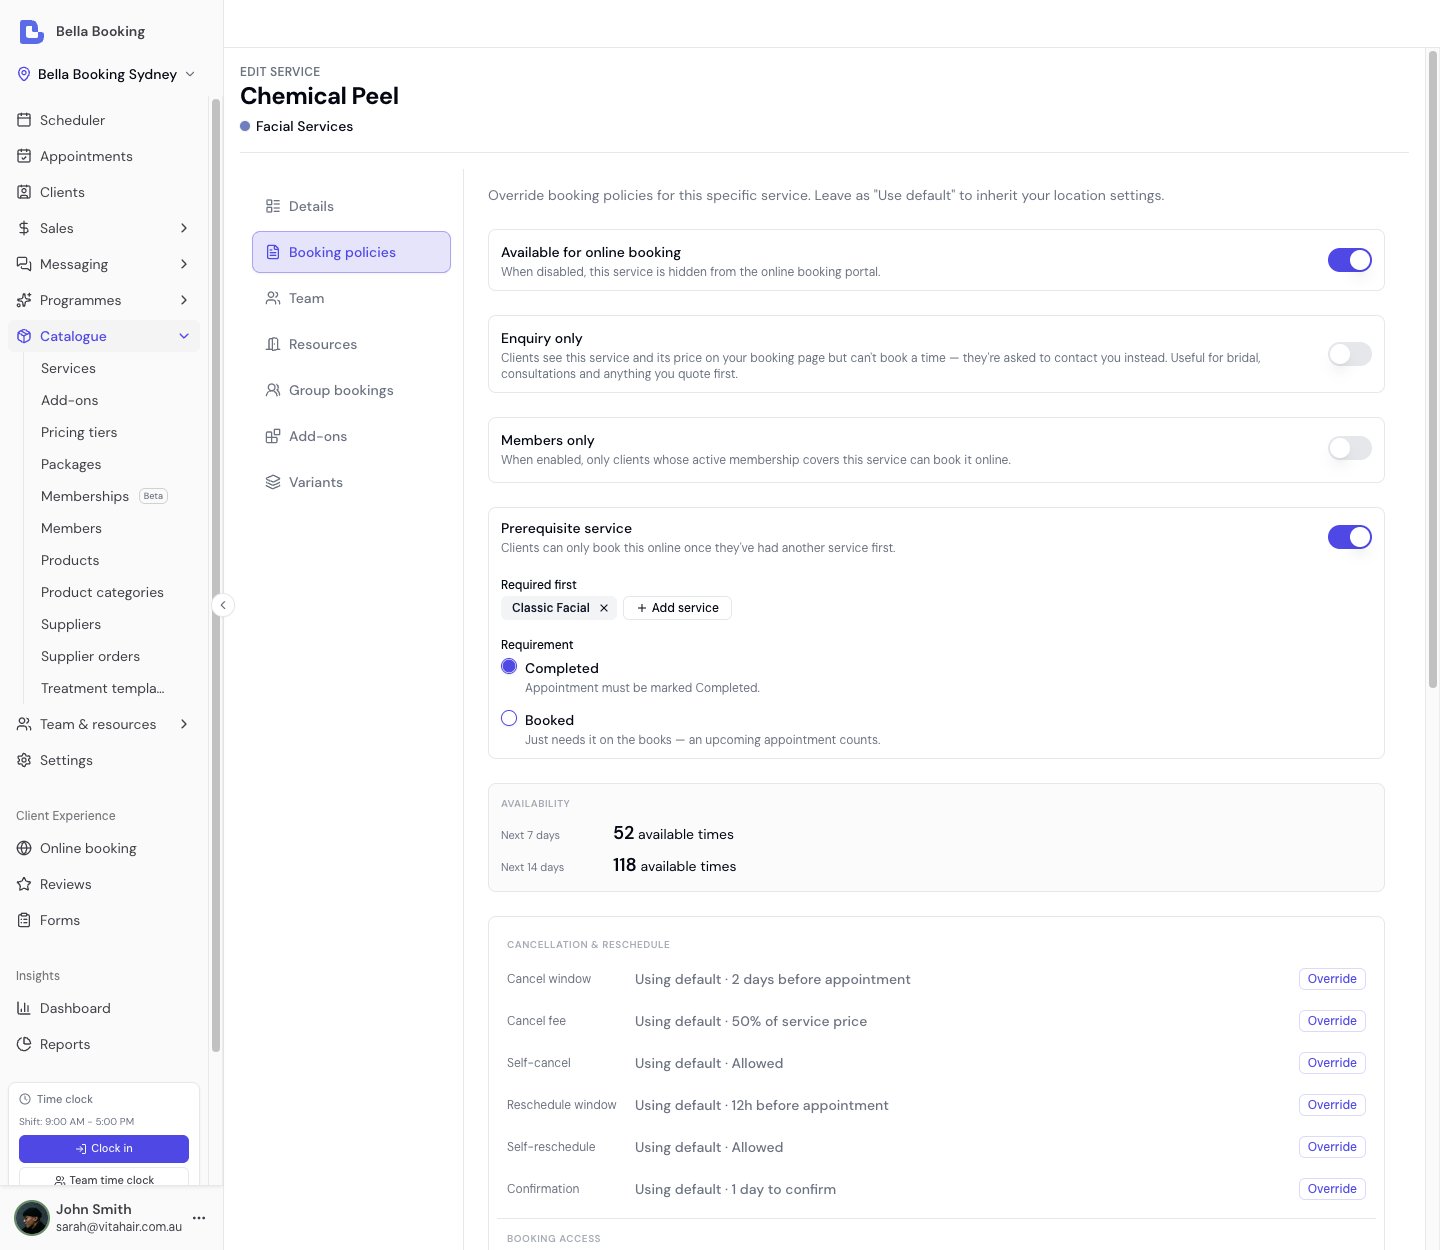
- Available for online booking (optional):
- Toggle OFF to hide this service from your online booking page entirely
- When ON (the default), the service appears online if at least one qualified team member has online booking enabled - for an All team members service that’s any online-bookable member; for a Specific service it’s any of the selected members
- When OFF, the service is completely hidden from the booking portal regardless of team member assignments
- This only affects online booking - your team can still book this service from the dashboard
- The Services page shows “Online”, “Enquiry only”, “Offline”, or “No team members” badges to indicate status
- Enquiry only (optional, shown while the service is available online):
- Turn ON to list the service on your booking page without letting clients pick a time - clients see a Call to book or Email to book link instead of a time picker, using whichever contact detail you publish (just Enquire when you publish neither - publish a phone or email under Settings → Online booking → Appearance → Contact details so that label has somewhere to go)
- The price is shown unless you have hidden prices for this service or as the location default
- Suits bridal, complex colour, and anything you quote after a conversation: nothing books in unchecked
- The service is left out of the booking steps, and out of your Reserve with Google listing. A bundle that includes it is left out of online booking too, because booking the bundle would assign a time to the service
- Your team can still book it from the dashboard as normal
- Prices (optional):
- On the Booking policies tab, set Prices to Hidden when the amount varies based on consultation
- Clients will not see the amount. A price prefix (for example From) still shows on some booking steps
- Leave Use default to follow Settings → Booking policies, or set Visible / Hidden for this service only
- Resources (optional):
- Require resource: Toggle ON if this service requires a room, chair, or equipment to be booked. When enabled, online booking will only show time slots where at least one eligible resource has available capacity.
- Eligible resources: Select which resources can be used for this service. Multiple resources can be eligible (e.g., “Room 1” or “Room 2”). During online booking, the system automatically assigns the first available resource.
- You can list eligible resources without requiring them - this lets your team optionally assign resources from the dashboard without blocking availability.
- People per booking / Reserves the whole space (only visible when Require resource is on): two independent ways to share a room. People per booking is how many people can share one booking - default 1 (solo); set 2 for a couples room, higher for a shared class or high tea, and at booking time the booker declares how many people are coming (naming them is optional - linked family and/or plain guest names). Reserves the whole space is private hire - one booking takes the entire room regardless of headcount (a private sauna). See People per booking and private hire below for the full walk-through.
- Processing time (optional):
- Time after the active service where the client remains but the team member is free to serve others
- Select “Use default” to inherit the location-level default, or choose a specific value
- Values step in 5 minutes up to an hour, then in quarter-hours to 2 hours - so a 40-minute colour development is entered as exactly that. Worth being precise: processing time is what frees your team member, so declaring more than you actually have lets the next appointment run past the point you need to be back with the first client
- Common uses:
- Colour development: Allow hair colour to develop (e.g., 30-45 minutes)
- Treatment absorption: Let skincare products work before the next step
- Setting time: Allow a perm or treatment to set
- During processing time, team members can serve other clients while the client waits
- Processing time is included in the total duration shown to clients (e.g., “90 mins (incl. 30 min processing time)”)
- This applies whether the service is booked alone, in a bundle, or stacked with other services
- Buffer Time (optional):
- Blocked time before and/or after the service where the team member is unavailable for other appointments
- Buffer before: Setup or preparation time before the service begins
- Buffer after: Cleanup or reset time after the service ends
- Select “Use default” to inherit the location-level default, or choose a specific value for each
- Values step in 5 minutes up to an hour
- Unlike processing time, buffer time is not visible to clients - it only affects team member availability
- Common uses:
- Room setup: Preparing the treatment room or station
- Equipment sterilisation: Cleaning tools between clients
- Consultation review: Reviewing client notes before the appointment
- Click Save to add the service to your catalogue
Scheduler colour
Each service has an optional Scheduler colour field that controls the background colour of its appointment tiles on the scheduler. Colour inheritance:- If the service has a colour set, that colour is used
- If the service has no colour but its category has a colour, the category colour is inherited
- If neither has a colour set, the default palette colour is used
- Edit the service
- Go to the Details tab
- Find the Scheduler colour picker
- Choose a colour from the presets or enter a custom hex value
- To revert to the category colour, click Reset to category colour
- Status (default): Tiles are coloured by appointment status (Confirmed, Completed, etc.), or by the client’s check-in state (Waiting, In progress) once they’ve arrived. Both are configured in Settings > Scheduling > Scheduler colours
- Service: Live tiles are coloured by the service colour (with category fallback). After checkout or cancel the whole tile takes the Completed or Cancelled colour. In the Day, 3 days and Week views a small strip along the top still shows the status - or the check-in colour, when the client is with you - while the appointment is live
People per booking and private hire
A service in a shared room can be sold three ways, using three independent settings on the service’s Group bookings tab (its eligible rooms stay on the Resources tab). Pick the ones that match how the service is actually delivered - you don’t need separate “Solo”/“Couple”/“Private” services.These settings are for one booking that several people share, or that takes the whole room. When instead you want a party who each need their own team member at the same time (e.g. a couples massage with two therapists), use Group Bookings - group bookings and People per booking are alternatives, not used together on the same service. Unsure which of the multi-person setups you need? Start at Bookings for more than one person - a decision table covering family visits, parties, shared-space sittings, private hire and discounted duos.
- People per booking - how many people can share one booking (the booker plus co-attendees). A couples float room is 2; a group high tea is 8. At booking time the booker declares how many people are coming (a How many people? stepper in the service panel that opens from Choose) - that headcount reserves the space. You also choose whether the price is charged per booking or per person - see Per-booking or per-person pricing below. Naming those people is optional: pick linked family members and/or just type a guest’s name, up to the headcount minus one. A typed guest name is a label only: it creates no client record and carries none of that guest’s own entitlements.
- Reserves the whole space - private hire. One booking takes the entire room regardless of headcount, so no one else can be booked into it at that time (a private sauna session, an exclusive room buy-out).
Per-booking or per-person pricing
60 as A$60, £60, €60, or whatever your business trades in.
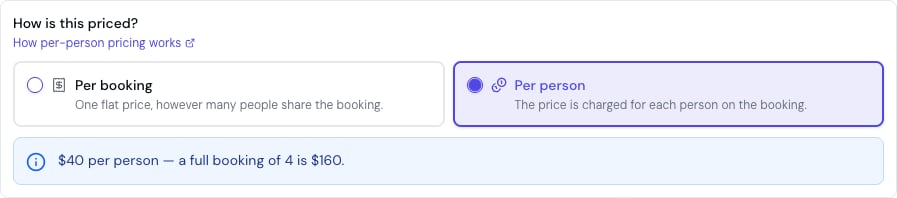
- Per booking (the default) - one flat charge for the whole booking, however many people come. A
90private sauna session is90whether two people or four share it. This is exactly how shared-space services have always priced, so nothing changes for your existing services until you opt one in. - Per person - the price you set is the per-head price, and the booking is charged for every person coming. A float priced
60per person is120for two,180for three.
60 per person”, and once the client picks the headcount the review line shows the sum - 2 × 60 = 120, “For 2 people · priced per person”. A per-booking service shows its single price exactly as before.
Worked example - a couples float priced per person. Your Float Session seats two (People per booking 2) and you set it to charge per person at 60. A couple taps Choose and picks 2 on the How many people? stepper:
- The card shows “From
60per person”. - The review line reads
2 × 60 = 120- the whole booking is120. - It’s still one booking, one line, one payment: the headcount is folded into the line price, so a membership, package, deposit or discount settles the whole
120exactly as it would any other line - no per-head special cases. (Add-ons stay per line - added once, never multiplied per head.)
300 room hire, priced once no matter the headcount), or choose per person when each head adds to the price (a per-person float, a per-guest high tea). For a fixed discounted party price instead - a “2-for” special below the natural sum - use a fixed-total bundle rather than per-person pricing.
How room capacity fits in
Each resource has a total capacity (e.g., a bathhouse sauna that seats 6). Independent bookings share that room up to its capacity: six solo sauna sessions fill a 6-seat sauna. A booking that carries several people (People per booking) takes one seat per person; a whole-space booking takes all of it. A new booking is allowed only when the room still has room for it.
Worked example - a bathhouse sauna that seats 6 (capacity 6):
Mixed bookings are allowed up to the room’s capacity - e.g. one couples session (2 people) plus four open sessions = 6 = full.
To configure:
- Edit the service and open the Resources tab: turn Require resource ON and select the eligible resources
- Open the Group bookings tab
- Under How do people book this?, pick the option that matches - Just one person, Several share the space, Booked together, a team member each (group bookings), or Private hire. The chooser sets the underlying options for you (Private hire only becomes available once the service requires a resource with at least one eligible resource selected - step 1); the raw switches stay visible below if you’d rather set them by hand
- Or set them directly: People per booking for a shared booking (or leave it at 1), and/or turn on Reserves the whole space for private hire
- For a shared booking (People per booking above 1), choose how it’s priced - per booking (one flat charge, the default) or per person (the per-head price × the declared headcount). See Per-booking or per-person pricing above
- Couples massage room (capacity 2) - Solo Massage = People per booking 1; Couples Massage = People per booking 2, with the booker naming who’s coming.
- Private sauna (capacity 4) - a shared session sets People per booking to how many share it; a private hire turns on Reserves the whole space so the whole sauna is held for the one booking.
- Group treatment room with 8 recliners (capacity 8) - Standard session = People per booking 1 (up to 8 independent bookings share the room); a corporate buy-out turns on Reserves the whole space.
Editing a service
- Find the service you want to edit in the list
- Click the Edit icon or open the service details
- Update any field:
- Basic information (name, description, category, duration, price, price prefix)
- Add-on option groups and options
- Team member assignments
- Pricing tiers
- Minimum notice period: Override or use default
- Cancellation policy: Override or use default settings
- Payment policy: Override or require specific deposit
- Allow client to choose team member: Override or use default
- Available for online booking: Enable or disable this service for online booking
- Enquiry only: Show the service online but ask clients to contact you instead of booking a time (a bundle that includes it is left out of online booking too)
- Allow join waitlist: Override or use default
- Prices: Visible, Hidden, or Use default
- Images: Add, reorder or remove the photos clients see beside this service on your booking page (up to 10; the tab appears once the service is saved)
- Resources: Toggle “Require resource” and select eligible resources
- Processing time: Set or remove processing time after this service, or use the location default
- Buffer before / Buffer after: Set or remove buffer times, or use the location default
- Click Update to apply your changes
- When you set a custom minimum notice period or cancellation policy for a service, it overrides the default setting
- To revert to defaults, select “Use default” for that setting
- For appointments with multiple services, the most restrictive policy applies
Duplicating a service
When the next service you need is nearly the same as one you already have - the same cut at 30, 45 and 60 minutes, or the same facial at two strengths - copy it instead of filling the form in again.- Open the three-dot menu next to the service
- Choose Duplicate
- The copy opens in the editor, named after the original service with “(Copy)” on the end. Change the name and whatever else differs, then Update
- Bundles. A bundle lists the exact services it includes, so the copy is not added to any bundle the original belongs to. Add it yourself if you want it there.
- What the original unlocks. If other services require the original as a prerequisite, they keep requiring the original, not the copy. (The copy does keep the prerequisites the original itself had to meet.)
Archiving a service
Services cannot be deleted directly - they must be archived first. Archiving hides the service from active views and online booking while preserving all historical records.- Locate the service you want to remove
- Click the toggle menu (three dots) and select Archive
- Confirm in the dialog
Reordering services
Services and bundles can be displayed in a custom order to prioritise popular offerings:- Use the drag handle (the two-column grip) next to each service or bundle
- Drag to the new position. On a phone or tablet, press and hold the handle, then drag. A tap on the row still opens the item.
- Or open the three-dot menu and choose Move up or Move down
- The order is saved automatically
- Services and bundles can be mixed in any order
Members-only services and bundles
You can restrict a service - or a whole bundle - so that only clients with a covering membership can book it online. This is the Members only toggle, available on both the service form (under the Booking policies tab) and the bundle form.How it works
- Turn Members only on for a service or bundle. From then on, that item can only be booked online by a client whose active membership has a benefit covering it (the same membership benefit that would discount it - see Memberships). A benefit scoped to the service, or to the bundle, satisfies the gate.
- A client without a covering membership simply can’t complete an online booking for that item - they’re told it’s available to members only.
- This gates online booking only. Your team can still book a members-only service or bundle for anyone from the dashboard.
Members-only services inside a bundle
A members-only service placed in a bundle now requires a covering membership too - closing a previous gap where bundling a members-only service let non-members book it online. In other words, a bundle is members-gated if the bundle itself is marked members only, or if any service inside it is members only. Either way, a non-member is correctly turned away online.Show them with a lock, or hide them
By default a members-only service stays on your booking page with a Members only badge (and, when you sell memberships online, a way through to your plans), so visitors can see what joining unlocks. If you’d rather not advertise this work publicly, switch Hide members-only services on under Settings → Online booking → Appearance → Booking options. It’s one choice for the whole booking page, not a per-service setting. With it on, a members-only service or bundle disappears from your service list, your search results, your landing page and the information search engines read, for anyone whose membership doesn’t cover it. Members who are covered still see theirs when booking, at their member price (the gift card page hides members-only items from everyone), and your team can still book any of it from the Scheduler. Full detail: Online booking appearance.Prerequisite services
Require a consultation (or any other service) before a treatment can be booked online - Completed or Booked mode, Any or All when you list more than one. Full walkthrough: Prerequisite services.Resource-only services
Some services don’t require a team member at all - only a resource (room, bed, or piece of equipment). Examples include float tanks, saunas, tanning beds, infrared pods, cryotherapy chambers, and self-service laser rooms.How it works
Each service has a Team member required toggle (enabled by default). When you turn it off:- The service no longer requires a team member to be assigned
- At least one of Team member required or Require resource must remain enabled - a service cannot have both turned off
- Team member assignment fields are removed from the service form and the appointment creation screen
- The service can still have team members assigned optionally from the dashboard if needed
Setting up a resource-only service
- Create or edit a service
- In the Resources section, enable Require resource and select eligible resources
- Turn off the Team member required toggle
- Save the service
You must enable Require resource and assign at least one eligible resource before turning off Team member required. This ensures every appointment for this service has a resource allocated.
Online booking behaviour
When a client books a resource-only service online:- The team member selection step is skipped entirely - clients go straight from selecting the service to choosing a time
- Availability is based on the resource’s own schedule and capacity - not on any team member’s schedule. A resource has its own operating hours and can be marked out of service or blocked; if it has no schedule of its own, it follows your business opening hours. See Resource Operating hours and Out of service
- The system automatically assigns an available resource, just as it does for standard services with required resources
- Clients never see resource names or capacity details
Notifications
If you have customised your email or SMS templates to include{{TeamMemberName}}, that variable will be blank for resource-only appointments (since no team member is assigned). Review your automated message templates and ensure they read naturally when {{TeamMemberName}} is empty - for example, avoid phrasing like “Your appointment with ” which would render as “Your appointment with ”.
Scheduler display
Resource-only appointments appear in the scheduler differently depending on the view:- Resource view: The appointment appears under the assigned resource column, just like any resource-assigned appointment
- Team member view: The appointment does not appear under any team member column (since no team member is assigned). Use the resource view to see these appointments
Constraints
- At least one of Team member required or Require resource must be enabled on every service
- Pricing tiers (which are team-member-based) do not apply to resource-only services
Team members and resources: every setup
Every service is built from two switches - Team member required and Require resource - and you combine services with bundles. Together these cover almost any setup. The one hard rule: a service must need a team member, a resource, or both - never neither.Two principles that govern everything
- A service reserves exactly what it needs, for as long as it needs it.
- The team member is held from start to end plus buffers, but is free during processing time - so a stylist can start another client while a colour develops.
- A resource (room, bed, machine) is held for the whole time including processing - the room stays occupied while the colour develops.
- The client is present for the service plus processing.
- “Eligible resources” is a pool of interchangeable options, and a service reserves only one of them. List Room 1 and Room 2 and the system reserves whichever is free - not both. To reserve two different resources at the same time (a sauna and an ice bath), use a parallel bundle (see below).
Every combination, with a real example
Bundles: sequential vs parallel
- Sequential bundle - services run one after another (back-to-back). The same team member can perform every step.
- Parallel bundle - services run at the same time. Each staffed service needs its own team member (one person can’t be in two places at once), so when booking online you choose “Any available” and the system assigns distinct team members. Resource-only services in a parallel bundle need no team member, so a sauna + ice bath package books with no team members at all.
A bundle is a first-class item - scope things to it directly. As well as recognising the services inside a bundle, Bella lets you point a feature at the bundle itself: a membership benefit can be scoped to a bundle, a prepaid package can include a bundle as a line (one session covers the whole bundle), a linked form can be attached to a bundle, and a gift card can be sold for a bundle. A bundle can also be marked members only. Pick the bundle from the same picker you’d use for services. (Scoping to the underlying services - or to “all services” - still works too. Discount codes are scoped to services, not bundles.)
Dashboard vs online booking
- Dashboard (team members): flexible. Constraints - a resource at capacity, a double-booked team member, the same client twice at once, an ineligible resource - are warnings you can override, so you can handle exceptions. Only true blockers stop you: a required team member or resource left empty, a time Enforce working hours rules out, or a time another client is part way through paying for.
- Online (clients): strict. A time is only offered when every requirement is genuinely free - team member, resources and capacity all check out. Clients never see or choose resources; the system assigns them behind the scenes.
Optional resources are advisory online. If a service lists resources but doesn’t require them, online booking ignores them - it won’t reserve one or count it against capacity. Only the dashboard surfaces optional-resource contention, and only as a warning. If you want a resource to actually gate availability, turn Require resource on.
Common questions
Q: Can one service reserve two different resources at the same time? A: Not a single service - it reserves one resource from its eligible pool. To hold two at once (e.g. a sauna and an ice bath), make a resource-only service for each and combine them in a parallel bundle. Q: Can a service have no team member? A: Yes - turn off Team member required (it must then Require resource). It becomes resource-only: online booking skips team-member selection and books on the resource’s own schedule and capacity (falling back to your business opening hours when the resource has no schedule of its own). Q: Can a service need neither a team member nor a resource? A: No. Every service must need at least one - you’ll see “At least one of ‘Team member required’ or ‘Resource required’ must be enabled.” Q: In a parallel bundle, why does it ask for different team members? A: Parallel services happen at the same time, so one person can’t do both - each staffed service needs its own team member. Choose “Any available” when booking online and the system assigns distinct team members. Resource-only services in the bundle are exempt (they need no one). Q: My sauna + ice bath bundle wouldn’t book - why? A: Two things to check: (1) each service should require only its own resource (the barrel-sauna service shouldn’t also list the ice bath); (2) make sure both are resource-only and the bundle is set to parallel. With that, the bundle reserves both and shows on each resource’s column. Q: My service lists a room but it isn’t blocking online bookings - why? A: The resource is optional (listed but not required), and optional resources don’t gate online availability. Turn on Require resource if it should. Q: How do I let one room take both solo and couple bookings? A: Give the room a capacity (e.g. 2) and set the service’s People per booking to how many people share one booking (1 for solo, 2 for a couple). The booker names who’s coming, and the room fills up to its capacity across overlapping bookings. For exclusive use of the room, turn on Reserves the whole space instead. Q: Does processing time free up my team member? A: Yes. During a service’s processing time the team member is free to start another client, while the room (if any) and the client stay reserved.Service categories
Categories help organise your services into logical groups, making it easier for clients to find what they need.Adding a category
- On the Services page, click Add category at the top
- Enter:
- Category name (required)
- Description (optional)
- Click Save
Editing a category
- Find the category in the left sidebar (tablet and desktop) or the category dropdown (phone)
- Click the category to select it
- Click the Actions dropdown and select Edit
- Update the name or description
- Click Save
Archiving a category
Categories follow the same archive-first approach as services and bundles.- Select the category you want to archive
- Click the Actions dropdown
- Select Archive
- Confirm in the dialog
Restoring an archived category
- Use the status filter to show archived categories
- Select the archived category
- Click the Actions dropdown
- Select Restore
Permanently deleting a category
Permanent deletion is only available for archived categories:- Use the status filter to show archived categories
- Select the archived category
- Click the Actions dropdown
- Select Permanently delete (shown in red)
- Confirm in the dialog
Reordering categories
- Use the drag handle next to each category in the categories list (tablet and desktop)
- Drag to the new position. On a phone or tablet, press and hold the handle, then drag.
- Or open the category Actions menu and choose Move up or Move down (works on every device)
- The order is saved automatically
Service bundles
Bundles package several services together at a bundle price, booked in one go. At booking a bundle expands into one appointment line per component service - each carrying its own variant, pricing tier and add-ons - and runs either sequential (back-to-back, one team member can do it all) or parallel (at the same time, each staffed service with its own team member). A bundle is a first-class item: a package, a membership benefit, a gift card, a linked form and the Members only gate can all be scoped to the bundle itself.Service Bundles - the complete guide
Execution modes, all four pricing modes with worked examples and how a fixed total / % discount is split across the component lines, members-only bundles, the “show individual services” toggle, and how packages, memberships and gift cards cover a bundle. Read the full Bundles guide →
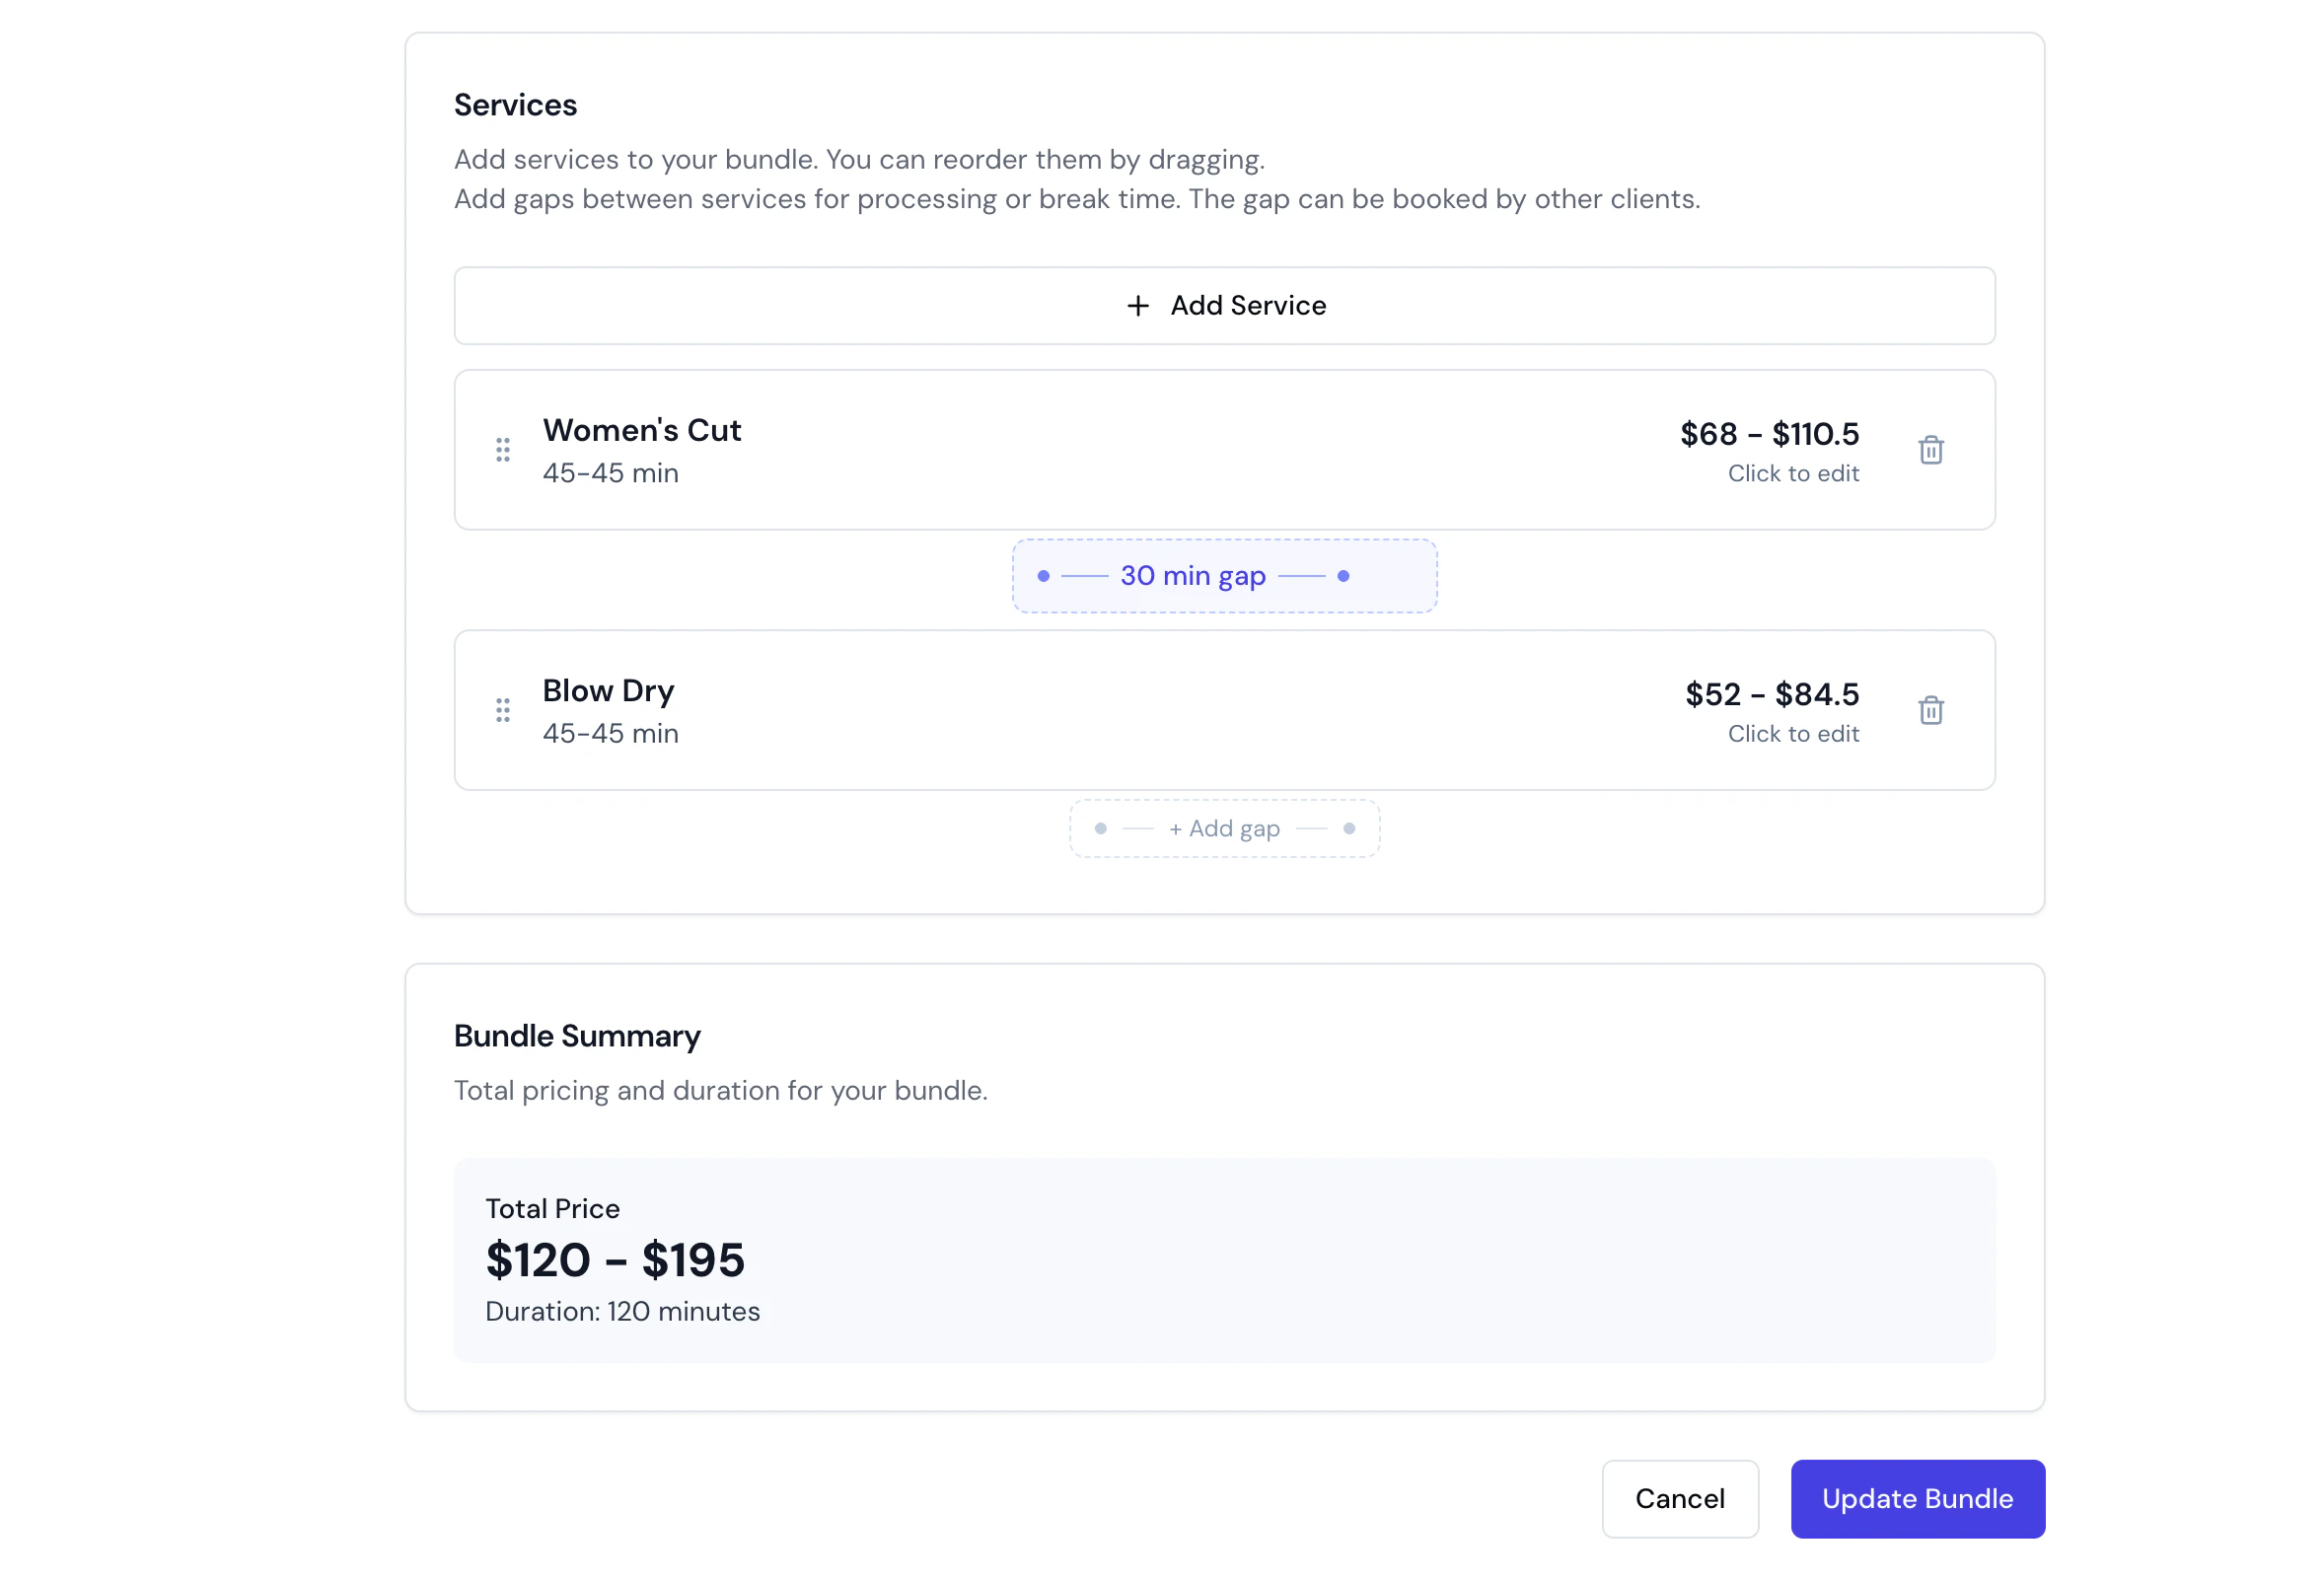
Bundles group different services for one client. To book the same service for a party - a couples massage, friends in together - use Group Bookings instead.
FAQs
Q: Can I have the same service with different durations? A: Yes. The recommended approach is to use service variants - create one service with named variants (e.g., “Short Hair”, “Long Hair”), each with its own price and duration. Alternatively, you can create separate service entries if the services are substantially different (e.g., “Express Blowdry” and “Luxury Blowdry”). Q: Do I need to create a separate service for each team member? A: No - a service is created once and offered by your whole team. When adding or editing a service, set Team members to All team members or pick Specific team members; every qualified member can then perform it, and clients still choose their preferred team member at booking (unless you turn that off). For different pricing per team member, use pricing tiers instead of duplicate services. Only create separate services when the offerings genuinely differ (e.g. a different duration or treatment) - there’s no need to add a team member’s name to the service name. Q: What happens to past appointments if I archive a service? A: Past appointments remain unchanged. The service is only hidden from new bookings and online booking. Q: Can I show photos of my work next to each service? A: Yes. Each service holds up to 10 service images, and clients see the first one beside that service in your booking list. The Images tab appears once a service is saved, so create the service first and reopen it. Bundles need no photos of their own: they show a lead image from each service they include. Q: Can a bundle include services from different categories? A: Yes! Bundles can include any combination of services across all categories. Q: Can I change service prices without affecting existing appointments? A: Yes. Price changes only apply to new bookings. Existing appointments retain their original pricing. Q: How do I set bundle pricing? A: Bundles support four pricing modes - Use service prices, Set total price, % discount, and Free - and a fixed total or discount is split proportionally across the component lines. See the Bundles guide → Pricing modes for worked examples. Q: What is “Processing Time” on a service and why would I use it? A: Processing time is the time after the active service where the client remains but the team member is free to serve others. Common uses include:- Colour development: Allow hair colour to develop before cutting
- Treatment absorption: Let skincare products absorb before the next step
- Setting time: Allow a perm or treatment to set
- Room setup: Preparing the treatment room before the client arrives
- Equipment sterilisation: Cleaning and sanitising tools between clients
- Consultation review: Reviewing client notes before the appointment
- Processing times labelled (default) use the service’s own setting
- Processing times labelled (custom) have been overridden for this bundle
- Click the reset icon to restore a service’s default processing time
- Single services may need processing time after completion
- When services are stacked, the processing time ensures proper spacing for the next appointment
- The processing time represents time inherent to the service itself
Archiving and restoring services, categories & bundles
Bella Booking uses an archive-first approach. Services, categories, and bundles cannot be deleted directly - they must be archived first. Archived items are hidden from active views and online booking but their records are preserved.Archiving
- Find the service, category, or bundle in the Services
- Click the three-dot menu (or the Actions dropdown for categories)
- Select Archive
- Confirm in the dialog
Viewing archived items
Use the status filter on the Services page to see archived services, categories, and bundles.Restoring
- Find the archived item using the status filter
- Click the three-dot menu (or the Actions dropdown for categories)
- Select Restore
- The item returns to the active catalogue
Permanently deleting
Permanent deletion is only available for archived items:- Find the archived item using the status filter
- Click the three-dot menu (or the Actions dropdown for categories)
- Select Permanently delete (shown in red)
- A confirmation dialog appears - you must type the item’s name to confirm
- Click Permanently delete to remove the item
Archiving is reversible and is the recommended approach. Past appointments that used the service are not affected - historical records are preserved. Restoring an archived service makes it available for new bookings again.