Introduction
The Team Schedule page provides a visual overview of your entire team’s working hours, time off, and availability. It’s the central hub for managing schedules across your business, allowing you to quickly see who’s working when, identify scheduling gaps, and make adjustments on the fly.Key Features
- Visual Grid View: See all team members’ schedules at a glance with colour-coded rows
- Weekly Hours Summary: See total scheduled hours per team member at a glance
- Team Member Colours: Each team member’s row displays a coloured left border matching their scheduler colour
- Flexible Time Periods: Switch between 1-week and 2-week views
- Quick Navigation: Jump to this week, next week, or navigate by date
- Team Member Search: Filter the grid to find specific staff
- Blocked Time Display: See scheduled breaks and blocked time alongside working hours
- Inline Actions: Set custom hours, add time off, add breaks, or edit working hours directly from the grid
- Bulk Actions: Set multiple team members as not working for business closures or holidays
- Real-Time Updates: Changes are reflected immediately
Accessing Team Schedule
- In the main sidebar, click Team
- Select Schedule from the submenu
- A header with navigation controls
- Quick access buttons for “This Week” and “Next Week”
- A time period selector (1 Week / 2 Weeks)
- Date range navigation arrows
- A search bar to filter team members
- The schedule grid showing all team members
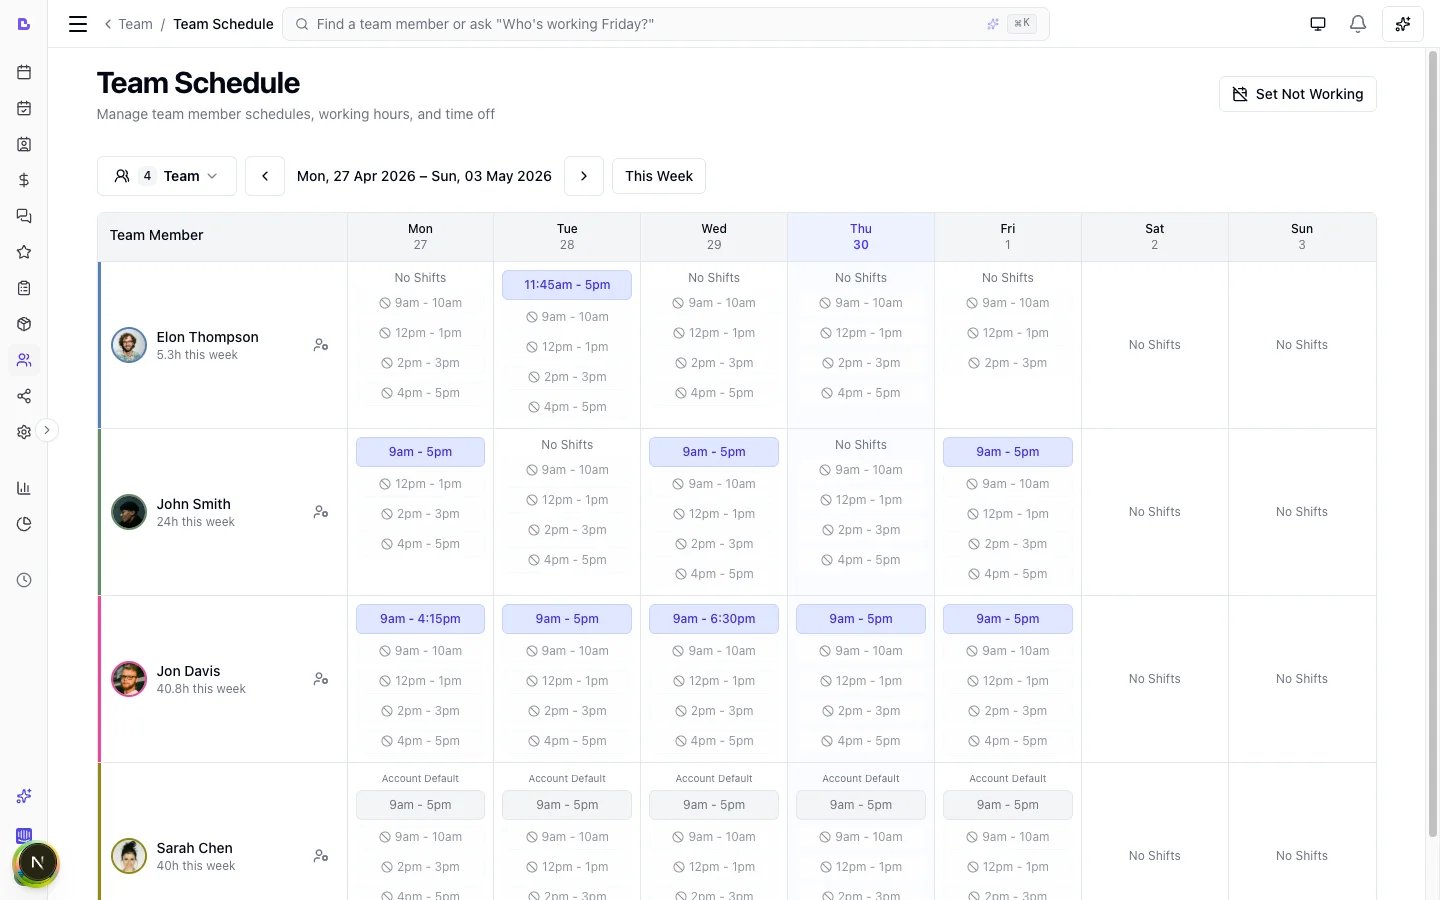
Understanding the Schedule Grid
Grid Layout
The schedule grid displays:- Left column: Team member names, avatars (with coloured rings), and weekly hours total (e.g., “32h this week”). A coloured left border matches each team member’s scheduler colour for quick visual identification.
- Header row: Days of the week with dates. Today’s column is subtly highlighted.
- Grid cells: Working hours, time off, blocked time, or off days for each team member/date combination.
Cell Types
Work Hours (Blue)
Cells showing working hours appear in blue with the time range displayed (e.g., “9:00 AM - 5:00 PM”). Multiple shifts are shown as separate blocks if a team member has split shifts.Custom Hours (Blue with Badge)
When a team member has custom hours set for a specific date, the cell shows a “Custom” badge below the time range. This indicates the hours differ from their default schedule.Account Default Hours (Muted with Label)
When a team member has no personal schedule configured (or their schedule doesn’t include a particular day), the cell shows an “Account Default” label above the hours in muted styling. The time range appears in a lighter, less prominent style compared to explicitly configured schedules, making it easy to distinguish inherited hours at a glance. The hours shown are inherited from your account’s opening hours (configured in Settings > Scheduling). To give the team member their own schedule, click Edit Working Hours from the cell menu.Time Off (Grey)
Time off appears in grey with:- All-day time off: Shows “Time Off” text
- Partial time off: Shows the specific time range blocked
Blocked Time (Amber)
Blocked time (breaks, meetings, etc.) appears as amber badges showing the time range and optional description. Blocked time is managed from the Scheduler or via the Add Break action on the Team Schedule grid. These blocks prevent online bookings during those periods.Off Days
Days with no scheduled shifts show “No Shifts” in light grey text.Recurring Off Days
When a day has a recurring schedule (e.g., Monday every 2 weeks) and it’s an off-week, the cell displays “Off (recurring)” in indigo italic text instead of “No Shifts.” This makes it clear the day is intentionally off due to a recurring pattern, not missing configuration. Hovering shows a tooltip confirming “Off — recurring schedule (this is an off-week).”Mixed Display (Partial Time Off + Work)
When a team member has partial time off but also has working hours outside that period, the cell displays both:- The time off segment (grey)
- The remaining work hours (blue)
Navigating the Schedule
Time Period Selection
Choose how much of the schedule to view:- 1 Week: Shows Monday to Sunday of the selected week
- 2 Weeks: Shows two full weeks (14 days)
Quick Navigation
- This Week: Jump directly to the current week
- Next Week: Jump to the following week
Date Navigation
Use the left/right arrows to move forward or backward:- In 1-week view: Moves by one week
- In 2-week view: Moves by two weeks
Team Member Search
Use the search bar to filter the grid by team member name. This is useful for larger teams when you need to focus on specific staff.Quick Actions
Cell-Level Actions
Click on any cell in the grid to access quick actions via a dropdown menu:| Action | Description |
|---|---|
| Edit This Day | Add or edit custom hours for this specific date |
| Edit Working Hours | Modify the team member’s regular weekly schedule |
| Add Time Off | Schedule time off starting from this date |
| Add Break | Create a blocked time period (one-off or recurring) |
| Delete Time Off | Remove existing time off for this date |
| Clear Custom Hours | Remove custom hours and revert to default schedule |
- Cells with time off show “Delete Time Off”
- Cells with custom hours show “Clear Custom Hours”
- Cells without time off show “Add Time Off”
Member-Level Actions
Click the settings icon next to a team member’s name to access:| Action | Description |
|---|---|
| View Details | Open the team member’s profile drawer |
| Edit Working Hours | Go directly to edit their weekly schedule |
Managing Schedules from the Grid
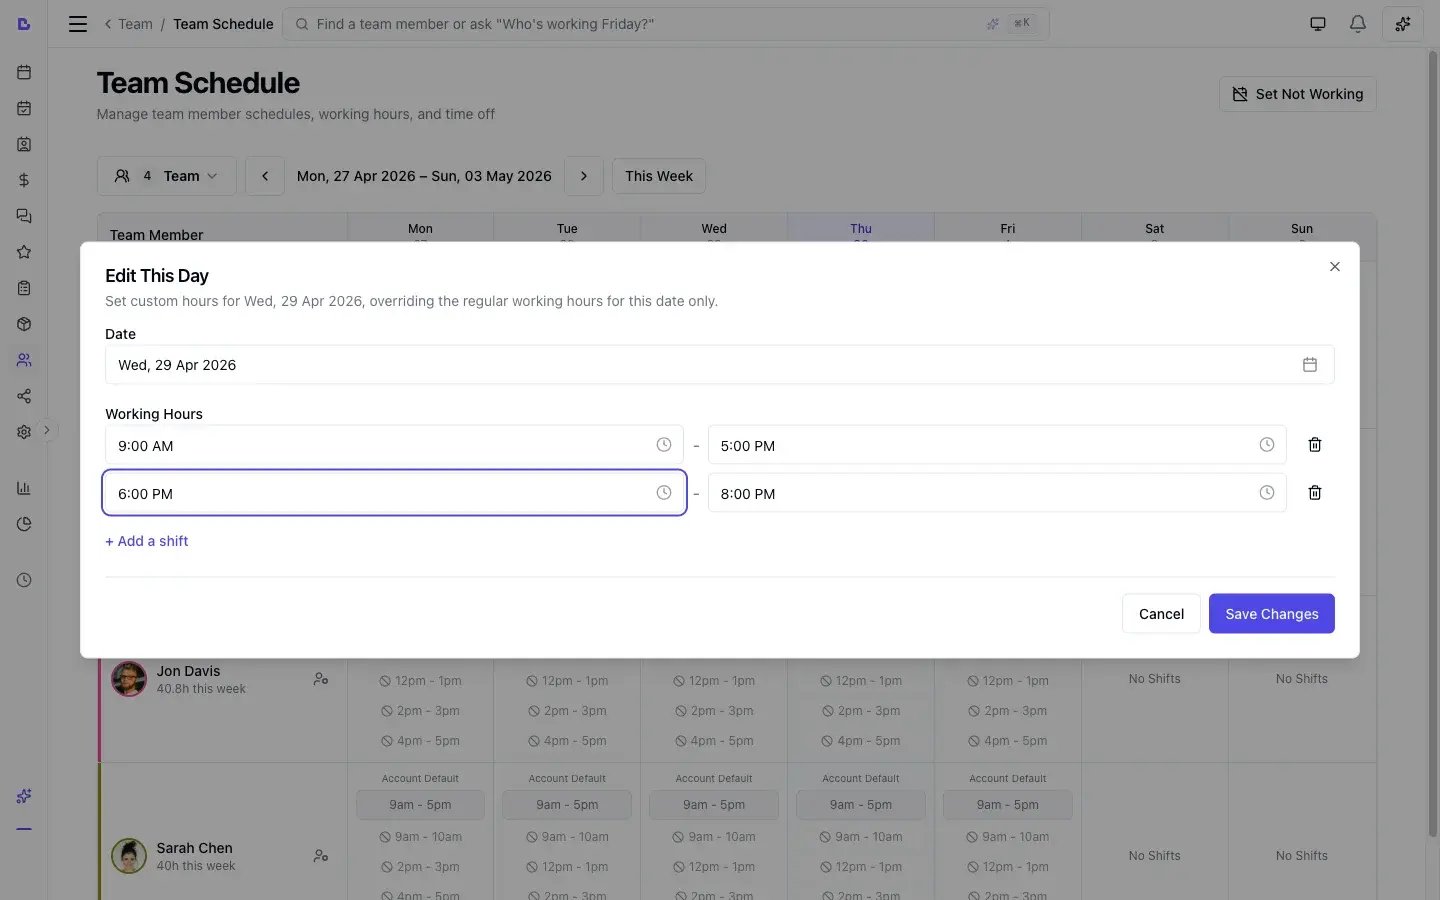
Setting Custom Hours
Custom hours override the default schedule for a single day.- Find the team member and date in the grid
- Click on the cell
- Select Edit This Day
- In the modal:
- The Date is pre-filled based on the cell you clicked. Changing the date will show a warning, as you’d be overriding a different day than intended.
- Add one or more shifts with start/end times
- Click Add a shift for split shifts
- Use Reset to Default to clear the form and revert to the team member’s default schedule for that day
- Click Save
Adding Time Off
- Find the team member and date
- Click on the cell
- Select Add Time Off
- In the modal:
- Select the Type (Annual leave, Sick leave, Personal leave, Training, or Other)
- Toggle All day on or off
- Set the Start Date and End Date (for multi-day time off)
- If partial, set Start Time and End Time
- Optionally add a Description
- Conflict warning: If the team member has existing booked or confirmed appointments during the selected dates, a warning message will appear showing the number of conflicting appointments. This helps prevent accidentally scheduling time off over existing bookings.
- Click Add Time Off
Editing Working Hours
- Click the settings icon next to the team member name, OR
- Click on any cell and select Edit Working Hours
- The modal displays a list of all existing schedules with their start dates
- The schedule that applies to the currently viewed date shows a “Currently Active” badge
- Each schedule shows how many working days are configured
- To edit an existing schedule, click on it in the list
- To create a new schedule, click Add New Schedule — the form pre-fills with your account’s opening hours as a starting point
- In the edit/create form:
- Set the Start Date for when these hours take effect
- Configure each day’s shifts (Monday through Sunday)
- Add multiple shifts per day if needed
- Use the copy icon next to any day to apply those hours to all other open days
- Click Save Changes (editing) or Create Schedule (new)
Recurring Day Schedules (Every Other Week)
For team members who don’t work the same days every week — such as every other Monday, or Saturday every two weeks — you can set per-day recurrence on individual days within a schedule.How It Works
Each day in a schedule can have its own repeat interval. Days without a recurrence repeat every week (the default). Days with a recurrence only apply on matching weeks — on off-weeks, the day is explicitly off (no availability, no bookings).Setting Up a Recurring Day
- Open Edit Working Hours for the team member
- Edit or create a schedule
- Next to any enabled day, click the ↻ repeat icon
- In the popover, set the interval (e.g., “Every 2 weeks”)
- Click Done
- The day now shows a label like “Every 2 weeks” next to it
Common Scenarios
Every other Monday: Set Monday to “Every 2 weeks.” Tuesday through Friday have no recurrence (weekly by default). One schedule handles it. Saturday every two weeks: Set Saturday to “Every 2 weeks.” Weekdays remain weekly. One schedule. Whole week alternates (A/B weeks): Create two schedules with different start dates (one week apart). Set all days in both to “Every 2 weeks.” They alternate automatically.Important Notes
- The Start Date of the schedule is the anchor for the recurrence. “Every 2 weeks” counts from the Monday of the start date’s week.
- On off-weeks, the day is explicitly off — no availability is shown and clients cannot book. This is intentional: if you set Monday to “every 2 weeks,” off-week Mondays are closed, not inherited from business hours.
- Custom hours and time off still take priority over recurring schedules.
- In the schedule list, recurring days appear in the summary (e.g., “5 working days · Mon 2 wks”).
Clearing Custom Hours
To remove a one-off schedule change and revert to defaults:- Click on a cell showing custom hours (has “Custom” badge)
- Select Clear Custom Hours
- Confirm the action
Deleting Time Off
- Click on a cell showing time off
- Select Delete Time Off
- Confirm the deletion
Adding a Break
You can add blocked time (breaks, meetings, etc.) directly from the Team Schedule grid without needing to switch to the Scheduler.- Click on a cell for the team member and date
- Select Add Break from the menu
- In the modal:
- Select the Team Member (pre-filled)
- Set the Date (pre-filled from the cell you clicked)
- Set the From and To times
- Optionally add a Description (e.g., “Lunch break”)
- Change the Frequency if this break repeats (daily, weekly, etc.)
- Click Save
Set Not Working (Bulk Action)
For business closures, public holidays, or any situation where multiple team members need time off simultaneously:- Click the Set Not Working button in the page header
- In the modal:
- Select the Start Date and End Date for the closure period
- Select which team members to include (all are selected by default)
- Optionally add a Description (e.g., “Public Holiday”)
- Click Set Not Working
- Public holidays (Easter, Christmas, etc.)
- Business renovations or temporary closures
- Team-wide training days
Tooltips and Details
Hover over any cell to see detailed information:- Full date: The complete date (e.g., “Mon, 2 Dec 2025”)
- Shift details: Each work period with start and end times
- Total hours: Sum of all work hours for that day
- Custom hours indicator: Notes if hours are customised
- Time off details: Type and description of time off
- Quick tip: “Click on any shift for options”
Member Detail Drawer
Click on a team member’s name or avatar to open their detail drawer, which shows:- Profile information (name, email, phone)
- Weekly hours total and upcoming time off count
- Quick actions to edit working hours or add time off
- Upcoming schedule for the next two weeks
- Upcoming time off entries with type and dates
Planning Future Schedule Changes
The default hours feature supports setting schedules with future start dates. This allows you to plan ahead for schedule changes, seasonal adjustments, or ending availability after a specific date.How Future Schedules Work
When you set default hours with a Start Date, the system:- Keeps your current schedule active until the day before the start date
- Automatically applies the new schedule from the start date onwards
- Preserves all previous schedule versions for historical reference
- Schedule A starts 1 Jan 2026 (Mon-Fri 9AM-5PM)
- Schedule B starts 1 Jul 2026 (Mon-Fri 8AM-4PM)
- Schedule C starts 1 Jan 2027 (No shifts)
Setting a Future Schedule
From Team Schedule page:- Navigate to Team → Schedule
- Click on any cell for the team member and select Edit Working Hours
- Click Add New Schedule
- In the form:
- Set the Start Date to your desired future date
- Configure each day’s shifts as needed
- Click Create Schedule
- Navigate to Team → [Team Member] → Working Hours tab
- Click the ⋮ menu on any day
- Select Edit Working Hours
- In the modal:
- Set the Start Date to your desired future date
- Configure each day’s shifts as needed
- Click Save
Ending Availability After a Specific Date
To stop a team member’s availability after a certain date (e.g., end of year): From Team Schedule page:- Navigate to Team → Schedule
- Click on any cell for the team member and select Edit Working Hours
- Click Add New Schedule
- Set the Start Date to the first day of no availability (e.g., 1 January 2027)
- Uncheck all seven days so each day shows “No shifts”
- Click Create Schedule
- Navigate to Team → [Team Member] → Working Hours tab
- Click the ⋮ menu on any day → Edit Working Hours
- Set the Start Date to the first day of no availability (e.g., 1 January 2027)
- Uncheck all seven days so each day shows “No shifts”
- Click Save
Example: Limiting Availability to End of 2026
Step 1: Ensure current working schedule is set- Team → [Member] → Working Hours
- Set default hours starting from today with your normal working days
- Save
- Team → [Member] → Working Hours
- Click ⋮ → Edit Working Hours
- Set Start Date = 1 January 2027
- Uncheck all checkboxes (Monday through Sunday)
- Verify each day shows “No shifts”
- Save
- Settings → Scheduling
- Toggle all days to closed
- Save
Verifying Future Schedules
To confirm your future schedule is set correctly:- Navigate to Team → Schedule
- Use the date navigation arrows to move to the future date range
- Verify the team member shows “No Shifts” for all days after your end date
Best Practices
Weekly Planning
- Review the Team Schedule at the start of each week
- Ensure adequate coverage for busy periods
- Check for scheduling conflicts or gaps
Managing Time Off
- Encourage team members to request time off in advance
- Review the schedule before approving leave
- Consider impact on service availability
Custom Hours
- Use custom hours sparingly for one-off changes
- For permanent schedule changes, update default hours instead
- Document the reason in the description when adding time off
Default Hours Configuration
- When setting default hours, always configure all seven days to avoid unexpected fallbacks
- Days not included in a team member’s schedule will fall back to account opening hours
- To mark a day as “off”, uncheck the day’s checkbox (this sets empty shifts, preventing fallback)
- Test your schedule by navigating to future dates in the Team Schedule grid
Large Teams
- Use the search function to find specific team members quickly
- Consider reviewing schedules by role or department
- Use the 2-week view for longer-term planning