

Introduction
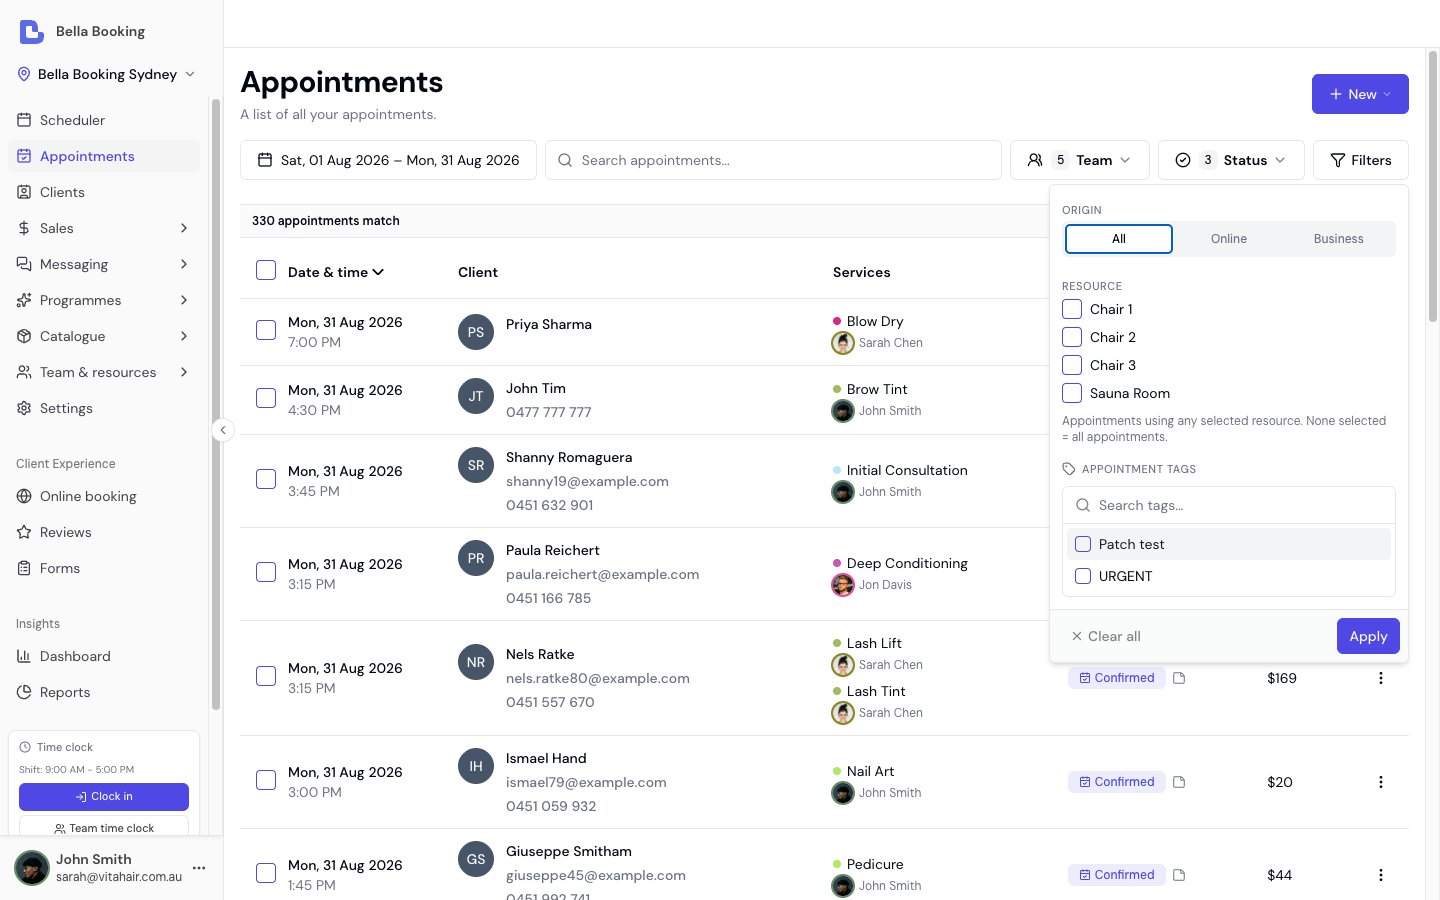
The Appointments page provides a powerful search and filter interface to find, view, and manage appointments across your entire calendar. Use advanced filtering by client, team member, status, and date range to quickly locate any appointment, even across large time periods.Key features
- Advanced Search: Search appointments by client name, email, or phone number
- Team Member Filtering: Filter appointments by one or more team members
- Status Filtering: Filter by appointment status (Booked, Confirmed, Completed, Cancelled)
- Date Range Filtering: View appointments in any date range using the date picker in the toolbar, with one-click presets for the common ranges
- Sorting: Date & time (the list opens latest date first), Client, Status, and Total. See Sorting and filters.
- Pagination: Navigate through large result sets efficiently
- Quick Access: Click any appointment to view full details and make changes
- CSV Export: Export filtered appointments to CSV for reporting and analysis (includes add-on names per service)
- iCal Export: Export appointments to iCal format for importing into calendar applications
Accessing the appointments page
- Click Appointments in the main sidebar navigation
- The Appointments page opens with a default view showing appointments from the last 30 days
Search and filter options
Client search
Search by Name, Email, or Phone:- Type any part of a client’s name, email address, or phone number in the search field
- Results update automatically as you type
- Search works across all fields simultaneously
- “John” - finds all clients named John
- “john@example.com” - finds the specific client with that email
- “0412” - finds all clients with phone numbers containing “0412”
Team member filtering
Filter by Team Member:- Use the team member dropdown to select one or more team members
- By default, all team members are selected (shows all appointments)
- Deselect team members to filter appointments to specific team members
- Useful for viewing individual team member schedules or performance
- Appointments for resource-only services (no team member assigned) appear when all team members are selected but are excluded when filtering by specific team members
- Click the team member dropdown
- Select or deselect team members to filter
- The appointment list updates automatically
Status filtering
Filter by Appointment Status:- Booked: Appointments still waiting on a step - client confirmation, business approval, a deposit, or a saved card. The badge names which one: “Awaiting Deposit”, “Awaiting Card”, “Pending Approval” or “Pending Confirmation”
- Confirmed: Fully confirmed appointments ready to proceed
- Completed: Finished appointments
- Cancelled: Cancelled appointments
- Click the status dropdown
- Select one or more statuses to filter
- By default, Booked, Confirmed, and Completed are selected - cancelled appointments are hidden
- Deselect statuses to exclude them from results
- Select all four statuses to show everything
- Clear all returns the status filter to that default, so cancelled appointments stay hidden until you tick Cancelled yourself
- Show only upcoming appointments: Select Booked and Confirmed only
- Review completed work: Select Completed only
- Check cancellations: Select Cancelled only
- View everything: Select all four statuses
Date range filtering
Set a date range: One date button in the toolbar carries the whole range. It reads whichever range you’re on (the two dates to start with, or the preset name once you pick one), and opens a panel with two halves:- Quick select down the left for the ranges you reach for most: Today, Yesterday, Last 7 days, Last 30 days, This week, This month, Last month. Picking one applies it and closes the panel.
- A two-month calendar on the right for anything else: click the first day of the range, then the last. The list updates as you go, and the button then reads the two dates. On a phone the panel stacks: the quick-select options run along the top as a scrolling strip, with a single month below.
- Use shorter date ranges for faster loading
- Use longer ranges when searching for specific historical appointments
- The default range covers the last 30 days, which balances performance and coverage
- This week follows the first day of the week set under Settings → Business settings
Booking source filtering
Filter by Booking Source:- All (default): Show appointments from all sources
- Online: Show only appointments booked via your online booking page
- Business: Show only appointments created from the business dashboard
- All: Show all online bookings regardless of team member preference
- Requested: Show bookings where the client chose a specific team member
- Any: Show bookings where the client selected “any available”
- Online · Requested team member - the client chose a specific team member
- Online · Any team member - the client selected any available team member
Sorting and filters
Search and filters choose which rows are listed. They do not change the order. To change the order, click a column heading that sorts. Unless the page says otherwise, the first click sorts text A to Z, and numbers and dates highest or newest first. Click the same heading again, or the heading the list already opens on, to reverse it. The arrow beside the heading shows the direction: up is A to Z, oldest first or lowest first, and down is Z to A, newest first or highest first. A heading that sorts by name ignores capital letters: “anna” and “Anna” sort together. The list opens on Date & time, arrow down (latest date first). Client, Status, and Total sort as well. Services and Form do not. There is no column for when the appointment record was created. Date & time is when the appointment is booked for. Search, the date range, team member or resource, status, booking source, and tags are filters. They choose which appointments are listed. On a narrow screen Client, Services, Status, Form, and Total are hidden. Date & time stays, so that sort is still available.Viewing appointment details
From the Appointments List:- Click any appointment row in the table
- The appointment details panel opens
- View full appointment information including:
- Client details
- Services and team members (or resource only, for resource-only services)
- Date and time
- Status
- Payment information
- Notes
- Overview: The schedule, notes, invoice and booking details at a glance.
- Forms: Form submissions linked to this appointment, with the option to send a form to the client.
- Photos: Photos taken at this appointment - including the client’s photos linked to it.
- Files: Every file on this appointment, with the same linked-client view.
- Treatment plans: The client’s treatment plans, ready to review or update during the appointment.
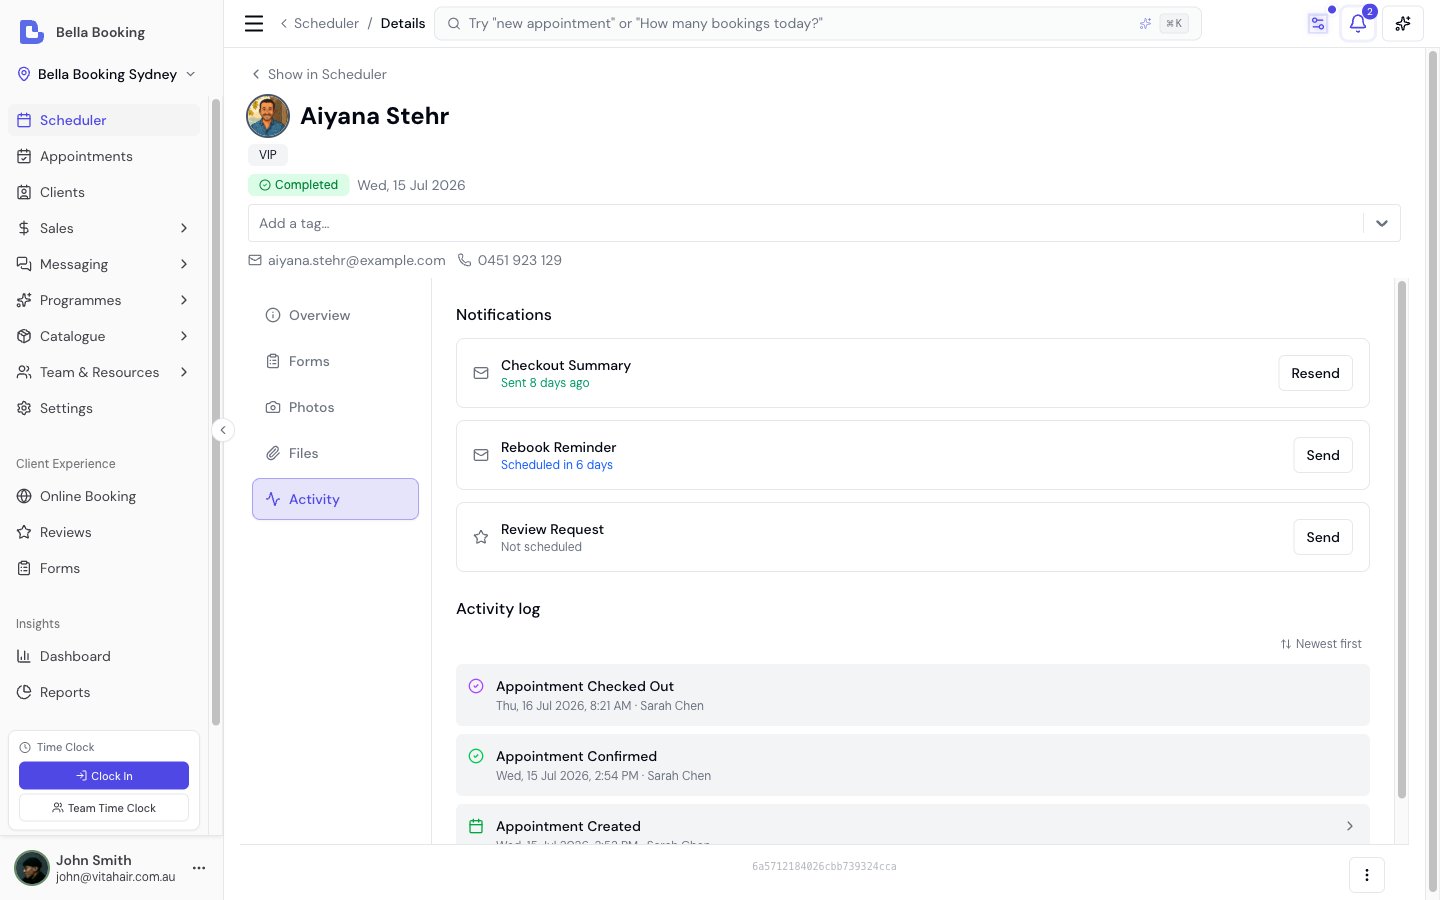
- Activity: The appointment’s notifications - what’s planned and sent, with a card for each message that applies to this appointment (confirmation, the reminders, the rebook reminder, the review request, both follow-ups) - above the full activity log of status changes, payments and messages. Sending or resending from any of them opens a preview first.
- Approve / Confirm - On the scheduler preview and appointment page, Confirm and Approve live on the status badge and are also listed in the Actions menu, not the button row. For online bookings this shows as “Approve”; for dashboard bookings, “Confirm”. Confirm and Approve always open a confirmation first, including from the appointments list, client file, Messages, series row, and the scheduler preview. Turn off Notify the client to skip the client message. When notify is on, the dialog lists whether Email and SMS will send, or why not. If the booking is waiting on a saved card, the same dialog warns that approving waives the card. Decline on the approval or awaiting-card banner opens the same cancel dialog, with Decline wording.
- Edit - change the client, services, team member, date, time, or notes on the same appointment. Start time follows the first service, and it stays when you remove every service before adding another. See Editing or rescheduling an appointment.
- Reschedule appointment - when editing, the Notifications section appears showing which reminders will be sent for the new time. If rescheduling to a time within a reminder’s window, you can choose to send it immediately
- Cancel appointment
- Checkout appointment (if not completed)
- View client profile
- Resend notification - Resend the booking confirmation, pending approval notice, deposit request, card request, or checkout summary to the client. The action label names whichever one will be sent (for example “Resend deposit request” when a deposit is owed, “Resend card request” when the booking is waiting on a saved card). On the appointments list this opens the same preview as the Activity tab; nothing is sent until you confirm.
- Send reminder - Manually send an appointment reminder to the client (available for Booked and Confirmed appointments). On the appointments list, reminder, rebook reminder and review request also open that preview first.
- Send first follow-up and Send second follow-up - Send either follow-up message by hand, for a confirmed or completed appointment that has already finished. Sending needs Messages Plus. Each opens the same preview, where you can switch the channels for this send and edit the wording for this send only.
Adding products before checkout
You can add retail products to any appointment when you create or edit it - you don’t have to wait for checkout.- Open the appointment and choose Edit (or start a new appointment)
- In the Items section, click Add item and choose Product
- Search by name, SKU or barcode, pick the product, then set the quantity and the team member credited with the sale
- Save - the lines stay on the appointment and pre-fill at checkout, where they settle with the rest of the bill
Products can’t be added while Repeat is switched on when creating a repeating appointment. Add them to individual appointments afterwards - each appointment in the series can be edited normally.
Understanding appointment statuses
Booked status
- Initial status for appointments still waiting on a step
- Appointment is created but not yet confirmed
- The status badge names what it is waiting on alongside “Booked”: “Awaiting Deposit”, “Awaiting Card”, “Pending Approval” or “Pending Confirmation”
- Client must confirm (via link in reminder messages), pay the deposit, or save a card - whichever applies
- If client confirmation is enabled, appointments stay “Booked” until confirmed
- If a deposit is required, appointments stay “Booked” until the deposit is paid (deposit takes precedence over confirmation)
- If a card on file is required by a service or membership override, appointments stay “Booked” until the client saves a card. Approving one yourself waives the card requirement
- Under the location’s Card on file policy an online booking by a client with no saved card creates no appointment at all until the card is saved, and then arrives Confirmed - so it never waits here. The exception is a booking that also carries products you take full payment for at booking: one combined payment settles them and saves the card, so that appointment is created first and does wait
Confirmed status
- Final status indicating appointment is fully confirmed
- Appointments are auto-confirmed when client confirmation is disabled (location setting)
- When client confirmation is enabled, appointments stay “Booked” until client confirms
- Online bookings with deposit become Confirmed when payment succeeds
Completed status
- Appointment has been finished
- Checkout has been completed
- Payment has been processed
- Sale record has been created
Cancelled status
- Appointment has been cancelled
- May include refund information if cancellation policy applied
- Cancelled appointments remain in the system for reporting
Checking in a client
Check-in lets your front desk mark a client as arrived, then mark their service as underway - so everyone can see at a glance who is waiting and who is being looked after.Check-in never changes the appointment’s status. A checked-in appointment stays Booked or Confirmed until you check it out, and Completed still means checked out and paid. Check-in is a separate, optional layer on top of the statuses above.
- Open the appointment (from the Scheduler or the Appointments list), or stay on the client file, Messages, or a series overview
- Click Check in on the scheduler preview or appointment page, or choose Check in from the ⋮ on the appointments list, client file, Messages, or a series row
- The appointment now shows a Waiting badge with the arrival time
- Checking a client in requires the Check in appointments permission - roles that can check out appointments have it by default
- On the Scheduler, a checked-in appointment also changes colour when you’re colouring by status - Waiting and In progress each have their own colour, which you can customise under Scheduler colours. If you colour by service, live appointments keep their service colour and show the check-in colour as a strip along the top in the Day, 3 days and Week views. After checkout the whole tile uses the Completed colour
- The assigned team member gets a notification (in the notification bell, and as a push notification on their device) the moment their client is checked in. Each team member can turn Client checked in notifications on or off in their notification preferences
- The check-in and start times are shown on the appointment, so you can see how long a client waited. Across your business, the Appointments summary report rolls this up into average wait time, average actual duration, and a check-in rate, and the dashboard’s Today section shows how many clients are waiting or in progress right now
- Rescheduling an appointment to a different day clears its check-in - the client hasn’t arrived for the new day. Moving it to another time on the same day keeps the check-in, since the client is already with you
- Checkout works exactly the same whether or not a client was checked in - check-in is never required
A client who hasn’t been checked in is simply “not arrived” - that’s not a no-show. If a client misses their appointment entirely, mark it as a no-show as described below; that flow is unchanged.
Cancelling an appointment
Open the appointment and click Cancel, then pick a reason. Before you confirm, the dialog lists what the client gets back - one line per thing this appointment used, with what happens to each:
Change any line to Forfeit to leave it exactly as it is - a late cancellation or no-show where the
client doesn’t get their session back, say. Restore all and Forfeit all set every line at once
(they never touch the money lines, so a bulk choice can’t quietly refund a card).
Only the lines this appointment actually used are shown. An appointment that used nothing shows none of them.
The checkout payment line appears when you cancel an appointment that was already checked out, and it
defaults to Forfeit - cancelling has never refunded a client’s card on its own. Set it to Refund
to send the money back to the card it came from, or to Credit balance to keep it and give the client
store credit instead. It’s shown only to team members who can issue refunds (Owner and Admin by default) -
the same permission the Sales screen needs - so anyone else cancels without that choice. Deposits are
separate: they’re governed by the refund amount above, following your cancellation policy.
Marking a no-show
When a client misses their appointment without cancelling, you can record it as a no-show. How to mark a no-show:- Open the appointment (from the Scheduler or Appointments list)
- Click Cancel
- In the cancellation dialog, select No show as the reason
- Confirm the cancellation
- No-show: The client did not attend and did not cancel in advance. Increments the client’s no-show count.
- Cancellation: The client (or your team) cancelled before the appointment time. Increments the client’s cancellation count.
Table columns
The appointments table displays:- Client: Client name with contact information
- Date & time: Scheduled appointment date and time
- Services: List of services booked (with add-on count indicator when add-ons are selected)
- Team Member: Assigned team member(s). For resource-only services, this column may be empty - the appointment is assigned to a resource instead
- Status: Current appointment status with visual badge
- Total: Total appointment price (includes add-on prices)
Pagination
Navigating Large Result Sets:- Use pagination controls at the bottom of the table
- Navigate page by page or jump to a specific page
- Adjust items per page if needed
- Total count shows how many appointments match your filters
Exporting appointments
Bella Booking provides two export formats for appointments:CSV export
Export appointments to a CSV file for reporting and analysis:- Set your desired filters (date range, team members, status, client search)
- Click the Export button at the top of the table and choose Export to CSV
- The CSV file downloads with all filtered appointments
- Open in Excel, Google Sheets, or any spreadsheet application
- Date & time
- Client name, email, and phone
- Services
- Team members
- Status
- Total
iCal export
Export appointments to iCal format for importing into calendar applications:- Set your desired filters (date range, team members, status)
- Click the Export button at the top of the table and choose Export to calendar (.ics)
- An
.icsfile downloads with all filtered appointments - Import the file into your preferred calendar application
- Google Calendar
- Apple Calendar (macOS/iOS)
- Microsoft Outlook
- Any application supporting the iCal (.ics) format
- Appointment date and time
- Client name
- Services and team members
- Appointment duration
- Sync appointments to your personal calendar
- Share schedules with team members who don’t have Bella Booking access
- View appointments alongside personal events
- Backup appointment data in a universal format
Best practices
Finding Specific Appointments:- Use client search for quick access to a specific client’s appointments
- Combine filters for precise results (e.g., specific team member + date range)
- Use status filters to focus on appointments needing attention
- Use shorter date ranges when possible for faster loading
- Use Clear all when done to reset to the default view
- Use specific searches rather than broad date ranges when looking for particular appointments
- Check “Booked” status appointments daily to monitor pending confirmations
- Review “Completed” appointments weekly for reporting
- Use “Cancelled” filter to review cancellation patterns
FAQs
Q: Can I search for appointments by service name? A: Currently, search is limited to client information (name, email, phone). Service filtering may be added in future updates. Q: How far back can I search for appointments? A: You can search any date range. However, very large date ranges may take longer to load. We recommend using date range filters for better performance. Q: Can I export appointments from this page? A: Yes! Bella Booking offers two export options:- CSV Export: Click the Export button and choose Export to CSV to download all appointments matching your current filters. The export includes date/time, client details, services, team members, status, and totals. Great for reporting and analysis in spreadsheets.
- iCal Export: Click the Export button and choose Export to calendar (.ics) to download appointments in iCal format (.ics file). Import this file into Google Calendar, Apple Calendar, Outlook, or any other calendar application. The export respects your current filters (date range, team members, status).
Related documentation
- Scheduler - Calendar view and appointment management
- Payment links - Ask a client to pay an appointment balance online
- Clients - Client management and profiles
- Settings - Online booking - Online booking configuration
With the Appointments page, finding and managing appointments across your entire calendar is quick and efficient. Use the powerful search and filter tools to locate any appointment in seconds.