

Introduction
The Sales section is your centralised hub for all transactions - services, products, and payments. Quickly review sales history, add new sales, issue refunds, attach notes, and keep your sales organised.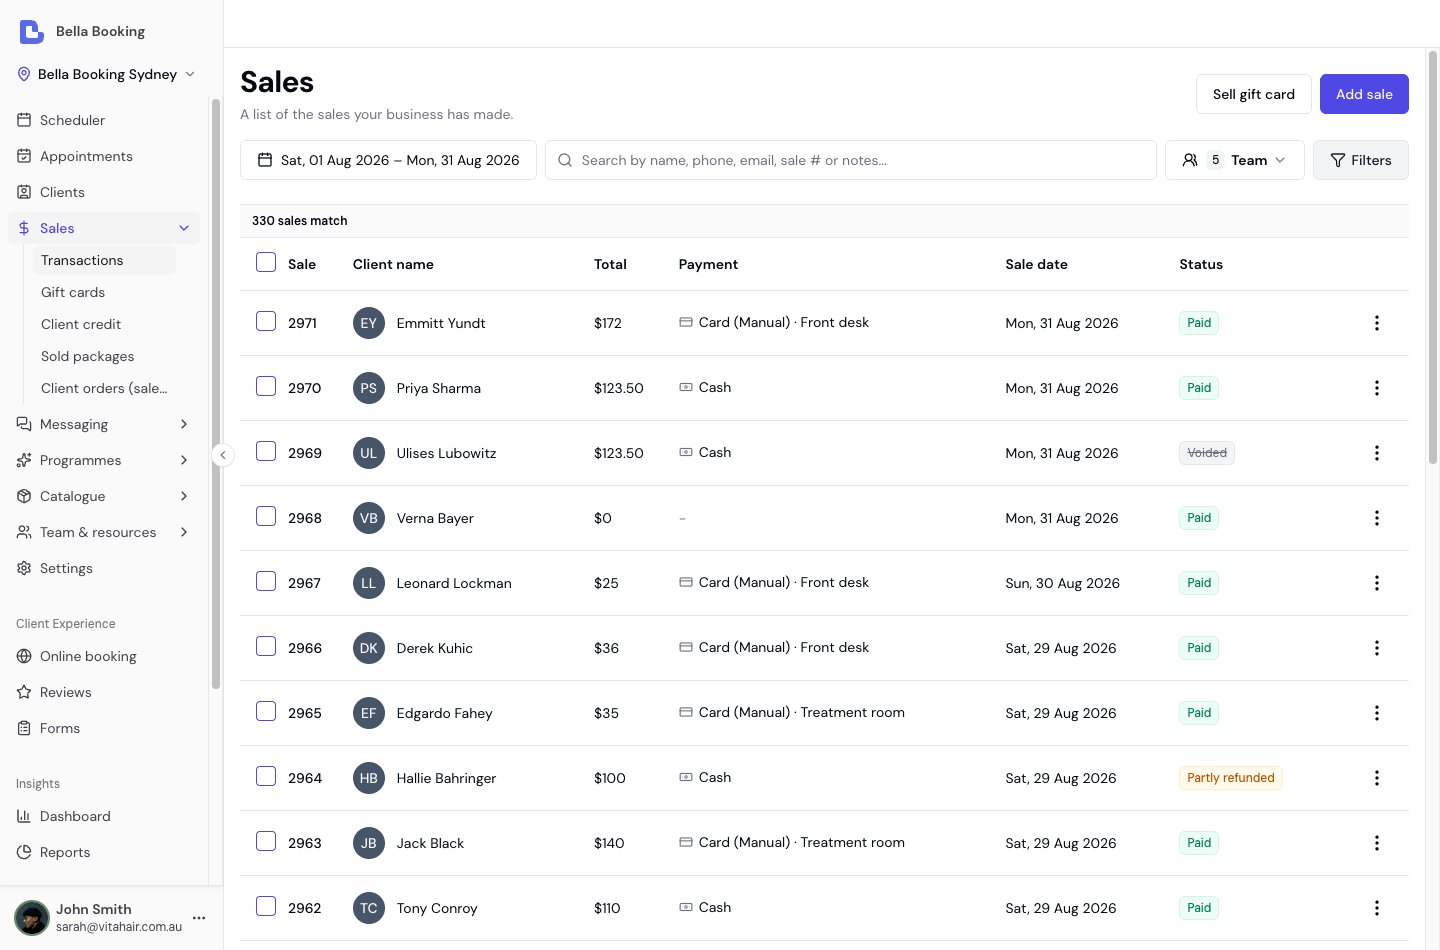
Key features
- Sales History Table: View all completed sales with essential details: sale number, client name, total, and sale date.
- Add sale: Easily record new sales.
- View Sale Details: See complete information about any sale including items, payment, and notes.
- Refunds: Process full or partial refunds directly from each sale.
- CSV Export: Export your sales data to CSV for reporting and analysis.
Step-by-step usage instructions
Navigating the sales list
- Access the Sales section from the main sidebar to view a table of all recent transactions.
- Use the search bar above the list to find sales by sale number
- Click any row to open the sale details panel for further actions.
Sorting and filters
Search and filters choose which rows are listed. They do not change the order. To change the order, click a column heading that sorts. Unless the page says otherwise, the first click sorts text A to Z, and numbers and dates highest or newest first. Click the same heading again, or the heading the list already opens on, to reverse it. The arrow beside the heading shows the direction: up is A to Z, oldest first or lowest first, and down is Z to A, newest first or highest first. A heading that sorts by name ignores capital letters: “anna” and “Anna” sort together. The list opens newest first. Sale sorts by sale number, Total by the sale total, and Sale date by the date of the sale. Client name, Payment, and Status do not sort. On a narrow screen Client name, Total, Payment, Sale date, and Status are hidden. Hiding them does not change the order. Widen the window to sort by Total or Sale date. Search finds a sale by sale number. The date range, team member, payment method, refund status, and total are filters.Adding a new sale
You can also start one without leaving the calendar: + New → New sale in the Scheduler header opens the same panel over your schedule - handy for a retail sale between appointments. It only needs the Sales → Create permission, so a team member who isn’t allowed to browse sales history can still ring one up.
- Click the
Add salebutton above the sales table. - The Add sale side panel will open. Complete each section:
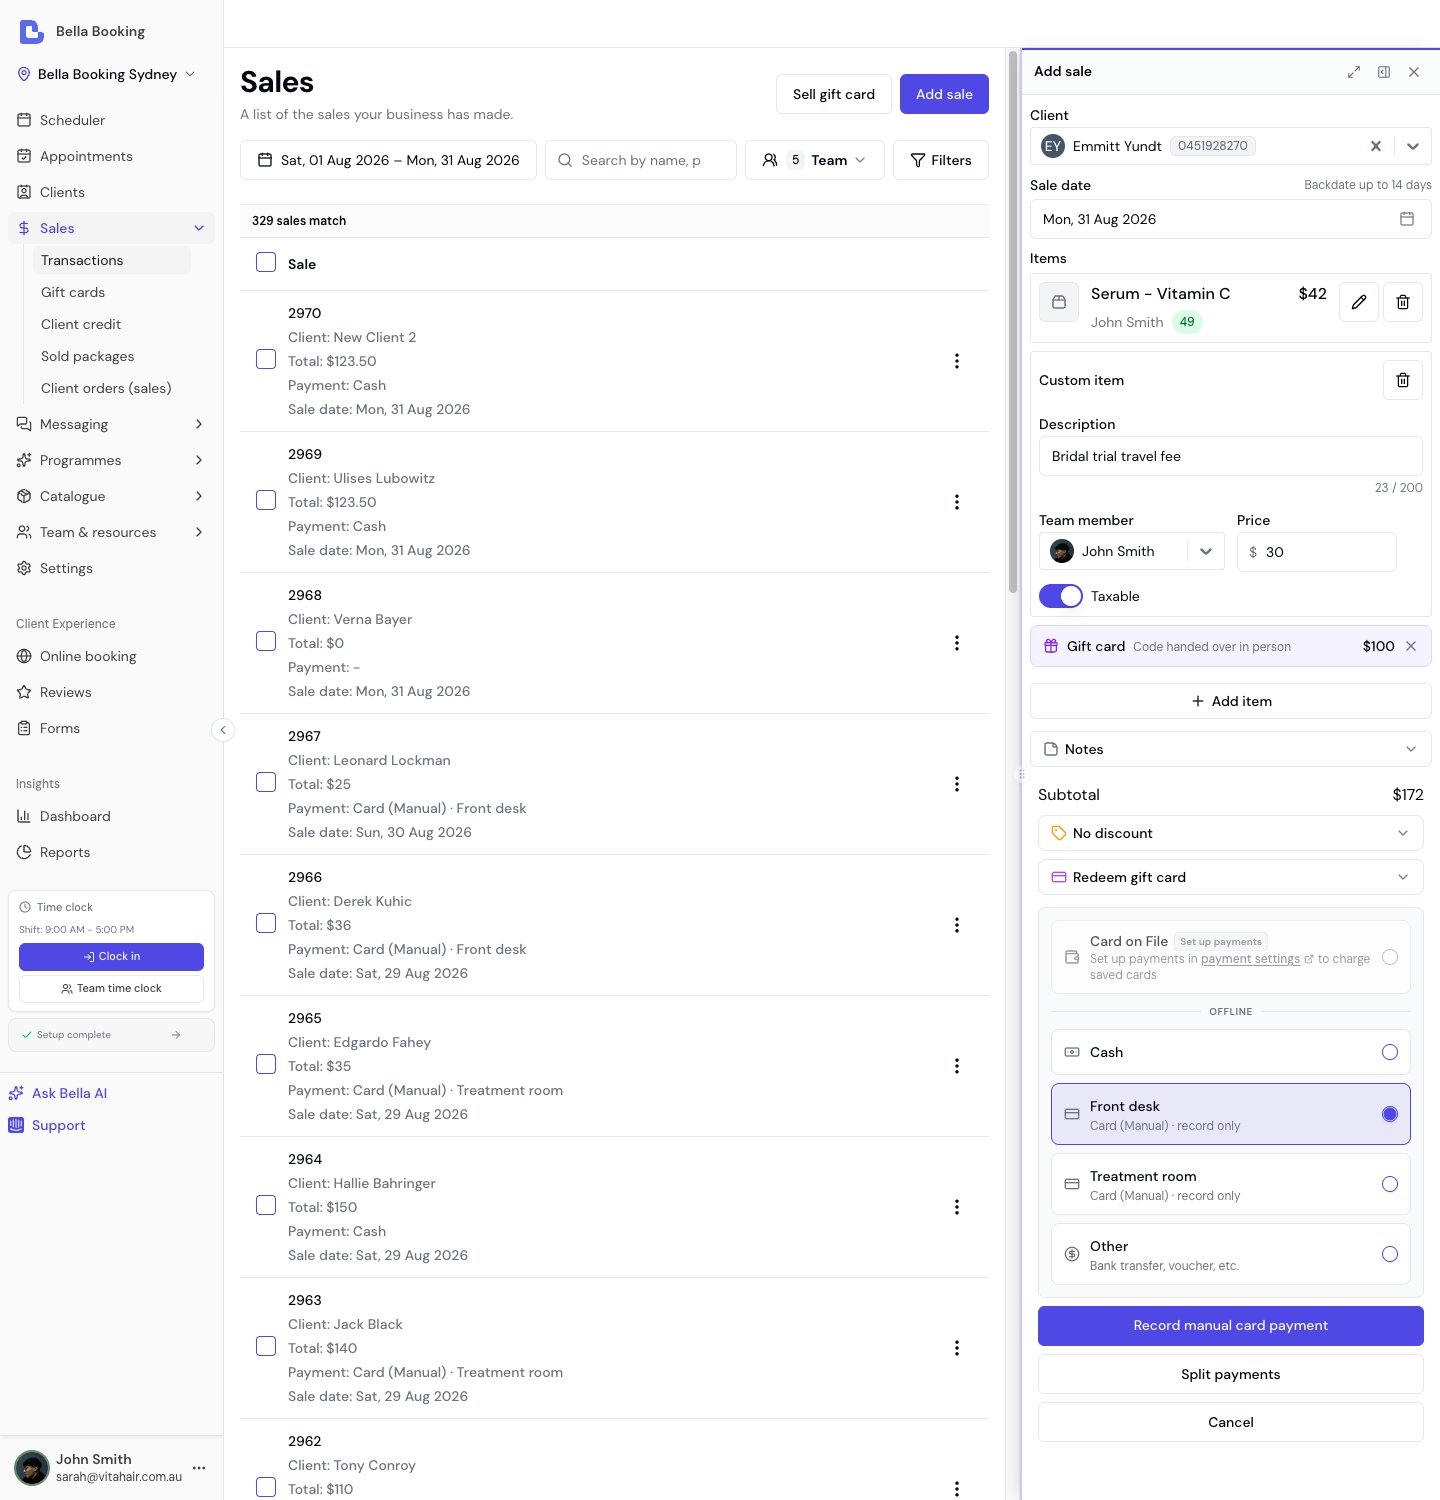
- Client: Select an existing client or create a new one.
- Products: Click Add item and choose Product, then search by name, brand, SKU or barcode - a USB scanner that types into the box finds the product the same way the Products list does. Set the quantity on the line.
- Custom items: Click Add item under Items and choose Custom item for a one-off charge with no catalogue product or service behind it - see Adding a Custom Item below.
- Packages: Click
Add packageto sell a prepaid package (when enabled in settings). - Notes (optional): Enter notes for your team’s reference or reminders.
- Review sale details at the bottom. If everything is correct, click
Payto confirm and record the sale.
Selling gift cards: where gift cards are on your plan, a gift card can go on this sale as a line of its own (Add item → Gift card, see Adding a gift card below), or be sold on its own with Sell gift card on the Gift cards screen. See Gift cards for the sell and redemption flow.Selling more than one of something: each product line has a Quantity alongside its price, so three of the same shampoo is one line with Quantity 3 rather than the product added three times. The row shows the unit price and the line total (
3 × $30.00), the quantity prints on the client’s receipt, and
stock comes down by the full amount. Quantity works the same way on an
appointment Check out.
Adding a gift card
A client paying for their service who also wants a voucher for someone else can buy both in one transaction - one payment, one receipt, one line in your sales list.- On the Add sale panel, or at an appointment Check out, click Add item under Items and choose Gift card.
- Choose an amount, service or bundle, decide whether to email the code or hand it over, and add the recipient’s details. Click Add to sale.
- Take payment as usual. The card is created when the sale completes.
Adding a custom item
Need to charge for something that isn’t in your catalogue - a late-arrival fee, gift wrapping, a one-off consultation? Add a Custom item instead of creating a permanent product or service for a charge you’ll only use once.- Click Add item under Items and choose Custom item - on the Add sale panel, or on an appointment when you create or edit it, or at Check out. A line added early counts towards the appointment total straight away and pre-fills at checkout.
- Fill in the row:
- Description (required, up to 200 characters) - free text, shown on the receipt exactly as typed.
- Team member (optional) - defaults to you; pick another team member or leave it unassigned for a walk-in charge with no attribution.
- Price (required, greater than zero).
- Taxable - on by default when your business is tax-registered (see Taxes (GST / VAT / Sales Tax)); this toggle only appears for tax-registered businesses. Turn it off to sell this one item tax-free.
- Add as many custom items as you need, alongside products, packages, and (at appointment checkout) services.
Custom items can’t be redeemed against a membership benefit or a prepaid
package, and a per-line discount can’t target one directly - apply a
ticket-level discount to the whole sale instead. If you find yourself adding
the same custom item repeatedly, it’s worth creating a real product or
service for it instead.
Payment methods
When recording a sale, select how the client paid. The same four options appear wherever you take a payment - Sales, appointment Checkout, and Record deposit:- Cash: Direct cash payment
- Card (Manual): In-person card payment processed outside Bella - record-keeping only. Named your card terminals at Settings → Card terminals? Then each machine appears as its own row (one or two names), or the Card (Manual) row asks which machine (three or more) - so every card payment says which terminal took it.
- Other: Any other payment method - bank transfer, voucher, barter, etc. Record-keeping only.
- Card on File: Charge the client’s saved card via Stripe (only available when the client has a valid saved card - see Saved Cards & Card on File). The brand, last four digits and expiry date are shown directly on the option so you can see at a glance whether the card is expiring or expired before charging. If Pass Processing Fees is enabled, a processing fee is added for each card payment taken this way - worked out on that payment’s amount, not on the whole bill.
When there’s nothing left to collect - a gift card or discount already covers the full amount -
the payment methods don’t appear at all. The sale shows what covered it and a single Complete sale
button, because no money changes hands. Appointment checkout behaves the same way when a deposit,
gift card, client credit or package covers the whole bill.
Viewing sale details
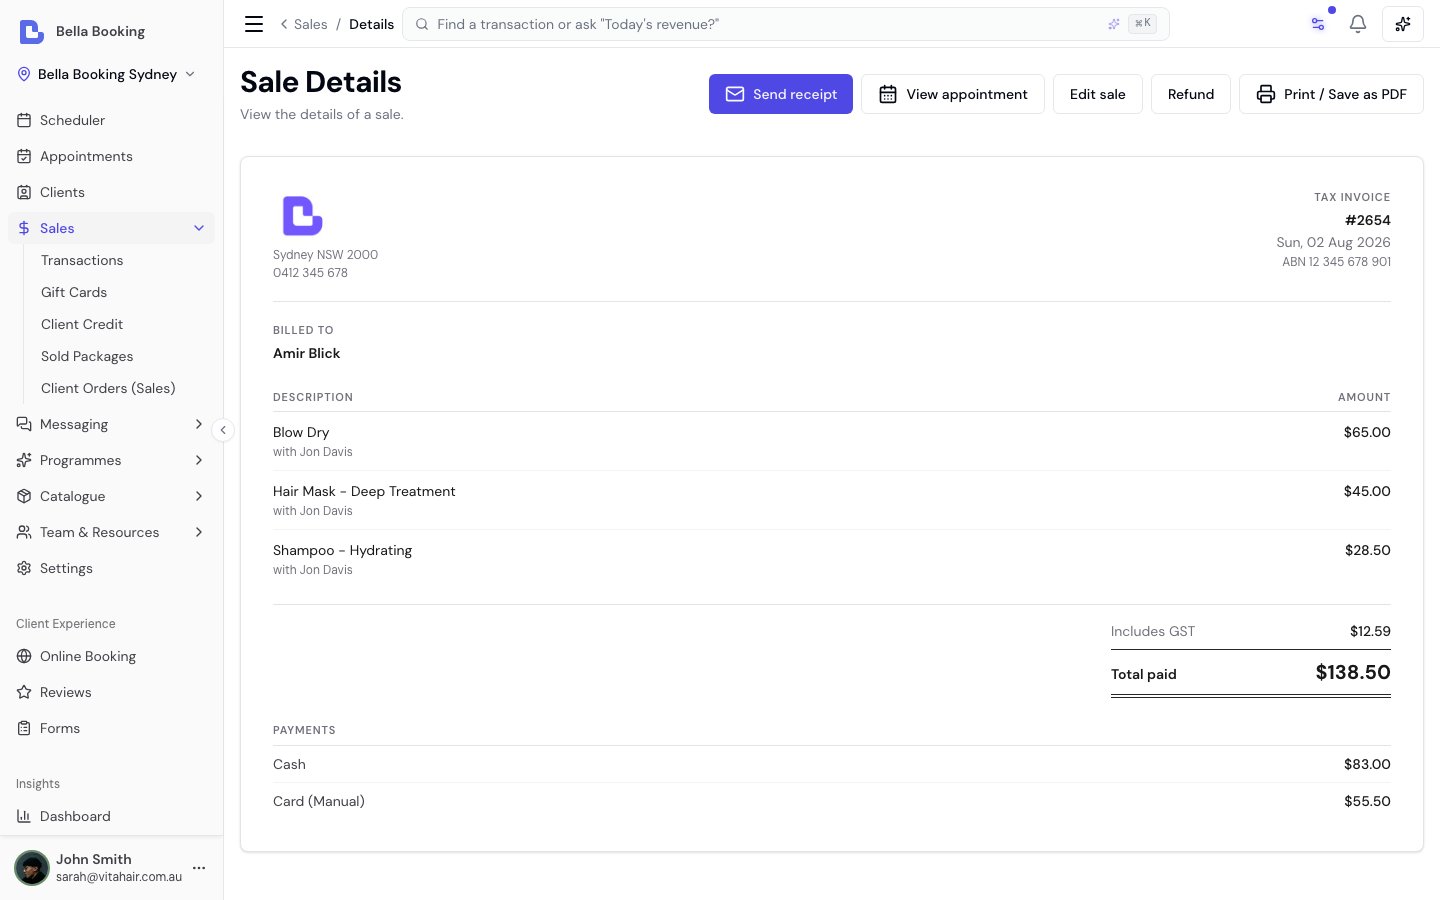
- Click any sale row in the sales table to view the sale detail page.
- The sale details page shows:
- Sale number
- Client name
- Sale date
- Payments - every tender used, itemised (a split sale lists each one)
- Items purchased (services with any add-ons, products, and custom items), each showing the team member
- Your tax registration number and the tax collected, when you’re registered
- Any refunds processed
- Total amount
- Notes
Giving a client their receipt or invoice
A sale is the client’s receipt - the same document a client might call an invoice, a tax invoice, a checkout summary, or proof of purchase. There is no separate “invoice” to create; the sale receipt covers all of these. Before you take payment you can add a Receipt note - a one-off message printed on this receipt only, such as an aftercare reminder or what a patch test showed. It’s in the Booking controls section of the checkout panel, and below the private note on Add sale. See Adding a note to a single receipt. There are a few ways to get the receipt to a client:- Automatically at checkout. When you take payment, Bella emails the client their receipt straight away - the subject is “Your receipt from” followed by your business name. This happens for both an appointment checkout (the Checkout summary (receipt) message) and a sale without an appointment - a walk-in or retail purchase (the Sale receipt message). For an appointment checkout you can turn off the receipt for a single checkout using the Notifications control on the checkout panel. Both messages are editable in Settings → Automated messages, each with its own email/SMS wording and channel switches (email on, SMS off by default).
- Send it on demand. Open the sale from the Sales list and click Send receipt (top right of the sale detail page) - or use Send receipt in the row menu on the Sales list. Bella emails the receipt to the client there and then - and texts it too if you’ve switched on SMS receipts. This works for any sale, including a walk-in retail sale with no appointment. If the client has no email or phone on file, Bella tells you why it couldn’t send.
- Print or save as PDF. On the sale detail page, click Print / save as PDF to hand the printout to the client or attach the PDF to your own email.
- Re-send it (appointment sales). If the sale came from an appointment, you can also re-send the Receipt (Checkout summary) from that appointment’s Notifications tab in the Scheduler.
For allied-health and wellness businesses, the itemised receipt is what a client submits to their private health fund or insurer to self-claim a rebate. If you’re registered for tax, add your registration number under Taxes so it prints in the heading of every sale that carries tax; if you’re not registered - or your services are tax-free, so the sale isn’t a tax invoice - put it in the receipt footer instead, which always shows. Either way, show each practitioner’s registration or provider number as their team-member receipt note. On any sale that carries tax, the receipt also shows the tax component and is a tax invoice - see Taxes (GST / VAT / Sales Tax). Bella doesn’t integrate with on-the-spot claiming systems (such as HICAPS or Medicare in Australia) - the client claims using the itemised receipt directly.
Sale date
Every sale has a sale date - the calendar day sales, tax and team reports use. It defaults to the day you complete checkout (or Add sale). If payment was taken on another day - for example you took card payment yesterday but only rang the sale today - set Sale date on the checkout panel or Add sale form (up to 14 days back). You can also fix it afterwards from Edit sale. The sale date is not the appointment date. Appointments summary still groups by when the appointment was; money reports group by sale date.Correcting a completed sale
Made a data-entry mistake on a finished sale? You can correct these in place, without refunding - and each correction is recorded in an Edit history on the sale (who changed what, when, and why):- Collection method - fix the recorded method when it was rung up wrong (for example, recorded as Cash when the client actually paid by Card (Manual)). You can switch between Cash, Card (Manual) and Other only. With named card terminals, moving a card payment between two machines is a correction too - each machine is its own choice in the list.
- Team member - reassign the team member credited for a service, product, or custom item line. If the sale came from an appointment, that appointment’s team member is updated to match, so your scheduler and reports agree.
- Receipt note - fix the one-off note printed on this receipt.
- Sale date - move the sale between report days when it was rung on the wrong day (today or up to 14 days back).
- Open the sale from the Sales list.
- Click Edit sale (top right of the sale detail page).
- Change the fields that need fixing.
- Enter a reason (required), then click Save.
Editing collection method is limited to record-keeping fields where no money has moved, and it always
targets the payment taken at checkout. A sale paid by Card on File (a real card charge),
Gift Card, Package or Client credit, or one split across several methods, can’t have its
collection method changed here. On a standalone sale you can refund it and take a new payment instead;
on a sale attached to an appointment that isn’t available, because a completed appointment can’t be
checked out again.A deposit’s method is fixed once recorded and is never what this control changes - if a sale
carries a deposit, editing the collection method relabels the checkout payment and leaves the deposit
as it was.Sale date, team member and receipt note can still be corrected. Correcting a sale needs the same
permission as issuing a refund.
Voiding a sale
Rang up the wrong service, or the wrong client? Voiding says the sale never happened. It’s the tool for a mistake - use a refund when the sale was right and money is genuinely going back. Voiding does four things at once:- Returns the money. A Card on File payment is refunded to the client’s card (a real refund - allow 5-10 days for it to appear). Cash, Card (Manual) and Other payments are simply removed from your records; hand the money back yourself.
- Gives back everything the sale used - gift-card balance, store credit, package and membership sessions, loyalty points, rewards, once-only offers, and product stock. The dialog lists each one by name, and you can set any of them to Forfeit to leave it as it is.
- Returns the appointment to unpaid, so you can change the services and check out again. The corrected checkout issues a fresh receipt.
- Takes the sale out of your reports. A voided sale isn’t counted as a sale, and it isn’t counted as a refund either - it simply isn’t there. It stays in your Sales list marked Voided, keeping its invoice number, so the correction is easy to explain later. To see what’s been voided over a period, filter the list by Refund status → Voided (a voided sale only ever shows under Voided, never under Fully refunded, even when its card was returned).
- Open the sale from the Sales list.
- Click Void sale (top right of the sale detail page).
- Read what will happen - the dialog says what happens to the money and the appointment, then lists every balance going back to the client, one per line. Change a line to Forfeit to hold it back.
- Enter a reason (required), then click Void sale.
Voiding can’t be undone, and a sale that has already been refunded can’t be voided - refund the rest
instead. A voided sale can’t be corrected or have its receipt re-sent; do both on the new sale you ring up
in its place. The client isn’t sent anything when you void: the fresh receipt from the corrected checkout
is what they need.If your business uses Client credit, you can choose to keep the money and add it to the
client’s credit balance instead of refunding their card.Voiding needs the same permission as issuing a refund (Owner and Admin by default).
Processing fees on sales
When a sale is paid using Card on File and Pass Processing Fees is enabled, the processing fee is shown as a separate line on the sale detail page. This fee covers only the checkout charge - if the client also paid a deposit with a processing fee, that deposit fee is tracked separately on the appointment and is not included in the sale’s processing fee. For more details on how deposit and checkout fees are kept separate, see Deposit and Checkout Fees Are Separate.Issuing refunds
- Open the Sales from the side panel.
- Find the sale you wish to refund.
- Click the Toggle Menu (Three dots) and click
Refundbutton. - Enter the refund amount (partial or full) and select the refund reason.
- Choose the destination - return the money to the original payment method, or add it to the client’s credit balance to spend on a future appointment (no money leaves your account; requires Client credit to be enabled).
- Under What the client gets back, choose what happens to each thing this sale used - see the note below.
- Leave Notify the client on to send the Refund issued message, or turn it off for a correction the client does not need to hear about.
- Confirm the refund.
For sales paid using Card on File, the refund is processed automatically
through your payment provider and returned to the client’s original card. The
maximum refundable amount includes the sale total plus the checkout processing
fee (if any). Deposit processing fees are refunded separately through the
appointment’s deposit refund flow. For Cash and Card (Manual) sales,
refunds are recorded for your records only - you’ll need to handle the actual
refund separately.
- On a full refund every line comes back, exactly as before. Set one to Forfeit to leave it as it is.
- On a partial refund every line starts at Forfeit. Set the ones the refund covers to Restore - refunding one of two services, for example, and handing back the package session it used.
A gift-card balance and store credit aren’t in that list on a partial refund. Their value is part
of the bill, so returning them alongside a part-refund would hand the client back more than the refund
gave them. They come back on a full refund; short of that, settle the difference with the client directly
- Bella tells you the amount when it applies.
Adding or viewing sale notes
- Open the Sales from the side panel.
- Find the sale you wish to refund.
- Click the Toggle Menu (Three dots) and click
Add a notebutton. - Type your notes.
Recording deposits
You can collect a deposit against any booked or confirmed appointment - in person, over the phone, or by charging a client’s saved card on file.How to record a deposit
- Open the appointment in the Scheduler (click on the appointment).
- In the appointment details panel, click Record deposit.
- Enter the deposit amount.
- Select the payment method:
- Cash - cash paid at reception
- Card (Manual) - in-person card payment processed outside Bella (covers EFTPOS too). If you’ve named your card terminals at Settings → Card terminals, the picker asks which machine took it.
- Other - bank transfer, voucher, etc.
- Card on File - charge the client’s saved card via Stripe (available when the client has a valid saved card)
- Optionally add notes (e.g., “Cash paid at reception”).
- Click the action button to save. The button label reflects your selection - for example “Charge Visa ····4242 for Deposit” or “Record cash deposit”.
Cash, Card (Manual) and Other deposits are for record-keeping only - refunds
for those methods must be handled outside the system. Card on File deposits go
through Stripe and can be refunded automatically by cancelling the
appointment.
Related features
- Payment links - Ask a client to pay their appointment balance online after they’ve left
- Prepaid Packages - Sell prepaid session packages and redeem them at checkout
- Gift cards - Sell digital gift cards and apply them as payment at checkout