

Overview
The Messages section is a two-way inbox built into Bella Booking that handles both SMS and email. Send a client a text or an email, and their replies land back in a single threaded conversation. SMS uses your dedicated business phone number; email needs no number to send. The inbox itself is unlocked by that number, so it isn’t available in countries where we can’t provision one yet. Messages is part of Messages Plus, an add-on subscription. See Settings - Messaging for setup and pricing.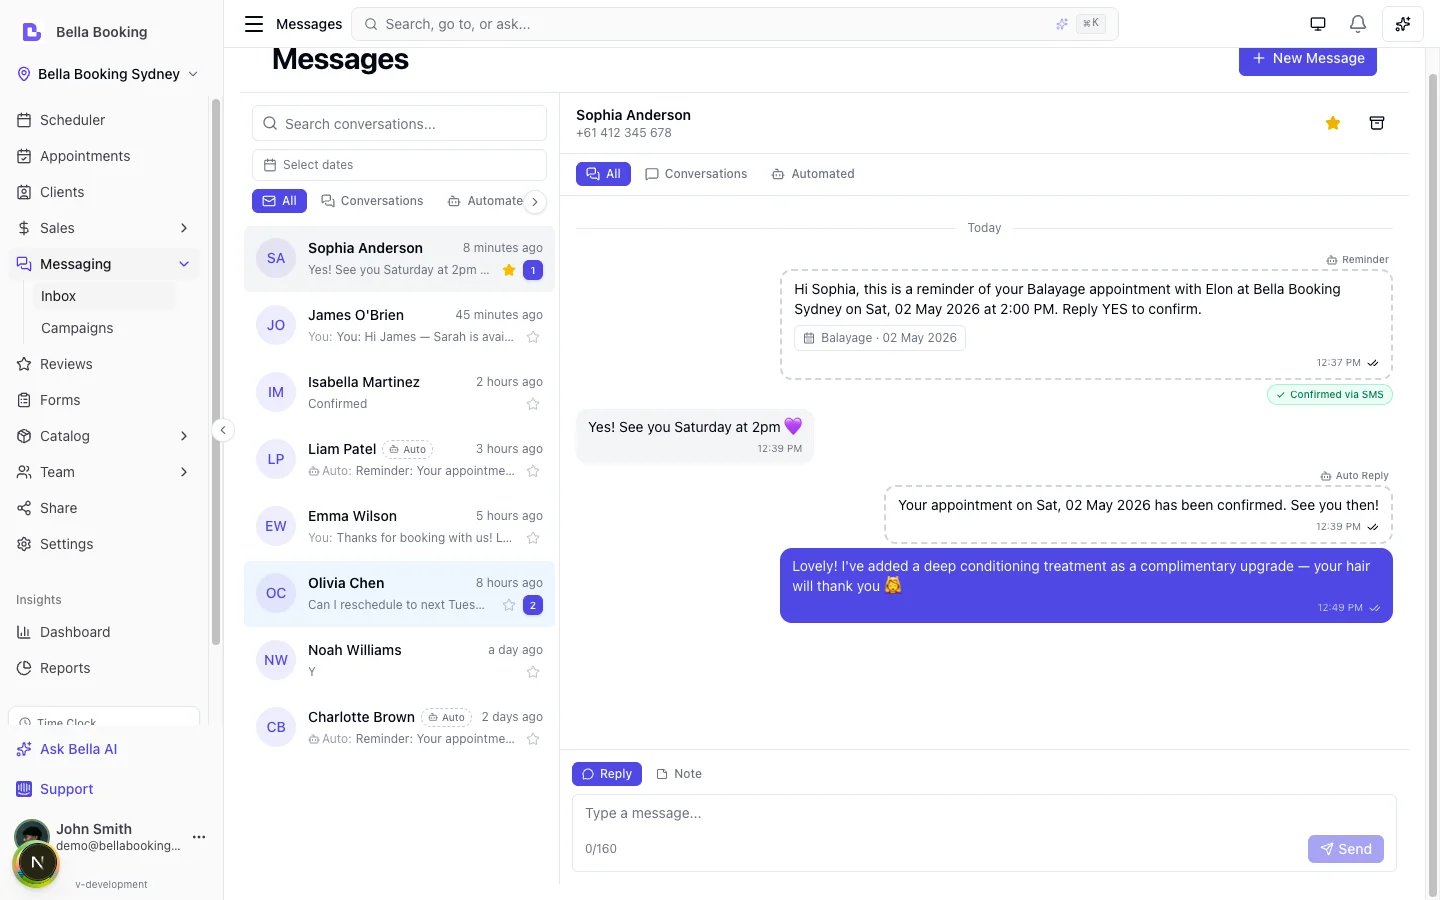
Key features
- SMS and email in one inbox - Message a client by text or email and see both in the same conversation
- Dedicated phone number - Your business gets its own local number for sending and receiving SMS. It also unlocks this inbox, so the inbox isn’t available in countries where we can’t provision one yet
- Threaded inbox - One conversation per client, with full message history across channels
- Two-way messaging - Clients reply by SMS or email and their responses appear in the thread
- Internal notes - Add private notes to any conversation (visible to your team only, never sent to the client)
- Automated messages in context - Appointment reminders and other automated messages appear in the same thread
- Real-time updates - New messages and delivery status updates appear automatically
- Client profile integration: See client details, upcoming appointments, and consent status alongside conversations. The three-dot menu on an upcoming appointment has View, Confirm (if Booked), Check in / Start / Undo, and Cancel. Confirm opens the same confirmation as everywhere else, including Notify the client. When notify is on, the dialog lists whether Email and SMS will send, or why not.
- Campaigns - Send one message to many clients at once, by SMS or email - see Campaigns (SMS and Email)
The messaging inbox
The Messages page is a three-panel layout:- Thread list (left) - All your conversations, with search and filters
- Conversation view (centre) - The selected conversation’s full message history
- Contact info (right, desktop only) - Client details and upcoming appointments
Thread list
The thread list shows all conversations sorted by most recent message. Each thread displays the client name (or phone number for unknown senders), a preview of the last message, and the timestamp. Email conversations carry an Email badge so you can tell them apart from SMS at a glance, and you can filter the list by channel. Filters:
Use the search bar to find conversations by client name, phone number, or email address.
Automated messages in the list are prefixed with a small Auto label before the preview, so you can tell automated traffic apart from messages you or the client sent.
Conversation view
Select a thread to see the full message history. Messages are displayed chronologically with date separators between days. Message types are visually distinct:- Your messages - Sent by your team, shown on the right in a coloured bubble
- Client messages - Received from the client, shown on the left
- Internal notes - Shown full-width with an amber background, visible to your team only
- Automated messages - Appointment reminders and other system messages, shown with a dashed border and bot icon
Message filters at the top of the conversation let you toggle between:
- All - Every message in the thread
- Conversations - Only manual messages and internal notes
- Automated - Only automated messages (reminders, confirmations, etc.)
- Star / Unstar - Flag important conversations for follow-up
- Archive - Move the conversation out of your active inbox
- Mark as read - Clear the unread badge
Contact info panel
The right-hand panel shows:- Client name, phone number, and email
- Communication consent - Whether the client has opted in to announcements and marketing
- Upcoming appointments - The next three scheduled appointments
- Quick links to View profile and Book appointment
Sending messages
Reply to an existing conversation
- Select a conversation from the thread list.
- Type your message in the compose box at the bottom.
- Press Enter (or click Send) to send.
Start a new conversation
- Click the New Message button at the top of the thread list.
- Search for a client by name, phone number, or email address.
- Choose the channel - SMS or Email (see below).
- Type your message.
- Click Send.
Send by SMS or email
When a client can be reached more than one way, pick the channel before sending:- SMS - sent from your dedicated number; uses SMS credits. Available when the client has a mobile number.
- Email - sent from your business, with the client’s reply threading back into this conversation. Add a subject line. Available when the client has an email address that hasn’t bounced. Email uses no dedicated number and no SMS credits to send; the shared inbox itself still needs a live number, so it isn’t available where we can’t provision one yet.
Add an internal note
Internal notes let you record information about a conversation without sending anything to the client.- In the compose box, click the Note toggle (switch from Reply to Note).
- Type your note.
- Press Enter to save.
SMS segments and character counting
This section applies to SMS only - email messages have no segments and never use SMS credits. SMS messages are billed per segment, not per message. One credit is one segment to one client. A plain message is about 160 characters per segment, or about 70 with emoji. The compose box shows the character count, the segments, and the credits as you type.Automated messages in threads
Automated messages - appointment reminders, confirmations, cancellation notices, and other notifications - appear inside the relevant client’s conversation thread. This gives you a complete communication history with each client in one place. Automated messages are marked with a bot icon and labelled with the message type (e.g., “Automated - Reminder”). They count toward your SMS credits just like manual messages. You can filter the conversation view to show only automated messages using the Automated tab, or hide them to focus on your manual conversations.Configure your automated messages in Settings - Automated
Messages. The Messages inbox shows them
alongside your conversations but does not control when or how they are sent.
Communication consent
Bella Booking tracks two types of communication consent on each client profile:
Consent status is shown in the Contact info panel of each conversation. You can update consent preferences from the client’s profile in Clients → select client → Information tab.
Notification preferences
Each client’s profile includes notification preferences that control how they receive automated messages:- SMS notifications - Requires a phone number on file
- Email notifications - Requires an email address on file
Unread badge
The Messages item in the sidebar shows a badge with the number of unread conversations. This updates in real time as new messages arrive. The badge is a silent, visual signal - an incoming client reply doesn’t play a sound or raise a device notification. The notification sound on the bell is tied to business events (appointments confirmed, cancelled or rescheduled, check-ins and the like), not to the Messages inbox, so keep an eye on the sidebar badge for replies.Auto-handling client replies
When a client texts your dedicated number, Bella checks the message against a small set of keywords and may act on it. Anything that doesn’t match is left as it is and shows up in your inbox for you to read and reply to.Keyword handling (yes / no / STOP) applies to SMS only. Email replies are
not scanned for keywords - they always land in your inbox for you to read and
respond to.
Yes to a reminder
A yes to an appointment reminder, sent any time before the appointment starts, confirms it. Bella then:- Confirms the appointment, the same as when you confirm it yourself: your Confirmed appointment message (in Settings → Automated messages) goes out on the channels you have on for it. Its SMS channel is off by default, so switch it on if you want the client to get a text back; switch the message off if you’d rather they hear nothing.
- Adds a green Confirmed via SMS pill below the reminder bubble.
yes, y, yeah, yep, yup, confirm, confirmed, ok, okay, sure, absolutely, definitely, yea, 👍
Punctuation and a few words of filler don’t get in the way: “Yes.”, “Y!”, “Yes please”, “Ok thanks, see you then” all confirm. A reply that says more than yes (“Yes but can we make it 3pm”) stays in your inbox for you to read.
No to a reminder
What a no to a reminder does is your choice, in Settings → Messaging under How replies work. Either way the reminder gets a pill below its bubble and you get a notification:- Flag it for follow-up (the default). The reminder gets an amber Declined - needs follow-up pill, you get a Replied no notification with the client’s words, and the appointment stays as it is until you act. Nothing is texted back to the client.
- Cancel the appointment. Bella cancels it for the client the same way they would from their booking page: your self-cancel and notice-period rules apply, any deposit follows your cancellation policy (a no inside your notice period forfeits it the way a late online cancel does), your Cancelled appointment message goes out on the channels you have on for it, and you get the same cancellation notification as for a cancel from the booking page. The reminder gets a Cancelled via SMS pill. If your rules don’t allow the client to cancel, the reply is flagged for follow-up instead and that notification says why. A no never charges a cancellation fee to a card on file.
no, n, nah, nope, cancel, decline, 👎
“No.” and “No thanks” count as a no. “No, I need to reschedule” does not: it stays in your inbox.
Consent keywords
These take effect immediately and apply to all automated messaging from your business:NO PROMOS and START trigger a short confirmation text from Bella so the client knows it took effect. STOP is recorded as an opt-out; Bella does not send a confirmation SMS (the carrier blocks it). Consent state is also visible in the Contact info panel.
Inviting clients to confirm via SMS
The default reminder template doesn’t tell clients they can reply YES - so unless they happen to text back one of the yes keywords, nothing is confirmed. To get more reminders confirmed by text, edit your reminder template in Settings → Automated messages and add a prompt like:Reply YES to confirm.
What the client hears back
Bella sends no fixed text of its own in reply to a yes or a no. The acknowledgement is your own Confirmed appointment or Cancelled appointment message, on whichever channels you have on for it, so what the client reads is yours to edit or switch off. Both messages send by email but not SMS until you switch their SMS channel on, so a client who only has a mobile number on file hears nothing back until you do. The two consent texts (NO PROMOS and START) are the exception: they appear in the thread with a dashed border and a small Auto-reply label, with their delivery status shown like any other outbound SMS.
Campaigns (SMS and email)
Campaigns let you send one message to many clients at once - ideal for promotions, announcements, seasonal offers, or re-engagement. Every campaign can be sent as an SMS or an Email: SMS for short, urgent messages; email for branded content with images and formatting, your own HTML or a Canva design, and a booking button.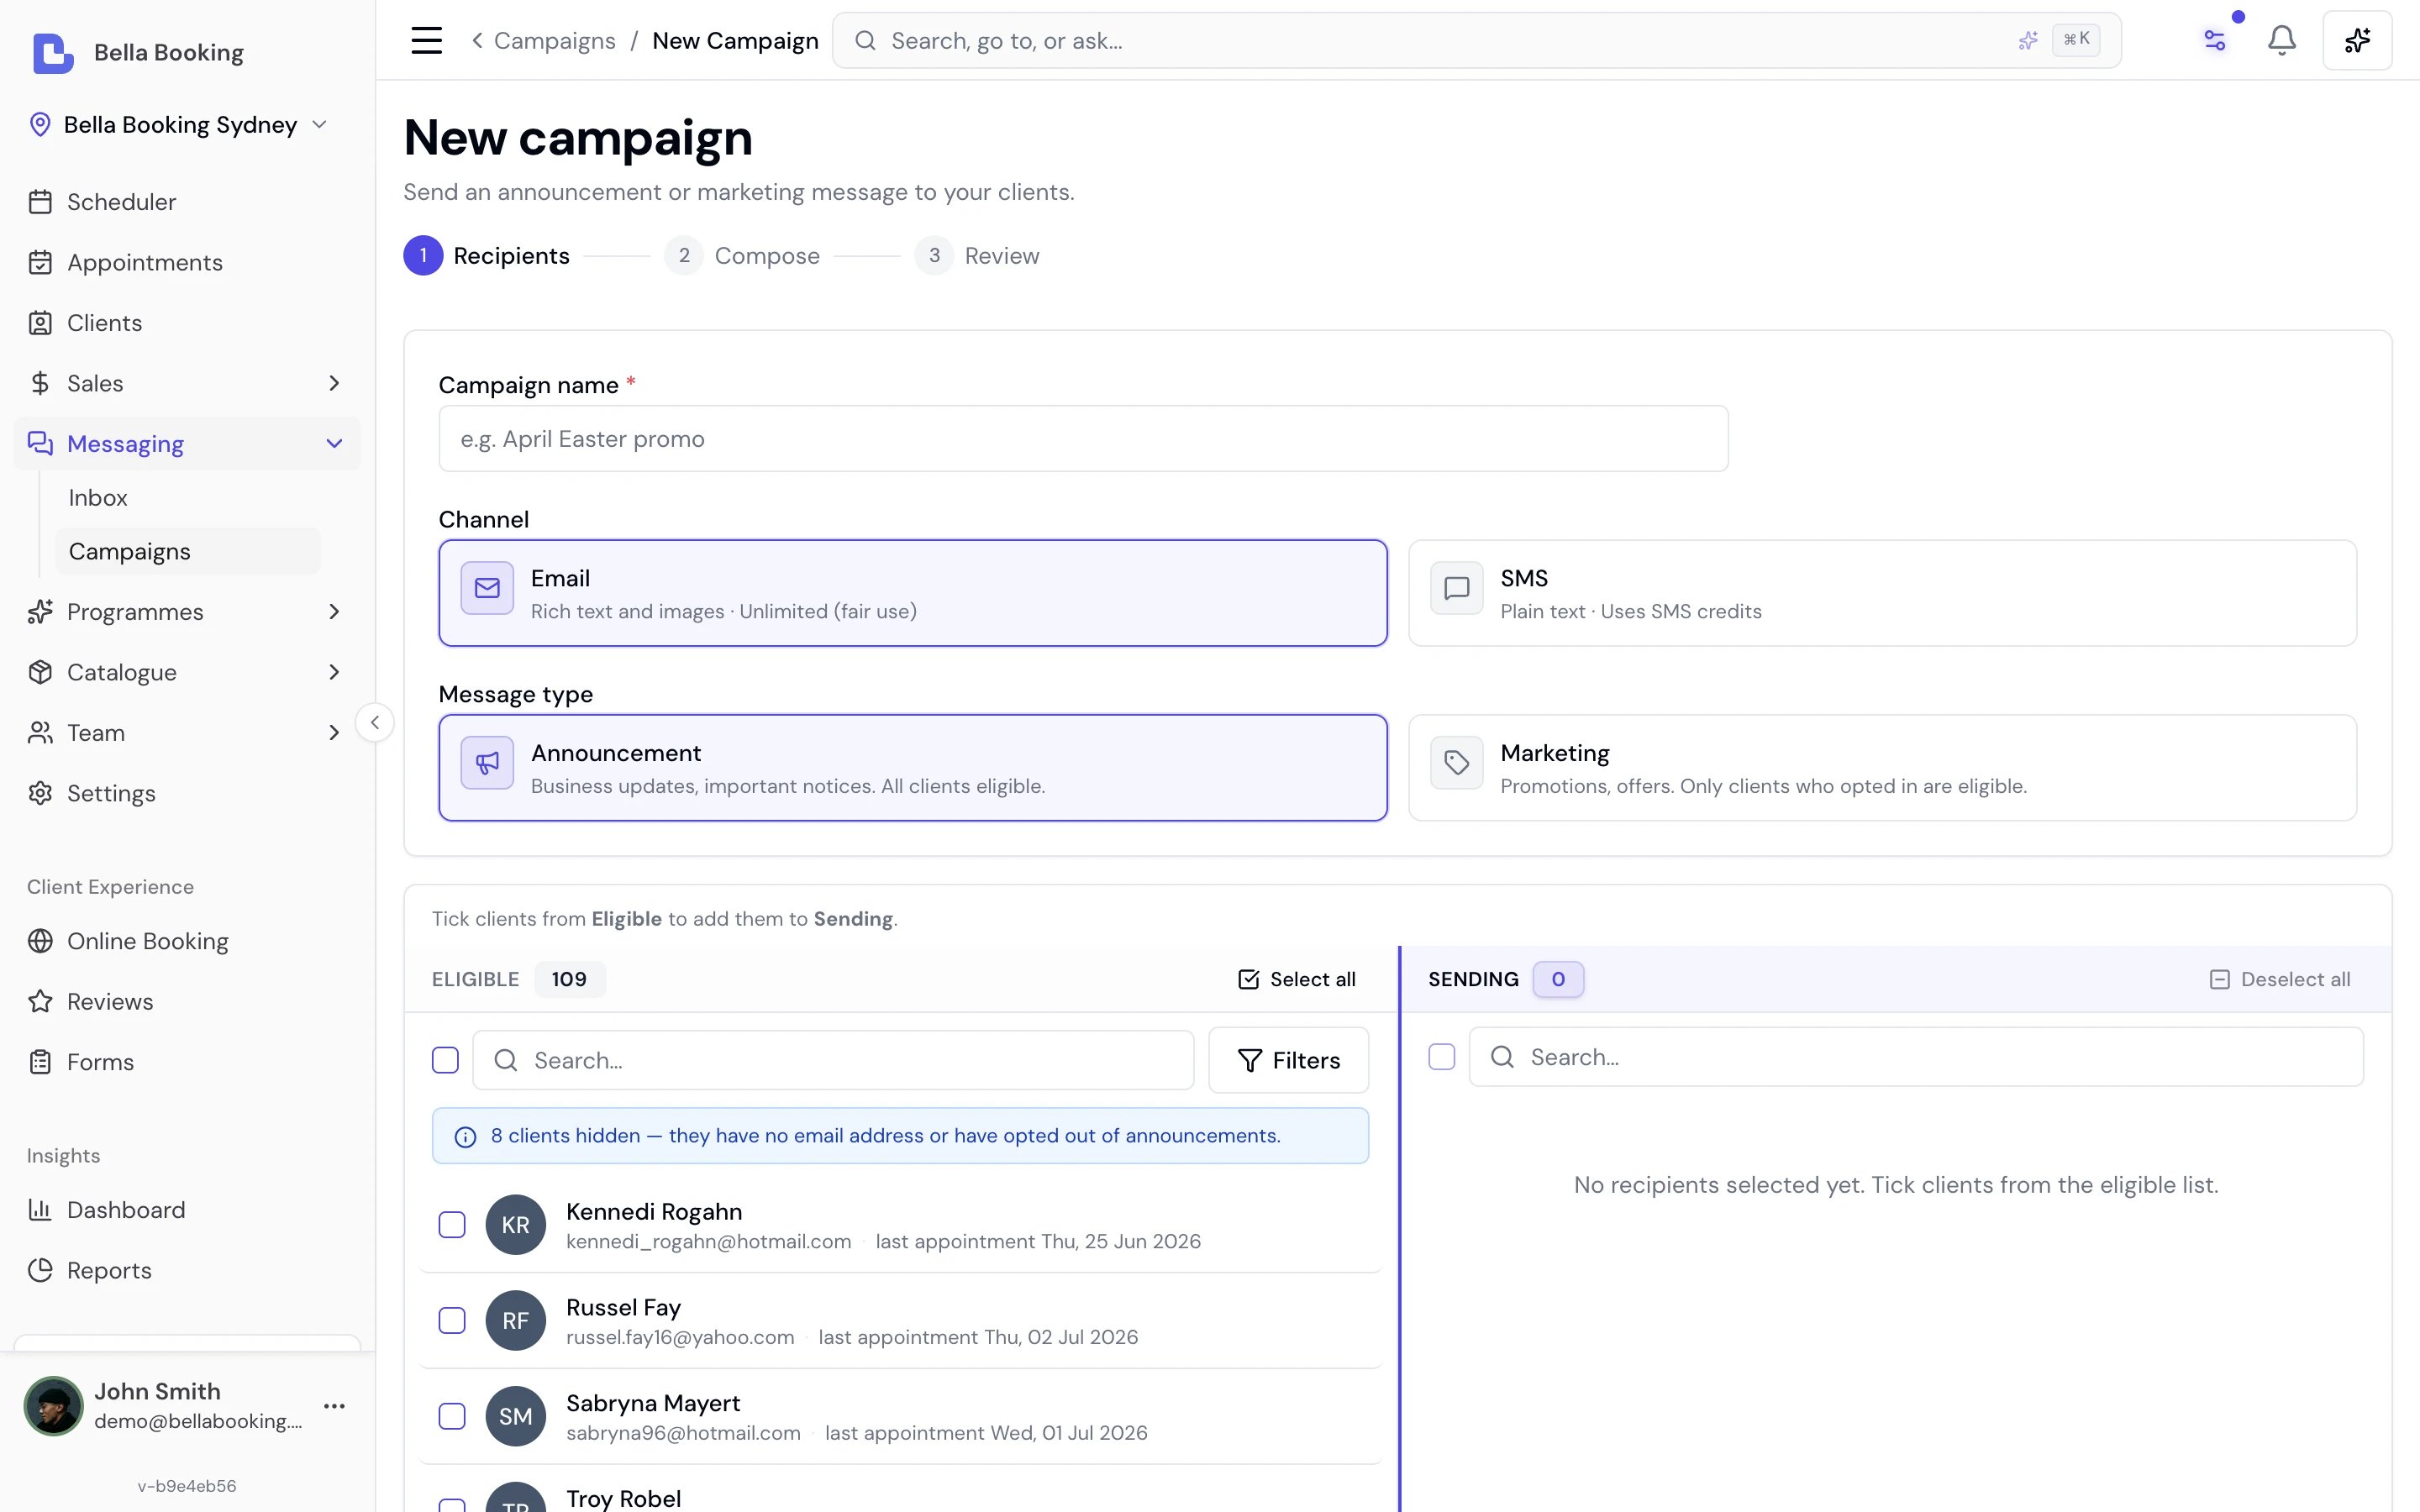
Start a campaign by choosing the channel (Email or SMS) and message type, then build your audience from every eligible client.
How it works in brief
The campaign builder is a short, step-by-step wizard - Recipients → Compose → Review. You move between steps with the Continue and Back buttons. Your subject and body aren’t on the first screen: you write them on the Compose step, after you’ve named the campaign, chosen your recipients, and clicked Continue.- Recipients - name the campaign, choose the channel (Email or SMS) and message type (Marketing or Announcement), then build and filter your audience. Clients who can’t receive it - no contact method or no consent for the type - are excluded automatically.
- Compose - write your message. For email, a Visual / HTML toggle lets you either build a branded email in Bella’s editor (rich text, inline images, a hero image, a Book now button, your logo and brand colours, and an optional AI-drafted first pass) or paste your own HTML - including a Canva Email design - to send exactly as it looks.
- Analyse & continue - Bella runs a pre-send check. Serious problems (like a misleading subject) must be fixed; the softer deliverability and structural suggestions - image-heavy content, missing alt text, an oversized email - are warnings, never blocks, so you can send anyway.
- Review - check the recipient count and preview, Send test to myself, then Send now or Schedule for later.
For the complete guide - the Visual and HTML compose modes, importing a Canva
Email design, the pre-send check, previewing and test-sending, scheduling,
consent, unsubscribes, and campaign history - see Email & SMS
Campaigns.
Verifying your business
Messaging regulations require a one-time verification of your business with our messaging provider - so your number is registered under your business’s identity. What’s involved, and when it happens, depends on your country:This applies only where we can provision a dedicated number. If we can’t yet in your country, there’s nothing for you to verify - see Countries where dedicated numbers aren’t available yet.
Most countries (Australia, United Kingdom, Sweden, …)
Verify first, then your number is provisioned:- Go to Settings → Messaging and select Verify your business
- Confirm your registered business details - in Australia, your ABN is checked against the business register so you can confirm your registered name
- Confirm your business address (a street address - PO boxes can’t be used)
- Provide what your country’s regulator asks for. In Australia, that’s one business registration document - an ASIC company extract or an ABR extract - a single file showing your registered name, registration number and address together (PDF, JPEG or PNG). If it doesn’t show your business address, you can add a separate proof of address (a utility bill, lease or bank statement). Other countries are asked only for what their own register needs - some confirm registered details with no document upload at all
- Submit - approval usually lands within 1-3 business days, and the result shows on the Messaging settings page
If you already have a dedicated number, it keeps working as normal - you’ll
just see a reminder to complete verification so your number is registered
under your own business details.
United States and Canada
These countries use a toll-free number rather than a mobile number, so the order inverts - your number is purchased automatically as part of verification, rather than afterwards:- Go to Settings → Messaging and select Verify your business
- Confirm your legal business details, business type (company, sole proprietor, non-profit, etc.), and - unless you’re a sole proprietor - your business registration number (EIN in the US; CBN, provincial number, or NEQ in Canada)
- Confirm your business address (a street address - PO boxes can’t be used)
- Describe how you’ll use messaging, add a sample message and your expected monthly volume. Bella captures the consent screenshot (your opt-in proof - see below) from your booking page for you
- Submit - your toll-free number is purchased automatically and carrier review usually takes a few business days
Your messages send from a shared number while carrier review is in
progress, and switch over to your own number automatically once approved.
The result shows on the Messaging settings page as soon as it’s back.
Getting the opt-in proof right
The carrier reviews your opt-in screenshot against your use-case description, and this is where almost every rejection happens. The proof is a screenshot of the moment a client hands over their mobile number, with the text disclosure beside the field. On your booking page that’s the sign-in step: the client enters their mobile number, and right under it your business name, the message types (sign-in code plus appointment confirmations, reminders and updates), the frequency, “Message and data rates may apply” and the STOP and HELP keywords. Nothing has to be ticked for appointment texts, and booking is never held up. With online booking on, Bella captures this for you. The wizard screenshots your live sign-in step itself and attaches it to your application, hosted publicly for the carrier’s review. You’ll see the captured image in the wizard: use Regenerate screenshot if your booking page’s branding or wording has changed, or Replace screenshot to upload your own. Your terms and privacy policy are submitted too, and Bella provides them. The carrier requires links to both, and checks that they match what your clients see when they hand over their number. You don’t need to write either: your booking page publishes a terms of service and a privacy policy for your business, linked right under the phone number field, and those are the links submitted. Already have your own? Put them in Settings → Business settings under Terms of service link and Privacy policy link, and Bella submits yours instead.Setting your own Terms of service link also asks clients to accept them: a
switch appears on Review & book and the booking waits until they turn it
on. Bella records which terms they agreed to and when, asks once rather than
every visit, and asks again only if you change the link. Businesses using the
terms Bella provides are not asked to accept anything.
- Shows the disclosure in full, with your business name visible
- Shows nothing pre-ticked. Pre-set consent is the single most common rejection reason - a ticked box or an enabled toggle fails the review
- Matches your use-case description. The sign-in disclosure covers appointment reminders and confirmations, so keep your description to those. To text promotions you need separate evidence of a marketing opt-in the client actively turns on, which is the promotions switch on the Review & book step
- Is captured in a desktop browser, showing just the page - no browser tabs or address bar, not a phone screenshot with your own status bar, and not the client profile’s “Communication preferences” screen (its toggles show saved preferences, not the moment of consent)
If your verification is rejected
Settings → Messaging shows the carrier’s exact reasons - for example “Opt-In Checkbox is Pre-selected” (your screenshot shows a ticked box or an enabled toggle) or “Opt-In Does Not Match the Use Case” (your description mentions message types, usually promotions, that your screenshot’s consent wording doesn’t cover). To fix it:- Go to Settings → Messaging - the flagged reasons are listed there, and everything else you entered is kept
- Select Update & resubmit. The wizard opens on the Messaging tab. Correct what the carrier flagged - usually the use-case description, the screenshot, or both. A rejected screenshot is marked: fix the flagged problem first, then Regenerate screenshot (recapturing an unchanged booking page doesn’t count as new evidence) or Replace screenshot to upload your own
- On the Review step, select Update & resubmit again to send it back. If the screenshot, use-case description, and sample message are all unchanged since the rejection, Bella blocks the resubmit until you update what was flagged
For every country
Your progress saves as you go, so you can finish later. If anything can’t be verified, we’ll show you exactly what to fix - everything else you entered is kept. Business-registration documents are passed straight to our messaging provider for review - Bella keeps only the provider’s reference, never the file. The US and Canada opt-in screenshot works differently: the provider reviews it from a link, so Bella hosts that image at a public address for the review.Permissions
Access to messaging is controlled by team permissions:
Configure permissions in Settings - Team permissions.