

Introduction
Resources represent physical assets in your business that are needed to perform services. Examples include:- Treatment rooms
- Styling chairs
- Massage tables
- Equipment (lasers, machines, etc.)
- Workstations
Where to find resources
Resources live under the Team & resources menu in the sidebar - open Team & resources > Resources. (Resources were previously found under Settings; they now have their own top-level home alongside your team.) The Resource schedule roster - a calendar view of every resource’s operating hours, out-of-service periods and blocked time in one place - sits under the same Team & resources menu.Enabling resources
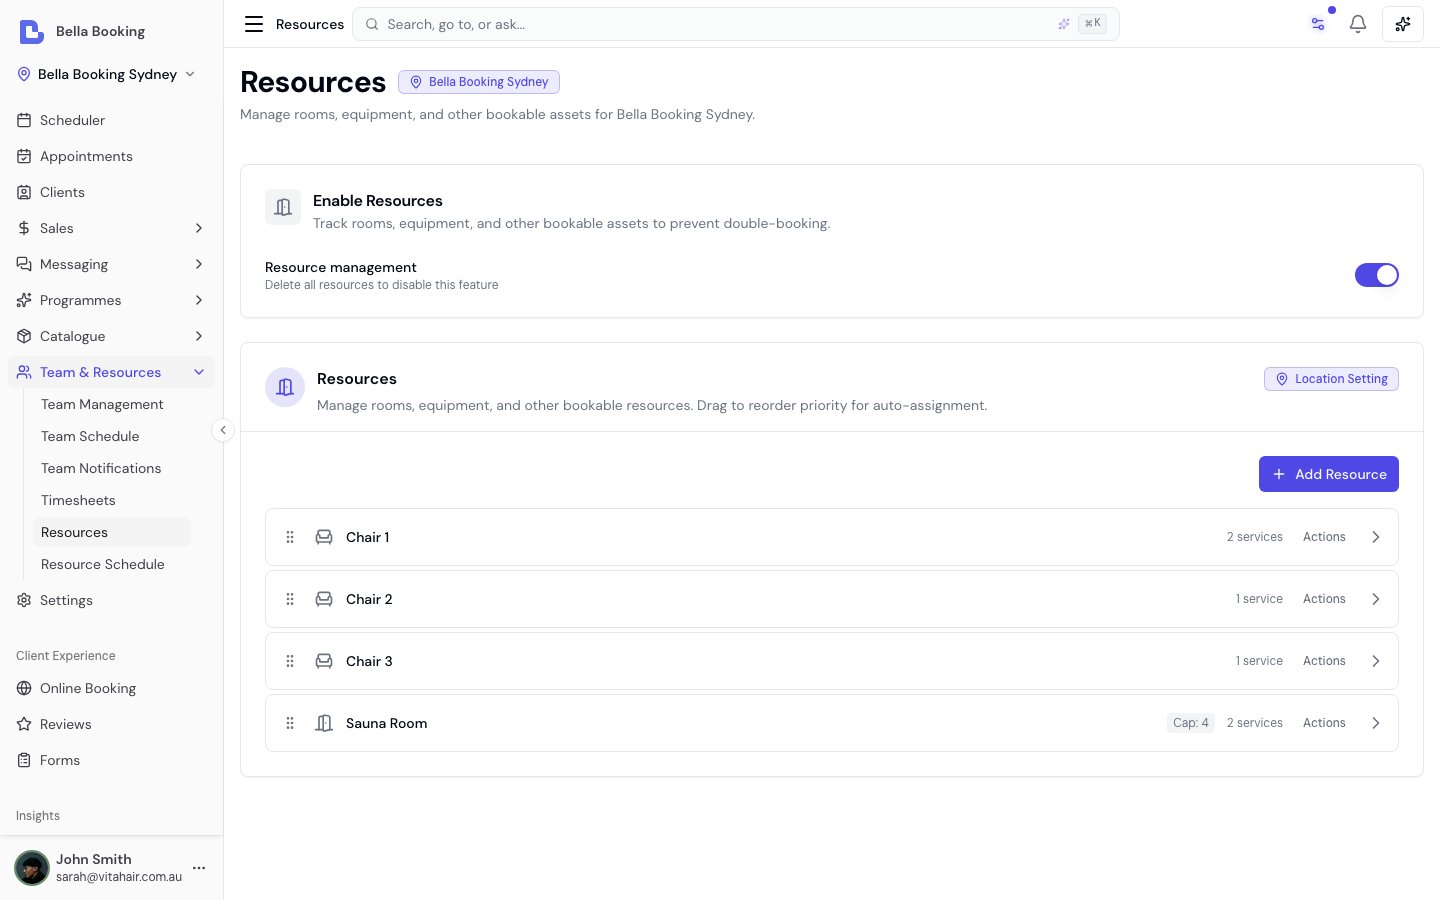
Resources are an optional feature that can be enabled per location. To enable Resources:- Go to Team & resources > Resources
- Find the Resource management toggle
- Turn it On to enable resources for this location
Managing resources
Creating a resource
- Navigate to Team & resources > Resources
- In the Resources section, click Add resource
- Enter the resource name (e.g., “Room 1”, “Chair A”, “Laser Machine”)
- Optionally pick a Type - Room, Chair or station, Equipment, or Other. The type sets the resource’s icon across the app; booking behaviour is identical for every type
- Optionally add a description (e.g., “Ground floor, window view”)
- Set the Capacity (see Resource Capacity below)
- Click Save
Editing a resource
- Click anywhere on the resource row to open the edit panel
- Modify the resource name, type, description, and capacity
- Click Update
Reordering resources
Resources can be reordered using drag-and-drop. That order is used for:- Scheduler columns - left-to-right order when the scheduler is grouped by resources
- Auto-assignment priority - which eligible resource is picked first for online bookings (and when an appointment is rescheduled)
- Drag the grip on the left of a resource row. On a phone or tablet, press and hold the grip, then drag
- Or open Actions and choose Move up or Move down
- Drop the resource in the desired position
- The new order is saved automatically
Resource capacity
Each resource has a capacity setting that controls how many places the resource offers at the same time - one place per person. A booking takes one place per attendee, or the whole room for private hire, which lets a single physical room host different “tiers” - e.g. group, semi-private, and private bookings - without manual juggling.How capacity works
A booking is allowed only when the places already committed across overlapping bookings + the new booking’s places ≤ Resource.Capacity. A booking takes one place per person coming (a whole-space booking takes the full capacity). Existing bookings that pre-date this feature are treated as 1 place each, so behaviour is unchanged until you configure a service otherwise.
Setting capacity
- Click on a resource to edit it
- Find the Capacity field
- Choose Unlimited or enter a specific number (minimum 1)
- Click Update
Capacity in the dashboard
When assigning resources to appointments in the scheduler:- Available resources appear normally in the dropdown
- Resources approaching capacity show usage (e.g., “2/3 booked”)
- Resources at full capacity show “Full (3/3)” with a warning - you can still select them, creating an overbooking
- When an appointment for several people needs more places than are free, the resource shows how many are left (e.g., “Only 1 place left”)
- Resources with unlimited capacity never show as full
- A resource that is closed, out of service or blocked at that time shows “Unavailable”
Capacity in online booking
When a resource reaches capacity for a time slot, online booking automatically hides that slot from clients if no other eligible resource is available. Clients never see resource names, capacity, or availability details - they simply see available time slots.Common capacity examples
Worked example - multi-tier Pilates reformer studio
A Pilates reformer studio with capacity = 6 (six reformers) can host several tiers concurrently - without double-booking - using each service’s room-sharing settings:
Mixing is allowed up to the room’s capacity, e.g. one Duet (2 people) + four Open sessions (4) = 6 = full.
Worked example - two services, two team members, one room
A clinic has one treatment room. Team member A does skin peels and team member B does massages, and both need that room. Create a resource Treatment room with capacity 1, then on each service’s Resources tab tick Treatment room and turn Require resource on. Capacity counts every booking in the room, whatever the service and whoever performs it. With a 10:00 peel booked with A, B’s massage can’t take the room at 10:00 too: online booking hides that time for the massage, and in the Scheduler the room shows Full (1/1) (you can still choose it, which double-books the room). Each team member’s own calendar is checked separately, so B stays bookable for anything that doesn’t need the room. If the room actually fits both treatments at once, set its capacity to 2.Resource operating hours and out of service
Resources have their own schedule, just like team members do. This lets you say when a room, chair or piece of equipment is actually available - and take it offline for maintenance - without touching your business opening hours or any team member’s roster.Operating hours and out-of-service periods are entirely optional. A resource with no schedule of its own simply follows your business opening hours (set in Settings > Scheduling) - so you only need to configure this for resources that keep different hours or need scheduled downtime.
To limit when a service can be booked (one treatment only between 11am and 1pm, say), use the service’s own Available times, or the variant’s own for one variant of a service, rather than a resource: operating hours here are for when the room or equipment itself is available.
Operating hours
You can give a resource a recurring pattern of available hours, plus one-off custom hours for specific dates:- Default operating hours - a recurring schedule (which days, and the start/end times each day). Each day can repeat every week, every N weeks, or monthly on the nth or last weekday. For example, a hydrotherapy pool that is only open Monday to Friday, 9 AM to 5 PM, even though the business itself trades on Saturdays; or a specialist room that opens only on the last Friday of every month.
- Custom operating hours - an override for one date (e.g. the pool opens late for a deep clean on one particular Tuesday), set with Edit this day on the resource schedule. Turn on Repeat these hours to repeat it every N weeks or monthly. Custom hours replace the default pattern on their dates only.
- Fallback - on any day the resource’s schedule does not define, it inherits your business opening hours. An empty schedule means the resource is available whenever the business is open.
Resources use operating hours; team members keep working hours. It’s the same idea - when the resource or person is available - worded to suit each.
Alternating weeks
To give a resource different hours on alternate weeks, keep one schedule with the first week’s hours. Then, on a date in the other week, use Edit this day, enter that week’s hours and turn on Repeat these hours set to every 2 weeks. Don’t create a second schedule for the other week: from its start date, a newer schedule replaces the older one for every day it defines, so a day set to repeat every 2 weeks is closed in the weeks between. If a new schedule would do that, the editor warns you before you save and names the days that would be closed.Out of service
Mark a resource out of service when it is unavailable for a stretch of time - most often for maintenance, servicing or repair. Choose a reason so your team can see why at a glance: Maintenance, Repair, Cleaning, Deep clean, or Other. (These are resource-appropriate operational reasons - not team-member leave types.)- Set a start and end (all-day, or a partial window with specific start/end times), pick the reason, and add an optional note with more detail (e.g. “Laser servicing”).
- While a resource is out of service, it cannot be booked. Online booking hides any slots that depend on it (unless another eligible resource is free), and the dashboard shades the period on the resource’s column.
Blocking a resource for a specific time
For a shorter, one-off closure you don’t need a full out-of-service period - you can add a blocked time directly against a resource on the scheduler (the same way you block out time for a team member). The resource is then unavailable for that window and online booking removes the affected slots.How it affects online booking
Operating hours, out-of-service periods and blocked times all remove slots from online booking when a required resource is unavailable and no other eligible resource can cover the booking. As always, clients never see resource names, schedules or the reason a slot is missing - they simply see fewer available times.Archiving a resource
Archiving a resource removes it from active use while preserving historical data.- Click on a resource row to select it
- Click the Actions dropdown button
- Select Archive
- Confirm the action in the dialog
Restoring an archived resource
- Click Show archived to see archived resources (button only appears if archived resources exist)
- Find the archived resource in the “Archived Resources” section that appears below
- Click the Restore button next to the archived resource
- The resource will be restored to active status
Permanently deleting a resource
Permanent deletion is only available for archived resources. Active resources must be archived first.- Archive the resource first (see Archiving a Resource above)
- Show archived resources, then click the trash icon next to the Restore button
- A confirmation dialog appears - you must type the resource name to confirm
- Click Permanently delete
Assigning resources to services
Resources are assigned at the service level, defining which resources are eligible for that service and whether a resource is required.Setting eligible resources for a service
- Go to the Services
- Click on a service to edit it
- On the Resources tab:
- Toggle Require resource ON if this service must have a resource assigned to be booked
- Select which resources are eligible for this service from the checklist
- Click Save
How many people share a booking, private hire and group bookings are configured on the service’s Group bookings tab - see Bookings for more than one person. The Resources tab is purely about which rooms, chairs or equipment the service can use.
Require resource toggle
The Require resource toggle controls whether a resource must be available for this service to be booked:You can list eligible resources for a service without requiring them. This lets team members optionally assign a resource when booking in the dashboard, without blocking availability when resources are unavailable.
Using resources in appointments
When creating or editing an appointment, you can assign a resource to each service.Assigning a resource during booking
- Create or edit an appointment
- For each service line item, click Edit to modify the service details
- In the edit mode, you’ll see a Resource dropdown (only if the service has eligible resources)
- Select the appropriate resource from the list of available resources
- The dropdown shows availability status: a resource that can’t take the appointment at that time is marked in red (e.g., “Full (1/1)” or “Unavailable”)
- Click Save to confirm the resource assignment
Resource availability checking
The system checks resource availability in real-time using capacity-aware logic:- Available resources appear normally in the dropdown
- Partially booked resources show usage count (e.g., “2/3 booked”) when the resource has capacity > 1
- Full resources are marked with “Full (3/3)” in red but can still be selected from the dashboard (creating an overbooking)
- Resources without enough places for an appointment with several people show how many are left (e.g., “Only 1 place left”) in red
- Resources a private hire can’t use because they already have an appointment show “Room in use” in red
- Closed resources (outside their operating hours, out of service or blocked) show “Unavailable” in red
Viewing resource assignments
In appointment details, you can see which resource is assigned to each service:- The resource name appears below the team member name with a door icon
Scheduler resource view
The scheduler supports two grouping modes, letting you view your calendar by team members or by resources (rooms, chairs, equipment).Grouping modes
Switching modes
- Click the Team or Resources button in the scheduler header to open the filter dropdown
- At the top of the dropdown, select Team members or Resources to switch modes
- The scheduler remounts with the new column layout
Column toggles
In both modes, toggles work identically - they show or hide columns:- In team mode: Toggle individual team members on/off to show/hide their columns
- In resource mode: Toggle individual resources on/off to show/hide their columns
What appears in resource view
- Appointments with resources: Displayed under the resource column they are assigned to
- Resource-only appointments: Appointments for resource-only services (no team member assigned) appear here under their assigned resource column. This is the primary way to view and manage these appointments
- Blocked time: A blocked time created against a resource appears under that resource’s column. (Blocked time created against a team member stays in team mode.)
- Out of service: Periods where a resource is marked out of service (for maintenance or repair) are shaded on that resource’s column, so you can see at a glance when it is unavailable
- Appointments without resources: Not visible (they have no resource column to appear in)
- Operating hours shading: Shown based on each resource’s own operating hours. A resource with no schedule of its own falls back to your business opening hours (see Resource Operating hours below)
What appears in team mode
- All appointments for selected team members, including those with and without resources
- Blocked time and time off are visible
- Work hours shading is shown based on each team member’s schedule
Mode persistence
Your selected mode and column toggles are saved automatically and persist across sessions. When you return to the scheduler, your previous mode and selections are restored.Resources across the dashboard
Beyond the scheduler, resources surface wherever you review your bookings:- Appointments list - the More filters panel on the Appointments page has a Resource filter, so you can list every appointment using a particular room, chair or machine (e.g. “show all bookings for Laser Room 2”).
- Dashboard - businesses with resources see a Resource Usage chart (bookings per resource in the selected period) alongside the team member capacity chart.
- Client profiles - a client’s appointment history shows the room or equipment each service used, next to the team member.
Best practices
Naming resources
Use clear, descriptive names that your team will easily recognise:- “Room 1 - Facial Suite” (descriptive)
- “Chair A - Front” (location-specific)
- “Laser - Soprano” (equipment-specific)
Resource planning
Consider your resource needs when setting up:- Identify shared resources: Equipment or rooms used by multiple team members
- Define service requirements: Which services need which resources
- Set up eligible resources: Ensure services are linked to appropriate resources
Monitoring utilisation
Use the scheduler’s resource filter to:- View how resources are being utilised throughout the day
- Identify booking gaps or overbooking
- Plan maintenance or downtime for equipment