

Introduction
Your online booking page lets clients book with you themselves, around the clock - no phone calls, no back-and-forth. This page explains what a client actually sees and does when they book, so you can set it up the way that suits your business. You control how much choice clients get: whether they pick a specific team member or let you decide, whether a deposit or card on file is required, and how far ahead they can book. The steps below describe the default experience; the sections after that show which settings change it.Can a client pick a time first, then the team member?
Effectively, yes - and it’s the default. You don’t have to make clients choose a person before they can see times.- Leave team-member choice on (the default). A client who doesn’t mind who they see picks Any team member, and on the time step each available time shows who that booking would be with (their photo and first name). The times stay in order. The person named is the one with the fewest bookings that day.
- Turn team-member choice off. The team-member step disappears entirely. The client just picks a service and a time, and Bella assigns the team member with the fewest bookings that day.
The booking steps
A client moves through these steps on your booking page:- Services - the client chooses one or more services or bundles (and any add-ons or variants you offer). For a group-enabled service, the client taps Choose and sets How many people? on the same panel where they pick options and add-ons, so a couple or small party can be booked together in one go (a couples-only treatment shows For 2 people on the row and skips the stepper, so the panel only asks for the guest’s name, which is optional, and any options).
- Team member (optional) - choose Any team member or a specific person. This step is skipped automatically when it doesn’t apply (see Choosing a team member).
- Time - pick a date on the month calendar, then a time. Each date carries up to three dots showing whether it has morning, afternoon or evening availability, so a client can see the shape of your week before tapping anything. Tapping a day collapses the calendar to a week strip, and Month opens it again. Times are grouped into Morning, Afternoon and Evening, each headed with how many times it holds and the hours they span, and each can be collapsed. Days with no availability are greyed out, with a shortcut to the next available date.
- Products (optional) - when your Product shop is on with reserve-for-appointment fulfilment enabled, clients can add products to collect at their appointment. Whether they pay at the appointment (the default) or online in the same journey follows your Products added during booking setting. The step appears when there are four or more products to show; with one to three, the same products appear as an Add products list on the Review & book step instead. Both are skipped on reschedules and waitlist requests. If you switch to Full payment when booking, they also need your online payments finished setting up - the products are paid in that journey, so they stay hidden rather than offering something that can’t be paid for.
- Review & book - the client checks the details, signs in with their phone number, pays a deposit or adds a card if required, and books.
Choosing a team member
On the team-member step, clients see an Any team member option (labelled “Best available match”) alongside a card for each team member who can perform the selected services.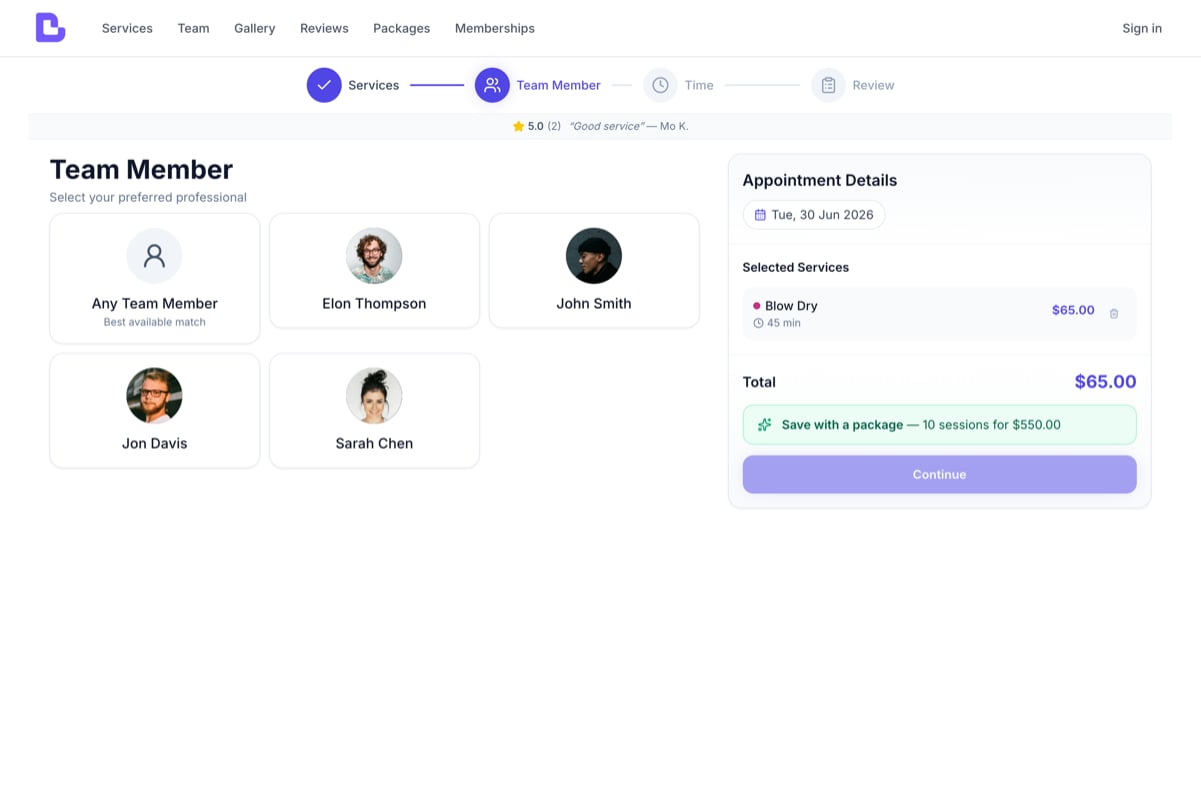
The team-member step - 'Any team member' (best available match) alongside each available team member.
- For the whole business: Settings → Online booking → Booking options (the same toggle also appears under Booking policies) - turn Allow clients to choose team member on or off. It’s on by default.
- Per service: each service has its own Allow clients to choose team member option, which overrides the business setting for that service. See Service catalogue.
- Every selected service is resource-only (assigned to a room or piece of equipment rather than a person).
- You’ve turned off client choice (business-wide or for a selected service).
- The booking is a parallel bundle (services performed at the same time by different team members) - Bella assigns the team automatically.
Picking a time - and seeing who it’s with
When a client books with Any team member, every time shows who that booking will be with: the team member with the fewest bookings that day. A booking for several people shows one team member per guest, each a different person, starting with whoever has the fewest. A client who picks a named team member still gets that person, and that booking counts, so the next Any booking goes to someone else until the numbers level out. The times themselves stay in clock order. Schedule gaps, if you use it, still decides which times appear. A person that time suits is chosen before one it would skip. A party that needs more people than that still fills the remaining guests with whoever is free, so the time is not taken off the list.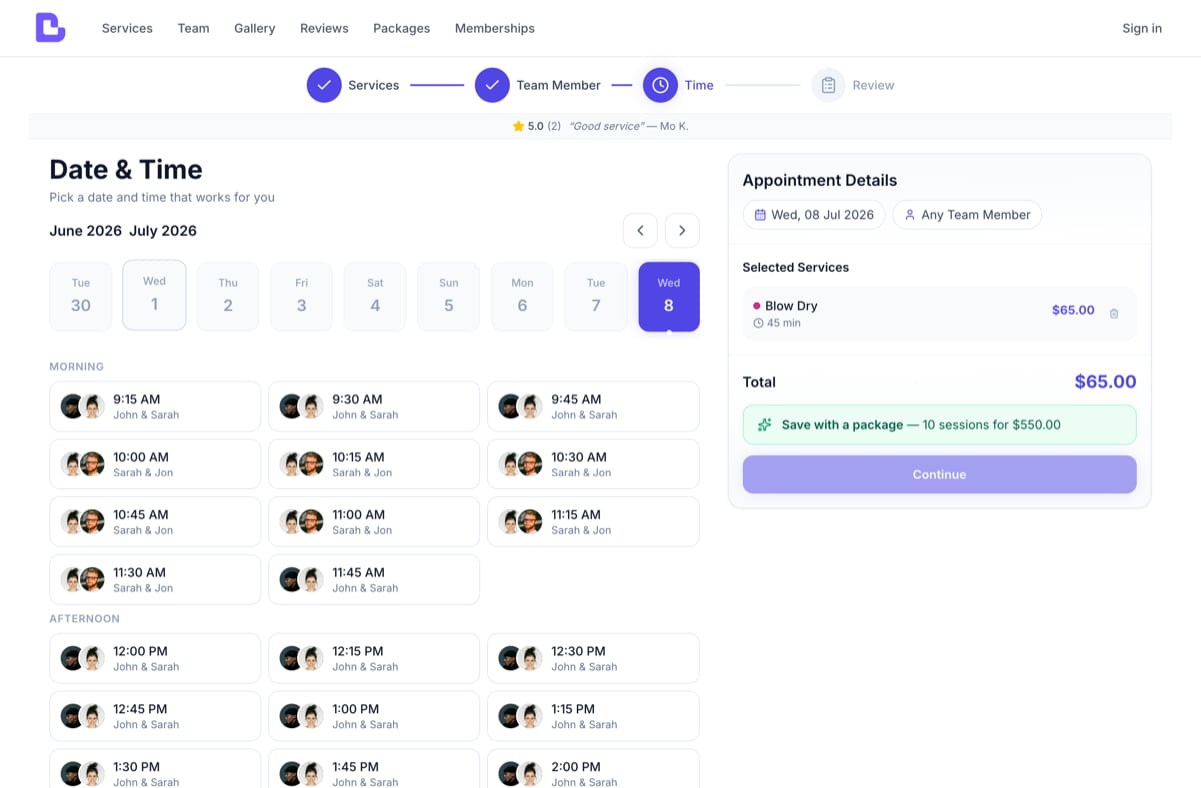
With 'Any team member', every time shows who that booking will be with.
Deposits and cards on file
If your booking policy asks for a deposit or a card on file, the client handles it at the Review step before the booking is confirmed:- Deposit required: the cart shows a Due today amount and the remaining balance. On confirming, the client is taken to a secure payment page to pay the deposit. With Pay to book the appointment exists only once payment succeeds, and their time is held for 30 minutes meanwhile; with Book now, pay within a window the appointment is booked first and confirms on payment.
- Card on file required: the client adds a card to confirm the booking - they are not charged at the time of booking. The card is only used later if a late-cancellation or no-show fee applies under your policy. Where Card on file is your location’s policy, a client with no card saved gets no appointment until they add one: their time is held for 30 minutes meanwhile, and saving the card creates the appointment, already confirmed. A client who already has a saved card books straight through. A booking that also carries products you take full payment for at booking is the one exception: it is created first, and waits as “Awaiting Card” while the single combined payment settles the products and saves the card.
Require approval for online bookings
If you’ve turned on approval for online bookings - either as your location default or for a particular service - a new online booking with no payment step arrives as pending your approval rather than confirming straight away. The client is told their request has been received, and it confirms once you approve it. Bookings that pay a deposit (or save a required card) at booking confirm on payment instead - see Booking policies.Joining the waitlist
If a client picks a date that’s fully booked and you’ve enabled the waitlist, they can join the waitlist instead of leaving empty-handed.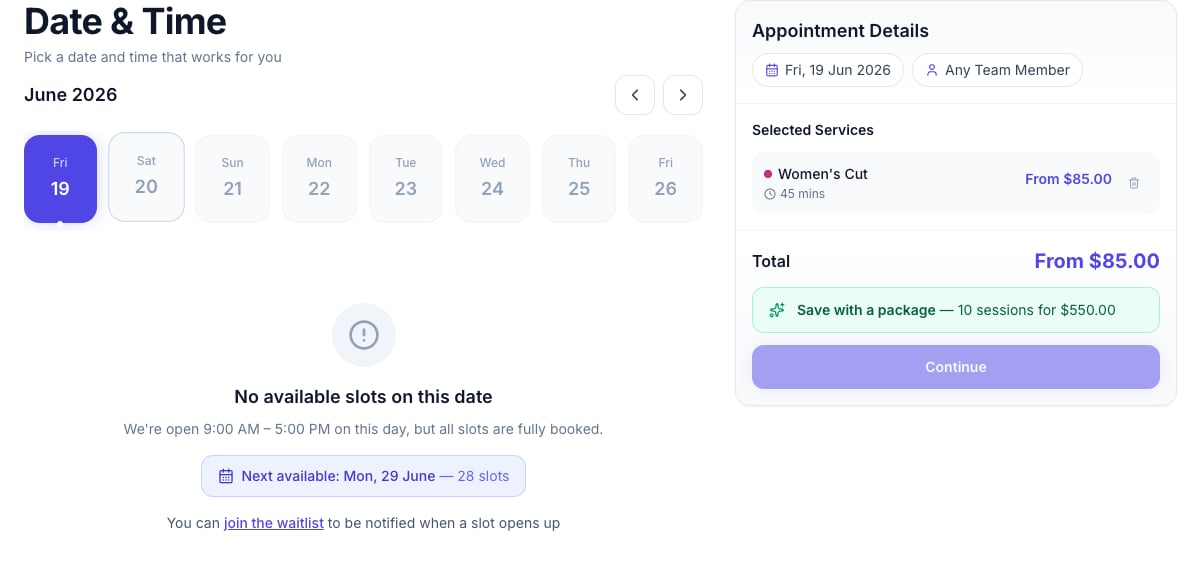
On a fully booked date, the client sees your opening hours, a shortcut to the next available date, and the option to join the waitlist.
- The waitlist option appears on the time step when the chosen date has no available slots.
- The client adds up to six preferred date-and-time ranges, with quick presets for Any time, Morning, Afternoon or Evening.
- Joining the waitlist requires the client to sign in. You’re notified, and the client is told you’ll let them know if a slot opens up.
Adding the appointment to their calendar
Clients can add their appointment to their personal calendar - no setup needed on your side:- From their emails: booking confirmations, reminders and reschedule emails include Add to calendar links (Google, Outlook and iCal) under the appointment time.
- From the booking page: the client’s appointment page shows Google Calendar and Apple / Outlook buttons for upcoming appointments, right up until the appointment finishes.
What clients see - prices, hours and your wording
- Service and category colours: the colours you set on your services and categories now carry through to the booking page. Each category shows a coloured accent on the services step, and each service has a small colour dot (falling back to its category’s colour) - the same colours your team sees on the scheduler, so your booking page feels on-brand and easy to scan.
- Prices and appointment fees: when a fixed appointment fee is on, each service or bundle card shows an all-in one-service or one-bundle price. The review step itemises the catalogue lines and adds the fee once for the whole appointment, including multi-service and bundle bookings. You can hide catalogue prices business-wide or per service, but the unavoidable fee name and amount still show before confirmation; only a price prefix (such as “From”) remains from the hidden catalogue price.
- Opening hours: you can choose whether your opening hours appear on the booking page. Hiding them doesn’t change which times are bookable - it only affects what’s displayed.
- Your wording: the booking page’s headings, button labels and intro text are editable, so the page speaks in your business’s voice. Anything you leave unset falls back to Bella’s default wording. See Online booking appearance.
Booking window and notice
- How far ahead clients can book: set a maximum booking window so clients can’t book months out. Dates beyond it are disabled in the date picker.
- Minimum notice: times that fall inside your minimum-notice window simply don’t appear, so clients can’t book too close to the appointment.
- How many appointments a day can take: set a maximum appointments per day and a day that reaches it stops offering times online. Your team can still book that day from the Scheduler.
The client’s booking portal
Alongside booking, every client gets their own area on your booking page - the booking portal. They sign in with their phone number and a code sent by text, and from there they can:- Update their own details on My profile - name, date of birth, address, photo and communication preferences. Whatever they enter flows straight onto their client record, so there’s nothing for you to re-key.
- Save a card for faster checkout, under Payment methods - the only way a card gets saved, since your team can’t key one in.
- See My appointments, My forms, My receipts, and any memberships, packages, gift cards or loyalty points they hold.
Signing in needs a mobile number - the code is sent by text, and there’s no email sign-in. A client with no mobile number on file can’t use the portal until you add one to their record.
Related
- Online booking appearance - branding, layout and wording for your booking page
- Booking policies - appointment fee, deposits, cancellation, approval, notice, booking window and appointments per day
- Payments - deposits, cards on file and what clients pay
- Share your booking page - your link, QR code and website embed
- Reserve with Google - a Book button on Google Search and Maps
- Online booking analytics - see where visitors drop off on the way to booking