

Introduction
The Scheduler is your calendar. Use it to book and move appointments, assign services and team members, and see the whole day at a glance.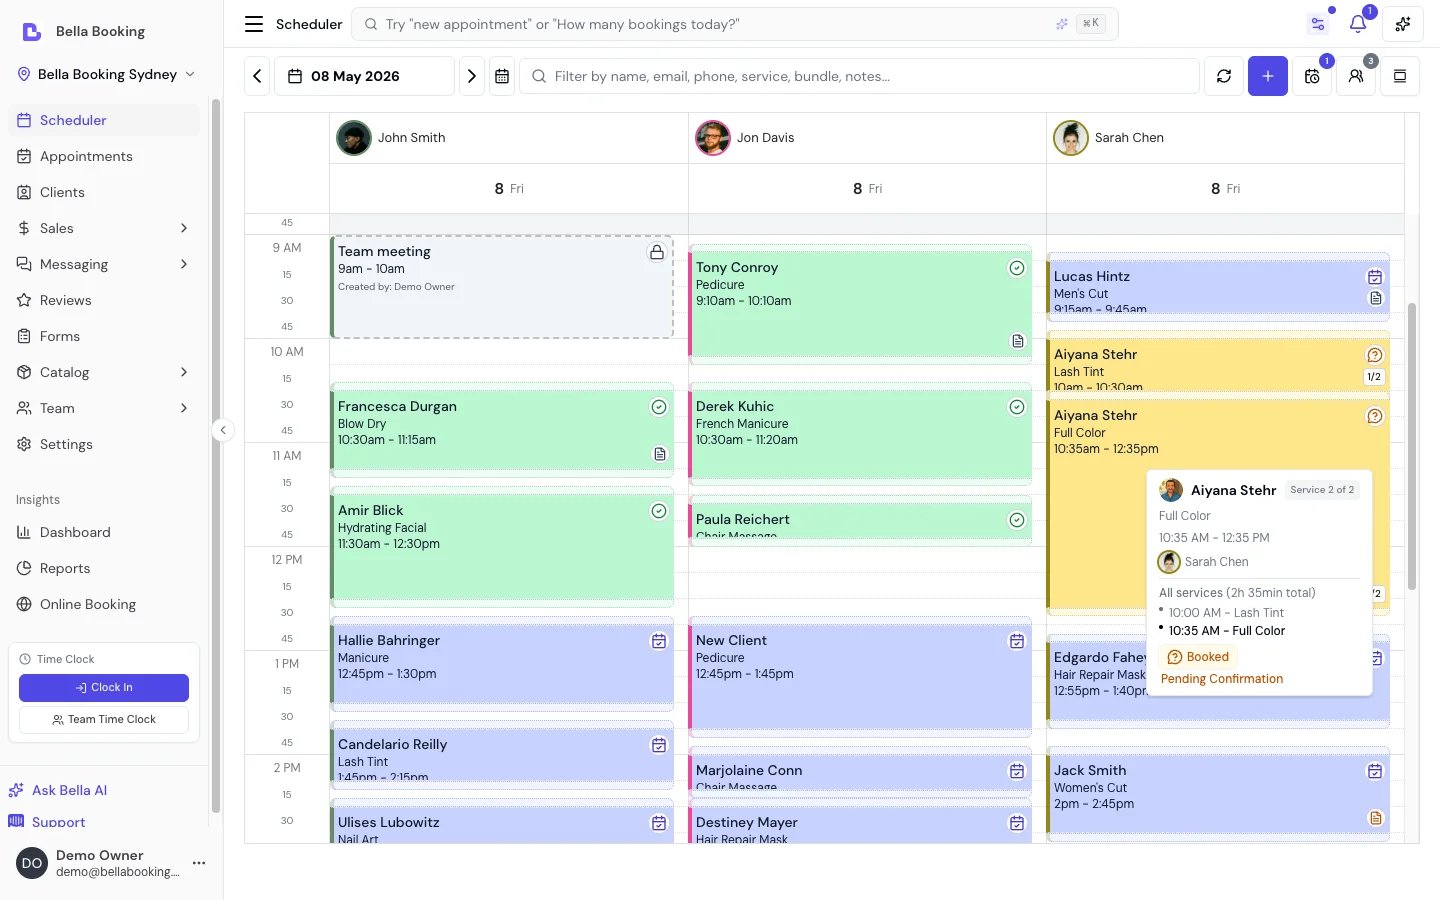
Key features
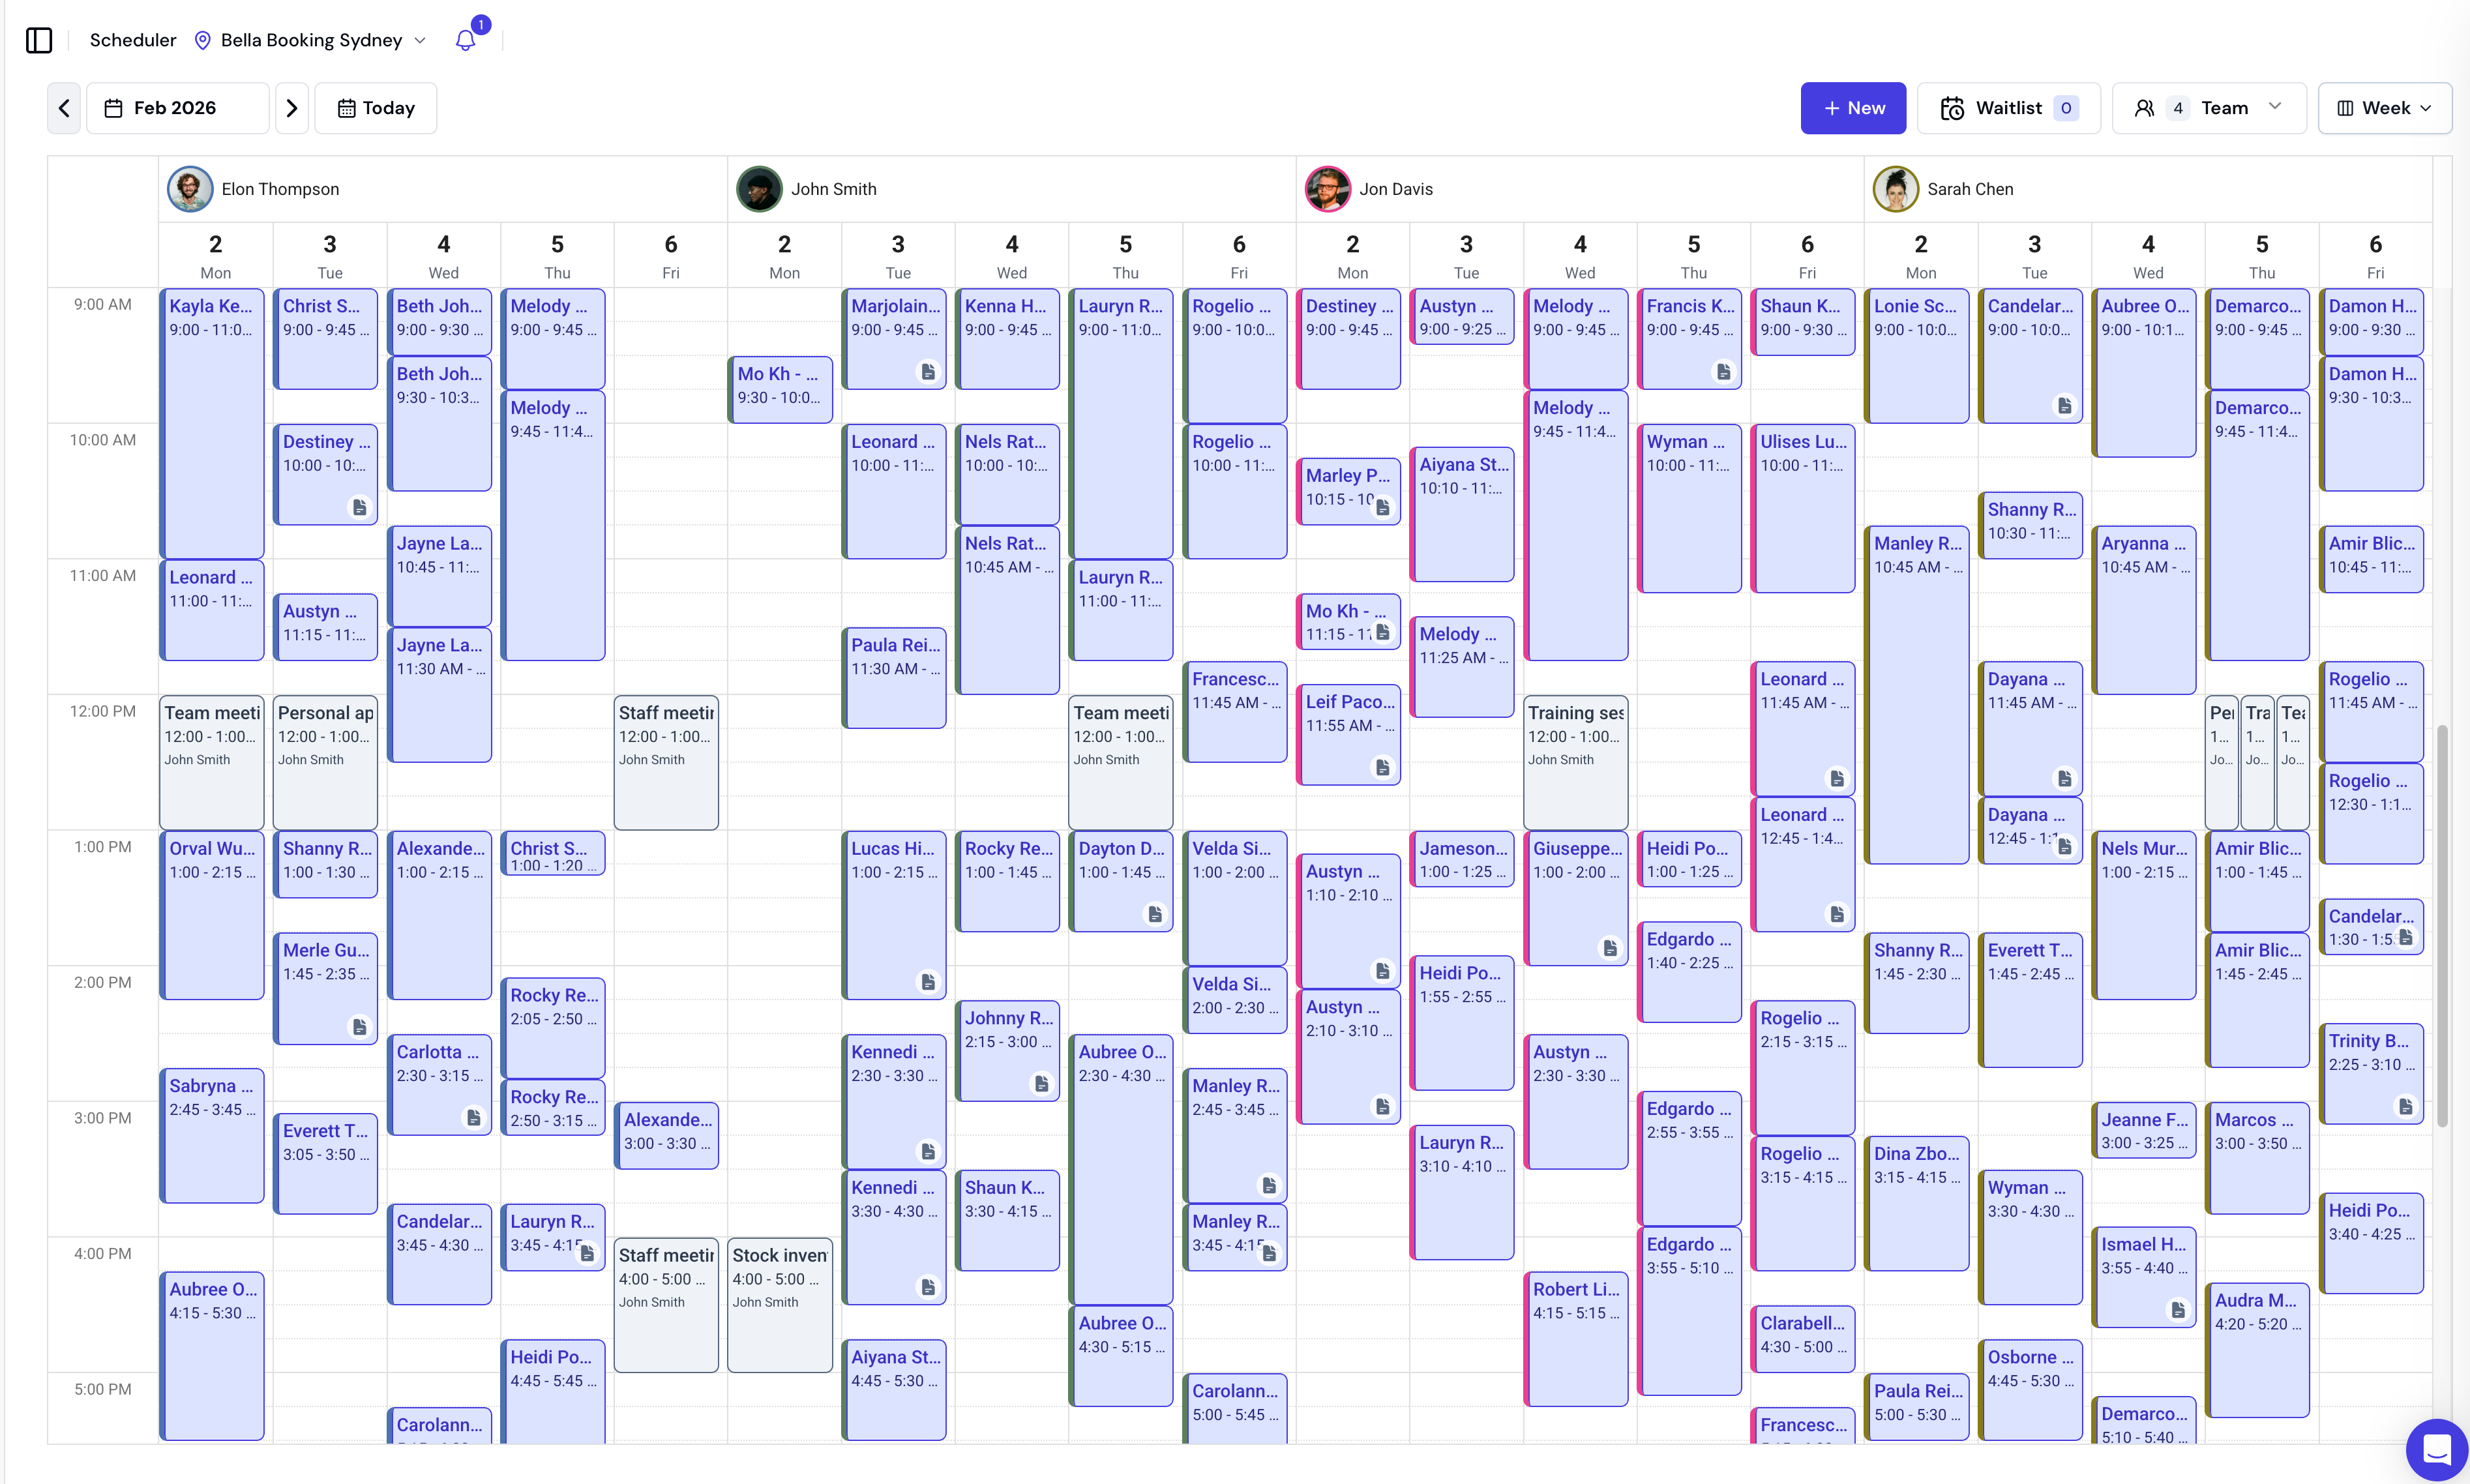
- Multiple Calendar Views: Switch between Day, 3 days, Week, Month, and Agenda views for optimal visibility of your schedule.
- Team schedule management: View and filter appointments by team member. See Team schedule for managing team working hours.
- Flexible Date Navigation: Quickly move forward or backward by day, week, or month; jump to today with a single click.
- Zoom: Adjust how finely the day is divided into rows (60m down to 5m) to see more detail or more of the day at once.
- Waitlist Management: Add, edit, book, or remove clients on the waitlist.
- Incomplete Booking Recovery: Follow up with clients who started an online booking but didn’t finish. See Incomplete Bookings.
- Comprehensive Appointment Management: Create, edit, reschedule, or cancel appointments; assign multiple services; and add client notes.
- Move an Appointment: Suggested times (“Next free time”, “Same time, a week later”), a browse-by-week list, or Pick on calendar - tap the new time directly on the live scheduler, in any week. See Moving an Appointment.
- Appointment Series: Create recurring appointments (weekly, fortnightly, monthly) in one step, with a preview of every date and any client or team-member clash. See Appointment Series.
- Shade non-working hours: Visualise team members’ working hours directly on the calendar with dimmed cells for unavailable times.
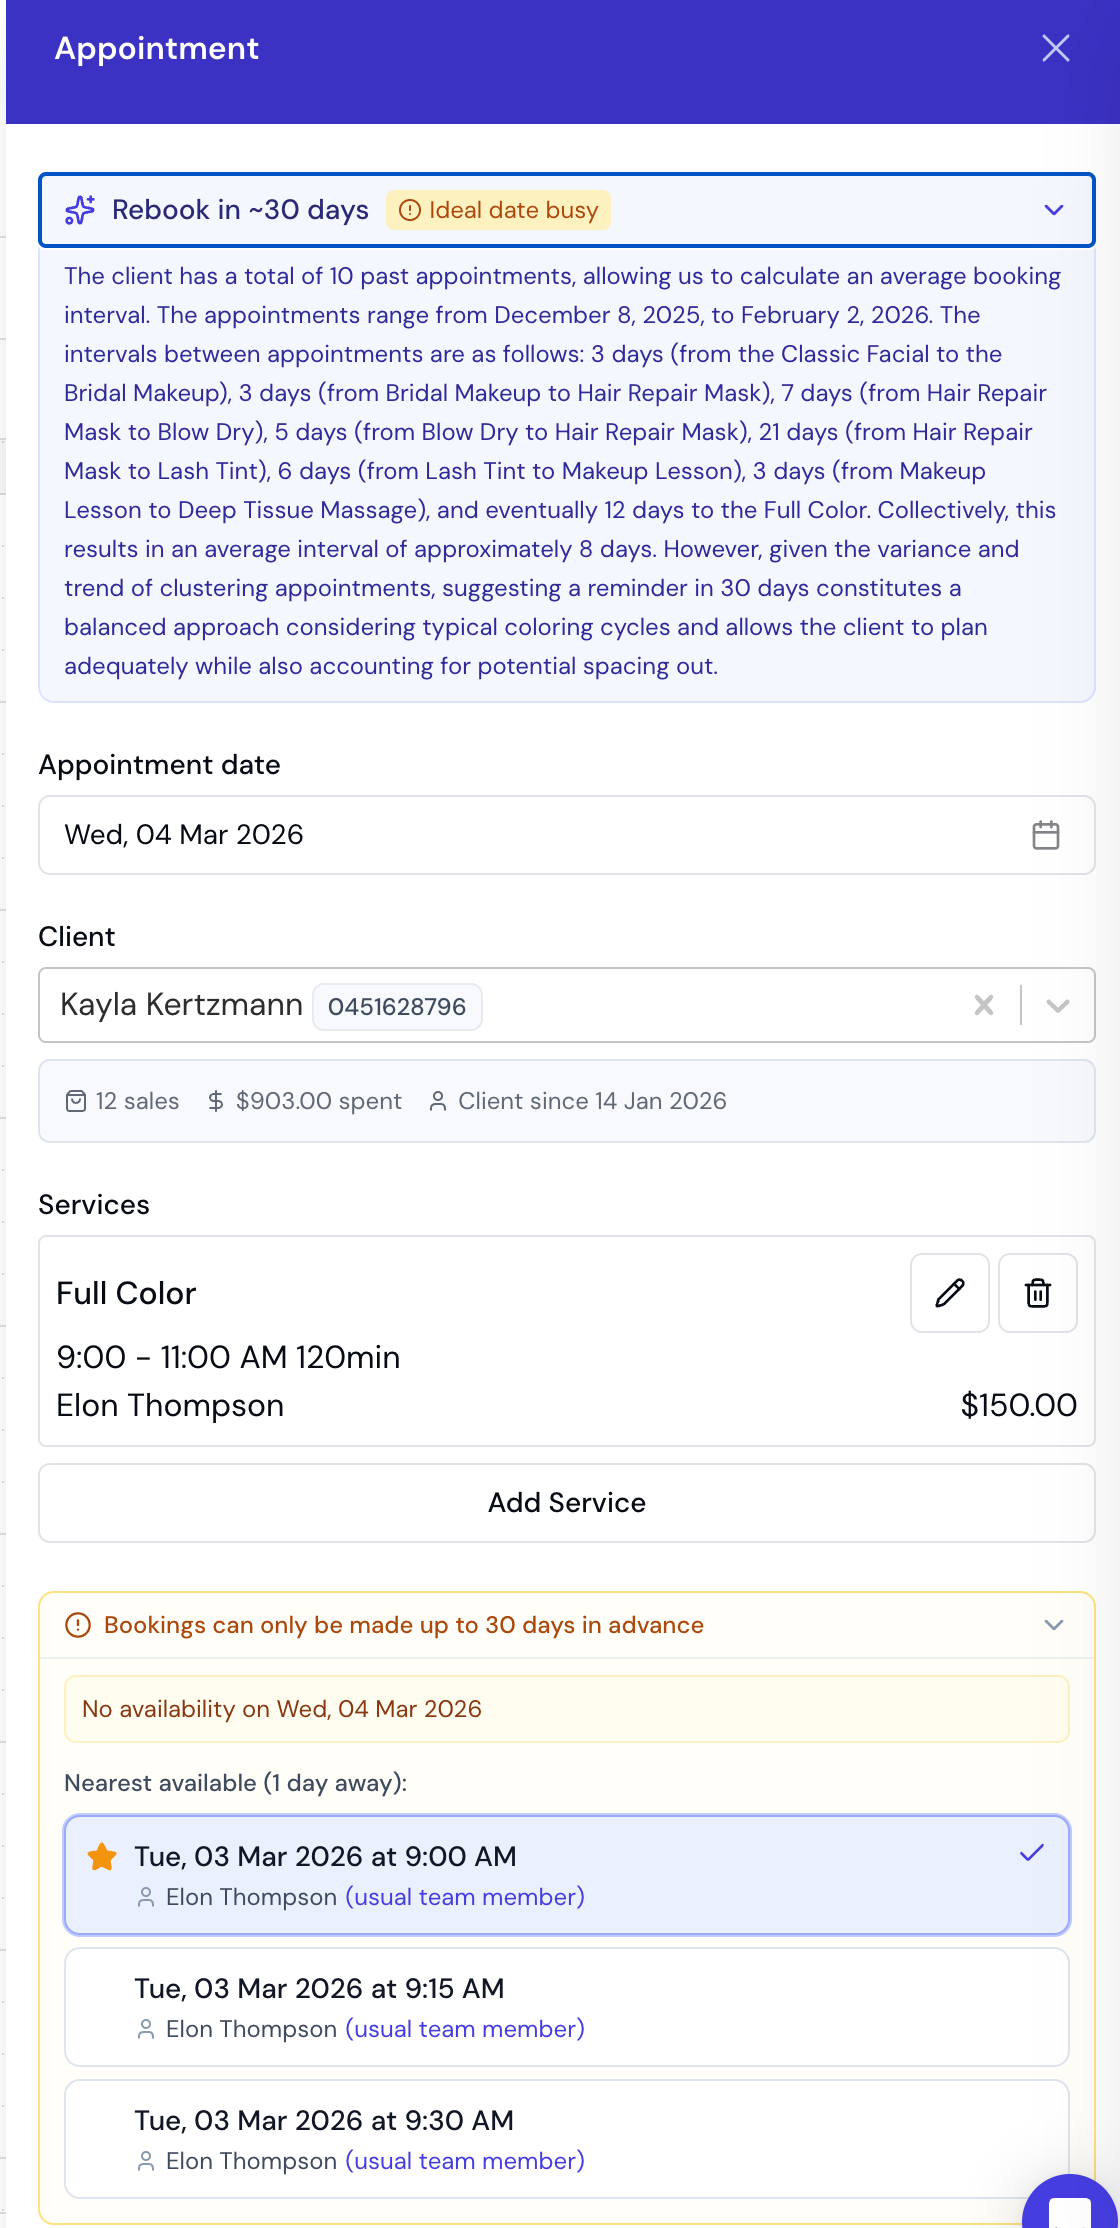
- Smart Rebooking Suggestions: AI-powered suggestions to help clients rebook based on their appointment history.
- Resend Notifications: Resend confirmation or checkout summary notifications to clients at any time.
- Refresh Button: Manually refresh the scheduler data with a single click from the header.
- Customisable Colours: Choose the background colour for appointment statuses (Confirmed, Pending, Completed, etc.), check-in (Waiting and In progress), blocked time, and non-working hours to suit your team’s workflow. See Scheduler colours.
Complete appointment workflow (end-to-end)
Understanding the full appointment lifecycle helps you manage your business efficiently. Here’s how an appointment flows from booking to completion.1. Creating the appointment
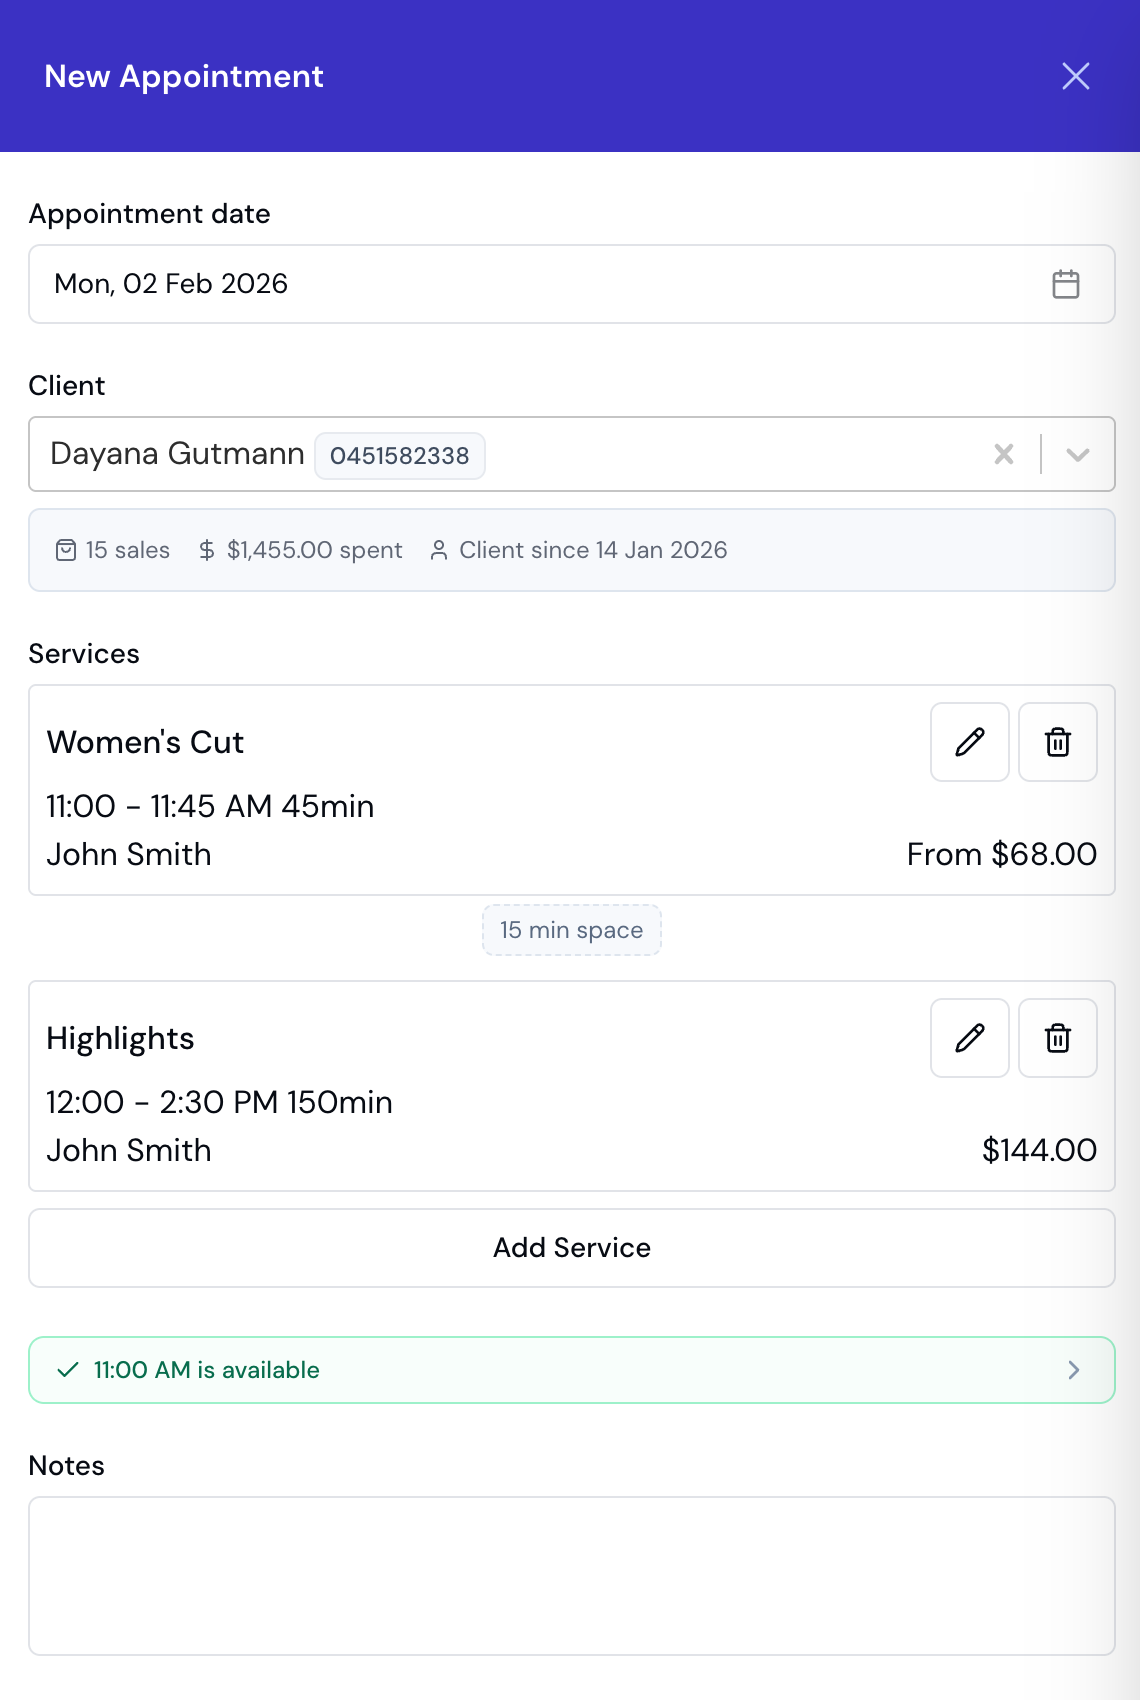
Quick Start:- Click a time slot on the calendar, click
Add Appointmentto open the appointment form - Select or create a client
- Add one or more services (and optional add-ons for each service)
- Assign a team member to perform the service(s)
- Confirm the date and time
- Add any notes (optional)
- Click Save to create the appointment
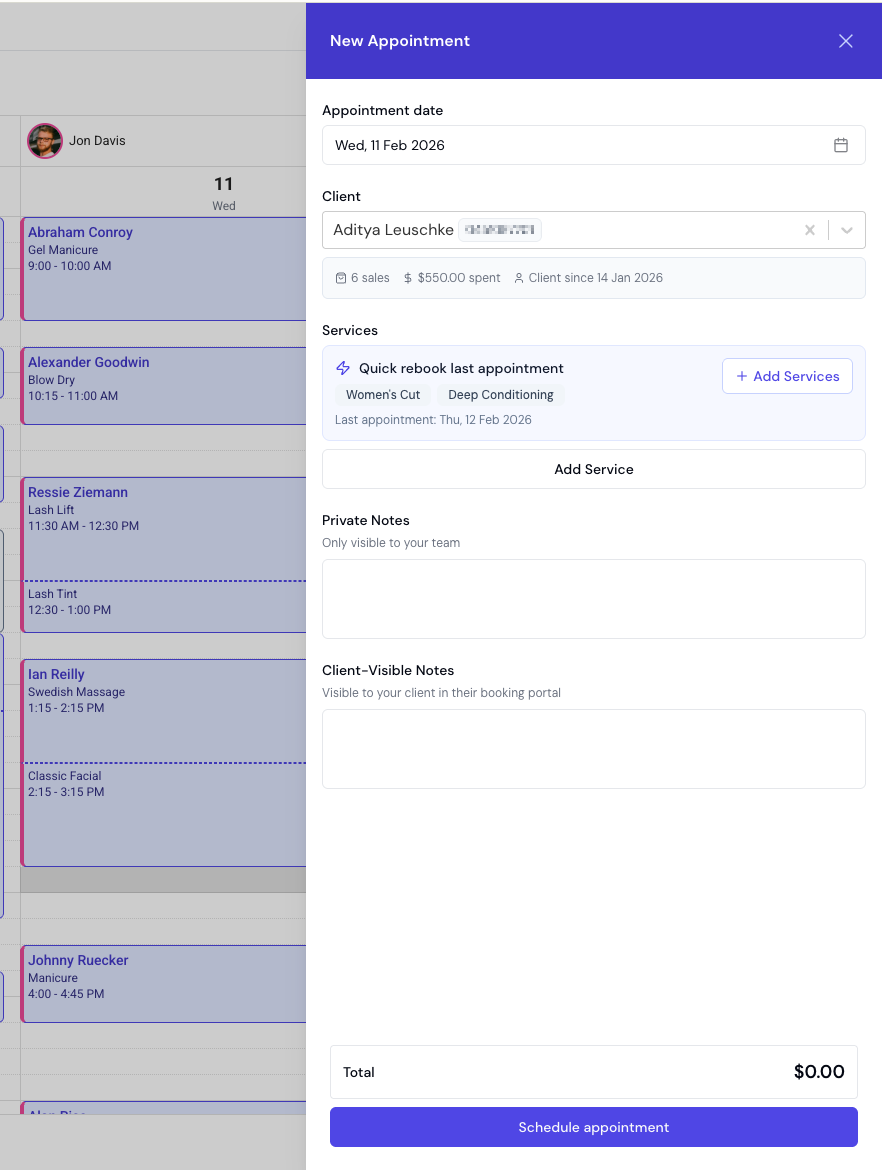
- Booking confirmation - sends immediately on save. Toggle it off if you don’t want to notify the client (e.g., you just spoke to them on the phone).
- Reminders (e.g., 24h reminder, 2h reminder) - each enabled reminder shows its scheduled send time. If the appointment is within the reminder window (e.g., booking for tomorrow when the reminder is set to 24 hours before), the toggle defaults to off and shows “Window passed - toggle to send now”. Turn it on to send the reminder immediately on save.
- The appointment appears on your calendar with a “Confirmed” status immediately
- Client receives the notifications you selected in the Notifications section
- Appointment is fully confirmed and ready to proceed
The + new menu
Everything you can create from the calendar lives behind the + New button in the scheduler header:
Each item appears only for team members who hold its permission: the first four need Appointments → Create, and New sale needs Sales → Create.
New sale opens in place, over the calendar - it doesn’t take you to the Sales screen. That’s deliberate: a team member who can take payments but isn’t allowed to see the sales history (Sales → Create without Sales → View) can still ring up a walk-in sale from the scheduler, and never lands on a page they can’t open. When they do have Sales → View, the saved sale links through to its record.
Find a time
For phone bookings or when a client requests a specific service without a preferred date, use Find a time:- Click the + New dropdown in the scheduler header and select Find a time (or press F)
- Select the client - their preferred team member and last appointment details load automatically
- Add one or more services (or click Rebook last appointment to pre-fill from their history)
- Choose a team member preference (preferred team member or any)
- Click Find available slots to browse availability across multiple days
- Select a time slot - the appointment form opens pre-filled with all details, ready to save
Days where the client already has an appointment are automatically excluded from the results.
Keyboard Shortcuts
Walk-ins: a walk-in is booked the same way as anything else - open the new appointment form and pick the client, creating their record on the spot if they are new. Every appointment belongs to a client, so there is no separate walk-in appointment type and no walk-in split in appointment reporting. For a retail sale with no appointment at all, use + New → New sale on the scheduler, which rings it up without touching the calendar.
Booking a time that has already passed: you can. Click the slot as usual - a time earlier today, or any
past date - and save. Bella flags it (“has already passed. You can still book it”) but never stops you,
because recording a walk-in after the fact, or catching up yesterday’s book, is normal for any business. Past
dates skip the availability check entirely; a passed time earlier today still shows you what else is on so
you can spot a genuine clash. Online booking is the opposite and always refuses a past time - clients
cannot book into the past.
Two appointments at the same time
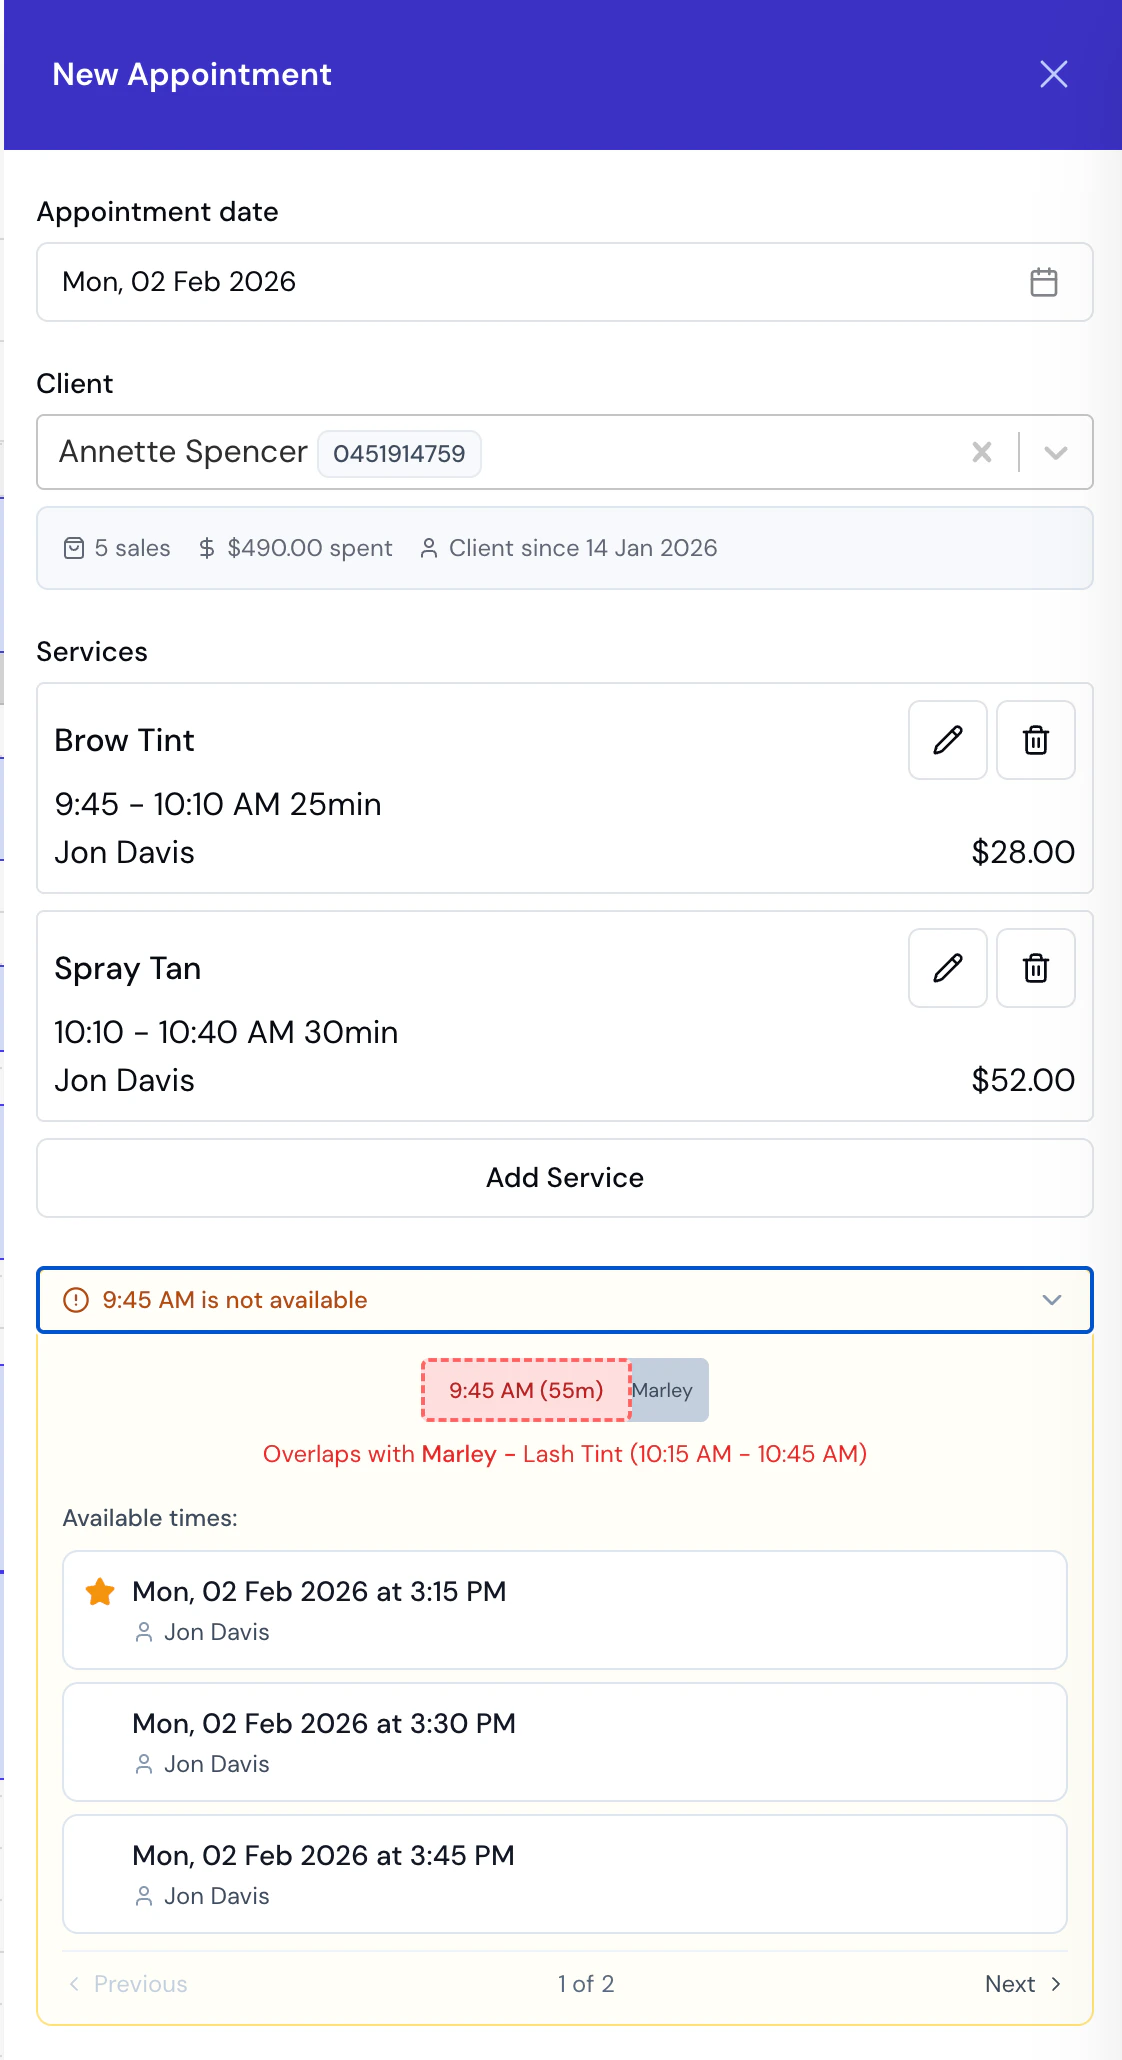
It depends on who is double-booked.- The same client, twice at once: blocked. Bella tells you ” already has an appointment at this time” and will not save, on the create form, the edit form, a calendar drag and the reschedule flow alike. One person cannot be in two places, so there is no override. To move a client onto a different service or time, edit the appointment they already have, or cancel it first and then book the replacement.
- The same team member, twice at once: allowed with a warning. Bella flags the clash and saves it anyway, because a team member genuinely can be booked over for a quick add-on, a colour check between clients, or two chairs at once.
2. Performing the service
On the day of the appointment:- The appointment appears on the calendar at the scheduled time
- The assigned team member provides the service(s)
- You can add notes during or after the service about what was done
3. Checkout and payment
When the client is ready to pay:- Open the Appointment: Click the appointment on the calendar
- Click “Checkout”: This opens the checkout screen
- Review Services: All booked services are listed with their prices, including any selected add-ons. You can change a service, add another, or add products and custom items here before you take payment.
- Add products and custom items (Optional):
- Click Add item and choose Product if the client purchased retail items
- Search by name, SKU or barcode (a USB scanner that types into the box works) and select products
- Click Add item and choose Custom item for a one-off charge with nothing in your catalogue behind it
- Product and custom item prices are added to the total
- Anything already added when the appointment was booked or edited is pre-filled here
- Review Subtotal:
- Subtotal displays total of all services (including add-on prices), products and custom items
- Select Payment Method:
- Cash - cash paid at reception
- Card (Manual) - in-person card processed outside Bella (covers EFTPOS)
- Other - bank transfer, voucher, etc.
- Card on File - charge the client’s saved card via Stripe (when available)
- Checkout summary (receipt) - send or turn off: By default Bella sends the client a Checkout summary (receipt) when you take payment (by SMS and/or email, depending on your automated-message settings and the client’s contact details). To turn it off for this checkout - for example a walk-in who doesn’t want a receipt - expand the Notifications card under Booking controls and switch Checkout summary (receipt) off (it will read “Won’t be sent”). Your global automated-message setting is unchanged.
- Complete the payment: The action button label reflects your selection - for example “Charge Visa ····4242” for Card on File, or “Record cash payment” for cash. Clicking it processes the transaction.
When there’s nothing left to collect, because a deposit, gift card, client credit, package or discount already covers the full amount, checkout skips the payment methods entirely. It shows what covered the bill - “Paid in full by the $43.00 deposit - nothing left to collect” - and a single Complete checkout button. There’s no method to choose because no money changes hands. If a deposit paid only part of the bill, you’ll still pick how you’re taking the remainder as normal.
- The appointment status automatically changes to “Completed”
- A sale record is automatically created with all services, products, custom items, and payment details
- Inventory is updated for any products sold
If the client pays later
There is no “unpaid” or “pay later” option at checkout. A sale is only created once the balance reaches zero, so an appointment the client hasn’t paid for is one you haven’t checked out yet.- Leave the appointment open. It stays Booked or Confirmed, and nothing is recorded as a sale or sent as a receipt. Filter the Appointments list by Booked and Confirmed to see everything still waiting on payment (widen the date range for older ones). Check it out on the day the client pays, using whichever method they pay with. That day becomes the sale date; if the money actually changed hands earlier, set Sale date on the checkout panel (up to 14 days back).
- Ask them to pay online. With online payments connected, send a payment link. The client pays by card in their own time and the appointment checks itself out. Without online payments the action isn’t offered.
- Take part of it now. Record what they hand over as a deposit and settle the rest at checkout. A sale can’t be completed while any of the balance is still owing.
4. Appointment status: booked vs confirmed
Understanding appointment statuses helps you track appointment lifecycle: Booked Status:- Initial status when a deposit is required or when the appointment awaits client confirmation. Which bookings are asked for a deposit follows Deposit applies to
- Appointment is created but not yet confirmed
- Client must pay the deposit (or confirm attendance) before the appointment is confirmed
- If payment fails or is not attempted, the client can retry until the auto-cancel window (if set) ends; then the booking is released
- Appointments in “Booked” status are still on your calendar but pending confirmation
- Under Pay to book, an online booking never reaches this status: it isn’t on the calendar at all until the deposit is paid, and it arrives Confirmed
- The Card on file policy works the same way for a client with no saved card: nothing is on the calendar until they save one, and the appointment arrives Confirmed. Two bookings still wait here as “Awaiting Card” - one where a service or membership override asks for the card and your own policy doesn’t, and one carrying products you take full payment for at booking, which is created first so its single combined payment can settle them and save the card
- Final status indicating appointment is fully confirmed
- Business-created appointments: Start as “Confirmed” immediately - unless a deposit is required (held as “Booked” until the deposit is paid, recorded, or waived) or a client-confirmation window is enabled
- Online bookings without deposit: Start as “Confirmed” immediately
- Online bookings with deposit, Book now, pay within a window: Start as “Booked”, become “Confirmed” when payment succeeds
- Online bookings with deposit, Pay to book: Created only when the deposit is paid, and created “Confirmed”
- Online bookings under Card on file: Created only when the client saves a card, and created “Confirmed”
- Clients receive confirmation notifications when status changes to “Confirmed”
- Confirmed appointments are guaranteed and ready to proceed
- You can manually confirm appointments if needed
- Click on the appointment and use the confirm option
- Useful for appointments that were created in “Booked” status
- Confirm and Approve always open a confirmation first. Turn off Notify the client to skip the client message. When notify is on, the dialog lists whether Email and SMS will send, or why not. If the booking is waiting on a saved card, the same dialog warns that approving waives the card.
- Business User Creates (no deposit): Booked → Confirmed (immediate)
- Business User Creates (deposit required): Booked → (deposit paid, recorded, or waived) → Confirmed
- Online booking (No Deposit): Booked → Confirmed (immediate)
- Online booking (Deposit Required, Book now, pay within a window): Booked → (payment succeeds) → Confirmed
- Online booking (Deposit Required, Pay to book): time held → (payment succeeds) → Confirmed, with no Booked step
- Online booking (Card on file, no saved card): time held → (card saved) → Confirmed, with no Booked step
5. Automatic sale creation
Important: When you complete the checkout process, Bella Booking automatically creates a sale record that includes:- All services performed
- All products sold
- Any custom items charged
- Payment method used
- Total amount paid
- Date and time of transaction
- Link to the original appointment
- Go to the Sales section to view all completed transactions
- Each sale is linked back to its appointment
- You can view, edit, or refund sales from the Sales section
- Complete transaction history for reporting
- Accurate revenue tracking
- Easy refund processing
- Client purchase history
- Team member performance tracking
Step-by-step features
Calendar navigation
- Switch Views:
Open Display in the scheduler header and pick
Day,3 days,Week,Month, orAgenda. 3 days shows three consecutive days side by side - the sweet spot on a phone, where a full week’s columns get narrow.
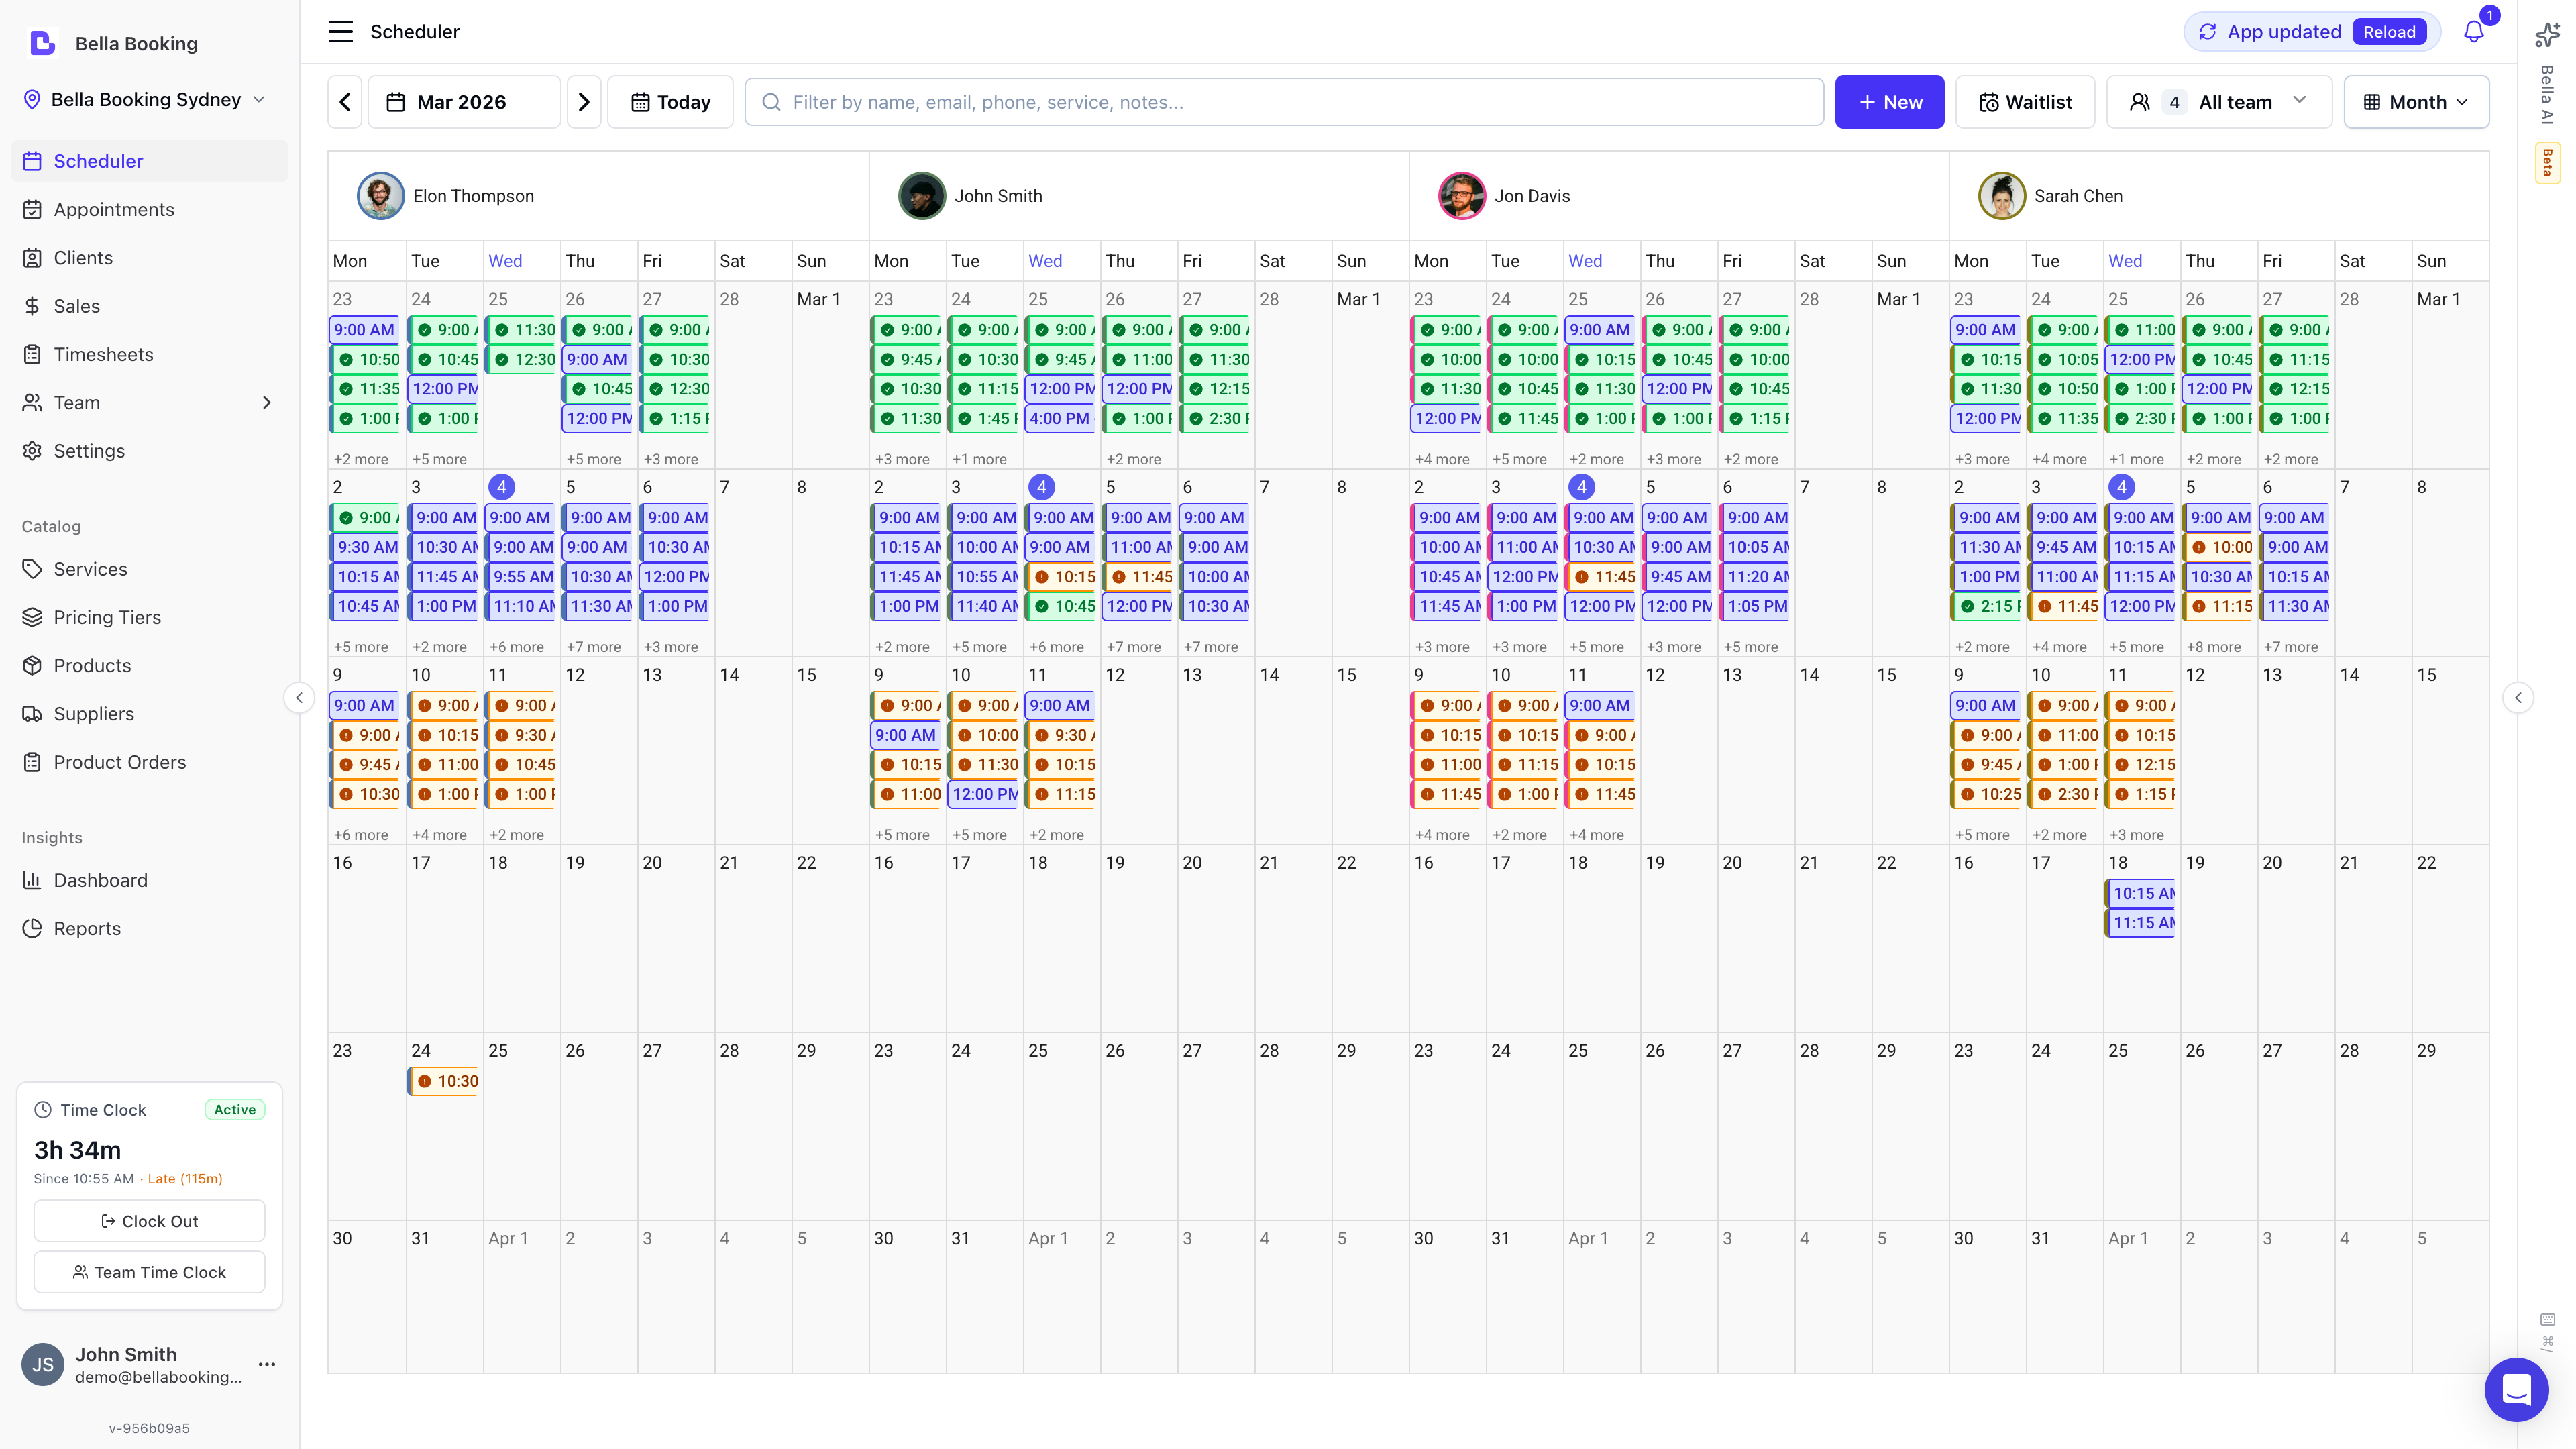
- Zoom: In the same Display menu, the Zoom control sets how finely the day is split into rows - 60m, 30m, 15m, 10m, or 5m. See Display & view controls below for everything in that menu.
- Move Through Dates:
Use the forward and backward arrows or the date picker to jump to specific dates.
Click
Todayto return instantly to today’s schedule. The calendar keeps the day you were looking at when you leave the Scheduler and come back later the same day. A new browser tab, or the next morning, opens on today. - Jump ahead:
Under the calendar in the date picker sit four one-tap chips - +1 week, +4 weeks, +6 weeks and +2 months - for the horizons you rebook on most, so nobody counts weeks by hand. Each chip counts from the date you are looking at, so taps add up: open the picker on today and +6 weeks lands six weeks out; tap +1 week again and you are seven weeks out.
Todaybrings you straight back. The same chips appear in Find a time (extending how far ahead to search), on the week strip when moving an appointment, and on the appointment form’s own date picker.
Display & view controls
Click Display in the scheduler header to open Display settings - the controls that change how the calendar is laid out. They are personal view preferences: they affect only your screen, not your settings and not what clients see. They are saved to your profile, so they follow you when you sign in on another device - the one exception is the view (Day / 3 days / Week / Month / Agenda), which stays with each device, since a phone and a desktop genuinely want different answers. Your team-member and resource column selections are per location; pick them once per site. Anything the business decides about the board - Colour by, the status and check-in colours, working hours enforcement, buffers - lives on Settings → Scheduling, which the menu links to at the bottom if you can manage settings.Visible hours is only what your grid shows, not anyone’s working day. If appointments fall outside the range, an amber outside range button appears in the header on a wide screen, listing them with one click to expand the view far enough to bring them back into sight.
Column names come from your team members and resources. Each column is automatically labelled with the team member’s name (or the resource’s name in Resources view) - there is no free-text column rename. To change a column’s label, rename the team member or resource. Use the team & resource filter to choose which columns appear.
Edit a roster from the column header. In team view, click a team member’s name at the top of their column for quick schedule actions: Edit this day (custom hours for the date you’re viewing), Edit working hours, Add time off, plus links to their profile and the full Team schedule. Shown to people who can manage the team schedule; for everyone else the header is just a label.
Which day the week starts on is a business setting, not a display preference - it’s seeded from your country and changed in Business settings, with a read-only pointer on Settings → Scheduling. Week view, rosters and date pickers all follow it.
Column order is set by dragging on Team (for team-member columns) or Resources (for resource columns). There is no drag-to-reorder on the calendar headers themselves - change the list order and the scheduler follows it. In Week view, a separate choice - Arrange by - controls whether those columns nest under each team member/resource or under each day.
On a phone, the scheduler switches to a compact, touch-optimised layout: the header controls tuck into a smaller toolbar and you tap an appointment to open it. In Day view the whole team fits on screen at once - columns share the width evenly, and card labels turn sideways when columns get tight (see Keep narrow cards readable above). For seeing ahead, the 3 days view shows three readable columns instead of seven squeezed ones, and Week view keeps its columns readable too: they hold their width and the week pans sideways, so you swipe across the full seven days rather than squinting at slivers. Creating, editing, dragging and checkout all work the same as on desktop.
Prices on the hover tooltip
Hover an appointment on the calendar and its tooltip shows the money alongside the details: each service line’s booked price, any add-ons as a+ amount under their line, and a bundle’s total on the bundle’s own row (a bundle is sold as one price, so its component lines don’t repeat it). An appointment total appears only when it tells you something the lines don’t already - several services, or priced add-ons that change the all-in figure. Amounts carry the service’s Price prefix (usually “From”) wherever the final figure can still move. Once an appointment is completed, the tooltip shows Total paid - what was actually charged, with the payment method - in place of the expected price.
Team members without the View client financials permission get the same tooltip with no money in it. The amounts are removed on the server before the calendar is sent, so nothing sensitive reaches their screen. See Team permissions.
Team and resource filters
The scheduler includes a powerful filter to view appointments by team members, resources, or both. Accessing the Filter: Click the Team & resources filter button (showing a count badge) in the scheduler header to open the filter dropdown. This is a different control from Filters, which narrows by status, booking source and tags. Filter Presets:
Custom Filtering:
Below the presets, you can toggle individual team members and resources:
- Team members: Toggle specific team members on/off to show/hide their columns and appointments
- Resources: Toggle specific resources on/off to filter appointments by resource
- If no resources are selected: All appointments are shown
- If any resources are selected: Only appointments with those resources are shown
- By team member (or By resource) - today’s default. Each column is one team member or resource, with all seven days of the week underneath it.
- By day - flips the nesting: each column is one day of the week, with every team member or resource side by side underneath it. Handy for comparing who’s doing what on the same day across the whole team, the way you’d otherwise compare one person’s whole week.
Appointments for resource-only services (where no team member is assigned) only appear when viewing by resource. Switch to the Resources grouping mode or select specific resources in the filter to see these appointments. See Resources - Scheduler Resource View for details on switching between team member and resource views.
- Each team member’s avatar displays a coloured ring matching their scheduler colour
- Appointments display a left border in the team member’s colour for quick visual identification
Filters (status, booking source, tags)
Use the Filters button in the scheduler header to narrow which appointments appear on the calendar. A small dot on the button means something differs from the defaults; Reset puts everything back.
Cancelled appointments do not block availability or Find a time - they are display-only when Filters includes Cancelled. Filters are session-only: reloading the page restores the defaults.
The Cancelled colour under Settings → Scheduling → Scheduler colours fills those cards in both Colour by modes.
Shade non-working hours
In Day, 3 days and Week views, time outside each team member’s working hours is shaded by default, so their scheduled hours stand out on the calendar. Turning the shading off:- Click Display in the scheduler header to open Display settings
- Find the Shade non-working hours toggle
- Turn it off if you want a plain grid with no dimmed cells
- Time slots outside working hours are filled with a solid shade
- Time slots within working hours keep the normal background
- Each team member’s column shows their individual schedule
- You can choose the shade colour under Scheduler colours
- The shading is always on and cannot be turned off
- Dimmed cells show a
not-allowedcursor and cannot be clicked - Clicking a dimmed cell shows a message indicating the team member is not scheduled to work at that time
- If a service’s duration extends past working hours, the appointment form shows a red warning and the submit button is disabled
Editing or rescheduling an appointment
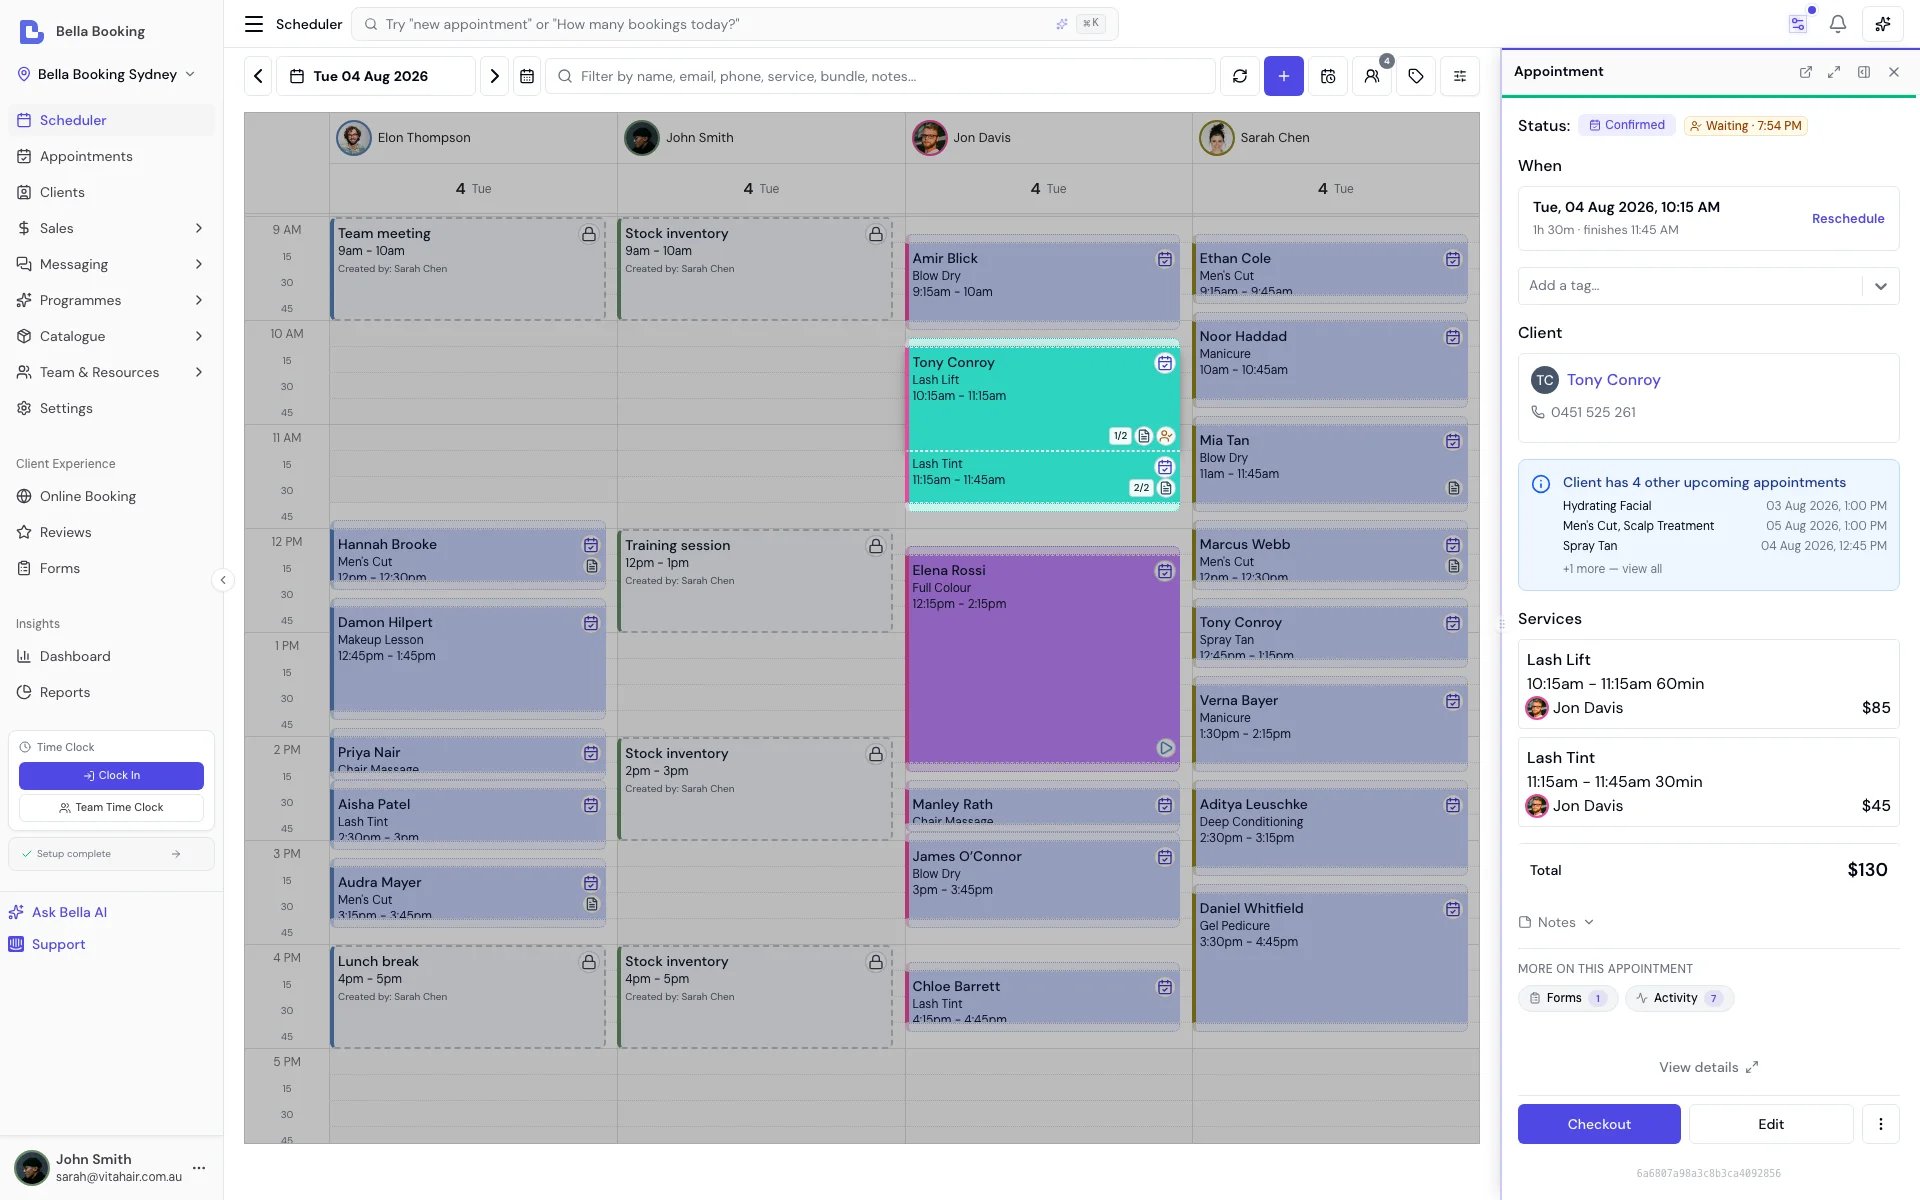
- Click an appointment on the calendar.
- Click Edit.
- Change the client, services, team member, date, time, or notes.
- Click Update. The appointment summary stays open, with Checkout still on the toolbar. Check in and Start show when they apply.
Resending notifications
You can resend appointment notifications to clients from the appointments list. How to resend:- Open Appointments.
- Click the three-dot menu on the appointment row.
- Select Resend confirmation (Booked or Confirmed), Send reminder, Send rebook reminder, Send review request, or Resend checkout summary (Completed).
- Review the preview (the same dialog as the appointment Activity tab) and confirm before the message is sent.
Use cases:
- Client didn’t receive the original notification
- Client needs the appointment details again
- Sending a reminder before the appointment
- Resending the checkout summary/receipt
Cancelling or deleting an appointment
Cancelling (recommended):- Open the appointment from the scheduler, the appointments list, the client’s Appointments tab, Messages, or a series overview.
- Open Actions on the scheduler preview or appointment page, or the three-dot menu on the list, client file, Messages, or a series row, and select Cancel. Cancel is also available for a completed appointment (it does not sit on the status chip).
- Select a cancellation reason from the dropdown if prompted, and optionally add a cancellation note with additional details.
- Turn off Notify the client if you want to cancel without sending the cancellation message. When it is on, the dialog lists whether Email and SMS will send, or why not. A completed appointment never sends one.
- The appointment status changes to “Cancelled” and remains visible for reporting.
- Open a cancelled appointment (or find it on the appointments list or the client’s Appointments tab).
- Click the three-dot menu and select Permanently delete. This needs the delete-appointments permission.
- Confirm the action.
Cancelling is recommended over deleting because cancelled appointments are preserved for reporting and history. Deleted appointments are permanently removed. You cannot permanently delete a live appointment: cancel it first.
- Cancellation Policies: If you have cancellation policies configured, they determine refund amounts
- Policy Evaluation: The system evaluates whether the cancellation is made with at least the required notice
- Refund Calculation:
- Cancellations with at least the required notice receive full refunds
- Cancellations with less than the required notice may have fees applied based on your policy
- Automatic Processing: Refunds are processed automatically through Stripe to the original payment method
- Business Override: As a business user, you can override the calculated refund amount for special circumstances
- Default Policy: Your default cancellation policy applies unless overridden at the service level
- Service-Level Overrides: Individual services can have their own cancellation policies
- Multiple Services: When an appointment includes multiple services, the most restrictive policy applies (shortest cancellation period, highest fee percentage)
- If self-service cancellation is enabled, clients can cancel appointments online themselves
- If disabled, clients must contact you directly to cancel
- When a cancellation policy is configured, online cancellation with less than the required notice is only available for appointments with deposit payments
- Appointments cancelled with at least the required notice can be cancelled online regardless of deposit status
- Business users can always cancel appointments regardless of self-service settings or deposit status
Blocked time management
Block out time when team members are unavailable for appointments, such as breaks, meetings, or personal time.Adding blocked time
There are two ways in:- Click an empty time slot on the calendar. A short menu appears offering Add appointment, Add appointment series and Add blocked time - choose Add blocked time and that slot’s team member, date and time are carried straight into the form.
- + New → Add blocked time in the scheduler header, when you’d rather fill in the details yourself. See The + New menu.
- Team Member: Select who is unavailable
- Date: Date of the blocked period
- From: When the blocked period begins
- To: When the blocked period ends
- Description (optional): notes about the blocked time like the reason
- Scheduler colour (optional): the colour this block takes on the calendar. It uses your business-wide blocked time colour unless you pick one here. See Scheduler colours
- Frequency: Change if this blocked time repeats (daily, weekly, etc.)
Blocked time is also visible on the Team schedule page as badges in the blocked time colour, so managers can see breaks alongside working hours when planning rosters. A block with its own colour uses that colour on the badge too. You can also add breaks directly from the Team schedule grid using the Add break action on any cell.
Recurring blocked time
For regularly scheduled breaks or time off:- Change the Frequency option
- Select pattern (Every day, Every week, Every fortnight, Every month)
- Set end date for the recurrence or leave open-ended
Editing or deleting blocked time
- Click on a blocked time block in the calendar
- Change any field to modify the details or timing and click Update
- Choose Delete to remove it
Buffer blocks on the calendar
When a service or bundle has buffer time configured (Buffer before or Buffer after), the scheduler displays buffer blocks - grey striped blocks that appear immediately before and/or after the appointment. How buffer blocks look:- Buffer blocks appear as small, muted blocks with a diagonal stripe pattern
- They sit directly adjacent to the appointment they belong to
- Each block displays “Buffer” and the team member’s colour
- Not draggable: Buffer blocks cannot be moved independently. They always move with their parent appointment
- Clicking opens the appointment: Clicking on a buffer block opens the parent appointment’s details panel, not a separate editor
- Visual indicator only: Buffer blocks show when a team member is blocked for setup or cleanup - they are not separate appointments
- Buffer before: Setup or preparation time before the appointment. The team member is unavailable during this period
- Buffer after: Cleanup or reset time after the appointment. The team member is unavailable during this period
Buffer time is configured per service or bundle in the Service Catalog. Location-level defaults can be set in Scheduling Settings.
Drag-and-drop scheduling
The scheduler supports drag-and-drop for quick rescheduling and adjustments. Dropping a card asks first. By default, releasing a drag opens the same confirmation as picking on the calendar: the new time, who performs it, any overlap warning, and a Notify the client toggle when the change would send the reschedule message (a drop that keeps the appointment’s start time - like handing it to another team member at the same slot - says so instead, and sends nothing). Move appointment saves it; Keep choosing puts the card back. Nothing is saved or sent until you confirm. Prefer the old instant drop? Turn Ask before moving off in the Display menu - the confirmation itself links there.Rescheduling appointments
- Click and hold on an appointment block
- Drag it to a new time slot
- Release, review the confirmation, and tap Move appointment
Moving appointments between team members
- Click and drag an appointment
- Drop it in another team member’s column/row
- Release and confirm to reassign
Adjusting appointment duration
- Hover over the bottom edge of an appointment block
- Click and drag to extend or shorten the appointment
- Release when the desired duration is reached
- The system recalculates timing
Recurring appointments never save mid-drag. Dropping a card that belongs to a series - or dropping it on another day and choosing Move all services - asks This appointment only / This and all future first: nothing moves until you choose, and dismissing the prompt keeps the old time, whether Ask before moving is on or off. The one exception is Move just this service, which splits that line off into its own new appointment rather than moving the series.
Moving an appointment to another time or week
Drag-and-drop only reaches the days currently on screen. To move an appointment anywhere - including a different week - open the appointment and tap Reschedule beside its date (or from the ⋮ menu). One screen offers three ways to pick the new time:
Picking on the calendar:
- Open the appointment and choose Reschedule → Pick on calendar (or ⋮ → Move on calendar)
- The calendar shows with a floating pill: “Moving [client]‘s appointment - tap a new time”
- Navigate to any day or week with the arrows, date picker, or view switcher
- Tap the new time slot
- Review the confirmation - the new time, every service’s new time, who performs it, and any overlap warning - then tap Move appointment
- The whole appointment moves together. Every service keeps its position within the appointment - a facial at 2:00 pm followed by brows at 3:00 pm stays back-to-back wherever it lands. To move just one service to a different day, drag that service instead - the scheduler offers to split it.
- Tapping another team member’s column moves the appointment to that team member (single-team-member appointments only) - the confirmation says so explicitly, e.g. “with Jess (was Sarah)”, and keeps the booked price unchanged. Appointments involving several team members, and parties, keep their whole team - the tap just sets the new time.
- A busy team member is allowed. Your calendar, your call - a warning appears in the confirmation when the new time overlaps something else on that team member’s column, and you can move it anyway. Confirming still refuses the same client twice at once, and a time Enforce working hours rules out; both are checked at that point, so the move is rejected rather than warned about (see Two appointments at the same time above).
- Notify the client in the confirmation controls whether the client receives the reschedule message.
- On the scheduler grouped by resource, the appointment keeps its room - change rooms from the appointment panel.
Rebooking from the calendar
Rebook creates a new appointment from a previous one - it does not move the original. On the scheduler it uses the same tap-a-time flow as moving:- Open the appointment and choose Actions → Rebook (or the ⋮ on the appointments list or client file)
- The calendar shows with a floating pill: “Rebooking [client] - click a time to book”, opened on the suggested next date from their history
- Stay there or navigate to any other day or week, then tap the time
- Review the confirmation - the copied services, who performs it, any overlap warning, and a deposit line if your policy requires one - then tap Book appointment
- The client gets a new-appointment message, not the reschedule message. Notify the client on the confirmation controls whether it sends.
- A required deposit uses the policy default. To waive it, charge a card on file, change the service, add notes, or start a series, tap Review in form.
- Edit and Checkout stay in the form. Those change or settle the existing appointment; they do not create a new one.
- After checkout, Rebook appointment still opens the form (so the suggested date is visible) - Pick on calendar is at the top of Scheduling if you would rather tap the grid.
- Rebook from a client’s appointment history opens the scheduler in a new tab (so the client record stays open). Rebook from the appointments list or the full appointment page stays in the same tab.
Rebooking suggestions
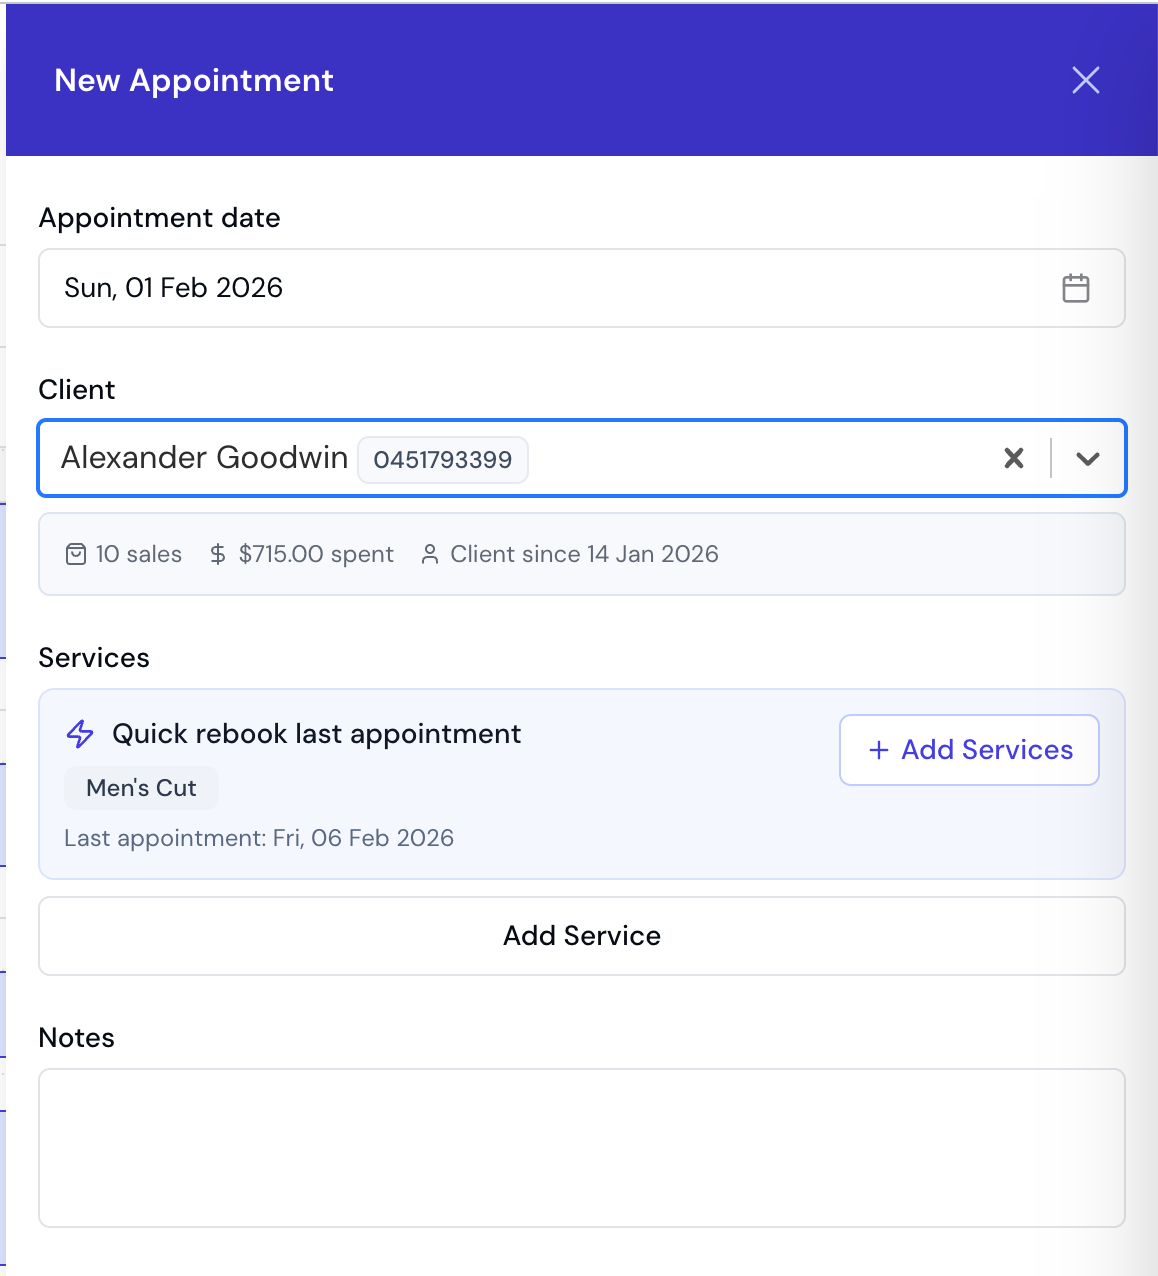
Bella Booking can intelligently suggest rebooking options based on a client’s appointment history. How it works: When you create a new appointment for an existing client:- The system analyses the client’s previous appointments
- It identifies their most frequently booked services
- Suggests the same services and team member combination
- Open the appointment creation form
- Select a client who has previous appointments
- If suggestions are available, you’ll see a “Suggested” section
- Click to apply the suggestion, which pre-fills:
- Previously booked services
- The team member who performed the service
- Adjust the date and time as needed
- Save the appointment
- Faster appointment creation for returning clients
- Consistent service delivery
- Helps maintain client-team member relationships
- Reduces time spent selecting services manually
FAQs
Q: How do I switch between different calendar views? A: Use the Day, 3 days, Week, Month, or Agenda buttons at the top of the Scheduler. Q: Can I change the services on an appointment and keep the time? A: Yes. Click the appointment, then Edit. Remove a service and add the one you want, then Update. Start time follows the first service. If you remove every service, Start time still shows the time the appointment had when you opened Edit, and the next service you add starts at that time (on the next 5-minute step if the saved time falls between steps). A service you add while another is still listed starts after the last one. See Editing or rescheduling an appointment. Q: How do I move an appointment to a different week? A: Open the appointment, tap Reschedule beside the date, and either take a suggested time or choose Pick on calendar - browse to any week and tap the new slot. See Moving an Appointment. Q: Can I see appointments for only one team member? A: Yes, use the team filter to display only the selected team member’s appointments. Q: Can I see cancelled appointments on the scheduler? A: Yes. Open Filters in the scheduler header and tick Cancelled under Status. By default cancelled appointments are hidden. Reset restores the default (Cancelled off). Q: How do I block out time for lunch breaks or meetings? A: Click an empty time slot and choose Add blocked time (or use + New → Add blocked time in the header), fill in the details, and save. You can make it recurring for regular breaks. Q: Can I sell products during appointment checkout? A: Yes - and you don’t have to wait until checkout. Click Add item under Items and choose Product when creating or editing the appointment, or at checkout. Adding a line early secures the stock straight away, so the last units can’t sell online before the client arrives, and the lines pre-fill at checkout to settle with the rest of the bill. You can add ad-hoc Custom item charge lines from the same menu, in any mode. Q: Can I delete a recurring blocked time? A: Yes. You can delete a single instance, this and future instances, or all instances of the recurring block. Q: How do rebooking suggestions work? A: When creating a new appointment for an existing client, Bella Booking analyses their appointment history and suggests their most frequently booked services and team members. Click the suggestion to pre-fill the appointment form. Q: Why don’t I see rebooking suggestions for a client? A: Rebooking suggestions are based on completed appointments. New clients or those without recent completed appointments won’t have suggestions available. Q: Why can’t I click on certain time slots? A: If Working hours enforcement is enabled, time slots outside a team member’s working hours are blocked. These slots appear dimmed with a striped pattern and show anot-allowed cursor. To create appointments outside working hours, disable the enforcement setting in Settings → Scheduling.
Q: Can I see when team members are available?
A: Yes. Shade non-working hours is on by default in Day, 3 days and Week views, so time outside each team member’s scheduled hours is already dimmed. Open Display in the scheduler header if you want to turn it off. Working hours enforcement keeps it on for everyone.
Q: Can I resend appointment notifications to a client?
A: Yes. Click on any appointment, then use the menu (three dots) and select “Resend confirmation” or “Resend checkout summary”. This sends the appropriate notification via SMS and/or email based on your automated messages settings.
Q: What notification is sent when I resend for a completed appointment?
A: For completed appointments, the checkout summary notification is sent. For booked or confirmed appointments, the confirmation notification is sent.
Q: Why can’t I see a resource-only appointment on the scheduler?
A: Appointments for resource-only services (no team member assigned) only appear in the resource view. Switch to the Resources grouping mode using the filter button in the scheduler header. In team member view, these appointments are not visible because they have no team member column to appear in.
Q: What are the grey striped blocks before or after appointments?
A: Those are buffer blocks. They represent buffer time (setup/cleanup) configured on the service or bundle. Buffer blocks show when a team member is blocked and unavailable for other appointments. They cannot be dragged independently - clicking them opens the parent appointment.
Q: Why can’t I drag a buffer block?
A: Buffer blocks are tied to their parent appointment and cannot be moved separately. To change buffer time, edit the service or bundle configuration in the Service Catalog. When you save a changed service buffer, Bella offers to apply it to that service’s upcoming appointments; past and completed appointments never change.